
Artful August
Posted: August 23, 2021 Filed under: bookworm, Darkroom Door, gel press, Hand drawn | Tags: Darkroom Door stamps, gel printing, Hand drawn 4 Comments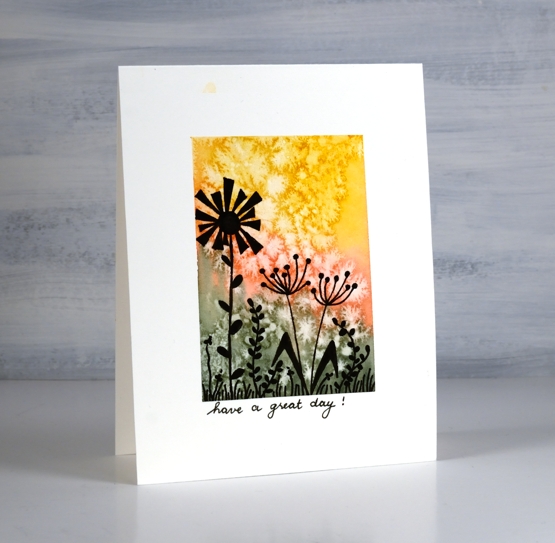
During August Rachel Greig from Darkroom Door has been hosting a challenge with prompts everyday to be interpreted in any artsy way you like. I haven’t managed to participate regularly but I have enjoyed making a few simple cards along with some gel prints and a journal page.
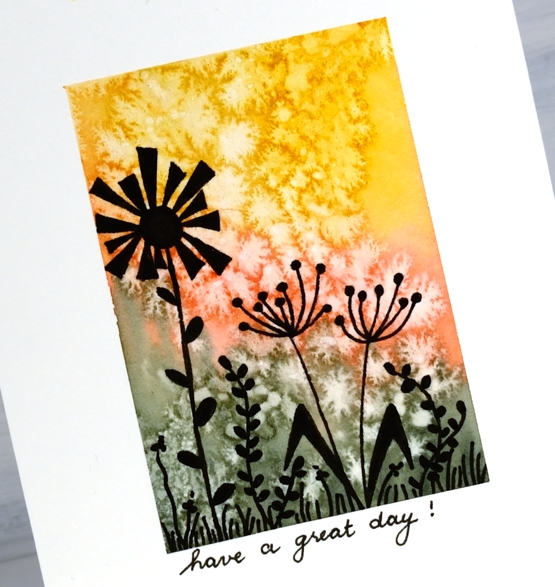
The card above was made for the silhouette prompt. I painted a watercolour background, sprinkled salt and then drew the silhouette flowers after the watercolour dried.
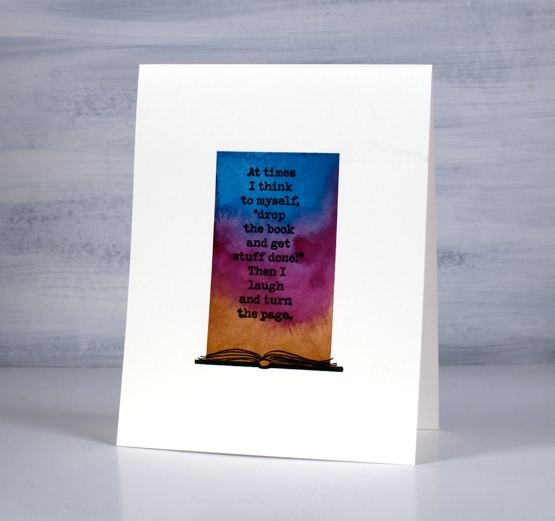
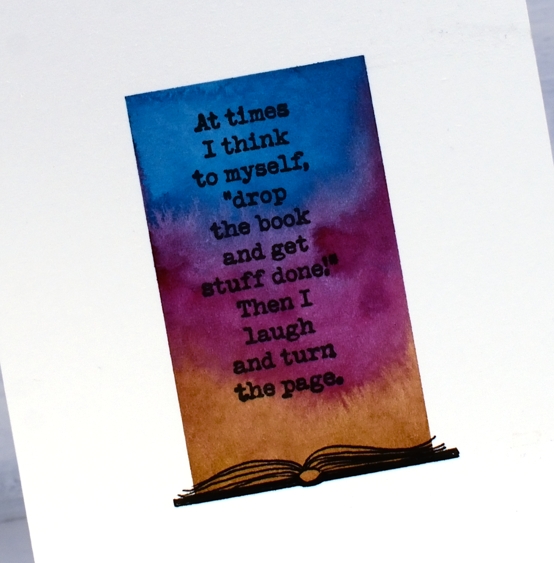
This one was for the words prompt. I am such a reader these days I thought of books when I saw the prompt. Once again I did a watercolour background then add the Darkroom Door book stamp and drew a book at the bottom.
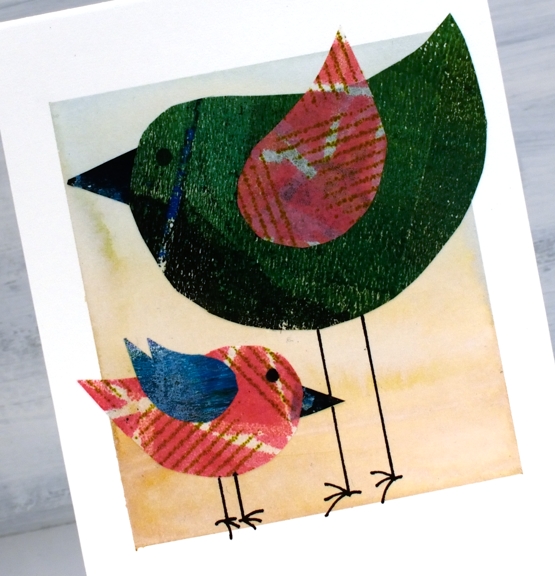
The next prompt I followed was birds. I cut body, wings and beak shapes from gel print pages then glued them over a pale watercoloured background
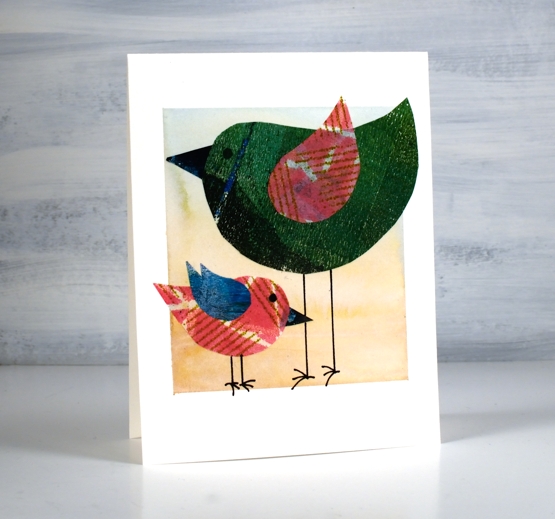
All these three cards began with the same masked and painted background. I found it was a simple way to start the projects and they are all one layer on hot pressed watercolour paper.
The prompts featured here are all from last week. I haven’t participated over the last few days but I plan to jump in again today with the butterflies prompt. If you are interested in seeing the wide range of projects hop over to instagram and check out the #artfulaugust and #rachelgreigartfulaugustchallenge
See you soon.
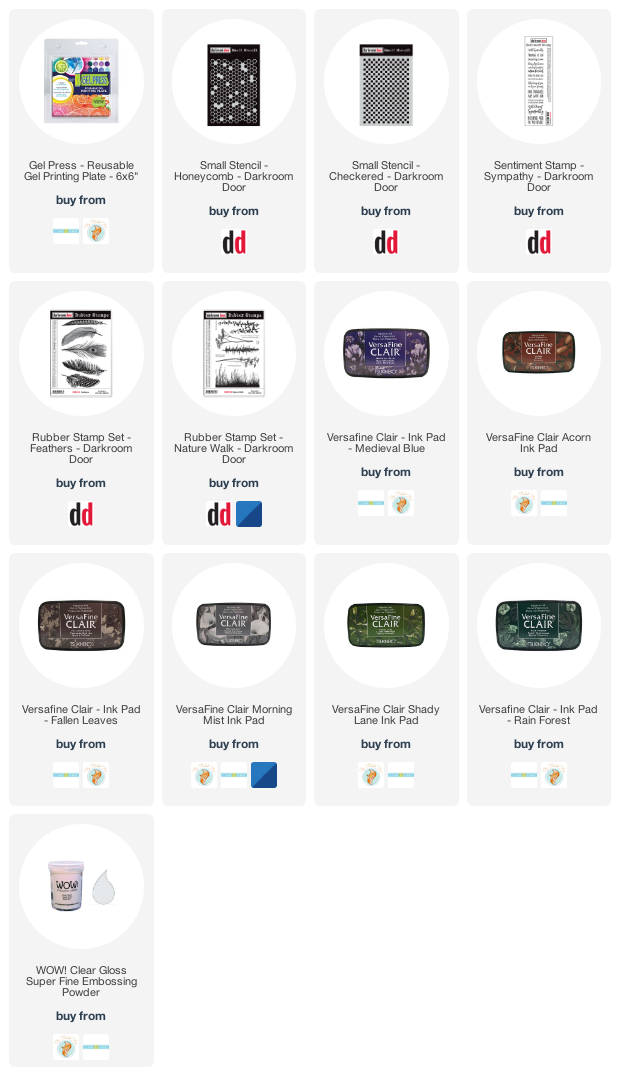
Supplies
(Compensated affiliate links used when possible)
Honeycomb & Checkered
Posted: August 10, 2021 Filed under: checkered, Darkroom Door, Feathers, gel press, honeycomb, Nature Walk, Stencils | Tags: Darkroom Door stamps, Darkroom Door stencils, gel press, gel printing, Tsukineko Versafine inks 3 Comments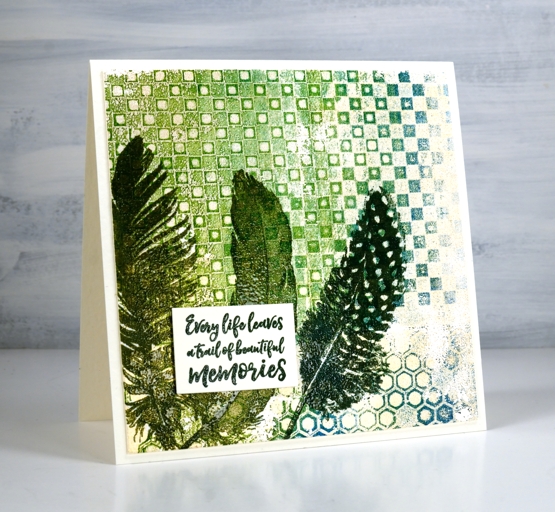
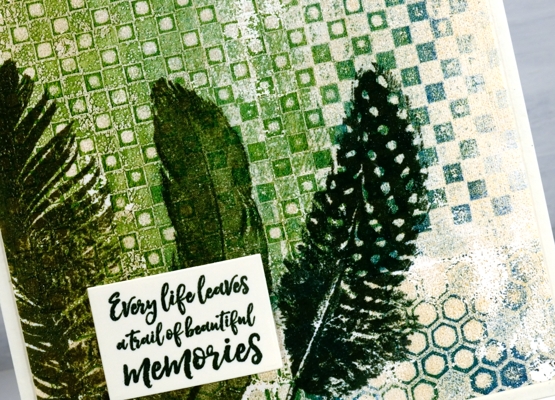
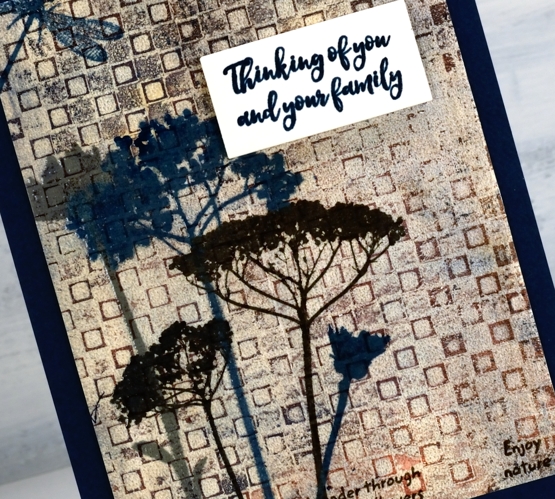
New stencils from Darkroom Door means new gel prints in my stack! I used greens, teal, beige and gold paints to print with the new honeycomb and checkerboard stencils. For the second card I used a mix of blue, beige, gold and coral paint for a rich print.
I used the stencil printing method demonstrated in this video and worked on printer paper with a 6″x6″ gel press.
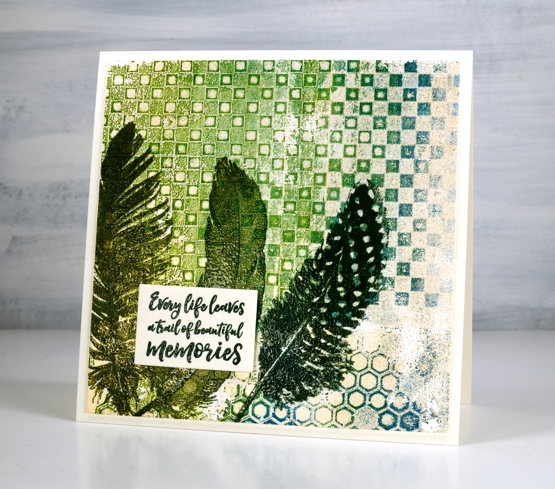
After completing a fresh stack of gel prints I chose these two because of the beautiful mix of colours and textures. I pulled out Darkroom Door feather and wildflower stamps and stamped them over the top of the prints. I decided to emboss using co-ordinating versafine inks to make the images stand up a little over the print.
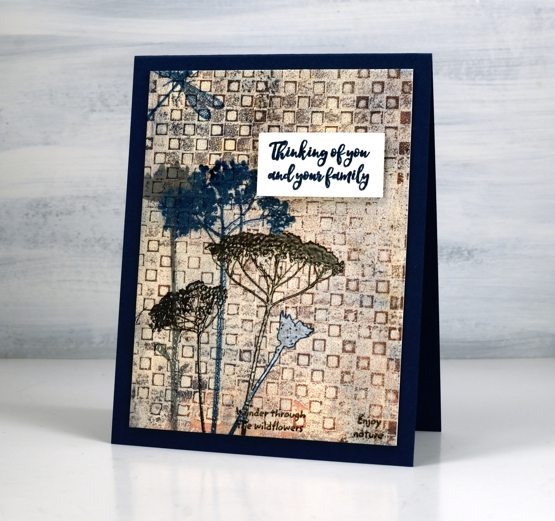
I chose sentiments from the DD sentiment strip stamp and embossed them to pop up over the stamped and printed panels.
Ever since I started gel printing with stencils I can’t get enough of the intricate detailed ones. These two new ones from Darkroom Door are very cool and create such great backgrounds!
Supplies
(Compensated affiliate links used when possible)
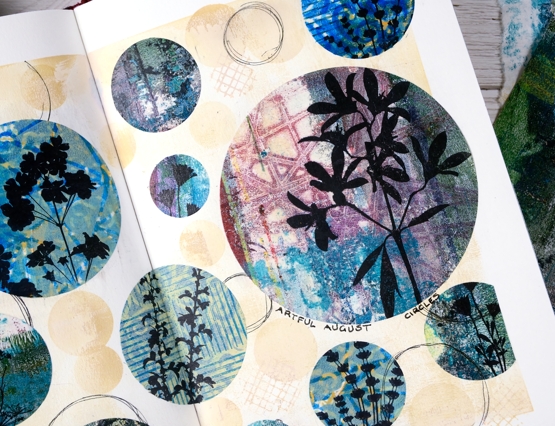
Artful August Circle Journal Page
Posted: August 5, 2021 Filed under: Art Journal, basket weave, Christmas bush, Darkroom Door, fragments, gel press, gelli plate, little swirls, mesh, Nature Walk, Paper Rose, Wildflowers Vol 2 | Tags: Art Journal, Darkroom Door stamps, gel press, gel printing, gelli plate 6 Comments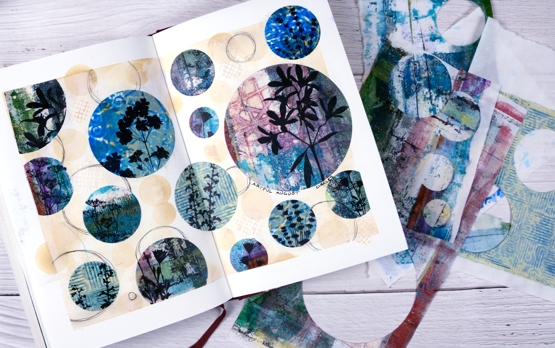
Rachel Greig from Darkroom Door is hosting ‘Artful August’, a challenge to make something arty each day in August. She has provided 31 prompts and I am going to play along as often as I can. Circles was the prompt yesterday so I cut circles from a just few of the many gel print panels I have piling up. I used only gelprints done on rice paper and they cut and adhered very easily.
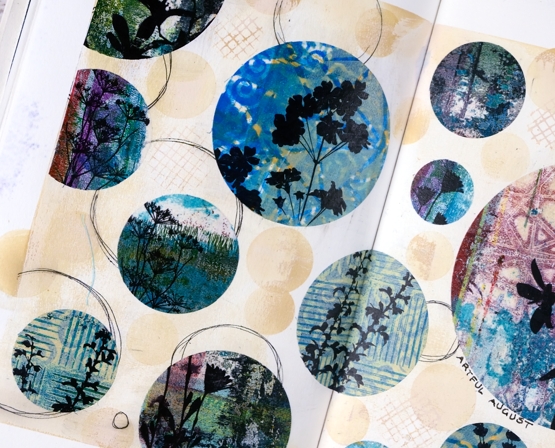
Once I had cut circles in different sizes from different gel printed panels I stamped flower silhouettes from several Darkroom Door sets. Before gluing the circles to the pages I painted the pages with a base of gesso + light brown paint and added some scribbly circles by tracing inside circle dies.

I glued the printed, stamped circles with matte medium both on the back of the paper and over the top to seal it. To add a bit more interest around the circles I blended antique linen ink through a homemade paper stencil.
The prompts in the challenge are very open and participants are encouraged to interpret them in any way and with any medium. If you are on instagram you can view the submissions by searching for #artfulaugust or #rachelgreigartfulaugustchallenge
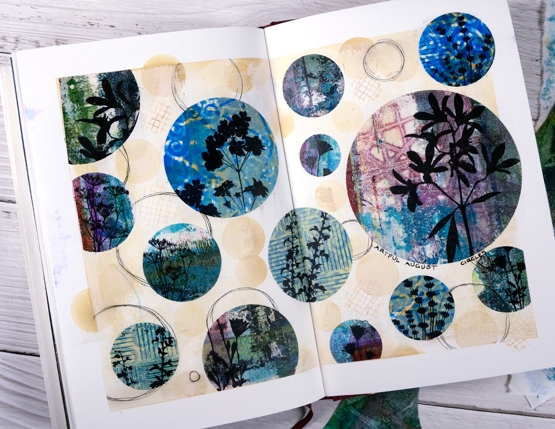
As I participate in the challenge I will have simple experiments along with some completed projects like this one. The fun is simply playing with the prompts. In making today’s journal pages I was very happy to use some pretty scraps, experiments and clean up pages from gel printing sessions. There are always too many to turn into cards but each one has a unique texture and colour mix.
Supplies
(Compensated affiliate links used when possible)
Enjoy the Journey Journal page
Posted: July 23, 2021 Filed under: Art Journal, Darkroom Door, gel press, nomad, scratches, vintage car, World Map | Tags: Art Journal, Darkroom Door stamps, distress oxide inks, gel press, gel printing, Ranger archival inks, Ranger Distress inks 3 Comments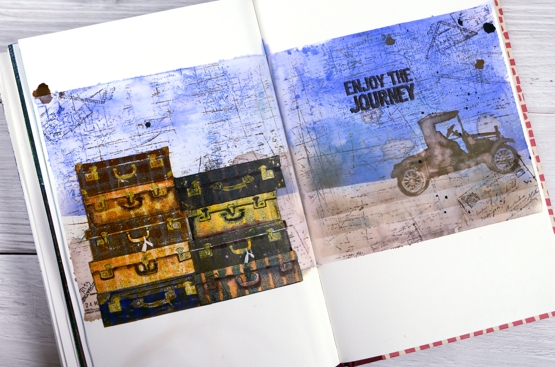
This week I have shared a gel plate video and a series of cards made with prints and leftovers from that gel printing session. If you look closely at this journal page you will see a couple more prints put to use.
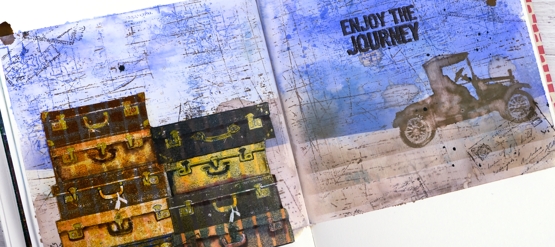
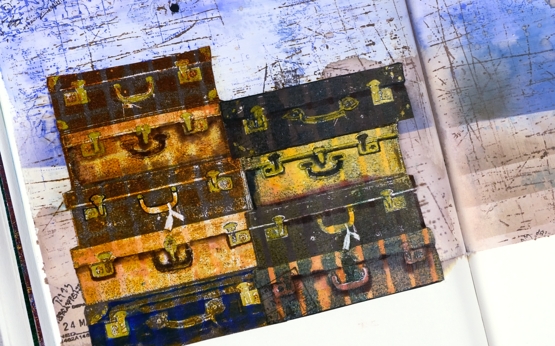
The Darkroom Door set, Nomad, recently arrived in my mailbox and the main reason I chose it was the pile of suitcases. I own one old suitcase which belonged to my grandmother; it houses the ‘dress up’ collection. It is not unlike the third one in the left hand stack. The stamp set also has a single suitcase, some passport stamps and two sentiments, one included on this page.
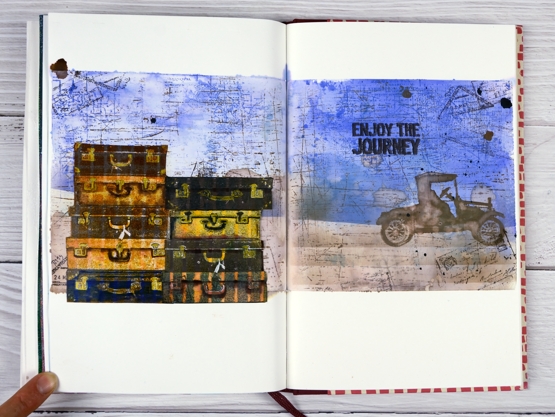
To add even more vintage-ness to the vintage suitcases I stamped them on a grid and striped prints from the gel printing session. I used corrugated cardboard to make the patterns on the gel plate originally. I stamped the suitcases in archival inks then added extra colour with distress inks and gel pens. To create the background I smooshed blueprint sketch distress inks on a piece of acetate, spritzed water over the ink then transferred it to the masked journal pages. With the blue protected I blended a brown base, also with distress inks. Over the top of the inking I added some impressions with the DD world map and scratches background stamps. To balance the suitcases I added the vintage car and sentiment on the right hand side.
Maybe these pages came from my longing to be out and about seeing new and old places, or a longing to be poking around antique and thrift stores. The latter will probably happen before the former.
Are you longing for a trip somewhere? Are you thinking near or far?
Supplies
(Compensated affiliate links used when possible)

Landscapes from leftovers
Posted: July 21, 2021 Filed under: Dies, gel press, into the woods, Penny Black, tall trees | Tags: gel press, gel printing, Penny Black creative dies 7 Comments
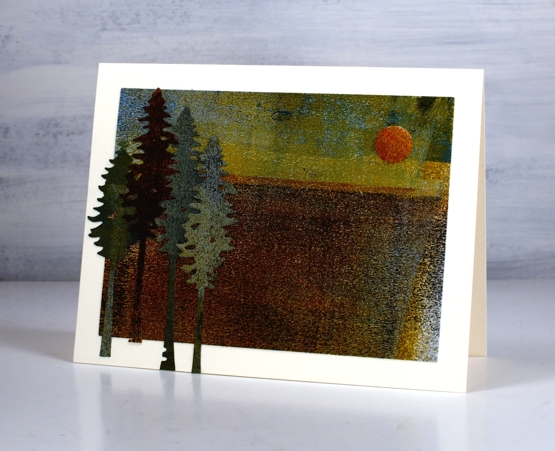
In my recent gel printing video I kept a piece of heavy weight paper off to the side for cleaning my brayer. I turned it around half way through the printing session so it ended up browns on one side and blue/grey/yellow on the other.

The colour and texture was too yummy to waste so I cut two rectangles which both spanned the centre or ‘horizon’ line of the large sheet. Because the panel above has a dark sky I punched a circle moon from another area and made it a night scene with the addition of black silhouette trees die-cut with the PB ‘into the woods’ die.
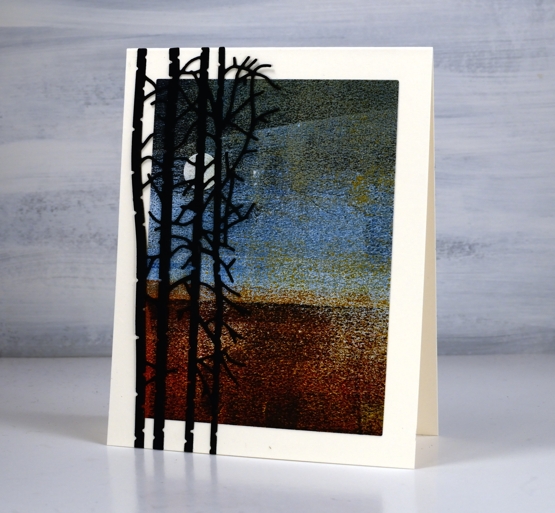
Not only is there plenty of visual texture in these panels the brayered paper is also very rough to touch. There is no trick to making these papers; I definitely don’t keep the clean up sheets every time but I find if I work with the same colours for a while and flip the sheet around when it has plenty of paint on it the combination of colour and texture can be beautiful.
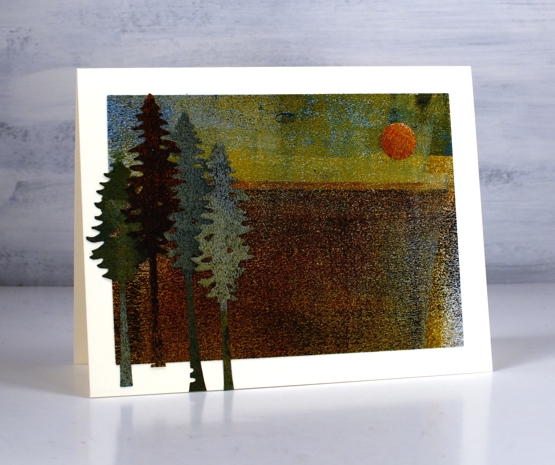
The second card is more of a late afternoon scene. The colour of the sun is similar to what we saw two days ago when the sky was hazy due to bushfires in northwestern Ontario.

The trees blend into the landscape somewhat as there is not a lot of contrast between the die cuts and the base. I used the PB ‘tall trees’ dies and cut them from the left over edges of the panel.
This is not the first time I’ve used scraps and scratch paper for cards and journal pages. This cityscape is made from gel printing masks and two of these cards are from a clean up sheet. Today I glued a large ‘clean up’ sheet into my art journal as a background for a future page. I don’t know what to do with it yet but I liked it too much to toss it away.
Supplies
(Compensated affiliate links used when possible)
Gel print backgrounds – stripes and grid
Posted: July 20, 2021 Filed under: companions, Finetec paints, gel press, mountain magic, Penny Black | Tags: gel press, gel printing, Penny Black stamps 9 Comments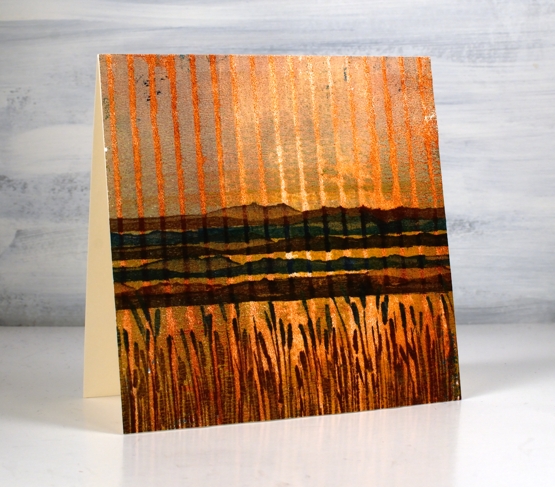
Yesterday I posted a gel printing video where I used both an egg carton and a piece of corrugated cardboard to add texture to my prints. I used a couple of the corrugated cardboard prints to make today’s cards.
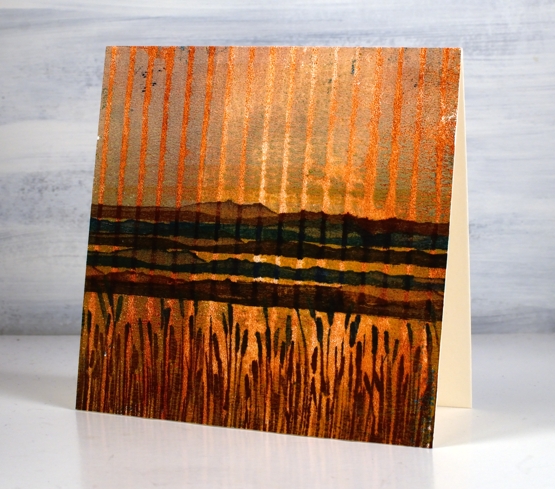
You can see how I printed this panel in the video. To turn it into a card I used a couple of new stamps from Penny Black. I stamped the mountain stamp five times in browns and blue then inked the rushes with a brown and a blue ink. I love the way it looks like a sunset or sunrise because of the background print. It wasn’t something I tried to create but a possibility I saw when looking at the prints.
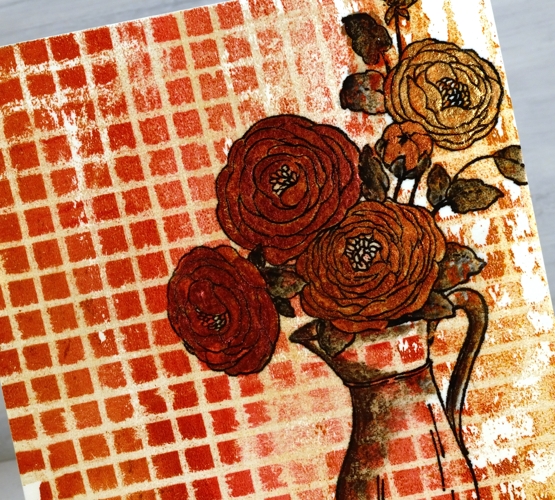
The print below was made with the same piece of corrugated cardboard pressed down on the gel press twice to create a grid pattern. You can see the process in yesterday’s video. I decided to stamp flowers on it as an experiment. I knew it might be too much pattern but I wanted to try. I stamped and embossed the Penny Black ‘companions’ stamp in versafine clair nocturne ink and it looked bold just as an outline.
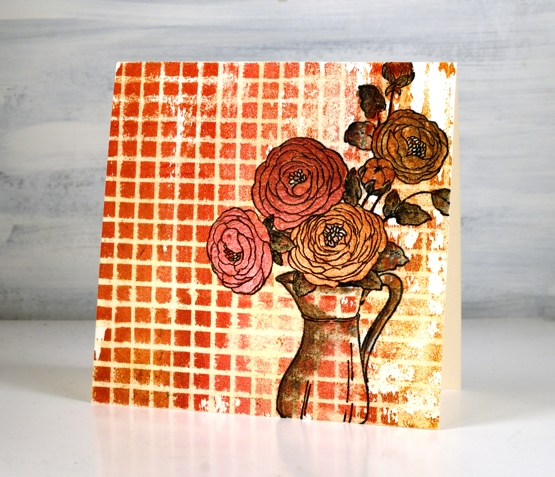
By painting inside the flowers I was able to separate them from the background enough to make them a feature not a competitor with the very busy grid pattern. I used a couple of layers of pearlescent paint on the flowers but quite diluted pearlescent black on the leaves and jug.
Tell me what ‘recycled’ items you have used for gel printing. I am keen to print with ‘all the things’! To be honest gel printing is top of my list of techniques right now. I hope you enjoyed the two recent gel printing videos. I will definitely make more. Tomorrow I have a couple of cards made from the piece of cardstock I used to clean my brayer. I showed a glimpse of it at the end of the video.
See you soon.
Supplies
(Compensated affiliate links used when possible)
Gel Printing with recycled cardboard
Posted: July 19, 2021 Filed under: carved leaves, Darkroom Door, gel press, layered Xmas wreath die set, Penny Black, sleigh, Tutorial | Tags: Darkroom Door stamps, gel press, gel printing, Penny Black creative dies, Penny Black stamps, video 8 Comments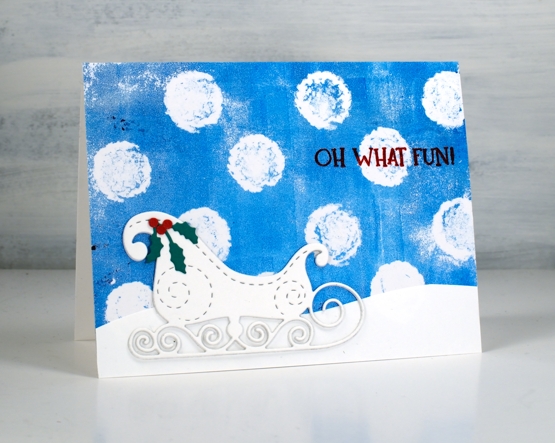
I posted a video last week featuring gel prints with stencils. In today’s technique video I use cardboard found at home. One piece was the packaging for eggs and the other a piece of corrugated cardboard.
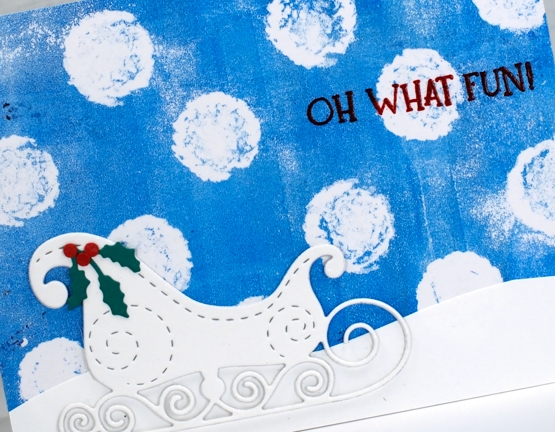
The huge snowballs falling in the card above were printed using the large circles on the egg carton. I could have done more on the gel plate with extra colour or texture but I kept it simple which works well behind the more intricate sleigh. You can see my process in the video below.
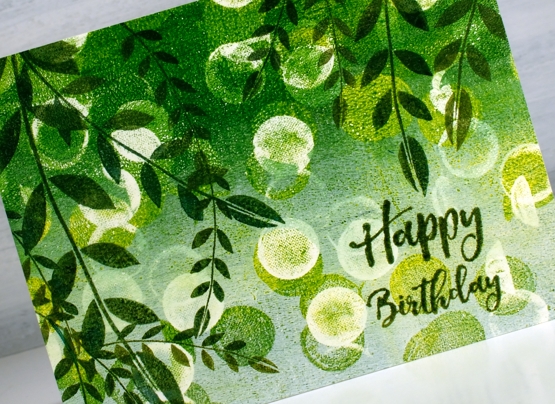
The card below also features a gel print background made with an egg carton but I pulled two prints on the one panel both with green and white paint and egg carton circles.
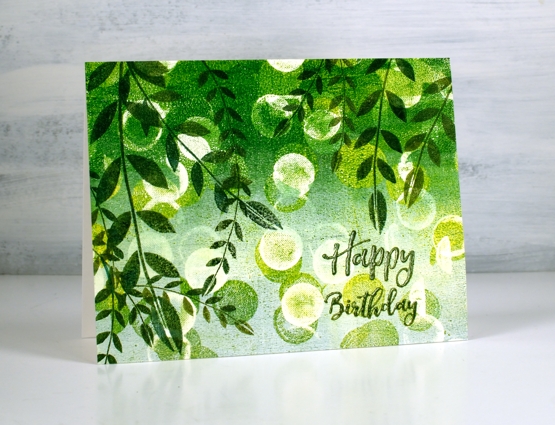
The card below also features a gel print background made with an egg carton but I pulled two prints on the one panel both with green and white paint and egg carton circles. I stamped leaves from the Darkroom Door stamp set, ‘carved leaves vol 1’ over the bokeh-like circle background. To get the right tones of green in the stamping I used both shady lane and rain forest versafine clair inks one over the top of the other. The sentiment is from the ‘happy birthday’ sentiment strip.
In the video I also made prints with a piece of corrugated cardboard pressing it down on the gel press once for a striped pattern and twice for a grid pattern. I’ve turned a couple of those prints into cards which will be on the blog tomorrow. I hope you try gel printing with some recycling you find at your place. See you soon.
Supplies
(Compensated affiliate links used when possible)
Winter Garden art journal page
Posted: July 14, 2021 Filed under: Art Journal, bookworm, Correspondence, Darkroom Door, gel press, little swirls, nomad, Paper Rose, snowflakes, Trees, Wildflowers Vol 1 | Tags: Art Journal, Darkroom Door stamps, Fabriano art journal, gel press, Paper Rose 12 Comments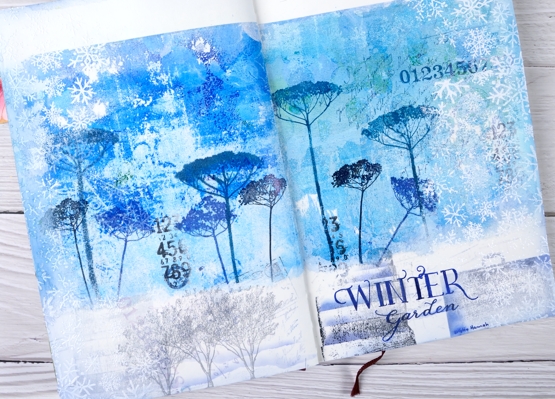
It’s been a while since I worked in my book themed art journal. As I looked over a table covered in gel prints I settled on two blue ones filled with pattern and paint. Both were on rice paper and sized 6″x6″ which is not big enough to cover the whole journal page. I decided to tear a rough edge on the bottom and glue the panels with space above and below.
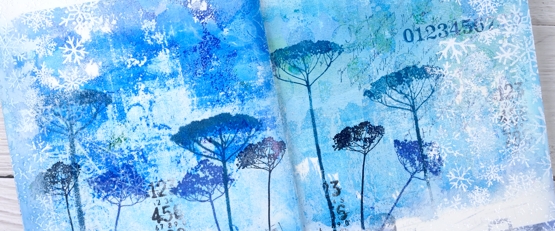
The inspiration for the page is Kristin Hannah’s novel ‘Winter Garden’. I used Darkroom Door floral stamps to decorated the gel prints with blue flowers then added more stamping to the blue area and the white space at the bottom of the page.
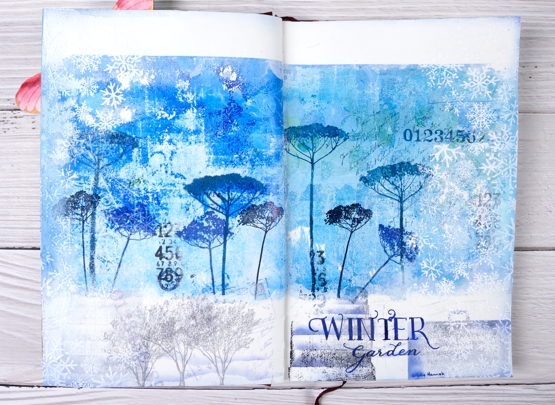
Picking from a few themes in the book I stamped trees to represent the orchard, a suitcase to represent the escape from Leningrad, books from the library where the main character worked. I also used number, correspondence and snowflake stamps to complete the collage.
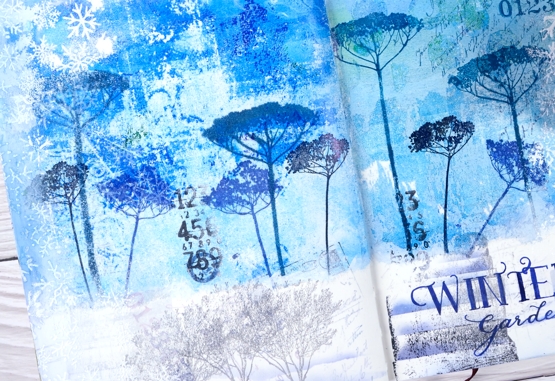
I am always in two minds about adding words to my pages and this time was no exception. Rather than a quote I just added the name of the novel and author. I used pigment and archival inks for all the stamping, white gesso around the edges and white ink and embossing powder to add the snowflake borders.
Have you read any Kristin Hannah? My book club considers ‘The Nightingale’ our best choice so far! We are always searching for good book club reads; if you have any suggestions please leave them in the comments.
Supplies
(Compensated affiliate links used when possible)
Gel Printing with stencils + video
Posted: July 12, 2021 Filed under: Butterflies, classic cars vol 1, Darkroom Door, fragments, gel press, gelli plate, Heather lowercase stamp set, little swirls, Nature Walk, Paper Rose, Pink Fresh studio, so extra supporting sentiments | Tags: Darkroom Door stamps, gel press, gel printing, Paper Rose, Pink Fresh studio 7 Comments
In recent gel printing sessions I have used some of my intricate stencils from Paper Rose Studio. This stencil, ‘little swirls‘ makes a particularly beautiful background. I’ve been printing on a 6″x6″ gel plate with a 6″x6″ stencil but I cut the print down to make a 4¼” x 5½” card.

I used stamps from Darkroom Door’s nature walk , butterflies and happy birthday sets. (all linked at the end of the post). The process for making this type of print is shown in the video below.
After any gel printing session I usually have quite a pile of prints, some become cards but I am hoping to use more in my art journal. I have to be a bit more adventurous in tearing and layering and turning them into more than just a patterned print.
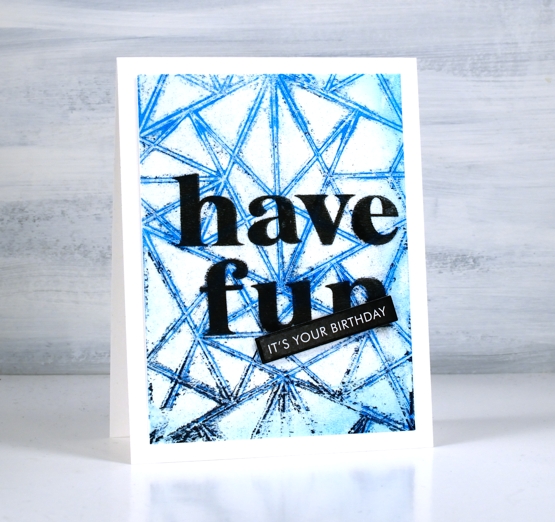
The making of the background above is included in the video. To turn it into a birthday card I stamped ‘have fun’ directly on the print then popped up a sentiment strip on top. The words are stamped in Gina K obsidian amalgam ink using the Pink Fresh Studio ‘Heather’ lowercase alphabet set.
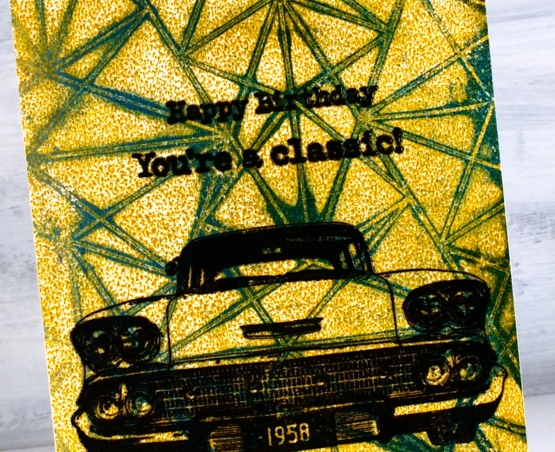
The making of the background below is also part of the video and you can see the mustard paint beaded on the surface of the gel plate making an allover pattern when printed. I didn’t necessarily want the beading but was happy when it ended up uniform. Paints of different brands perform differently on the gel press so experimentation is necessary to work out how much paint and which brands will give you the results you want.
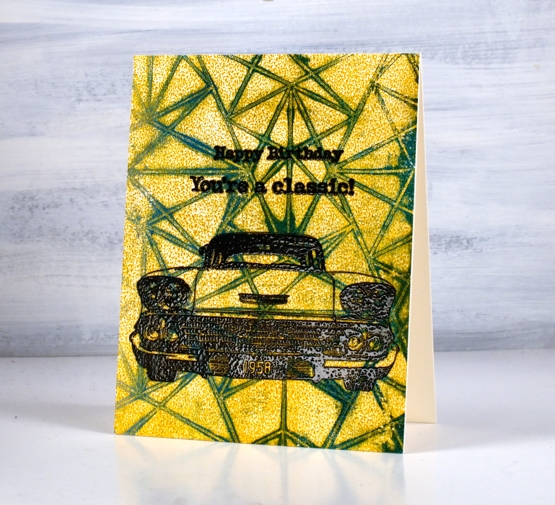
I turned this background into another birthday card by embossing a car from the Darkroom Door Classic Cars vol 1 set along with a sentiment from the same set plus one from the Happy Birthday set.
I also filmed some gel printing with a few textured surfaces from the recycling box; I’ll be sharing that video soon.
I’d love to hear how you use your gel prints; I’m always open to ideas.
Supplies
(Compensated affiliate links used when possible)
Fern gel print journal page
Posted: June 18, 2021 Filed under: Art Journal, gel press | Tags: Art Journal, gel press, gel printing, youtube 7 Comments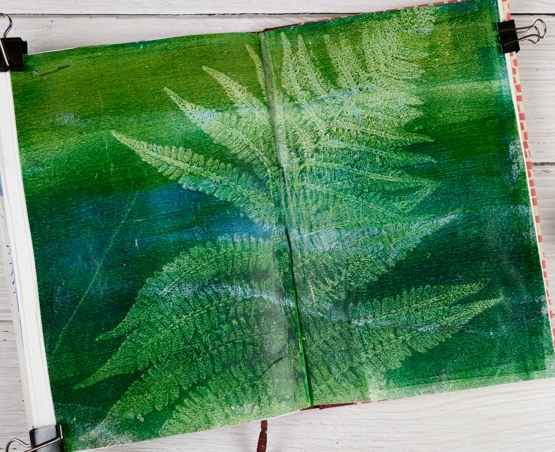
Another art journal page today which is unusual for me. After noticing there was a fern growing beside one of the drainpipes off my roof I had to try gel printing with one of the intricate fronds. I made a card with a fern gel print too but carelessly I let it leave the house before being photographed!
To gel print a leaf or feather I use a two step process. I apply paint to the gel plate; I used blues and greens and the large 12″x14″ gel plate. I lay the fern frond as flat as I could on the plate and then took a print; once again I used rice paper. The first pull picks up all the surrounding ink leaving a white empty frond shaped space in the middle. I carefully removed the fern which reveals the print of the frond still on the gel plate. I took a second pull, laying the paper down in the same place so it picked up all the detail of the fern. You can see a video of the same process in an earlier post.
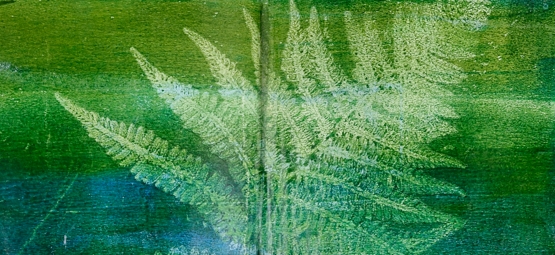
To attach the large print to my art journal pages was a little tricky. I cut it in half and worked one side at a time applying the matte medium to the page not the print. I will do the opposite next time. Rice paper is thin which makes it less bulky but I had to be careful not to use too much glue. When I made the card (which is gone!) I applied a thin coat of matte medium to the gel print and immediately pressed a piece of cardstock down on the rice paper and put something heavy on top. It worked well.
Thanks for joining me this week as I went off in card-less directions. I have enjoyed your encouragement and thoughts in the comments. If you are free tonight at 7:30 EDT and want to see me creating live online for the first time I would be thrilled. I have no idea what I’ll make; it all depends on what the wheel spins for me!


