Treasured Pine
Posted: November 1, 2022 Filed under: grafix, Penny Black, treasured pine | Tags: Fabriano Watercolour Paper, grafix, Penny Black stamps, Ranger Distress stains, Staedtler watercolour brush pens 6 Comments
You are excused for thinking you have scene this card before. When I get a new pine branch stamp I often set it against a blue sky. I have a pine tree in my front yard and I think it is at its best under a blue sky after a fresh fall of snow. Most of the year said pine tree is just making a mess in our yard and driveway. This lovely stamp is from Penny Black and is called ‘treasured pine’.
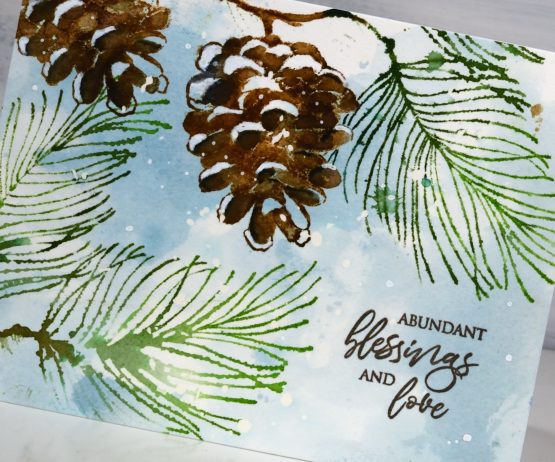
I worked on hot pressed watercolour that had been splattered with masking fluid earlier. I smooshed both speckled egg and uncharted mariner distress inks on a glass mat, spritzed with water then swiped my watercolour panel through the ink several times. I also spritzed water on the panel to spread the ink further.
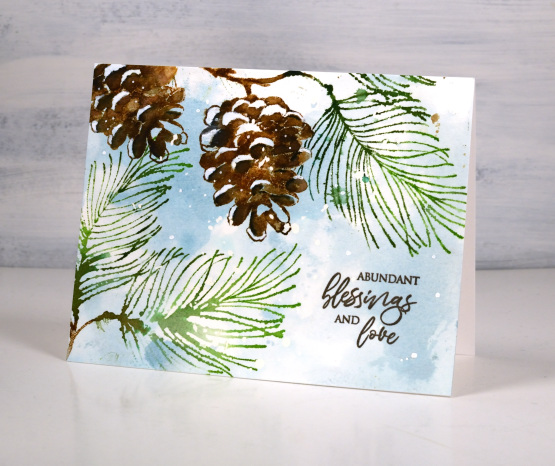
Once the background was dry I worked in a stamp positioner to stamp first the pinecone in a couple of brown inks then the pine needles in a couple of greens. I blended the ink on the pinecones with a brush to intensify the coverage and after the inks dried added white to the snow covered areas with a posca paint pen. I added a sentiment from the PB ‘feeling of Christmas’ set. To see a couple more pine themed designs click here and here
(Compensated affiliate links from Foiled Fox & Scrap n Stamp)
Fleeting Moment
Posted: June 2, 2022 Filed under: fleeting moment, Music Background, Penny Black | Tags: Fabriano Watercolour Paper, Penny Black stamps, Ranger Distress stains 6 Comments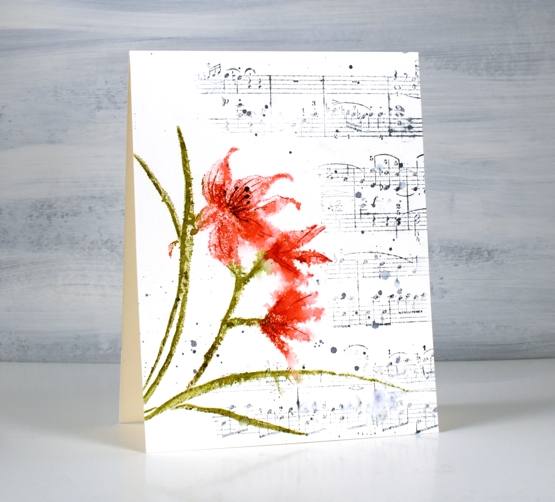
This orchid is from the new Penny Black release. It’s a large cling stamp called ‘fleeting moment. I think it is an orchid or perhaps a lily.
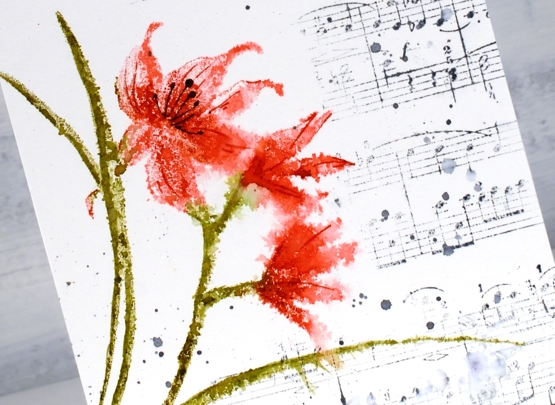
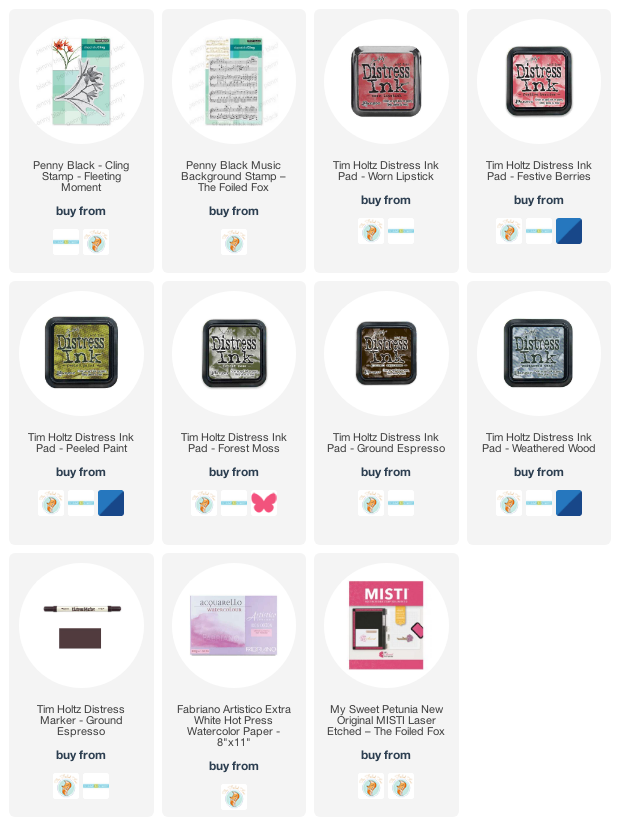
I used distress inks, worn lipstick, festive berries, to ink the petals while in a stamp positioner. I inked the stems and leaves with forest moss and peeled paint. Once stamped on hot press watercolour paper I lightly spritzed the flowers.
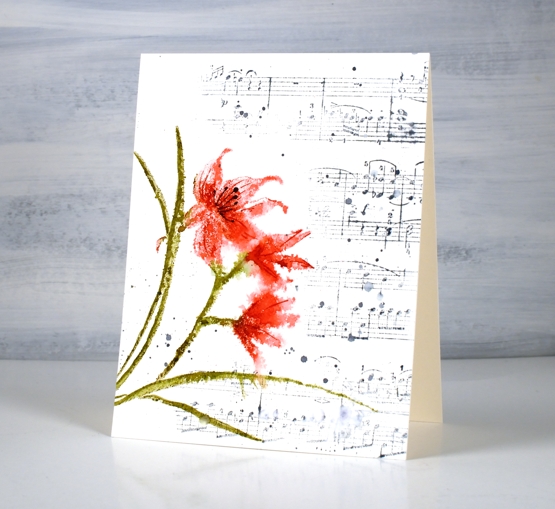
I dried the panel before adding details to the petals with markers. To fill in the panel I inked part of the music background stamp with weathered wood distress ink. After stamping I added splatters of water and ink.
The new ‘Blooming’ release is full of flowers, as the name suggests so there will be blooms aplenty over the next few weeks.
Supplies
(Compensated affiliate links used when possible)
Beauty of the Earth journal page
Posted: January 26, 2022 Filed under: Art Journal, Brutus Monroe, Darkroom Door, honeycomb, Nature Walk, number medley, Stencils, World Map, you are everything | Tags: Art Journal, Darkroom Door stamps, Darkroom Door stencils, Ranger archival inks, Ranger Distress inks, Ranger Distress stains 5 Comments
I have another double page spread in the 6″x 6″ journal today. Don’t tell the others but this one seems to be getting all the attention at present!
The pages in this journal are thick watercolour paper so I wanted to take advantage of that and use watercolour techniques. Most of the pages I have completed up until now have had a base layer of gesso or acrylic paint.
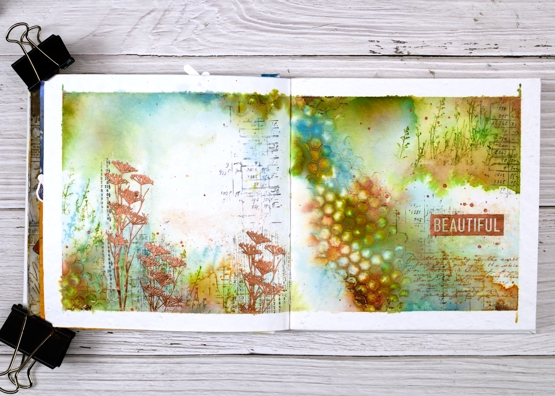
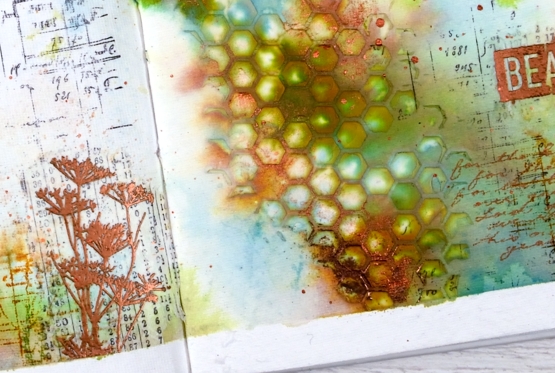
As you can see I taped the edges of the pages with tape before starting. I added some stamping in black here and there using a stamp from the Darkroom Door ‘number medley’ set. Next I used the DD ‘honeycomb’ stencil and modeling paste to add a texture strip from left to right down the centre of the spread. I added a small section bottom left also. Once the paste was dry I began painting colour around the honeycomb and across both pages. I spent a while doing this so as to see the blends and build up some depth of colour.
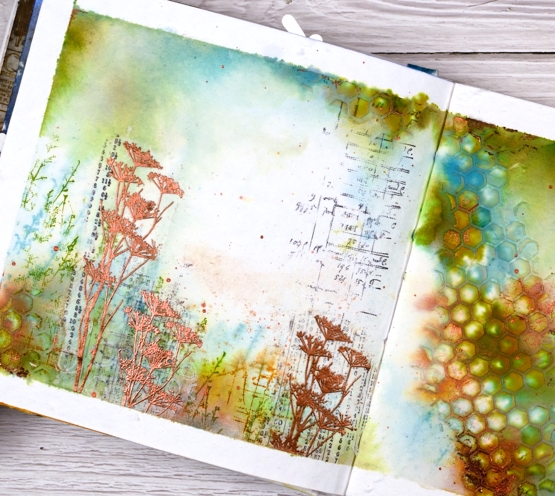
Other than some black stamping I used only three colours of distress ink, both spray stain and from the ink pads. I took care to keep some white space; sometimes I realise too late that I have colour all over the pages. I stamped some grasses in peeled paint archival ink so they would not dilute and broken china distress ink so they would dilute. I also stamped sections of the world map in rusty hinge. Although I loved the combo of peeled paint, rusty hinge and broken china I thought a bit of metallic shine would be nice so I added some wildflowers embossed in Brutus Monroe ‘penny’ powder.
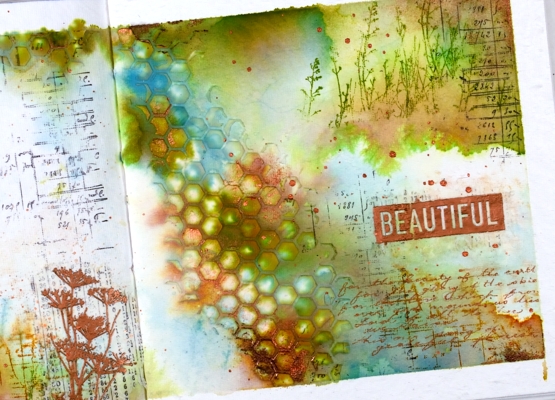
With a copper coloured gel pen I wrote the first verse of ‘For the Beauty of the Earth’ in the lower right hand corner then added the embossed word ‘beautiful’. And of course there is some copper splatter to finish it off. This is a style and look I have been hoping to create so you’ll probably see a few more like this one.
Supplies
(Compensated affiliate links used when possible

Woodsy Winter
Posted: December 28, 2021 Filed under: Penny Black, woodsy | Tags: Penny Black stamps, Ranger Distress inks, Ranger Distress stains 9 Comments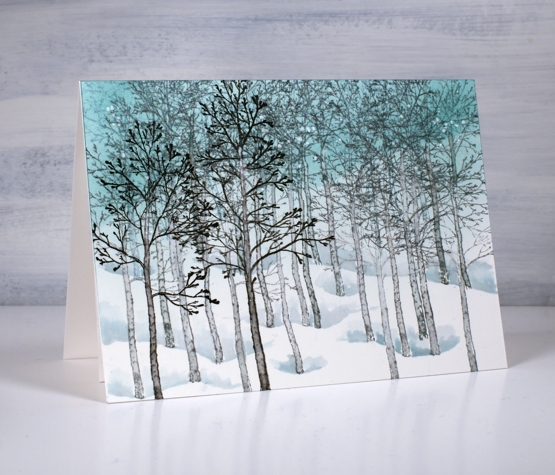
A winter scene for a winter birthday. Makes perfect sense especially when the recipient loves nature and spends as much time as possible enjoying the outdoors.
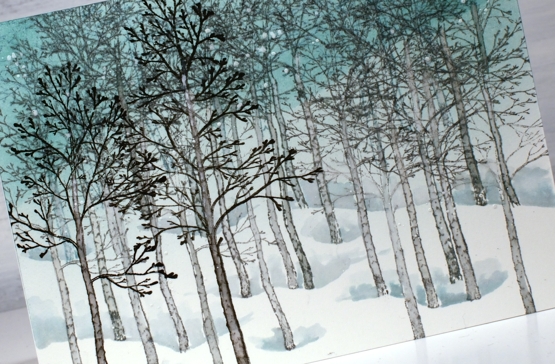
This card was a commission and I did plan it in my head before I began. I ended up making it twice, not because it didn’t work but because I smudged the black ink (final stamping step) before it dried! I started by blending the sky in evergreen bough and speckled egg distress ink then stamped background trees in speckled egg ink. There are three trees in the Woodsy set from Penny Black so I repeated them to fill the top of the panel then changed to iced spruce to stamp another line of trees further down and hickory smoke to stamp another line. Each colour was darker than the previous and the trees more prominent and forward in the design. Once all but the black trees were stamped I painted all their trunks just by blending the stamped ink. I used the same inks to paint shadowy dips at the base of the trees then when that was dry stamped the final foreground trees in black soot ink.
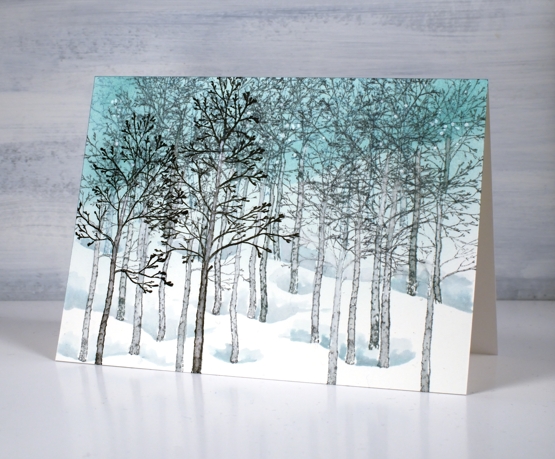
To finish I splattered white paint over the scene. The origin of this card goes way back to a card I made in 2012 using the famous Stampin Up set ‘lovely as a tree’.
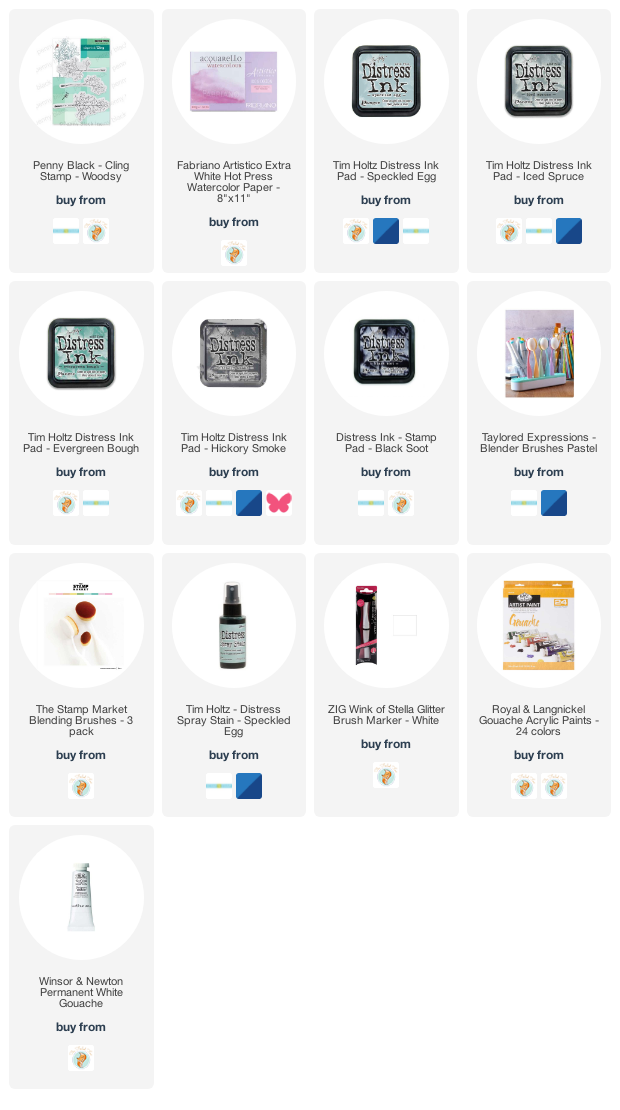
Supplies
(Compensated affiliate links used when possible)
Floral Birthday
Posted: October 29, 2021 Filed under: all the birthdays, companions, Concord & 9th, Penny Black | Tags: Fabriano Watercolour Paper, Penny Black stamps, Ranger Distress stains 10 Comments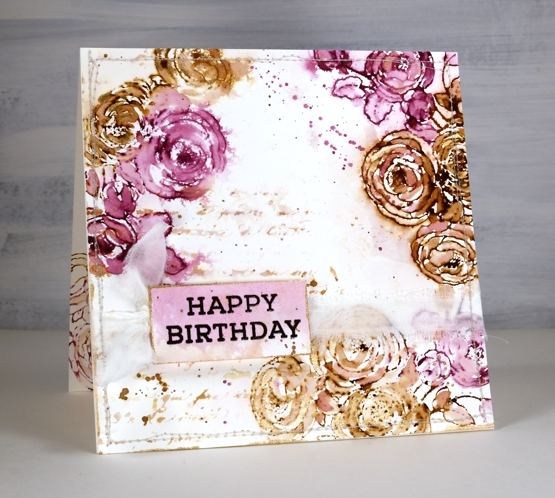
In my last post I shared a Christmas card featuring loose watercolour; the style of this card is even looser and was done with a few of the distress stain daubers I still have in my stash. Although I used techniques I’d devised years ago, this card was inspired by a card I saw on Pinterest recently. I followed the link and read through the whole post on the Tattered Nest Designs blog and combined some of her techniques with mine to create this very vintage floral birthday card.
I worked on hot pressed watercolour paper with gathered twigs and seedless preserves distress stains. I still have those two colours in the daubers but you could use ink pads or spray stains on a glass mat or craft mat to get similar results. Check out the Tattered Nest post to read how she did it with spray stains. I inked the PB ‘companions’ stamp with both distress stains and stamped on the corners of my watercolour paper panel. I dried the stain with a heat tool then started blending loosely with water and a paintbrush. If the ink was too intense I would use more water or dab it with a paper towel, if too pale I would add more stain with the paintbrush.
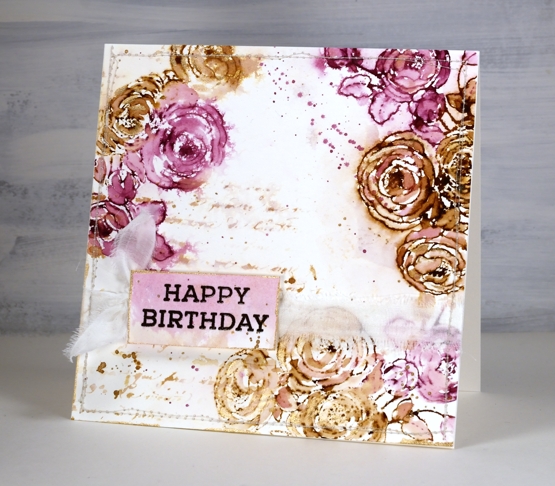
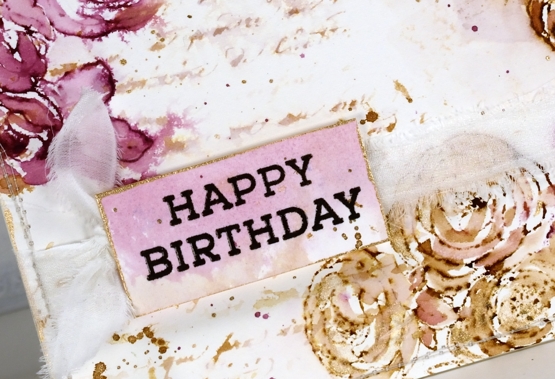
Once the flowers were loosely blended I inked the PB script background stamp with the same inks, spritzed it and stamped off on scrap paper. I spritzed it again with water before stamping a diluted print on the panel. You can see I also added splatter and created a sentiment on a small piece coloured with the same inks.
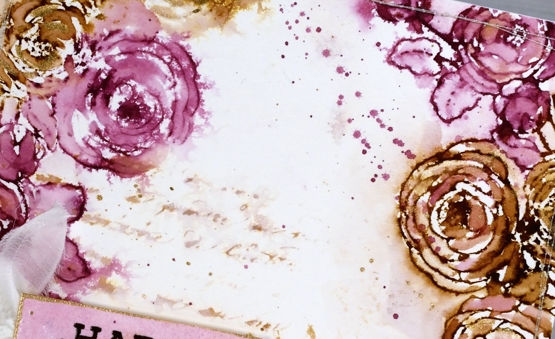
To finish the card I added splatter and some extra painting with rose gold pearlescent paint. You can see the gold border around the little tag in the close up above. Inspired by the Tattered Nest projects I sewed around the edge of the panel and then tore a strip of fabric to make a frayed ribbon sash.
Progress continues on my new online class; I’ve been gazing at the computer screen for days. I’m excited to share it with you very soon!
Supplies
(Compensated affiliate links used when possible)

Windswept
Posted: September 22, 2021 Filed under: Gilding Flakes, Penny Black, windswept | Tags: Penny Black stamps, Ranger Distress inks, Ranger Distress stains 8 Comments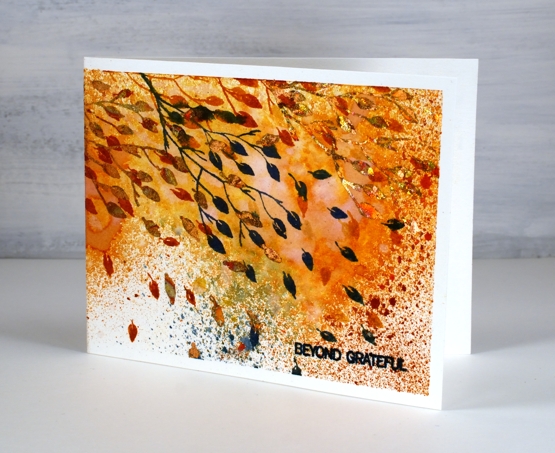
Today is officially the first day of autumn in the northern hemisphere and the leaves are flying here on the blog. I am featuring another new stamp from Penny Black, aptly named windswept. It is a simple rubber cling stamp depicting a branch and loose leaves. On my card the leaves are flying across the whole front and back of the card.
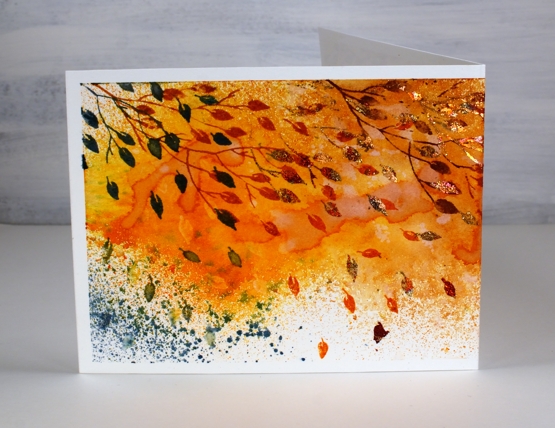
I taped the hot pressed watercolour panel to my glass mat as I planned to spray the panel with both water and ink. I sprayed quickly and lightly with spiced marmalade, scattered straw, rusty hinge, wild honey, vintage photo and stormy sky distress sprays. I sprayed some water over the top to blend some of the inks then dried with a heat tool creating some watermarks as I did so.

Once the panel was dry I stamped the branch across the panel starting on the left hand side (which ended up being the back of the card) then overlapping as I moved across to the right. I used distress inks in the same colours as the sprays to ink the branch a couple of colours at a time.
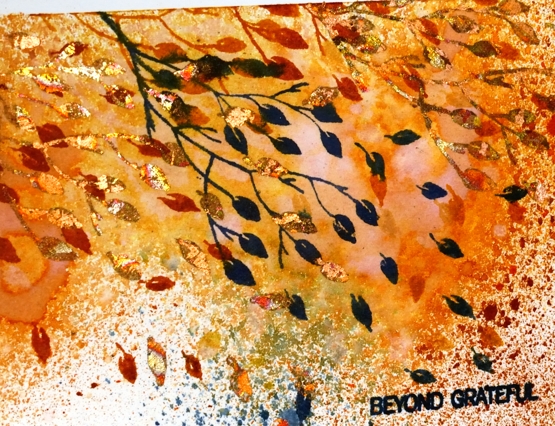
Once the panel was completely dry I decided to add some more leaves but with gilding flakes. It is a while since I used gilding flakes so I did a quick youtube search and tried two different methods. I preferred the second method which was to stamp with the Tsukineko essential glue pad then press the flakes onto the image. Gilding flakes travel far and wide if you are not careful so I had the vacuum cleaner at my side. I used the Cosmic Shimmer ‘red blaze‘ gilding flakes which are a beautiful mix of red, golds, bronze and brown metallic flakes, perfect for autumn. I finished off the card with a sentiment from the PB ‘ever thanks’ set.
Supplies
(Compensated affiliate links used when possible)

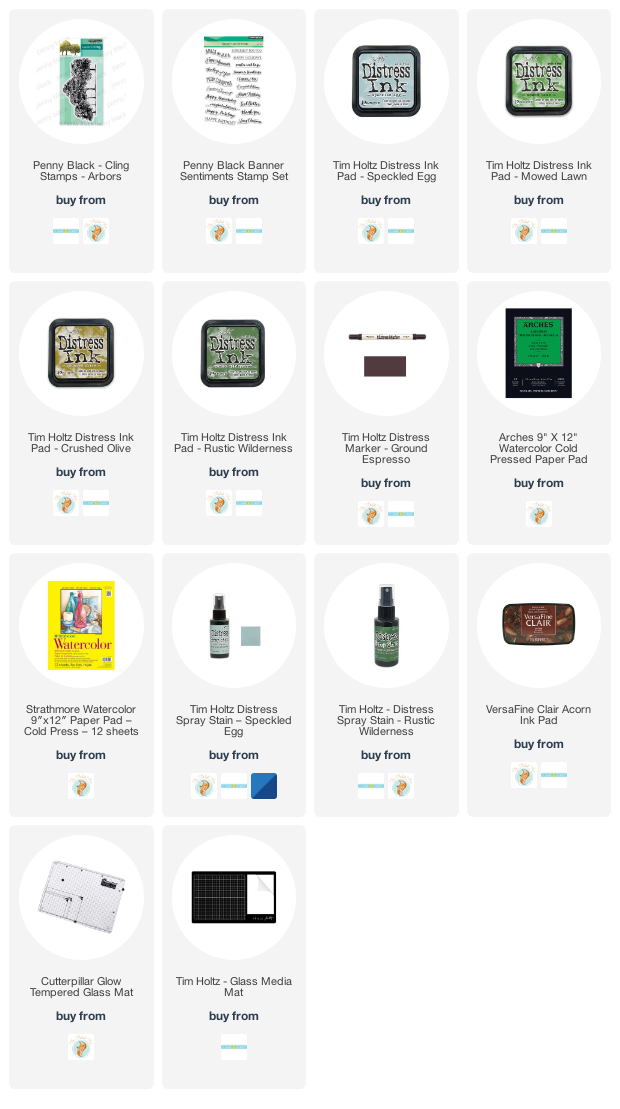
Arbors in green
Posted: March 18, 2021 Filed under: arbors, Penny Black | Tags: distress markers, Fabriano Watercolour Paper, Penny Black stamps, Ranger Distress inks, Ranger Distress stains, Tsukineko Versafine inks 9 Comments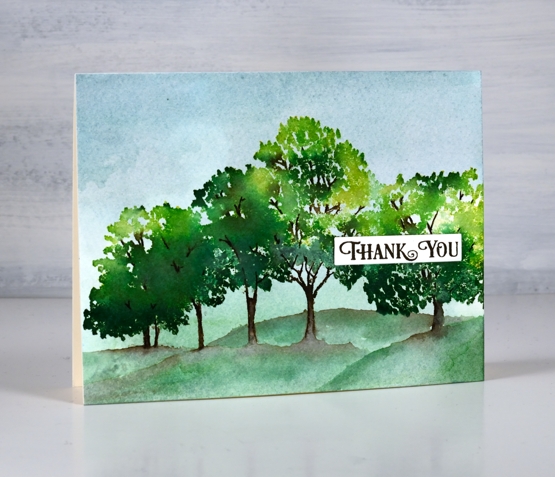
I can’t believe I am only just getting this beautiful tree stamp inked, especially considering my mantra, ‘you can never have too many tree stamps!’ This new stamp from Penny Black is called Arbors and I’m sure I will put it to use often. For its first inking I decided on keeping things traditional and green. We are just beginning to see grass appear here and there as the snow melts but no leaves yet.
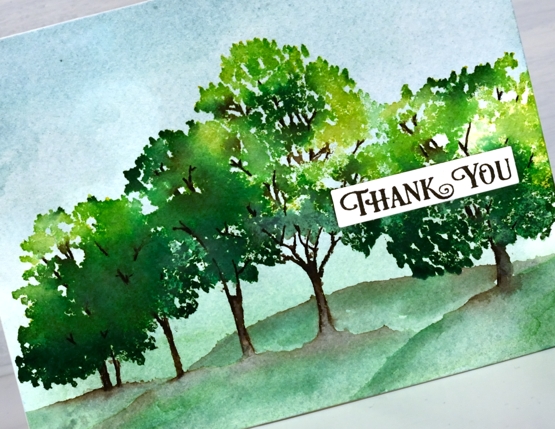
Before I started stamping I put some speckled egg and rustic wilderness stain on my glass mat and diluted it with a few spritzes of water. I swiped a piece of cold pressed watercolour paper through the stains, dried it and then repeated the process to fill my background with blue and green.
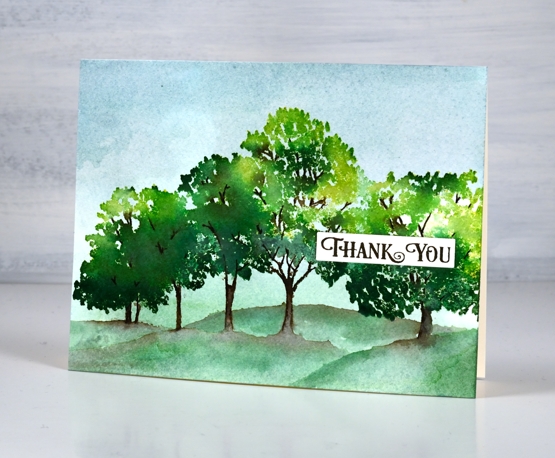
With the stamp and panel in a stamp positioner I inked the foliage of the trees with dabs of crushed olive, mowed lawn and rustic wilderness distress inks. I spritzed the stamp lightly before stamping to get the inks mingling with each other. It took several applications to build up the coverage. After applying quite a bit of green I inked the trunks and branches with a ground espresso distress marker leaving the base below the trunks uninked so I could paint some hills in and around the trunks. To do this I spread brown ink from the trunks left and right then added diluted rustic wilderness stain and painted hill shapes across the panel. I checked to see what I was short on in my stash and added a thank you from the banner sentiments set in acorn ink.
I can’t wait to ink this one up in autumn tones, but I guess a few trees in blossom might be timely first.
Supplies
(Compensated affiliate links used when possible)
You’re a star
Posted: February 19, 2021 Filed under: Alexandra Renke, Heather lowercase die set, My Favorite Things, ornamental star stencil, Pink Fresh studio, YAY for you | Tags: Alexandra Renke, My Favorite Things, Pink Fresh studio, Ranger Distress stains 7 Comments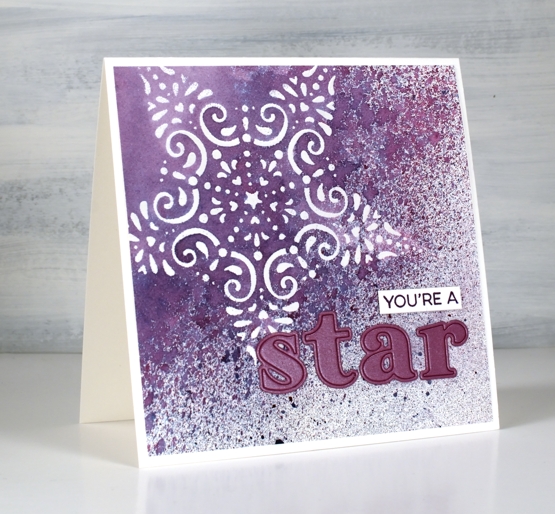
I’ve been wanting to work with some of my new stencils and the CAS Mix Up challenge is currently a embossed stencil challenge so I got to work. I taped the Alexandra Renke ornament star stencil to a piece of hot pressed watercolour paper and started sponging some versamark ink through the stencil. I soon switched to just squishing the versamark ink pad directly on the stencil as that was faster. I embossed the star in clear powder then put the panel in a box so I could spray some stain over it without decorating myself or my desk.
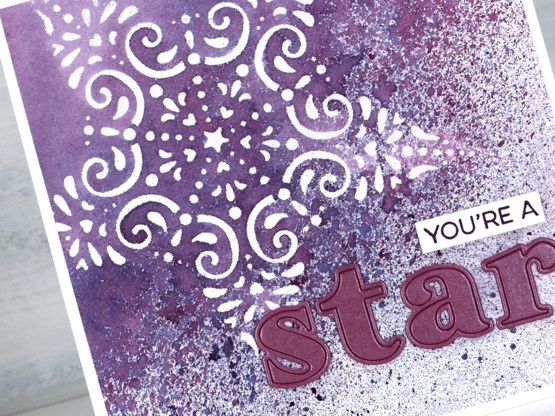
I sprayed seedless preserves, faded jeans and speckled eggs distress stains over the panel from 20-30cm away and ended up with a pretty speckled panel. I wanted to make the spotted sprayed area transition from speckled to solid so I painted water over one edge then spritzed water next to the painted area which achieved my goal leaving some of the panel barely touched by water. It took quite a while to dry and impatient me did smudge some of the speckles but they are underneath the die cut letters now so no harm done.
I applied tape to the back of a piece of co-ordiating cardstock then cut the letters s,t,a,r out using the ‘Heather lowercase alphabet’ die set from Pink Fresh studio. I searched through my stamps and dies to find a sentiment I could alter to say ‘you’re a’ and ended up using part of a stamp from the MFT ‘Yay for You’ set stamped in versafine monarch ink.

When I was doing the spray over embossing step I realised this stencil is probably going to pair up with spray stains again in an art journal page, the speckled effect over the lacy star is just so pretty.

I’m excited to participate in a challenge again, it has been a while! There is still time to get involved if, like me you have stencils that are waiting patiently to be the star or even the background of a card.
Supplies
(Compensated affiliate links used when possible)
A Day at a Time journal page
Posted: January 20, 2021 Filed under: alphabet medley, Art Journal, book spines, Darkroom Door, diamonds, handwritten script, plaid, pocket watch, sheet music, teacups, Woodgrain | Tags: Darkroom Door stamps, Darkroom Door stencils, Ranger Distress inks, Ranger Distress stains, WOW embossing powders 7 Comments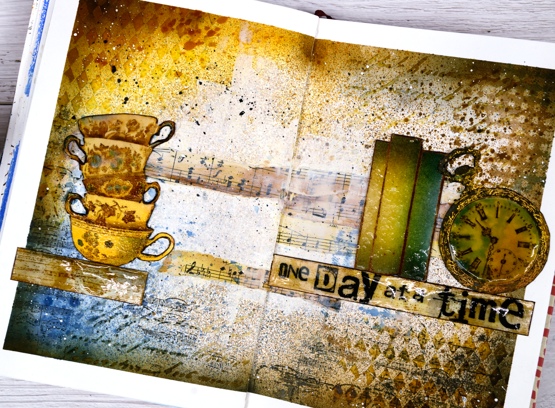
This page is in one of my Fabriano art journals. I’ve mentioned before that I have a love/hate relationship with these journals as the pages are not really meant for watercolour and I always want to do watercolour. I can’t bear to quit though because there are quite a few completed pages in the journals and I want to get to the end.
I began this spread with some inspiration pages open on my Pinterest ‘journal‘ board but no real plan; I was after a look but didn’t have a theme. I rarely use my distress stain sprays as sprays; I usually paint with them but this time I taped the edges of the pages then put the book in my recycle paper box and sprayed with vintage photo, faded jeans and wild honey spray stains. I then sprayed some water but as I mentioned, this paper doesn’t act like watercolour paper so the stains didn’t blend and move.
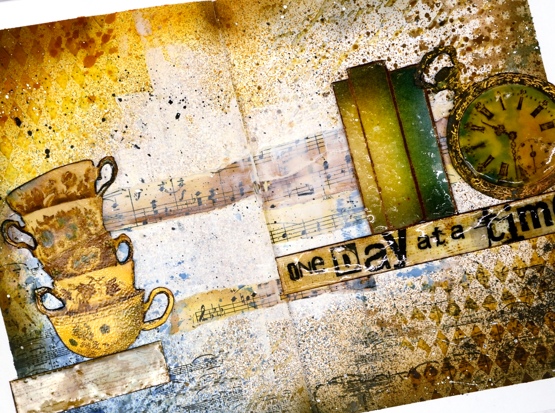
Next I added some texture with modelling paste through the Darkroom Door diamonds & handwritten script stencils. Once that dried I blended round the edges of the pages with faded jeans, vintage photo, wild honey and black soot distress inks which highlighted the added texture. I was happy with my chosen colours but still didn’t know what the focus should be. I coloured some strips of sheet music and added Darkroom Door ‘plaid’ and ‘sheet music’ stamping here and there.

Initially I wanted to use the pocket watch and the teacups so I stamped them in vintage photo and swiped them through diluted inks to pick up colour as well as adding colour with a paint brush. Once they were painted and cut out I clear embossed the clock face three times with high gloss embossing powder to look like glass and used normal clear embossing powder for the cups.
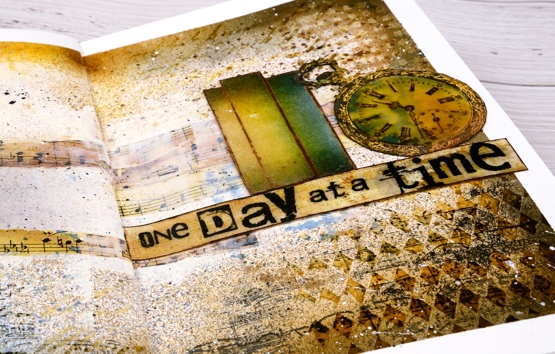
To brighten up the centre of the double page I ended up spreading white absorbent ground over the strips of sheet music and out towards the edges. Then began the longish process of turning the page into a composition. After much rearranging I realised that the tower of teacups and the pocket watch need a third element so I tried a floral piece then just a single shelf (stamped with DD woodgrain background stamp) and finally realised the ‘book spines’ stamp would probably work again. Honestly I’m not trying to put that stamp in every single journal page. Even with the books it still took a while to balance the layout and come up with some words. I finally decided on ‘one day at a time’ stamped on the shelf with the DD alphabet medley stamps. As Vicky Papaioannou often does on her amazing art journal pages, I finished with both black and white splatter then removed the masking tape before gluing down my elements.

It’s nothing like my initial inspiration photos on Pinterest but it did give me some good practice at adding texture and layers to my art journal, two things I don’t find easy. I only have one of my art journal pages on youtube as there is so much humming and ha-ing as I work out what I want. If I cut out the pondering parts is an art journal page process something you’d like to see in a video?
Supplies
(Compensated affiliate links used when possible)
Cabin by the lake
Posted: December 16, 2020 Filed under: cozy cabin, Penny Black, quietude, Stamped Landscapes, tannenbaum trio | Tags: grafix, Penny Black stamps, Ranger Distress inks, Ranger Distress stains 7 Comments
I’ve been trying to make some smaller panels and one layer cards over the last few days as I still need quite a few cards so how exactly did this happen!? Not smaller and not quicker but definitely satisfying. I was thinking about some of the scenic cards released by Penny Black this year and wanted to combine them into new scenes. I made the left side of ‘quietude’ + ‘cosy cabin’ + 1/3 ‘tannenbaum trio’ = a cabin by a frozen lake.
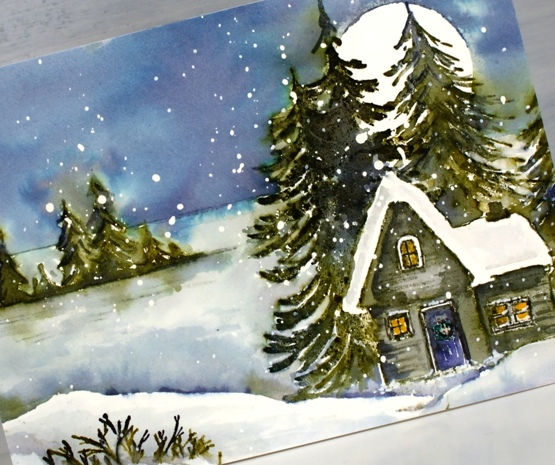
I worked on hot pressed watercolour paper with masking fluid splattered on it and began by stamping the small trees and horizon from the quietude stamp in iced spruce, forest moss and chipped sapphire. I blended over the trees with a paint brush but came back to them later to do more. I stamped the cozy cabin stamp next, forest moss and chipped sapphire on the trees, hickory smoke and black soot on the cabin. I remembered to colour inside the windows with a mustard seed marker before I got carried away with blending this time so it looks cozy inside. To add more trees behind the house I made a cabin post-it mask then stamped one of the tannenbaum trio stamps twice on the right hand side of the cabin.
Before adding the sky I made sure everything was dry then positioned a frisket film circle mask over the trees. I used speckled egg distress stain to paint the sky initially then when I had covered it all dropped in some chipped sapphire. Green ink did bleed out of the stamped trees but I kept a paper towel on hand to dab it dry before it could move too far.
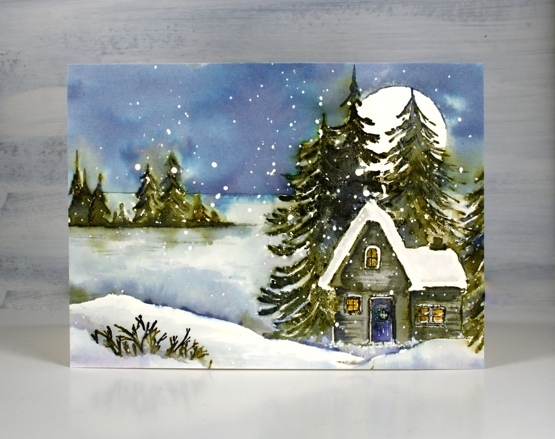
The lake area is mainly iced spruce and stormy sky to keep it paler and frozen looking but I added chipped sapphire and forest moss at the bottom where the lake is in shadow behind the snowbank. The snowbank looked too large and stark in the left hand corner so I stamped just the tips of the branches from the single tree in the cozy cabin set to look like a bit of foreground foliage. ( hot tip for my Ottawa people, all three sets featured on this card are listed in the Crop A While online store, just saying…)
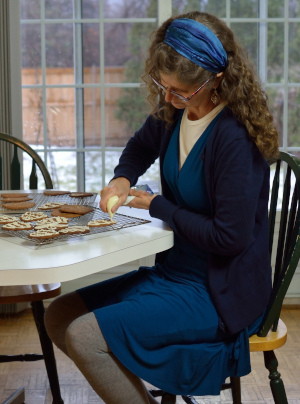
Quick update on Dressember: my card making friends keep pushing the fundraising total higher and I am so very appreciative. As I write this it has reached $1190.25. Thank you so much. Here is a photo from day 12 as I decorate gingerbread. Decorating the gingerbread is my favourite part of the process or maybe equal first place with eating it. This first batch unfortunately spread while baking to such an extent that the tree and mitten shapes were unrecognizable so the decorating was the only clue to what they were meant to be!
Supplies
(Compensated affiliate links used when possible)