
Winter Wildflowers
Posted: January 10, 2022 Filed under: Darkroom Door, Nature Walk, Woodgrain | Tags: Darkroom Door stamps, Ranger archival inks, Ranger Distress inks 4 Comments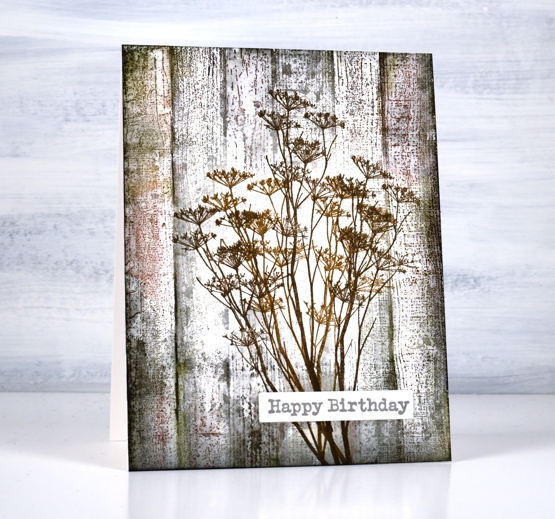
The bright and beautiful flowers of spring and summer delight me as you know but so do those left standing through autumn and winter. On a snowy walk recently I was happy to see the brown tones that show up bold and contrasting against the snow. Queen Anne’s Lace closes up and dries out after summer but that makes it all the better to balance some snow like icing.
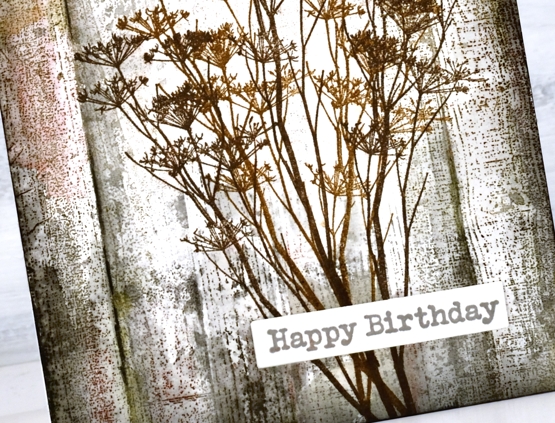
For this wintery image of dried stems against aged wood paneling I stamped the flower stems from Darkroom Door’s ‘nature walk’ first in brown archival inks so they wouldn’t blend when I worked on the background. I stamped the DD ‘woodgrain’ stamp over the top first in hickory smoke distress ink then a few more times adding black soot, forest moss and barn door distress inks. I blended as sparingly as I could to retain the texture of the stamp.
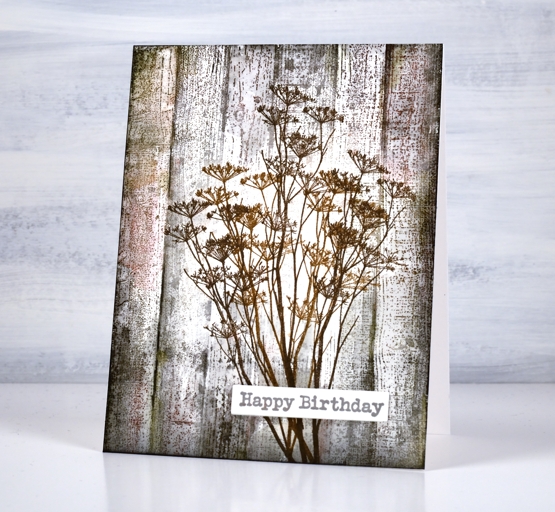
I added a sentiment from the DD ‘happy birthday’ set and now I am wondering if I can recreate the same aged wood effect on a journal page. This seems to be the way I roll at present; a journal page inspires a card then a card inspires a journal page.
By the way my Art Journal Adventure class has been postponed for now due to current restrictions here in Ontario but we will reschedule when possible. In the interim I will continue scheming and dreaming up themes and techniques!
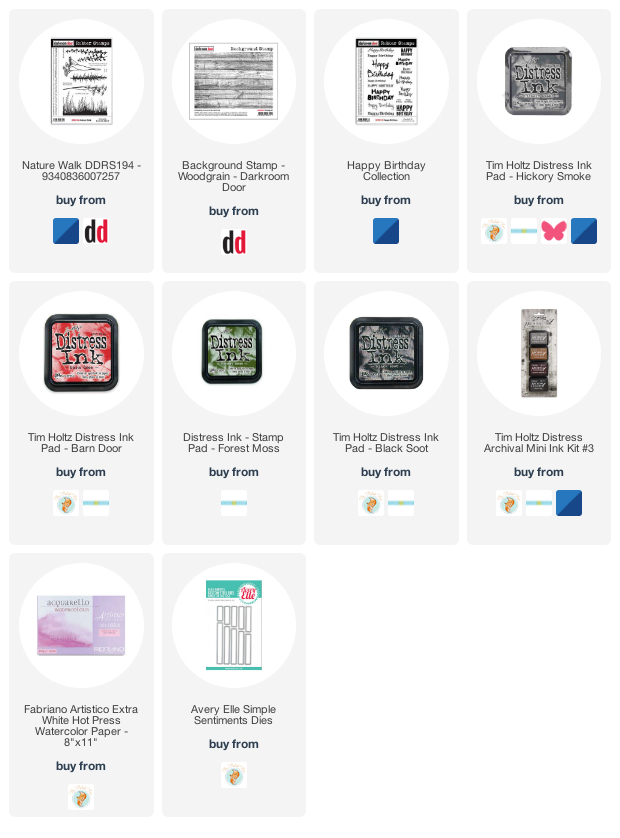
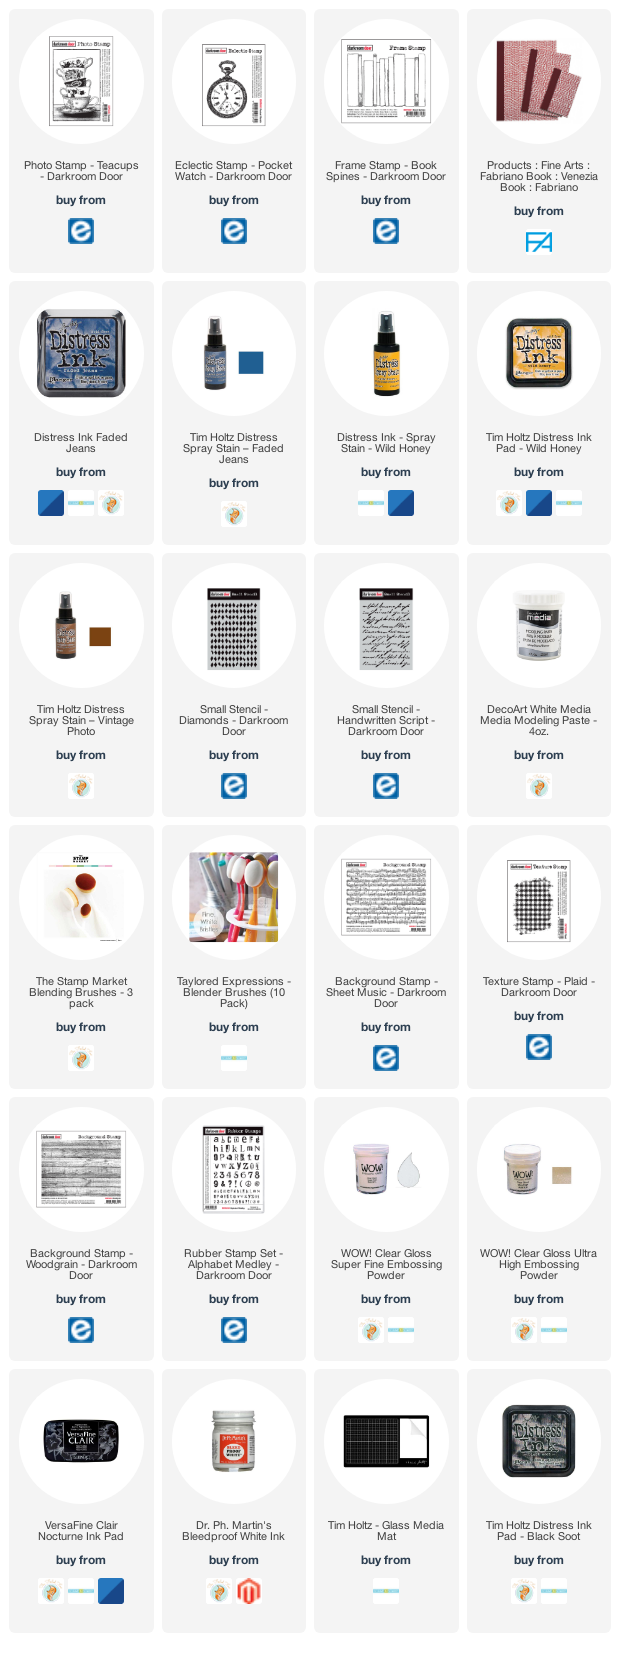
Supplies
(Compensated affiliate links used when possible)
Rustic Wreath
Posted: December 15, 2021 Filed under: blustery, Darkroom Door, Dies, Nature's Song, Penny Black, Taylored Expressions, Woodgrain | Tags: Darkroom Door stamps, Penny Black creative dies, Taylored Expressions 2 Comments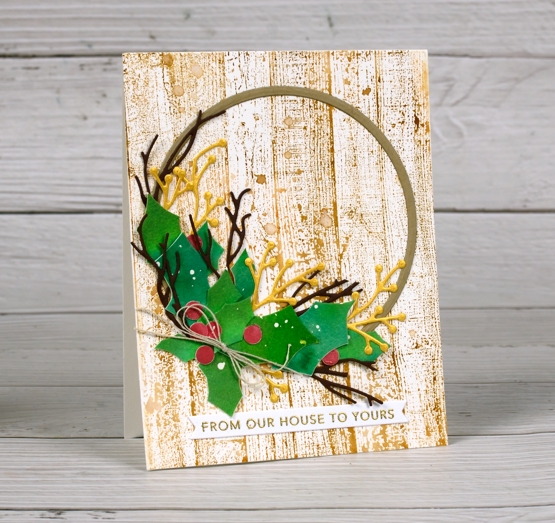
When I am designing classes, both online and in-person it can take many days and many samples before I settle on a collection of projects. This card is one that did not end up in a class but I love the rustic textured look of it.
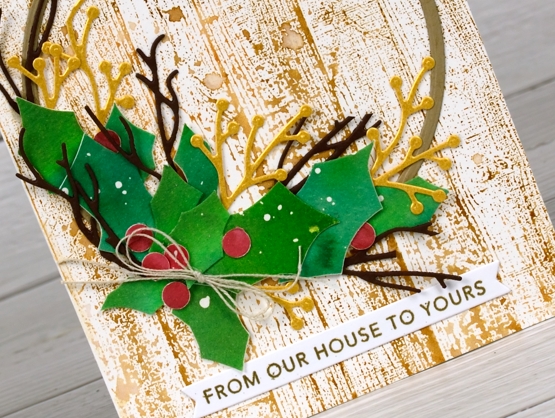
I used two circle dies to cut a kraft ring as the base of my wreath. I stamped the background with the Darkroom Door ‘woodgrain’ stamp and a few brown inks. To create the holly leaves and berries I painted a few strips of watercolour paper with greens and also a strip of red then hand cut the leaves and punched out the berries. To fill out the wreath I used some Penny Black die cut twigs and berries in brown and gold.
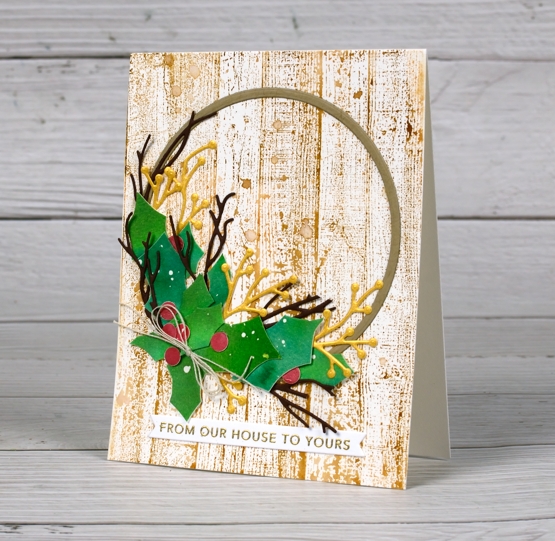
The sentiment is from Taylored Expressions; I used the very handy stamp and die sentiment strips combo. My daughter joined me on Monday afternoon and we had fun decking the tree and living area. I now have a decorated wreath hanging over my fire place and greenery hanging either side of the front door.
Supplies
(Compensated affiliate links used when possible)
Stockings are hung
Posted: January 29, 2021 Filed under: brick wall, Christmas sentiments, Darkroom Door, Dies, knitting, layered Xmas wreath die set, Penny Black, stockings, Woodgrain | Tags: Darkroom Door stamps, Darkroom Door stencils, Penny Black creative dies, Ranger archival inks, Ranger Distress inks 6 Comments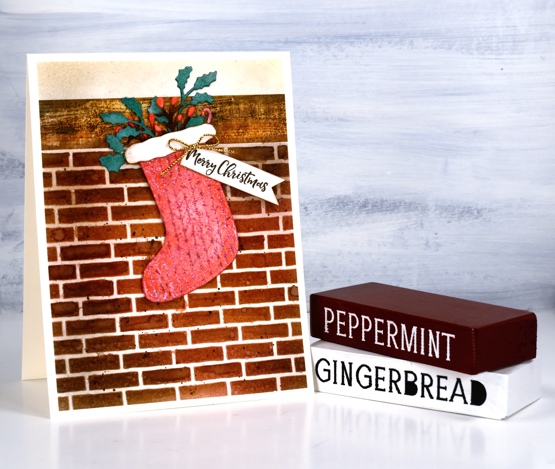
When I was making knitted panel cards a few weeks back I thought I should create a knitted stocking card at the same time. I also decided to try and make at least one, but hopefully more than one Christmas card each month. Usually I don’t feel like making Christmas cards after Christmas but I’m happy to right now so I made this little stocking and hung it by the chimney with care.

I stamped the Darkroom Door knitting pattern in versafine clair ‘glamorous’ ink, embossed in clear powder then painted over it with festive berries distress ink. I cut out a stocking with one of the Penny Black Christmas Stocking dies. To fill the stocking I cut foliage from watercolour paper using the PB layered wreath set then coloured the die-cuts with festive berries, pine needles and ground espresso distress inks. The stocking needed a bit more trim so I cut out a white cloud shape to and blended some brown ink around the edges.
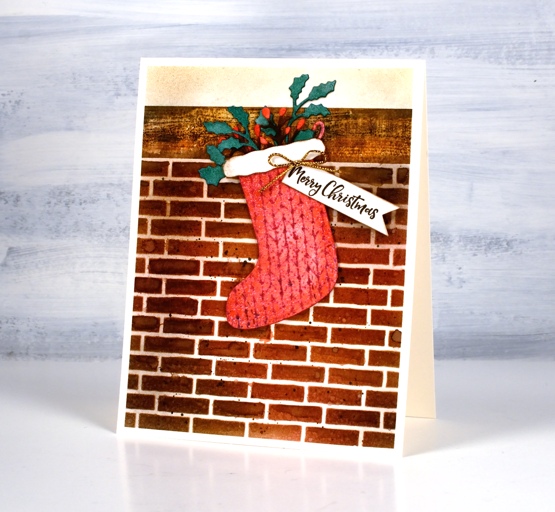
To create a chimney I used a stencil and a stamp from Darkroom Door, the woodgrain stamp for the mantle and brick wall stencil for the bricks. I worked on hot pressed watercolour paper for both so I could blend distress inks and add watermarks. I stamped the wood with ground espresso archival ink so it wouldn’t blend then painted and blended ground espresso, black soot and rusty hinge distress inks over the top. I blended the same three distress inks through the stencil then spritzed some water over it before lifting the stencil. I blended some of the bricks with a paintbrush and added some black soot splatter.
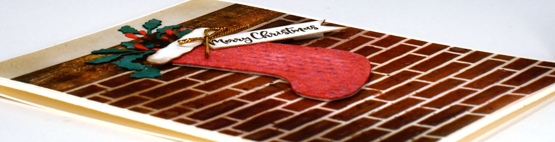
The mortar around the bricks looked too white so I blended antique linen ink over the whole panel and used some to blend above the mantel too. To finish of the card I added a gold bow and a sentiment from the DD Christmas sentiment strip stamp.
So that’s one Christmas card done so far in 2021! Do you make Christmas cards all year?
Supplies
(Compensated affiliate links used when possible)
A Day at a Time journal page
Posted: January 20, 2021 Filed under: alphabet medley, Art Journal, book spines, Darkroom Door, diamonds, handwritten script, plaid, pocket watch, sheet music, teacups, Woodgrain | Tags: Darkroom Door stamps, Darkroom Door stencils, Ranger Distress inks, Ranger Distress stains, WOW embossing powders 7 Comments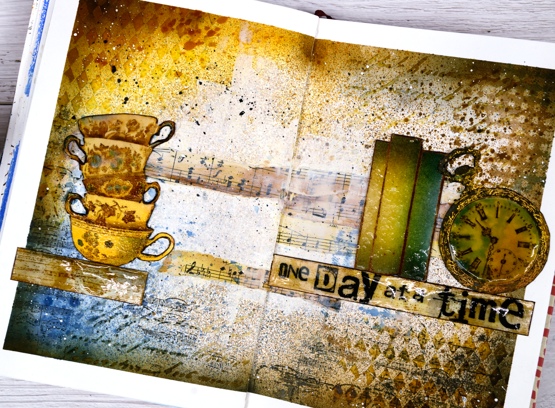
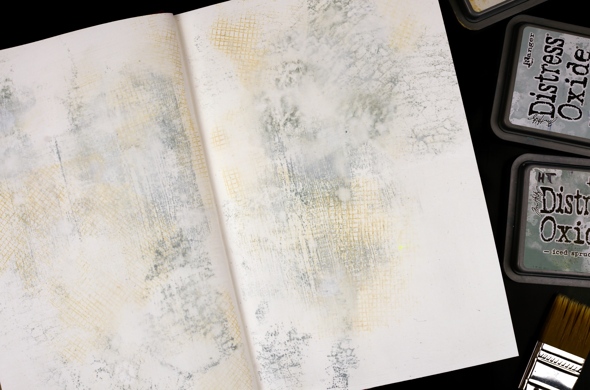
This page is in one of my Fabriano art journals. I’ve mentioned before that I have a love/hate relationship with these journals as the pages are not really meant for watercolour and I always want to do watercolour. I can’t bear to quit though because there are quite a few completed pages in the journals and I want to get to the end.
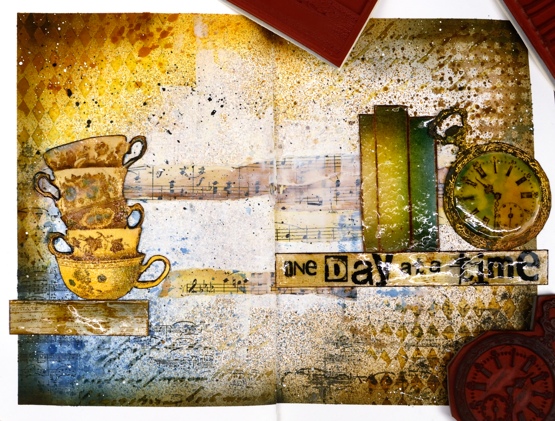
I began this spread with some inspiration pages open on my Pinterest ‘journal‘ board but no real plan; I was after a look but didn’t have a theme. I rarely use my distress stain sprays as sprays; I usually paint with them but this time I taped the edges of the pages then put the book in my recycle paper box and sprayed with vintage photo, faded jeans and wild honey spray stains. I then sprayed some water but as I mentioned, this paper doesn’t act like watercolour paper so the stains didn’t blend and move.
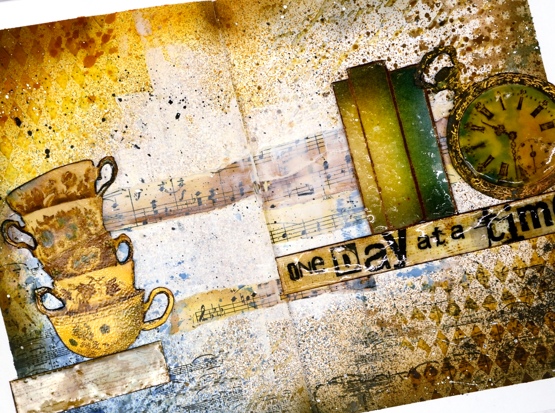
Next I added some texture with modelling paste through the Darkroom Door diamonds & handwritten script stencils. Once that dried I blended round the edges of the pages with faded jeans, vintage photo, wild honey and black soot distress inks which highlighted the added texture. I was happy with my chosen colours but still didn’t know what the focus should be. I coloured some strips of sheet music and added Darkroom Door ‘plaid’ and ‘sheet music’ stamping here and there.

Initially I wanted to use the pocket watch and the teacups so I stamped them in vintage photo and swiped them through diluted inks to pick up colour as well as adding colour with a paint brush. Once they were painted and cut out I clear embossed the clock face three times with high gloss embossing powder to look like glass and used normal clear embossing powder for the cups.
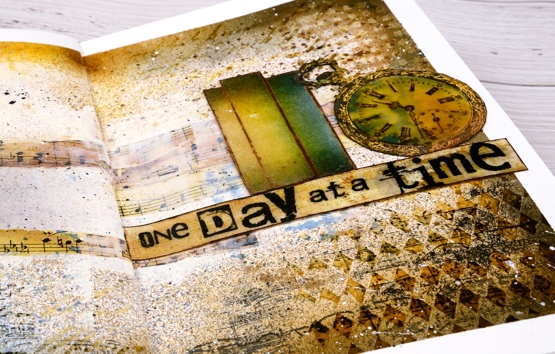
To brighten up the centre of the double page I ended up spreading white absorbent ground over the strips of sheet music and out towards the edges. Then began the longish process of turning the page into a composition. After much rearranging I realised that the tower of teacups and the pocket watch need a third element so I tried a floral piece then just a single shelf (stamped with DD woodgrain background stamp) and finally realised the ‘book spines’ stamp would probably work again. Honestly I’m not trying to put that stamp in every single journal page. Even with the books it still took a while to balance the layout and come up with some words. I finally decided on ‘one day at a time’ stamped on the shelf with the DD alphabet medley stamps. As Vicky Papaioannou often does on her amazing art journal pages, I finished with both black and white splatter then removed the masking tape before gluing down my elements.

It’s nothing like my initial inspiration photos on Pinterest but it did give me some good practice at adding texture and layers to my art journal, two things I don’t find easy. I only have one of my art journal pages on youtube as there is so much humming and ha-ing as I work out what I want. If I cut out the pondering parts is an art journal page process something you’d like to see in a video?
Supplies
(Compensated affiliate links used when possible)
Reading Year journal page
Posted: January 1, 2021 Filed under: book spines, Darkroom Door, Woodgrain | Tags: Coliro paints, Darkroom Door stamps, Ranger Distress inks 11 Comments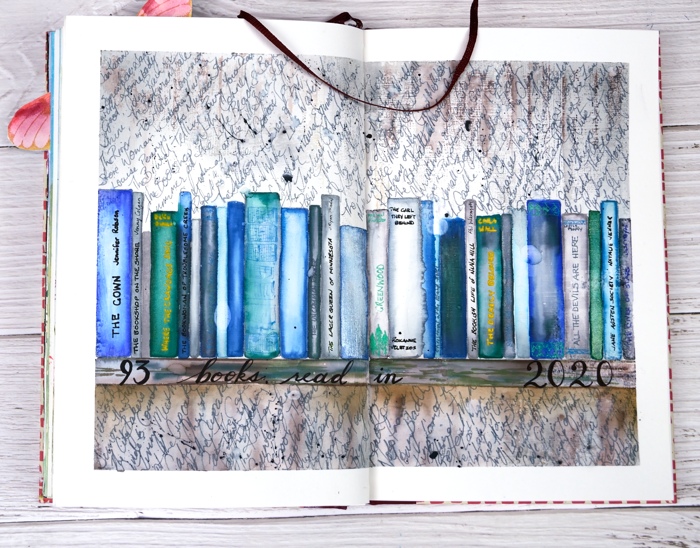
I know 2020 was a very different year from what any of us imagined but I hope you are able to look back on it and see some new habits or achievements that please and encourage you. I’ve always been a reader but I have to admit I spent more time immersed in stories this year. I read physical books, listened to many audio books as I worked on art and in the last week read e-books on my new e-reader. I was hoping to reach 100 books but fell a little short with a total of 93 and three currently on the go.
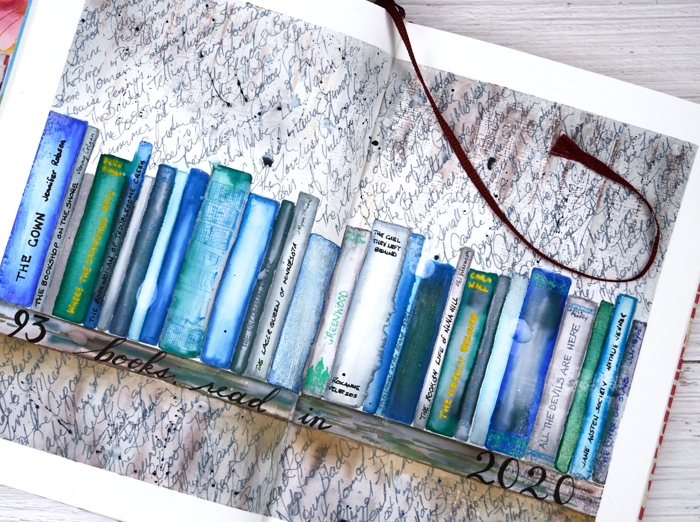
It is highly possible that I had years as a child when I read more than 93 but I don’t know; I didn’t keep a record. I have this year’s books written in a bullet journal but I decided to record them on an art journal page as well. This is the second book filled spread in my art journal and who knows, there may be more.
I love the book spines stamp from Darkroom Door and this time stamped it across the pages instead of in piles. After I had coloured all the book spines with watercolour markers and pearlescent paints I drew a shelf underneath and then stamped the DD woodgrain stamp above and below the shelf of books in grey and brown distress inks. I added a few titles to book spines with gel pens then used a scribbly script to fill the surrounding area with all the rest of the books. It soon became apparent that there would not be room for author names so I just did book titles. Once I had filled the space I had to squeeze the last few in between lines. I splattered some black soot distress ink over the page before removing the masking tape and adding the hand lettered title.
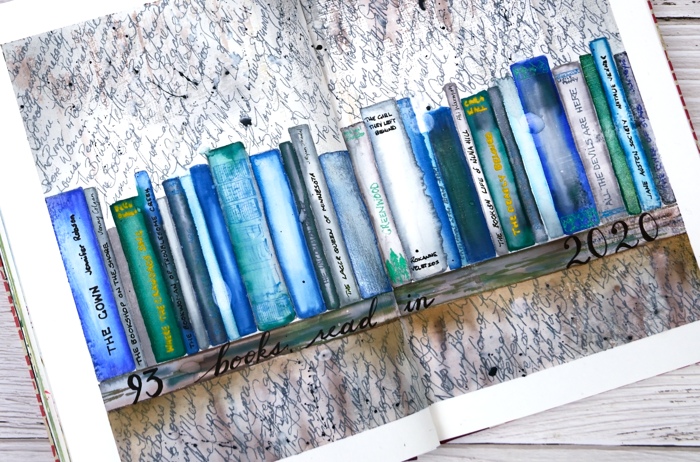
I read mysteries, war novels, crime novels, literary fiction, comedy, romance, historical fiction and a thriller. There were books I didn’t care to finish so they are not on the list and there were a handful I read twice. I read several series; I do like a good series and I took pains to try and have them arrive in my library holds in the right order or close to it.
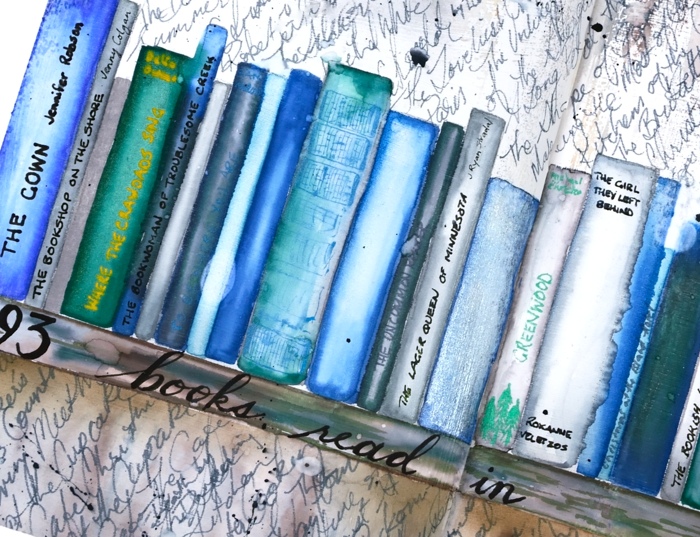
The book club I belong to did manage to meet this year, once indoors before the pandemic started then two more times, outdoors around a picnic table then, in late October, around a bonfire. We discussed ‘Where the Crawdad’s Sing’, ‘Small Great Things’, ‘The Lager Queen of Minnesota’ and ‘The River’. If you know of some good ‘book club books’ please let me know in the comments below. I have received helpful recommendations from you before which I’m looking forward to reading in 2021.
Happy New Year!
Supplies
(Compensated affiliate links used when possible)
Darkroom Door wedding cards
Posted: March 25, 2019 Filed under: Darkroom Door, Nature Walk, tall flowers, Woodgrain | Tags: Darkroom Door stamps, Ranger Distress inks, WOW embossing powders 9 Comments
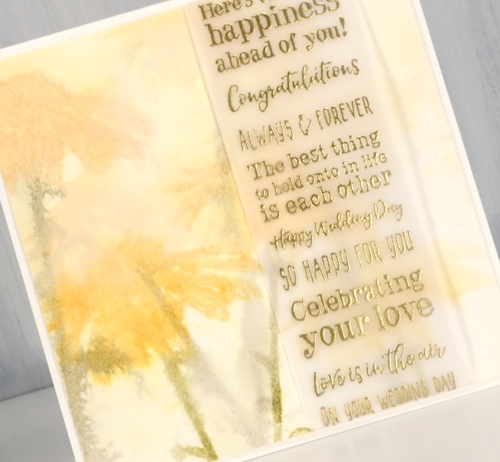
I’ve been creating with the tall flowers and nature walk stamps from Darkroom Door again, this time with a wedding theme in mind. Darkroom Door now has eight different sentiment stamps collections in list format, each one has a different theme. For two of today’s cards I isolated one sentiment by masking either side but on the second card I used a large chunk of the stamp as a feature over a soft blurry floral background. I am over on the Darkroom Door blog sharing these cards so make sure to pop over there for more details on my process.
This first wedding card made me think of a country style-decorate the barn type of wedding. I did a bit of masking to get the look of three daisies against a timber background and used twine to keep things natural and not too fancy. I inked the daisy from ‘Tall Flowers‘ set in worn lipstick, abandoned coral, forest moss and peeled paint distress ink, spritzed lightly with water and stamped in centre of a hot pressed watercolour paper panel, then used masks to stamp another on each side. I masked all three daisies so I could stamp the Woodgrain Background Stamp in weathered wood and frayed burlap distress inks.

My second card features the ‘wet on wet’ watercolour technique. The watercolour panel was very wet before I stamped the daisy stamp in wild honey and forest moss distress inks. I restamped to get paler images then dried the panel before wrapping a vellum strip with gold embossed wedding sentiments over the stamped flowers.
The very blurry style is not for everyone but in real life it does have a soft romantic look to it.
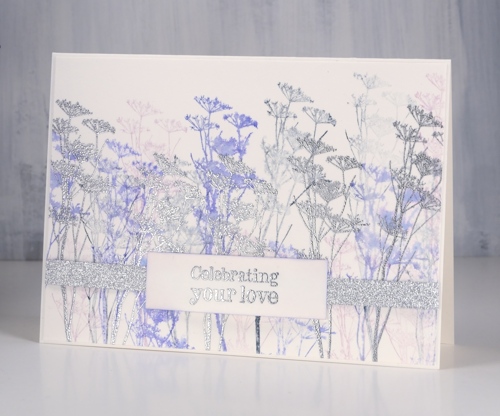
My final card features wildflower silhouettes in blueprint sketch and milled lavender ink stamped repeatedly to get first, second and third generation images as well as silver embossed flowers and sentiments with some very sparkly silver ribbon.

Working with sentiment strips that have fifteen different sentiments gives me plenty of options, some of the ‘wedding’ sentiments are totally appropriate for other events too.
I enjoyed the process of creating wedding cards in three different styles and I know I could have gone even fancier. What’s the fanciest card you have ever made?
Supplies
Steps journal page
Posted: March 7, 2019 Filed under: alphabet medley, Art Journal, Darkroom Door, mesh, Nature Walk, stone, tall flowers, Woodgrain | Tags: Art Journal, Darkroom Door stamps, distress oxide inks, Ranger Distress inks 5 Comments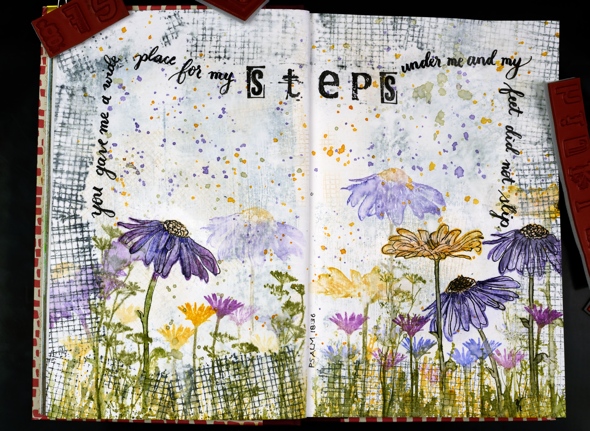
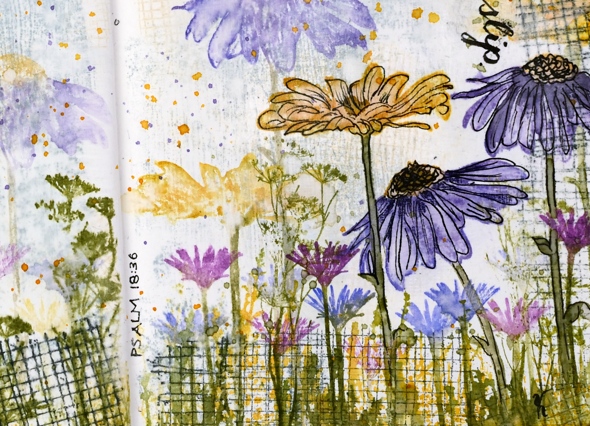
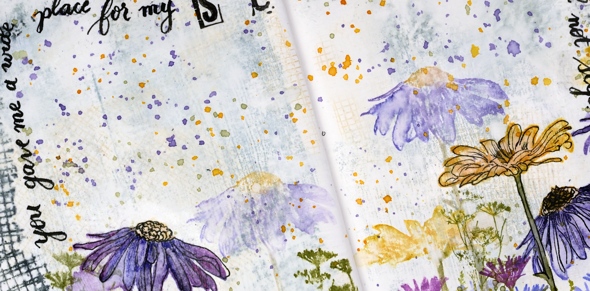
Are you a wee bit surprised to see a journal page here? I’m surprised myself, surprised but pleased. I really enjoyed dreaming it up and making it. It didn’t end up looking as I imagined but that is the way with journal pages is it not?
This art journal is a Fabriano journal; the paper is nice and thick but not watercolour paper so I painted over it with absorbent ground first. Then I grabbed a bunch of stamps from Darkroom Door along with three light coloured oxide inks and stamped mesh, stone and woodgrain texture stamps over the background. I spritzed it with water to soften the edges of the stamped images and dabbed some out too to make it subtler. Even after adding some water it was still bolder than I wanted so I painted another thin layer of absorbent ground over it.
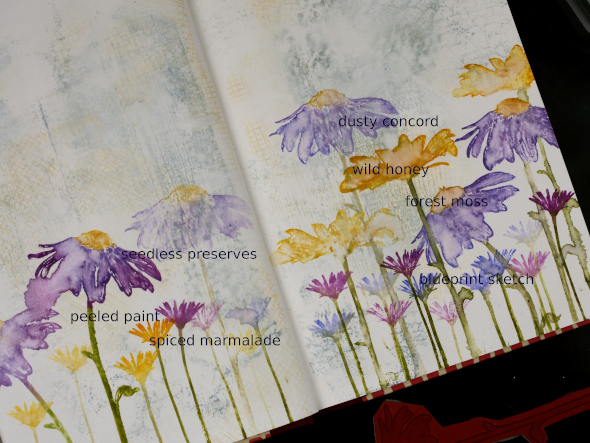
I filled the bottom of the page with repeat stampings of flowers from the Darkroom Door ‘tall flowers‘ set in distress inks then blended some of the big flowers with water. They don’t blend as well as they do on watercolour paper but the effect is still nice.
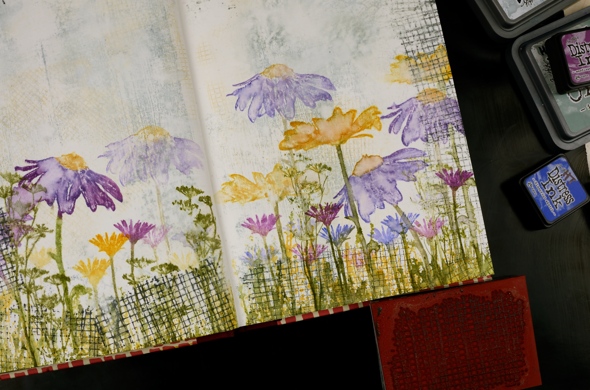
I added grass and flowers from the DD ‘ nature walk‘ set, also in distress ink then a border with the mesh texture stamp in black soot oxide ink. It was a bit bolder than I wanted so I spritzed then dabbed with a paper towel ( as you can see I’m a fan of the ‘spritz and dab’ ). I splattered wild honey, forest moss and dusty concord diluted ink over the whole spread and it ended up looking like confetti. To boost a few of the flowers I outlined them with fine tipped black markers.
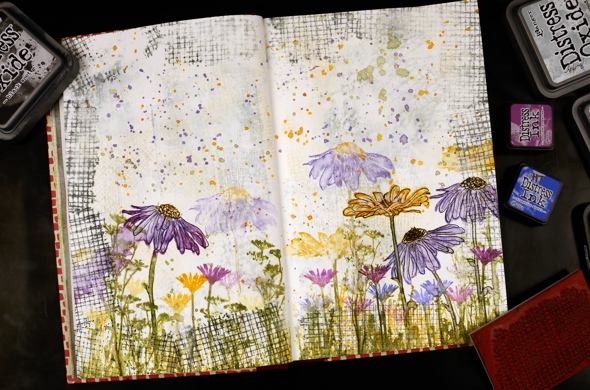
I wrote psalm 18:36 with a brush pen leaving a space to stamp the word ‘steps’ with the DD alphabet medley stamps. I find choosing words for a journal page tricky, which words and how to add them. But the beauty of a journal page is the experimental nature of it. If I don’t like something on this page, I’ll try something different on another. Once the ink had dried I sealed the large flowers and the lettering with distress micro glaze.
Do you have any art journallers you would recommend for inspiration? I already follow Rachel Greig from Darkroom Door, Julie Fei-Fan Balzer, Vicky Papaioannou and Maremi SmallArt who all have different styles and inspiring journal pages.
I’m hoping to create in my journals more often and will share pages here if possible. Even if you are not an art journal person the designs can usually be converted to a card and sometimes start out as cards anyway!
Art Supplies (all Darkroom Door stamps are linked in description)
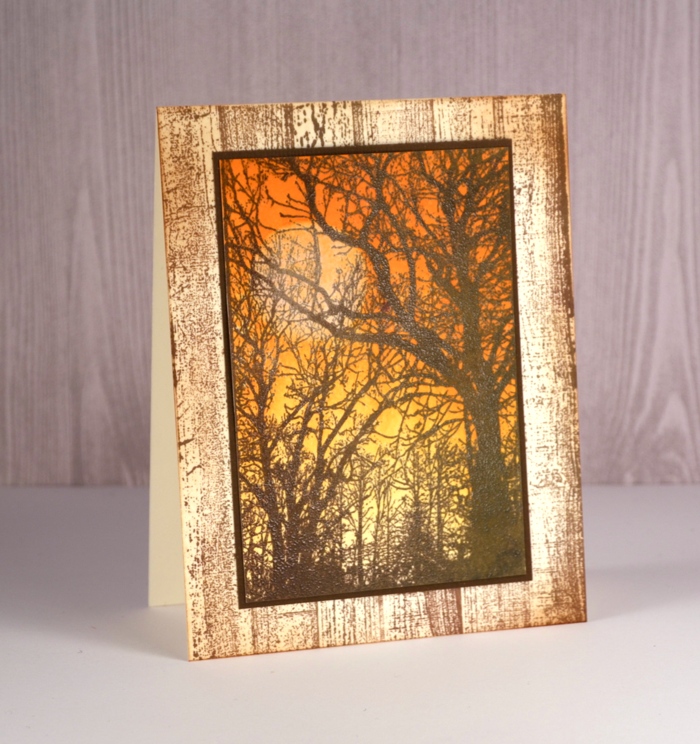
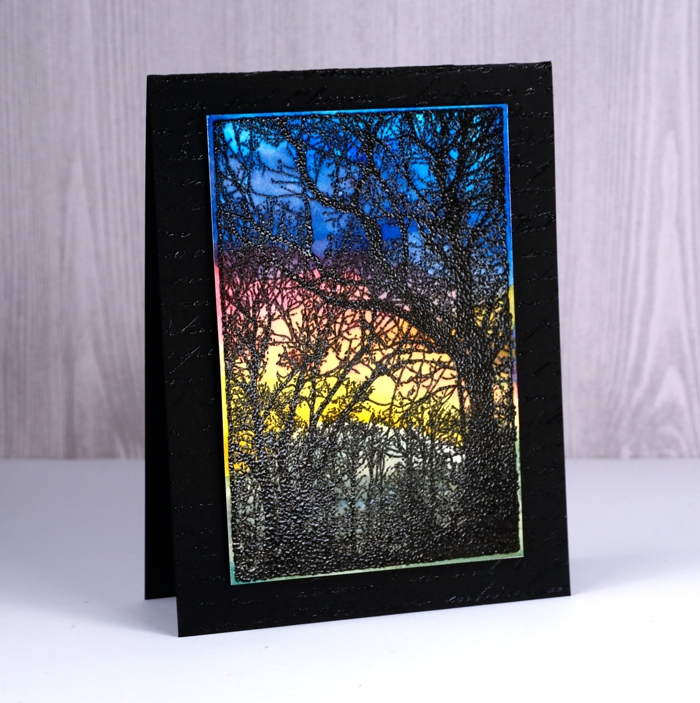
Woodlands
Posted: February 20, 2018 Filed under: French Script, Woodgrain, Woodlands | Tags: color burst, Darkroom Door stamps, Ranger Distress inks, Tsukineko Versafine inks, WOW embossing powders 4 Comments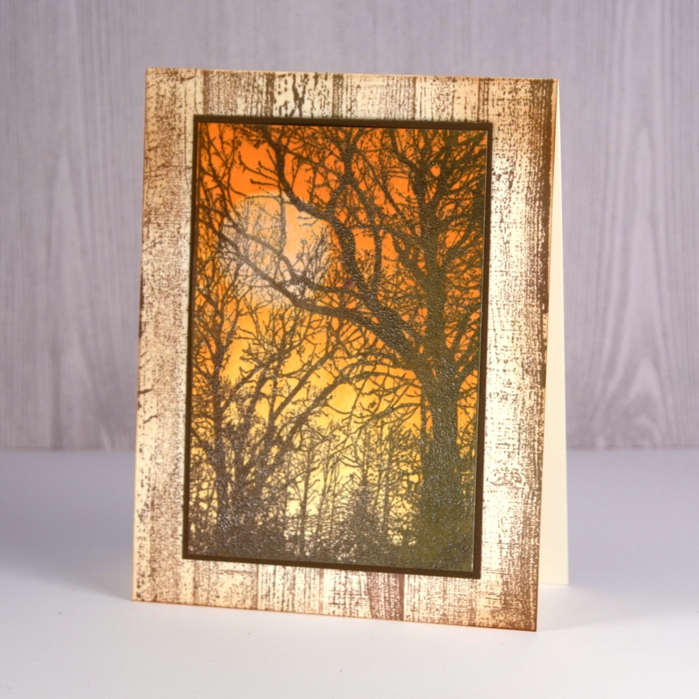
I had a lovely time with this new photo stamp from Darkroom Door. It’s called Woodlands and was perfect for creating an autumn scene, a winter scene and a sunset. Step by step instructions and a complete list of supplies are available on the Darkroom Door blog
The autumn scene involved brayering and distress inks.
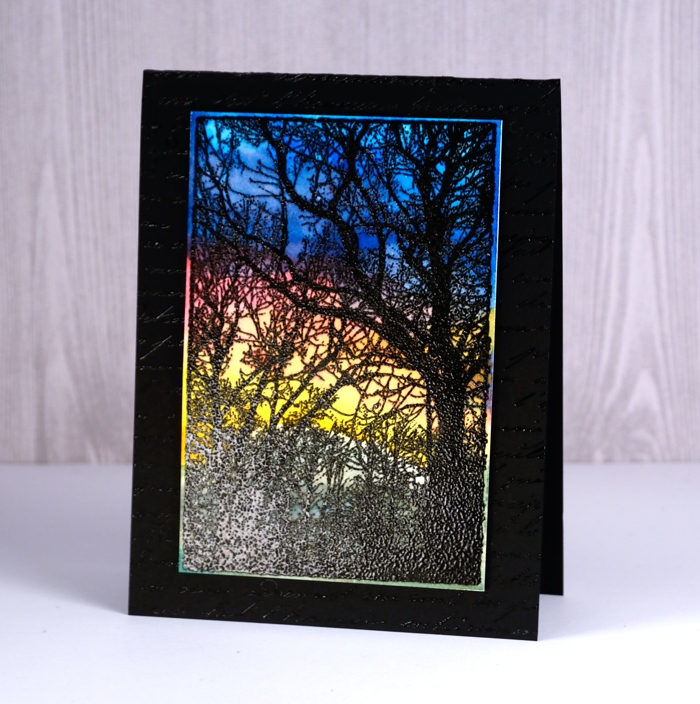
The sunset features the bright hues of colorburst powders over embossing.
The winter scene below, which might be my favourite, was painted with distress inks.
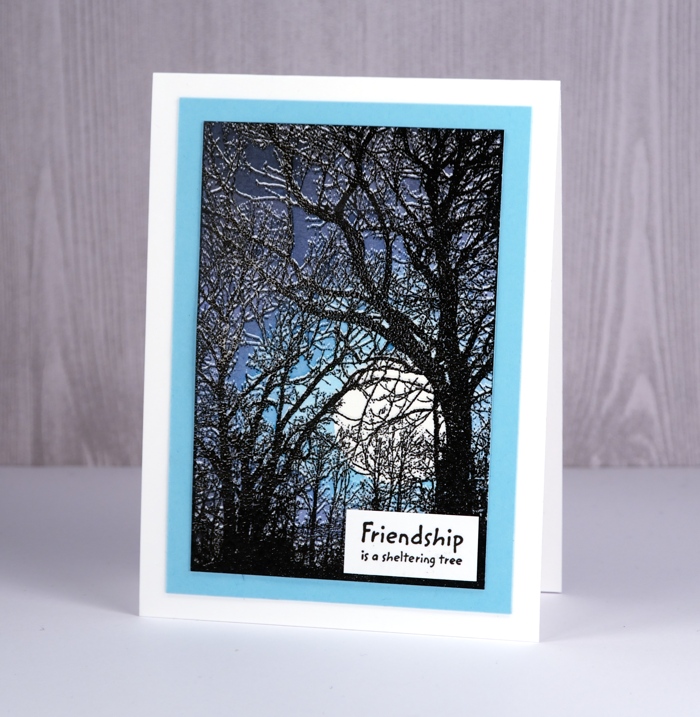
I used a cool technique with a stamp positioner to get a layer of snow on the branches; if you’re interested pop over to Darkroom Door and check it out.
Thank you for your kindness
Posted: November 2, 2017 Filed under: Leaves, Woodgrain 22 CommentsIt is nice to be back with my family in Canada, back in my workroom and back on my blog. Before I talk about today’s card, however, I would like to thank you, my blog readers for the outpouring of kindness I received in the comment section last month when I let you know my mother had died. I read every message; my dad did also and we deeply appreciate the time you took and the words you wrote to me and my family. I am grateful for your prayers, your thoughts and your words of understanding. Many of you shared that you have been through the same sadness. All you of you wrote to me with such kindness and concern that I feel very blessed to be part of such a caring community. I waited until I returned home to respond as I wanted to make a thank you card to post here on the blog along with my heartfelt thanks. I’m sorry it isn’t a real life card turning up in your mail box but it is made especially for you all the same. I recognised many names but there were many others who commented for the first time just to extend their sympathy to me; thank you all for taking the time. My father left his thanks to you, my blog readers, in a comment on that post; it is towards the end of the comments section if you care to pop back and read it.
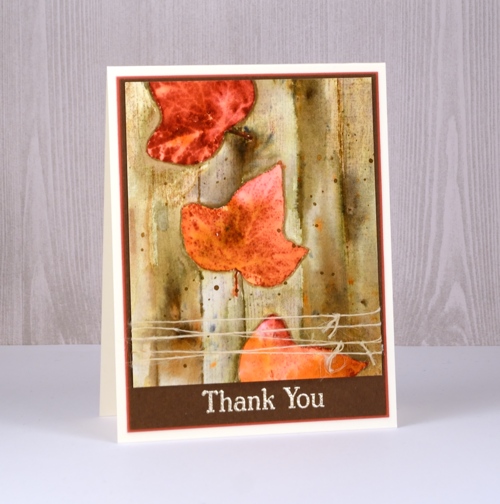
While I was in Australia I enjoyed some warm weather extending my summer by a few weeks. When I returned to Canada I was surprised to find many trees with leaves still changing colour and a yard full of leaves still to be collected. My first full day back was delightfully warm – sandals weather actually – but that seems to be over now; the temperatures have fallen along with a whole lot of rain! My card is inspired by the season here at home and stamped with Darkroom Door stamps. I used a leaf from the Leaves set and the woodgrain background stamp.
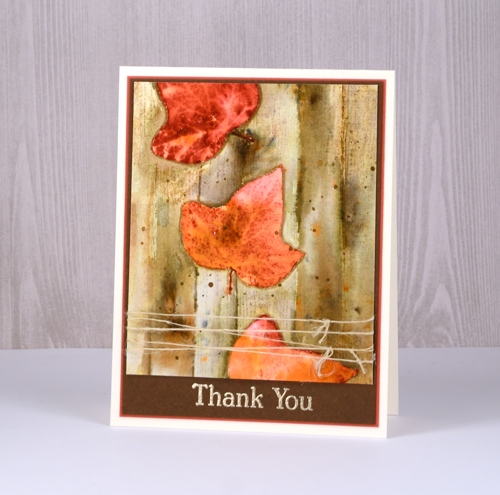
I stamped the leaf three times on hot pressed watercolour paper without re-inking in between, that way I was able to get a dark red, medium and a pale red impression (inks listed below). I stamped the leaf on post-it notes also and cut them out to use as masks. With masks in place I inked the woodgrain stamp in three shades of brown and stamped over the leaves. With all the stamping done I switched to painting using a small watercolour brush and some water to blend the distress inks. As I blended I sprinkled some brusho into the leaves and later onto the woodgrain to add some extra shades of colour and appearance of texture.
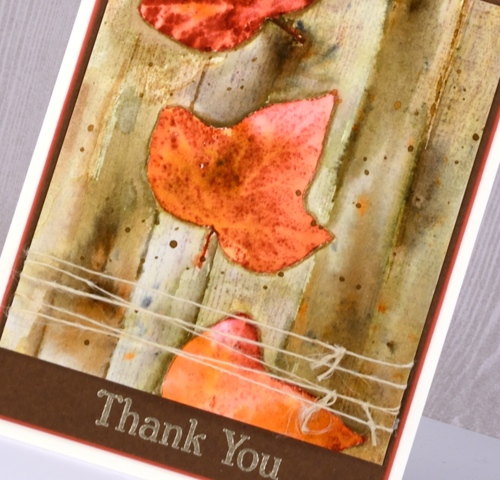
The panel is matted with two different browns and the sentiment stamped then embossed with platinum embossing powder. Its the first time I’ve used platinum and it seems to have co-ordinated well with the brown tones. I hope its one of those magical tones that looks good with a whole range of colours. I finished off the panel by wrapping some vintage French twine around then attached it all to a natural cardbase.
Thank you, again for your kindness; I read through your comments again as I wrote this post and I’m sure will I return to them in the future.
Supplies
Stamps: Leaves, Woodgrain, Thank you (made by Darkroom Door)
Distress Inks: frayed burlap, fired brick, antique linen, vintage photo (made by Ranger)
Paint: brusho sandstone & light brown
Papers: Neenah natural white 110lb, Fabriano hot pressed watercolour paper, brown toned cardstock
Also: versamark ink pad, WOW metallic platinum superfine embossing powder
Watercolour pencil: Faber Castell Albrecht Durer raw umber


