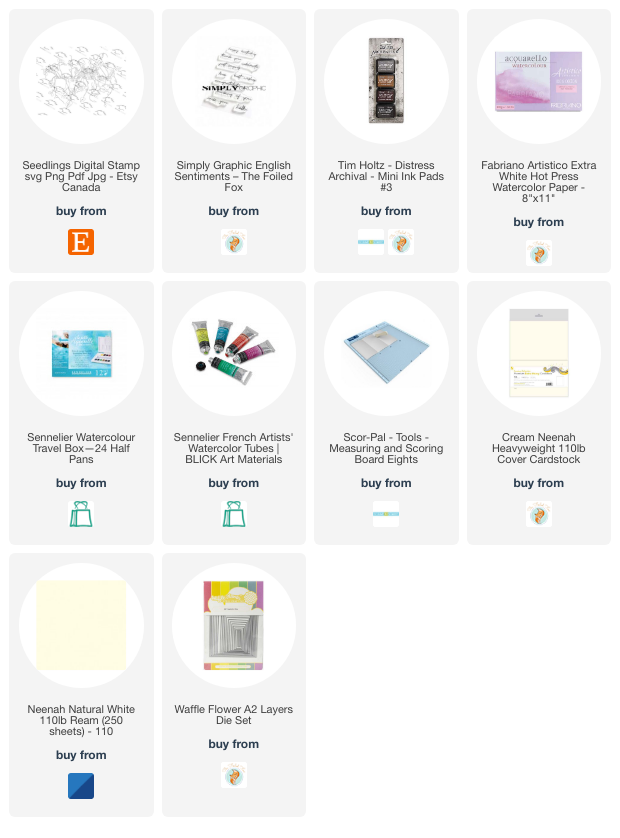
Seedlings
Posted: March 2, 2023 Filed under: Echidna Studios, seedlings, sennelier watercolours, Simply Graphic | Tags: digital stamps, Echidna Studios, Fabriano Watercolour Paper, sennelier watercolours, Simply Graphic 8 Comments
If you are a plan ahead – plant ahead person then you might have some seedlings growing somewhere in your house or green house. These are the only seedlings I have at this point but I must say they are looking quite healthy.
This is a digital stamp designed by my daughter and available in her etsy store Echidna Studios. I printed it so that it just fitted on an A2 card front but I think it might be nice to print it larger and feature only one or two pots on a card front with the shoots and leaves coming off the edge of the panel.
I printed on hot pressed watercolour paper and used my Sennelier pan paints for all the colouring. I used a mix of greens for the greenery and a mix of blue and brown for the pots. I really like blue and brown combos these days, something that I wouldn’t have imagined a few years back.
The sentiment is from Simply Graphic’s ‘English Sentiments’ set; I like the handwritten look and the size of the words. I know I could be handwriting a few sentiments myself here and there but I always add the sentiment last and by that time I don’t want to mess up a otherwise completed card with a crooked or uneven sentiment. That being said I think I should try a few handwritten sentiments on upcoming cards…
(Compensated affiliate links from Foiled Fox, Scrap n Stamp)
Snowflake Cards
Posted: February 23, 2023 Filed under: crystalline, Dies, Echidna Studios, grafix, Penny Black, snowflake digital stamp set | Tags: Echidna Studios, Fabriano Watercolour Paper, grafix, Penny Black creative dies 9 Comments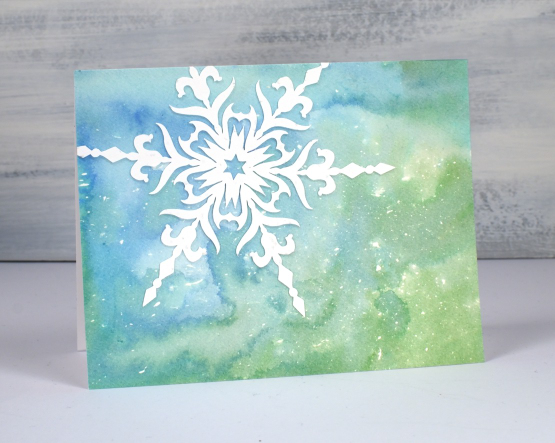
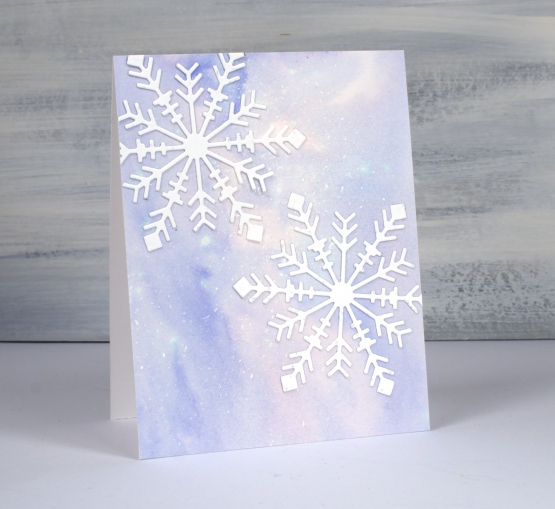
Apparently we are getting 10-20cm of snow tonight. So these cards are appropriate for late February! I teamed up with Grafix to complete these projects. I love using liquid frisket to create a scattering or a storm of snowflakes or stars across a watercolour background.
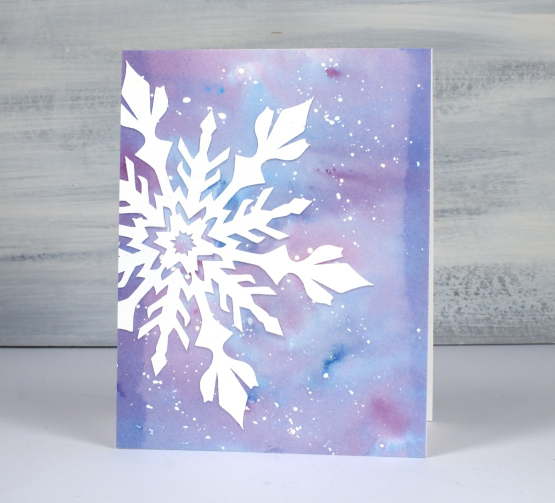
I splattered the liquid frisket on hot pressed watercolour, let the droplets dry then used dye inks to colour the panels. You can see the process in the video below.
I cut intricate snowflakes from lightweight white linen cardstock to add to the watercolour panels. All but the die-cut snowflakes on the final card are designs from Echidna Studios. I used snowflakes from the Snowflake Digital Stamp set. I have used them as stamps on previous cards but this time I cut them on a cricut.
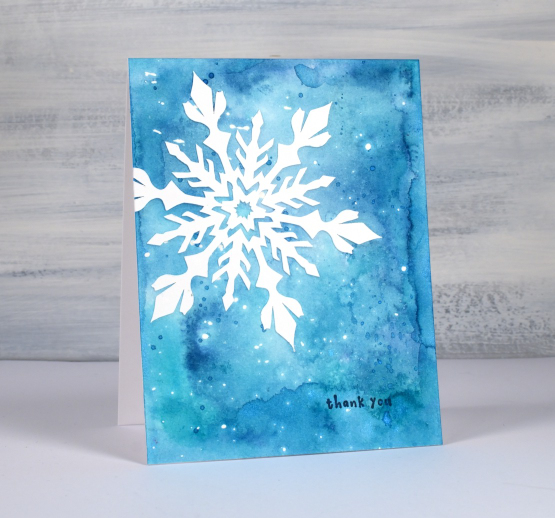
Because the snowflakes are quite intricate gluing them on with artist tac was very straightforward. I also use artist tac when I am attaching individual letters to create a word or sentiment.
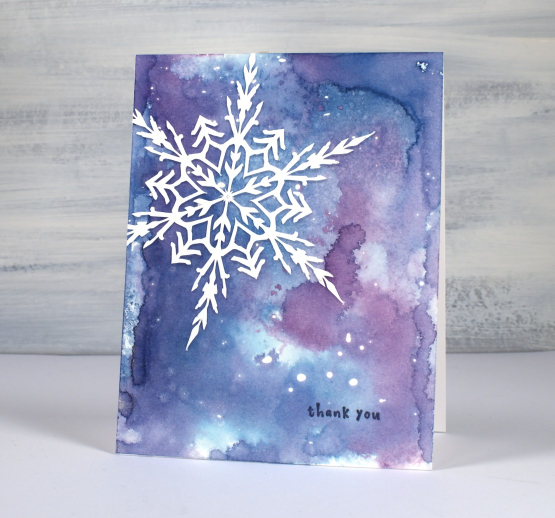
I used a few of the cards as thankyous and left a few blank.

I used smooshed distress inks to create the watercolour backgrounds but you could use watercolour paints or powders to make soft blended backgrounds.
(Compensated affiliate links from Foiled Fox, Scrap n Stamp)
Old Stone Doorway
Posted: February 3, 2023 Filed under: Echidna Studios, old stone doorway, sennelier watercolours, Simply Graphic, Watercolour | Tags: Echidna Studios, Faber-Castell Albrecht Durer Watercolour pencils, Ranger archival inks, sennelier watercolours, Simply Graphic 12 Comments
Isn’t this a sweet front path and door? It makes me want to head inside or wander around the garden. This digital stamp is another design by my daughter which is available in her etsy store, Echidna Studios. I printed it on Arches cold press watercolour paper. You know I generally use Fabriano hot press watercolour paper but I am trying to ‘use what I have’ so I pulled out the Arches for a change. I like how the texture of the paper adds texture to the front of the house.
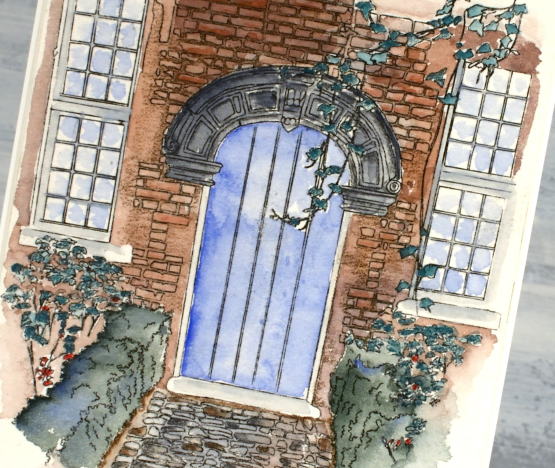
Using my Sennelier watercolour paints I painted a wash of brown over the brickwork, blue over the door and grey for the stonework. I also mixed a bluey green for the hedges. Next I switched to watercolour pencils and added shading to the bricks and stones, coloured the leaves and painted from the tip of my pencils to make the window and door frames grey and the reflections light blue. The sentiment is from Simply Graphic and is stamped in prize ribbon sketch archival ink
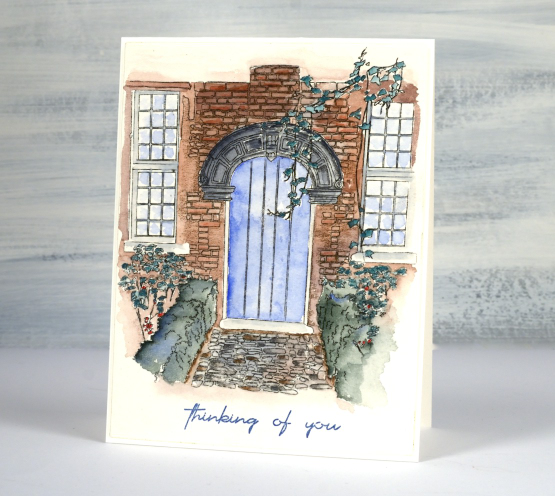
I almost stopped a couple of times as I wasn’t happy with the colours I had chosen and the lack of detail in the washes. I did keep going though and it pulled together. One thing that helps is that I didn’t use too many colours and I like the way the watercolour fades away at the edges. There are little white patches where I didn’t touch up the painting and I think they work too in adding a highlight here and there. I have printed another one out because a red brick house might also be fun to do.
The designer of this stamp is coming over for dinner tonight so I will ask where this door is in real life…
(Compensated affiliate links used when purchasing from Foiled Fox)
Cosy Cup of Cocoa
Posted: January 6, 2023 Filed under: Alcohol Ink, Echidna Studios, framed flowers stencil, gel press, Penny Black, tea set, The Crafter's Workshop, The Crafters Workshop | Tags: Echidna Studios, gel press, gel printing, Penny Black stamps, Ranger Alcohol Ink, Ranger archival inks 6 Comments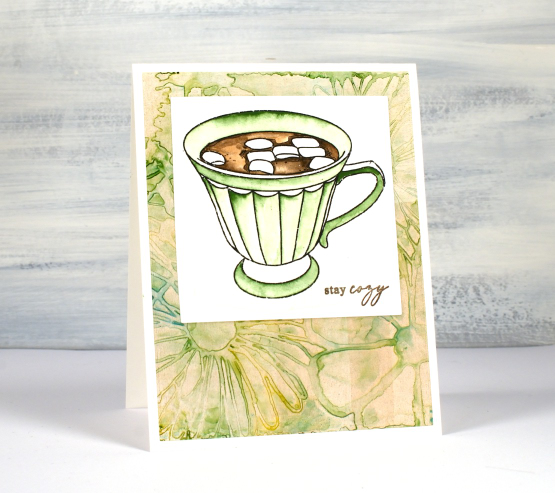
‘Tis the season for sitting by the fire, drinking hot chocolate and staying cosy. Since I last posted we have had snow, rain, ice and more snow! To create today’s card I paired a watercoloured Echidna Studios image with a alcohol ink gel print. I printed the cup from the ‘tea set‘ digital stamp set on hot pressed watercolour paper then painted it with Sennelier watercolour paints.
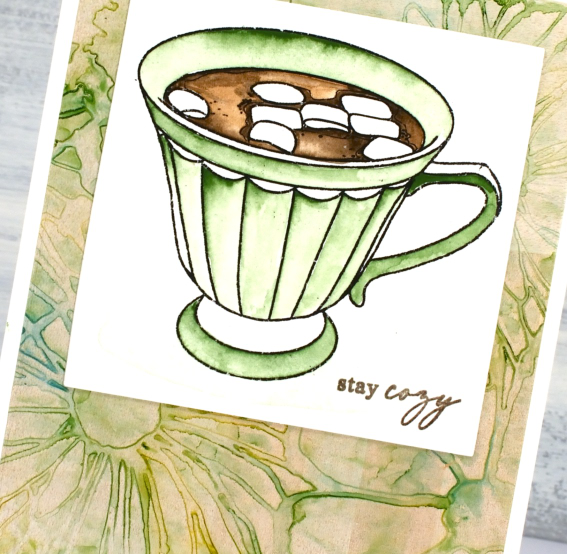
I added a Penny Black sentiment then framed it with a gel printed panel. It may seem like an odd combo of images but I like the way the colours worked together and it looked a little like a floral tablecloth underneath my cup image. I have only recently started using alcohol inks on my gel plate and discovered how the highly pigmented alcohol inks sometimes give me three or four prints from the one design. This pale one was either the second or third print pulled with paint after creating a colourful design on the plate with a stencil.
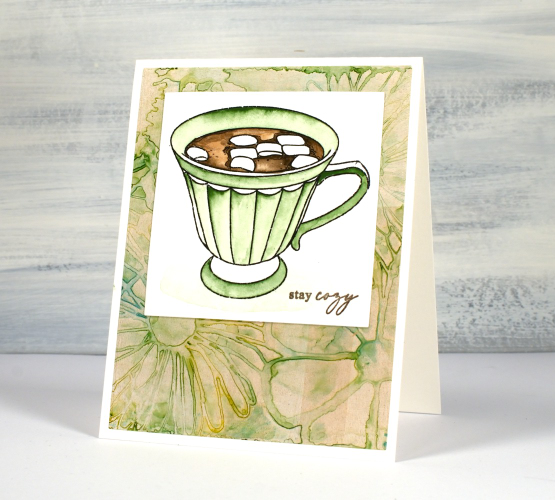
Hope you are staying cosy in the northern hemisphere or refreshed in the south. It is a strange thing to now celebrate my wedding anniversary and birthday in the bleak mid winter even though I was born and married in the height of summer! This weekend my husband and I are celebrating 33 years!
(Compensated affiliate links from Foiled Fox & Scrap n Stamp)

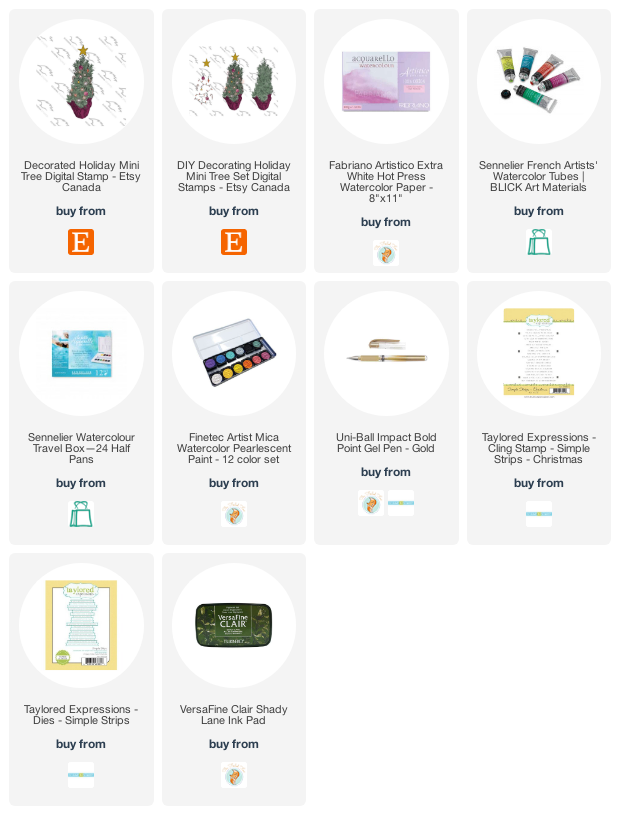
Mini Tree
Posted: December 21, 2022 Filed under: decorated holiday mini tree, Echidna Studios, Finetec paints, sennelier watercolours | Tags: digital stamps, Echidna Studios, Fabriano Watercolour Paper, Finetec artist mica watercolour paint, sennelier watercolours 2 Comments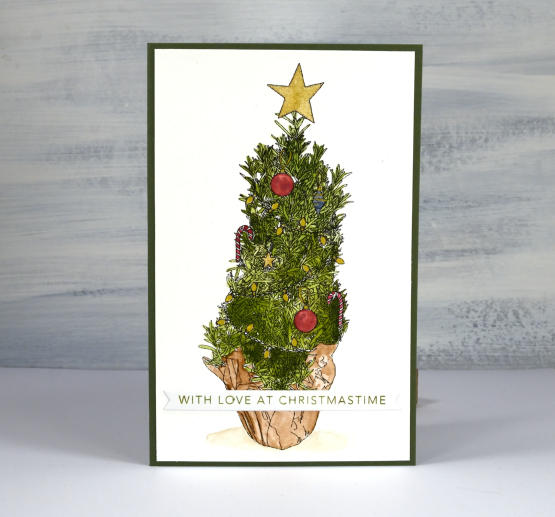
Another festive (digital) beauty from my daughter’s etsy store, Echidna Studios. Do you recognise the inspiration for this little tree? You probably see them in the grocery store; it’s a little pot of rosemary, shaped like a tree. The design is available already decorated or in a set with separate tree and decorations. It is only a few days before Christmas so of course I am featuring the already decorated one!
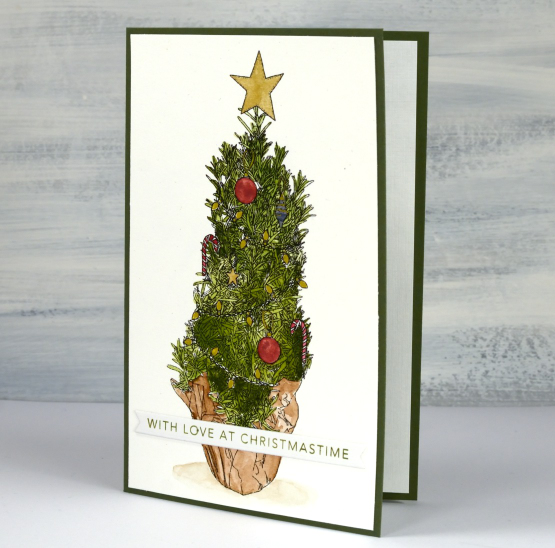
I printed the tree on hot pressed watercolour paper and painted the paper wrapping and tree with Sennelier watercolour paints. Several people asked me about printing on watercolour paper. Up until recently I had no success; I would manually feed it into the printer but the ink would smudge off. A friend told me about the preferences settings when clicking to print and now I choose ‘manual feed’ and ‘heavyweight paper’ and no more smudging!
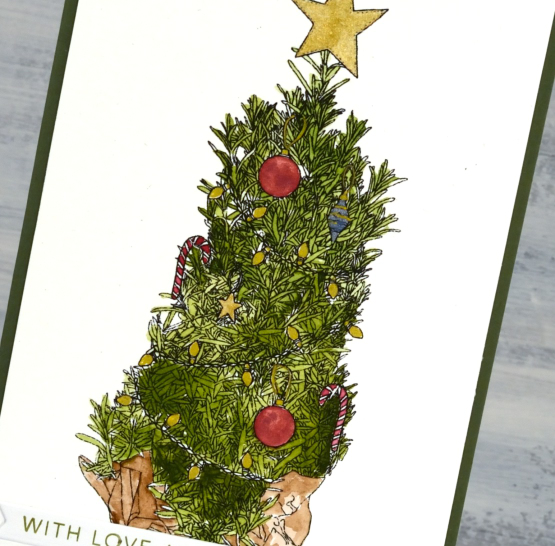
I switched to Finetec pearlescent paints and a gold gel pen to do the decorations so they have a little shimmer and shine to them. I reached into my little box of pre-stamped, pre-cut sentiments and pulled out one to suit the colours and the recipient. It’s a tall skinny tree (a bit like our family) so the card isn’t my usual size. It’s a 6¼” x 4″ olive green card base.

My life size tree is also decorated in red and gold this year. I always pick a slightly different colour scheme so this year all the red baubles came out, the tartan ribbon and the individual decorations in red, gold or wood. Do you change your colours from year to year?
(Compensated affiliate links from Foiled Fox & Scrap n Stamp)
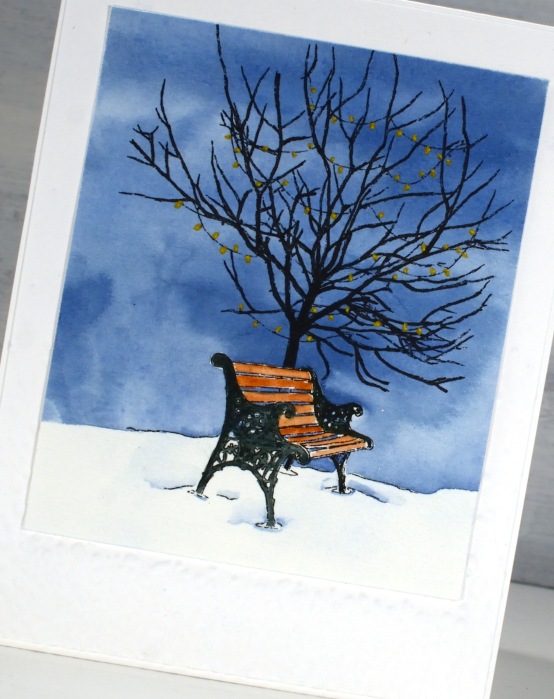
Winter tree
Posted: December 19, 2022 Filed under: Echidna Studios, winter tree & bench | Tags: digital stamps, Echidna Studios, Fabriano Watercolour Paper, sennelier watercolours 15 Comments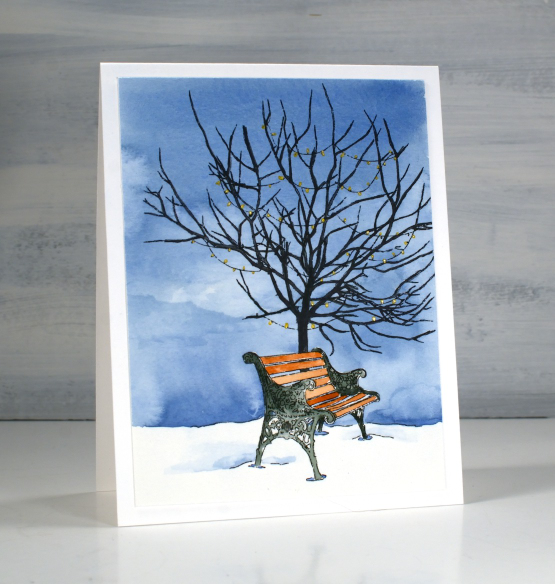
This sweet scene is based on a real tree and a real bench. It’s another design by my daughter and available as a digital stamp in her etsy store, Echidna Studios. I printed it twice on hot pressed watercolour paper. One image almost fills a 4¼” x 5½” card and the other is smaller leaving room to be framed by the snowfall embossed panel.
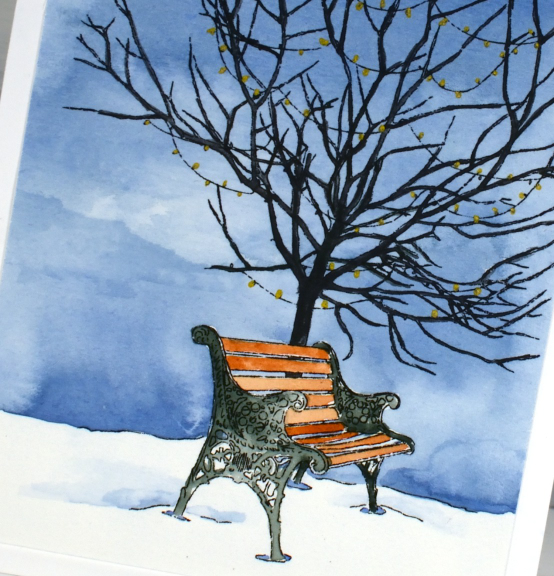
One of the nice things about digital stamps is the way they can be printed any size you want. I used Sennelier watercolour paints to paint the blue sky across the panel working my way around the bench but painting over the top of the tree. Once the sky was dry I painted the bench with brown and grey paint then the tree with black. Some of the branches are quite thin especially on the smaller version so I used a fine tip Pitt pen to colour them.
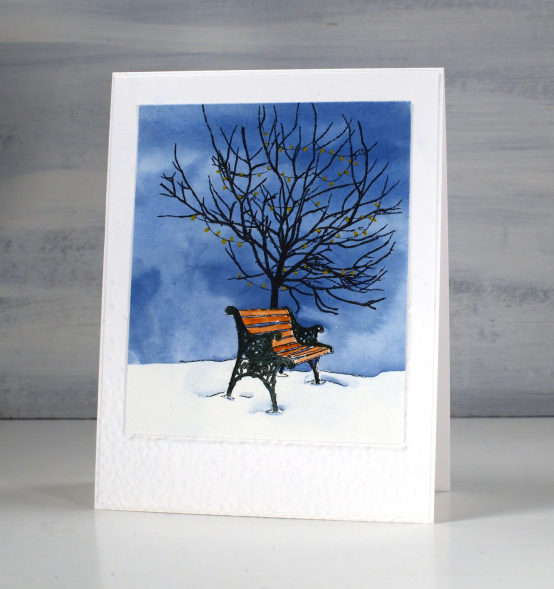
When the painting was all dry I coloured over the lights with a gold gel pen. Now that I have tried the image a couple of times I want to go more slowly and see if I can get those lights to glow a bit more. It is a calm pretty image but if I was trying to reflect the last few days of weather here in Ottawa both tree and bench would be covered in snow!
(Compensated affiliate links from Foiled Fox, Scrap n Stamp)
Stockings from Narnia
Posted: December 16, 2022 Filed under: Christmas stockings digital stamp set, Echidna Studios, sennelier watercolours | Tags: digital stamps, Echidna Studios, sennelier watercolours 8 Comments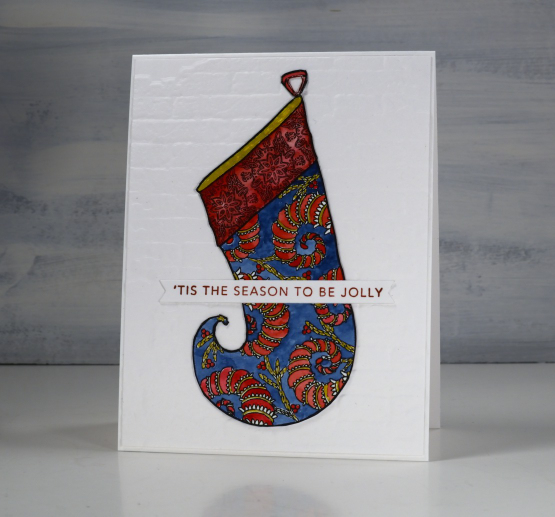
This set is simply called Christmas Stockings, but I definitely think you might see one of these hanging over Mr Tumnus’ fire place or maybe in the Beaver’s lodge. I have watercoloured two of the stockings from the set of three digital stamp my daughter designed and uploaded to her etsy store, Echidna Studios.
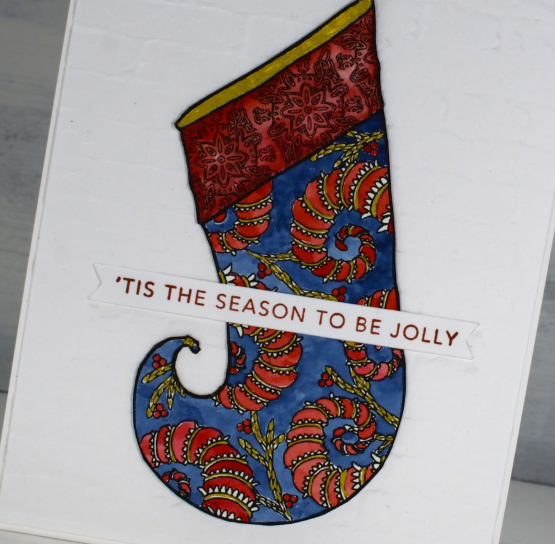
I printed the image on watercolour paper then used Sennelier watercolours paints and a gold gel pen to fill in the design. I took a little more time on the stocking above painting all the curly fronds whereas for the one below I blended a blue and a green paint to fill the patterned stocking.
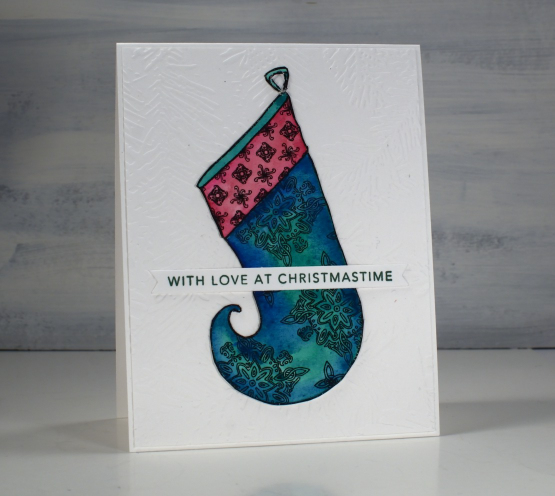
I attached both stockings to embossing folders, one with pine needles, the other bricks. I am very taken with embossing folders at present both for creating backgrounds and for making my own gel printing texture plates.
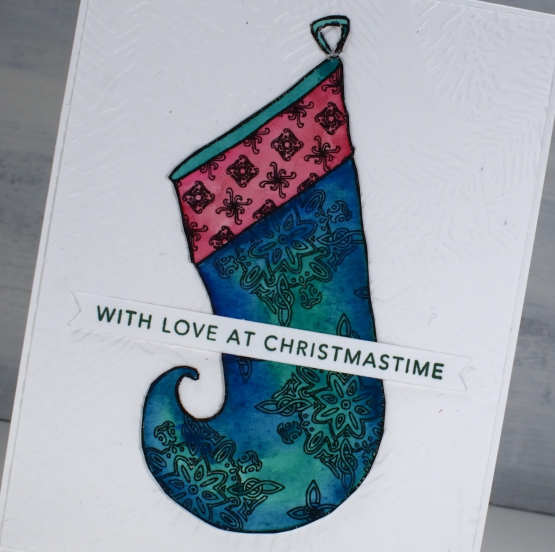
The handy dandy sentiments are from Taylored Expressions. At the beginning of my Christmas card making season I stamped the one stamp of 18 sentiments in a range of colours, cut them with the matching die and kept them in a little box which I have been able to reach into over and over. These two are among my last few Christmas cards but there will be more winter themed cards and Christmas thank you cards to come. My contents of my craft room are still spread around the house but I am making progress putting it back together!
(Compensated affiliate links from Foiled Fox, Scrap n Stamp)

Let’s Skate
Posted: November 22, 2022 Filed under: birds and banners, Brutus Monroe, Dies, Echidna Studios, Foiling, layered Xmas wreath die set, let's skate, Penny Black, silver sketch deco foil, snowflake digital stamp set, stocking stuffers | Tags: Brutus Monroe, brutus monroe embossing powder, digital stamps, Echidna Studios, Foiling, Penny Black creative dies, Penny Black stamps 4 Comments
Don’t let that blog post title trick you. I won’t ever be the one saying, “Let’s Skate”! I will happily say, “Let’s make cute cards with skates on them.” My less than stellar skating experience ended when my children became proficient and I realised I didn’t have to get out on the ice and wobble around any more.

These lovely skate dies are from Penny Black and I was thrilled when I saw them. I have been using them in the Christmas card class I’ve been teaching but decided to make a few vintage looking pairs with various pieced layers. Quite unusual for me to piece layers but I do like how they turned out. On card above I filled them with die-cut foliage.
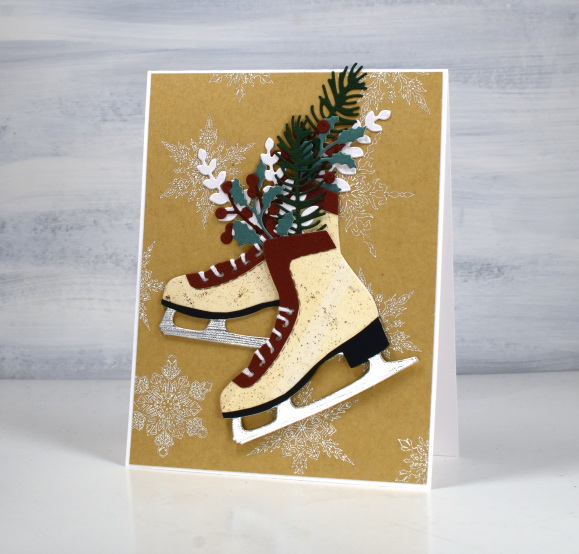
Both pairs of skates are popped up on snowflake backgrounds printed then foiled from my daughter’s snowflake designs available in her Etsy store. I printed the file on kraft paper on my laser printer then foiled in white on the piece above and Brutus Monroe silver foil on the design below.

The vintage style cream colour I used for the boot is a gel print, black cardstock for the heel, silver for the blade and some burgandy for the trim. Fiddly but worth it in the end.
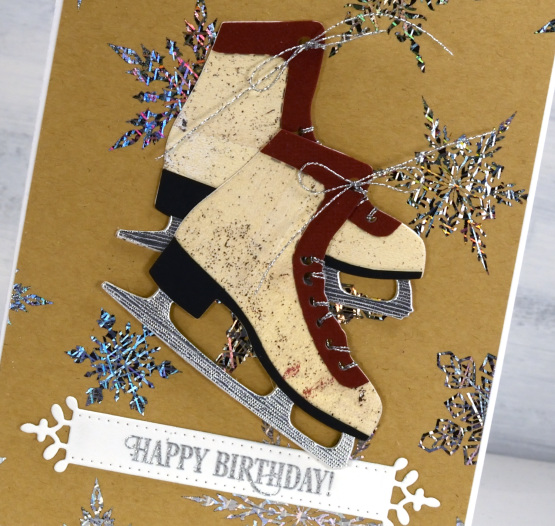
These skates look really cute cut from patterned or collaged paper too. Not cute enough to make me want to skate though!

(Compensated affiliate links from Foiled Fox, Scrap n Stamp & Ecstasy Crafts)

Stay Cosy
Posted: November 16, 2022 Filed under: Dies, Echidna Studios, Foiling, Penny Black, Skis 'n' sled, snowflake digital stamp set, winter wardrobe | Tags: Echidna Studios, Foiling, Penny Black creative dies, Penny Black stamps 5 Comments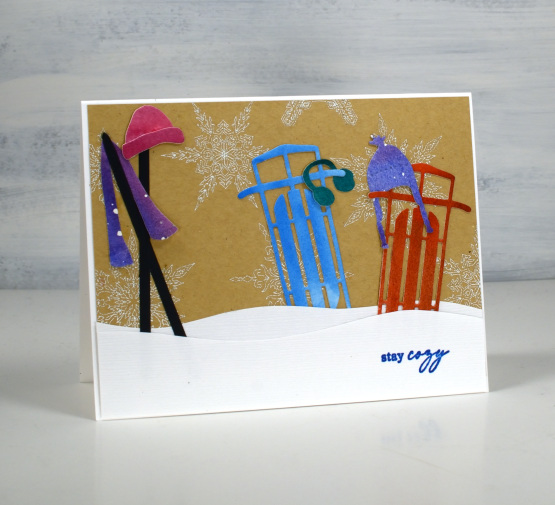
Today is the perfect day for a ‘stay cosy’ message. Overnight the snow started falling and the world is white once more. I guess that lovely long autumn wasn’t going to last forever!
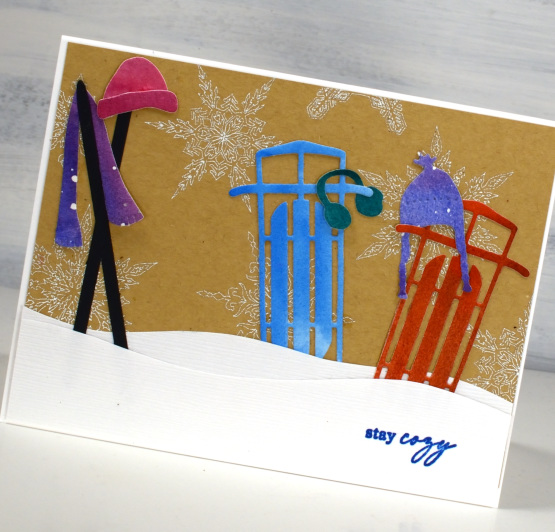
This card came together quite easily as I had some of the elements left over from other projects. The background is made from a digital stamp designed by my daughter (Echidna Studios on Etsy). I printed the snowflakes on kraft paper with my laser printer then foiled with white white foil. I love how delicate and pretty they are.
The sleds, skis and cosy winter clothes were left over from previous years and I had stored them with the dies just in case. They are all cut from painted watercolour paper. I hand cut the snow drifts from linen textured paper and added the sentiment from the PB ‘jolly snippets’ set.
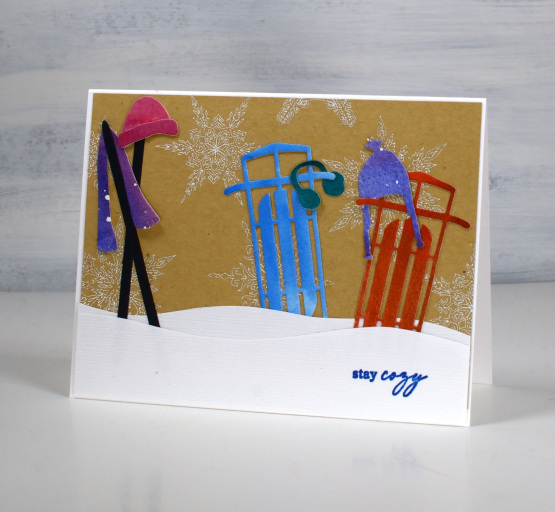
Hope you stay cosy today!
(Compensated affiliate links from Foiled Fox, Scrap n Stamp and Ecstasy Crafts)
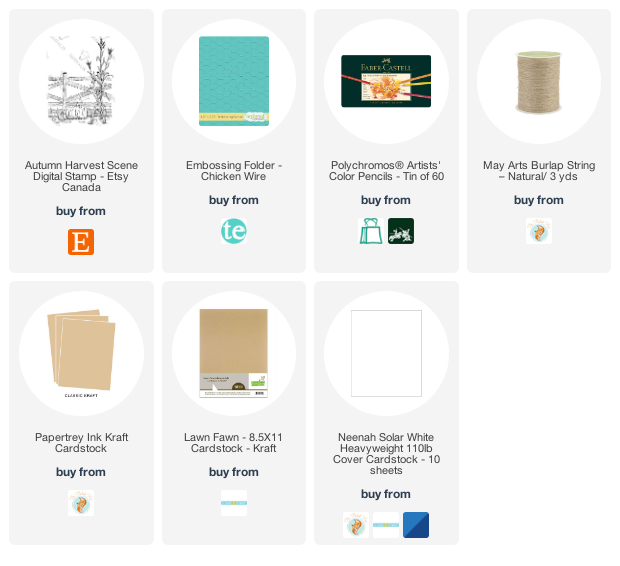
Autumn Harvest Scene
Posted: October 26, 2022 Filed under: autumn harvest scene, chicken wire, Echidna Studios | Tags: Echidna Studios, Faber-Castell Polychromos Colour Pencil, Taylored Expressions 1 Comment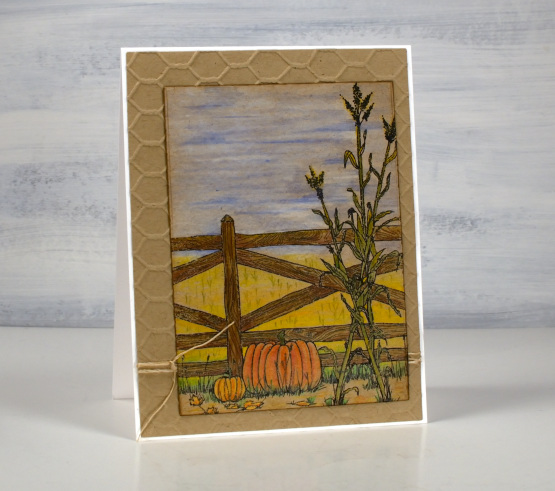
This delightful scene was designed by my daughter and is available as a digital download for cardmaking or other harvest themed crafting or decorating. Her etsy shop is called Digitalis Designs and is launching with a selection of harvest and halloween designs. I have been giving her suggestions for future releases!
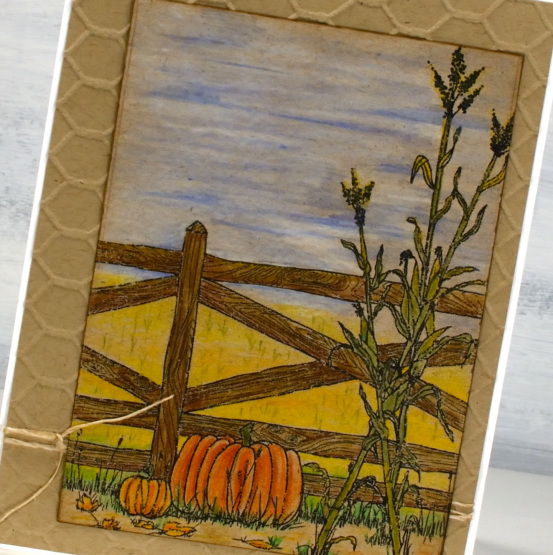
This is the first time I have created with a digital stamp so it’s just the beginning. I printed the ‘autumn harvest scene’ on kraft cardstock then coloured with polychromos pencils. I printed the scene to fit on an A2 card but the beauty of digital stamps is you can print them any size on many things!
I have had the cool chicken wire embossing folder from Taylored Expressions for a while waiting for a suitable time to use it. What could be better than a farm scene?
(Compensated affiliate links from Foiled Fox & Scrap n Stamp)