Wreath & wreath
Posted: December 4, 2019 Filed under: conifer wreath, homespun, Penny Black | Tags: Fabriano Watercolour Paper, Finetec artist mica watercolour paint, Penny Black creative dies, Penny Black stamps, Ranger Distress inks, Ranger Distress stains 4 Comments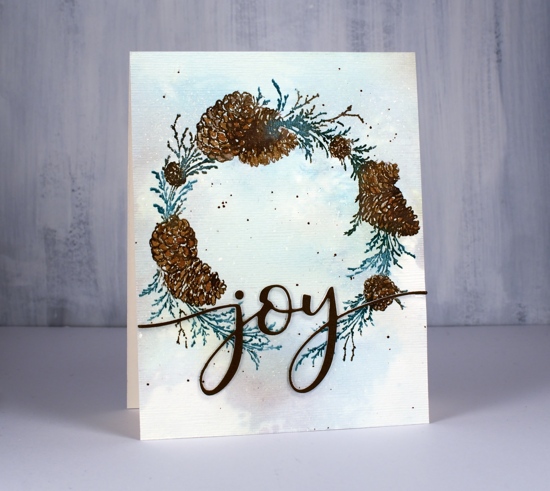
I have two more wreaths to share today; I don’t think I’ve ever made so many wreath cards. This year I did them in a class and I’ve done them here at home more than a few times with little stamps and big stamps. The fact that Penny Black came out with such beautiful wreaths this year kept the inspiration going.
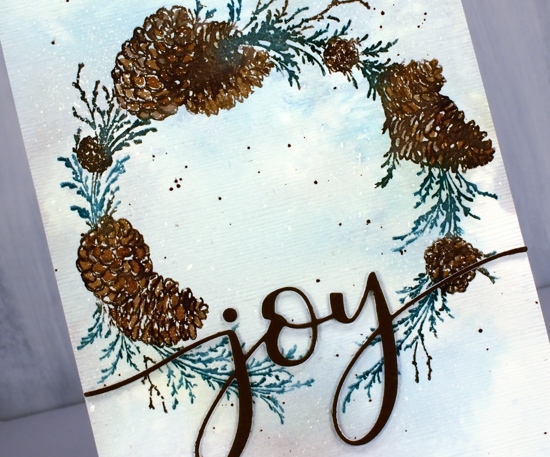
The stamp above is called ‘conifer wreath’ and the stamp below ‘homespun’. I used the same technique for both. Working on hot pressed watercolour paper (psst Foiled Fox has Fabriano in stock now!!) I splattered masking fluid over the paper before I started stamping or painting so I would have dots of snow appear at the end. Once the masking fluid was dry I used my glass mat and spread some pine needles, evergreen bough and gathered twigs distress stain over the mat. I diluted it with water then swiped both panels through the stain to pick up pale green and brown blurry colour.
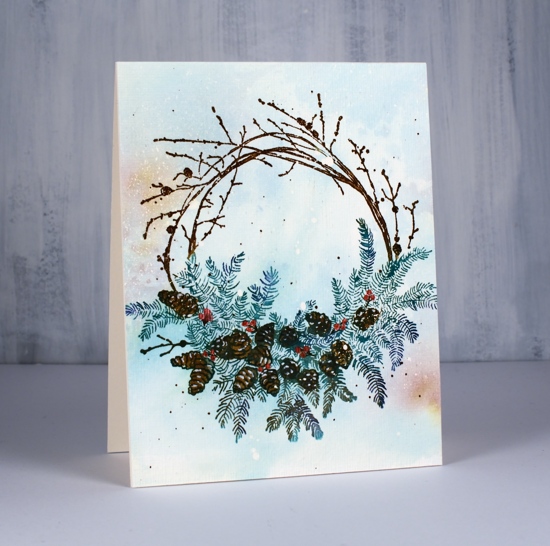
Once the background ink dried I used the stamp positioner to stamp the wreaths colour by colour using pine needles and forest moss distress inks for the foliage, gathered twigs and black soot for the twigs and pine cones and chipped sapphire for some added depth. I drew a few berries on the wreath below with a festive berries marker then painted over them with red from the finetec pearlescent paint set.
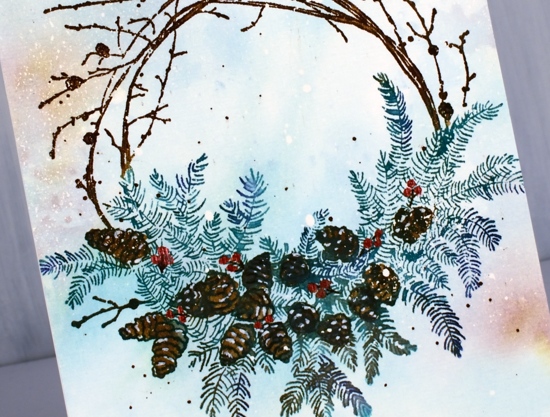
To add a little snow to the pine cones I used a white gel pen then splattered some green and brown ink around the wreaths. Once all the ink was dry I removed the masking fluid then added some texture to the panel with the clever SU embossing folder ‘subtle’.
To add a sentiment to the conifer wreath I die-cut a few ‘joy’ words with the PB die, ‘merry & joy’, stacked them and added them over the bottom of the wreath. Now what I really need to get done is a wreath to hang over my fireplace!
Supplies
Merry Misty Melody
Posted: December 2, 2019 Filed under: misty melody, Papertrey Inks, Penny Black, Wendy Vecchi | Tags: Papertrey ink, Penny Black creative dies, Penny Black stamps, Ranger Distress inks 6 Comments
I am thrilled to be over on the Foiled Fox blog again, sharing these sweet little birds. They are from a new Penny Black set, ‘Misty Melody’ and I’ve paired them with one word from the PB ‘…bright’ die for a wintry scene. By the way there happens to be a 15% discount sale happening until the end of Dec 2 so now is a good time to visit.

I worked on hot pressed watercolour paper as I planned to do a bit of blending on the birds. I made a mask for the birds on the branch by stamping it on some masking paper and cutting it out. For someone who dislikes fussy cutting I seem to have warmed to it a little. With the stamp in my positioner I stamped the birds on branch stamp on the watercolor paper in smokey gray versafine ink and on masking paper.
I chose the Papertrey ink cubes that I have been using over and over to stamp little wreaths and foliage patterns. To watercolour with them I squished dark chocolate, Americana and scarlet jewel onto the glass mat where I could add a drop of water and pick up colour with a paintbrush. I found an image of a European Robin as my guide and painted the breast with the two red inks, the Americana was too brown, the scarlet jewel too pink but the mix was ideal. For the wings and tales I used a mix of Americana and dark chocolate and the rest of the body I painted with distress hickory smoke. I went over the beak and eyes with a black micron pen and then painted the branches in a mix of dark chocolate and black soot. Once that dried I went over the birds’ feet with the micron pen.
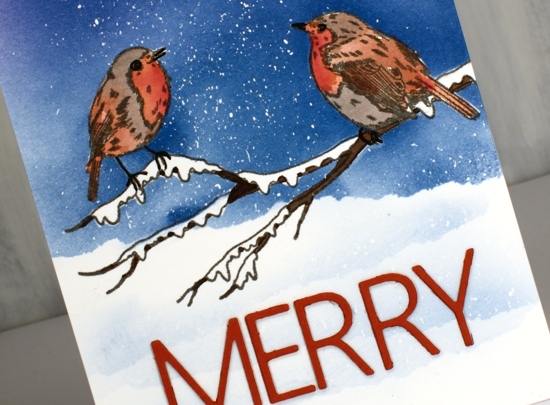
With all the bird and branch painting done I had to decide whether to paint the background sky or blend it with blending brushes or sponges. As I had the mask ready to go I chose blending brushes and positioned the mask to protect the painted birds and branch. I splattered masking fluid over the whole panel and let it dry. To create snow banks in the foreground I tore the edge off a piece of post-it note to mask just under the birds.
I stuck with the Papertrey ink cubes for the blended sky using mainly ‘blueberry sky’ and a bit of ‘royal velvet’. As I blended over the masking fluid I could see I was going to have a nice snowy sky. Once the sky color was a deep blue I repositioned the torn mask lower down three more times and blended over it for a soft ‘snowbank’ look. I didn’t have to pick up more ink as there was plenty still on the bristles of the blending brush.
Once all my painting and blending was complete I removed the masking fluid gently by rubbing it with my fingers; it is always very satisfying to see the snowy sky appear. To finish the card I cut two layers of the word MERRY from red cardstock backed with stick-it adhesive sheet and stuck them over the snowbanks. As you can see the letters come out of the die individually, I used the negative piece of cardstock and my magnetic ‘staytion’ and ruler to position them all correctly.

Thank you for dropping by today, all the supplies I used are linked below. I will be back here and on the Foiled Fox blog very soon.
Supplies
That Joy, Joy, Joy, Joy
Posted: November 18, 2019 Filed under: floral Christmas, framing florals Christmas, Ink to Paper, season of joy dies, season of joy stamps | Tags: Ink to Paper, One-Layer cards, Ranger Distress inks 5 Comments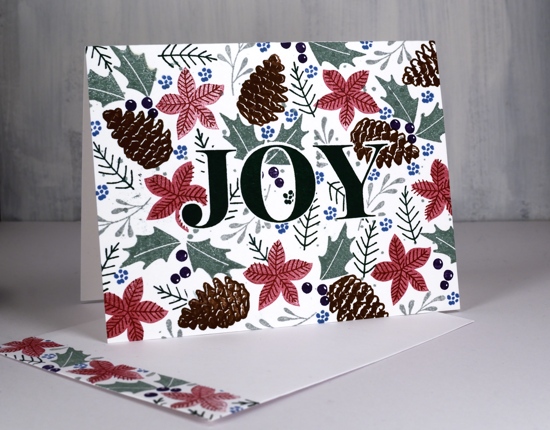
If you went to Sunday School when I did you will probably know which song my title alludes to. Maybe you even sang the tongue twister verse as well! You will probably recognise some of these stamps from two posts I did last week. I can’t seem to leave them alone. For someone who usually doesn’t do much with the little bitty stamps I have certainly taken to these ones.
Today’s cards are once again one layer cards although they almost weren’t right at the end! I often say at my classes that I make the mistakes so you don’t have to! Should I have stamped the word Joy on both cards before I did anything else? Yes! But instead of doing that I die-cut masks of the letters using dies from the Ink to Paper ‘Season of Joy’ co-ordinating die set. I centred the masks on my card bases carefully with the help of my ‘stay-tion‘ magnetic board and then I stamped all over them.
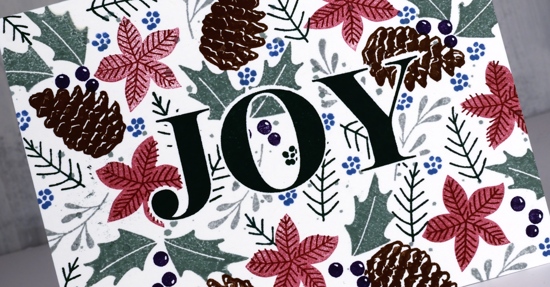
When creating a busy all over pattern it is important to stamp your elements in order of size, big ones like pinecones first and little ones like stars last. I failed to recognise that the letter stamps from the Ink to Paper ‘Season of Joy’ stamp set were the biggest elements of all. It still worked because I had my masks in place but lining up the letters inside the masked area at the end was a wee bit tricky. (Yay stamp positioner!) If I had stamped the letters then covered them with masks I would have had the same effect without the trickiness! Now you know, just in case you might try this fun exercise yourself.
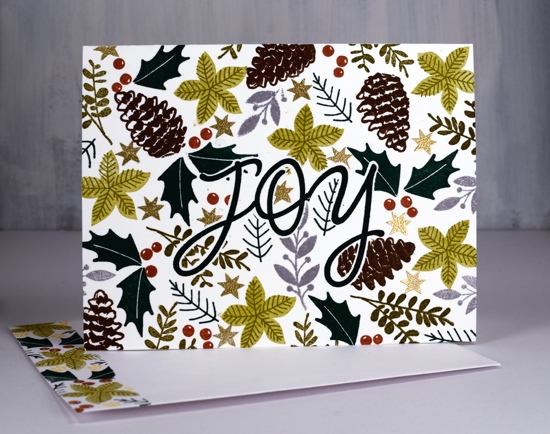
It really is fun working with all the little foliage stamps from the ‘floral Christmas’ and ‘framing floral Christmas’ sets from Ink to Paper. I have now used them for wreaths, bands, circles, hanging swags and these ‘all over’ designs. Once again I used the Papertrey ink cubes along with a few distress inks and versamark just for the gold embossed stars.
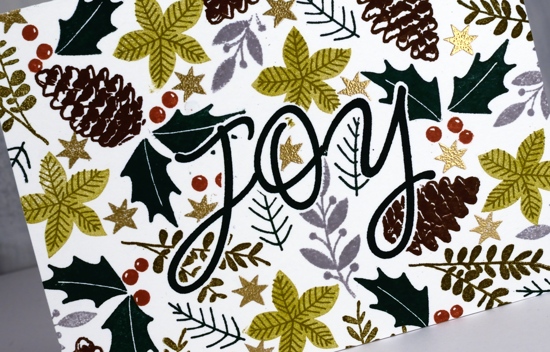
I guess you can see I am sticking to my resolution of stamping envelopes at the same time as cards. These ones are ready to be packaged for this weekend’s ‘WALL CANDY Art Expo‘ in Ottawa. If you are in the area please come to Aberdeen Pavilion at Landsdowne and visit Liane and me at the Paper Duet booth. The Expo will be full of amazing art so you might get a little Christmas shopping done.
Of course if you are shopping for yourself you can find all the links below. Thanks for dropping by.
Supplies

Time for tea
Posted: November 6, 2019 Filed under: Cup of tea, Tagged, teacups | Tags: Darkroom Door stamps, Penny Black creative dies, Ranger Distress inks 10 Comments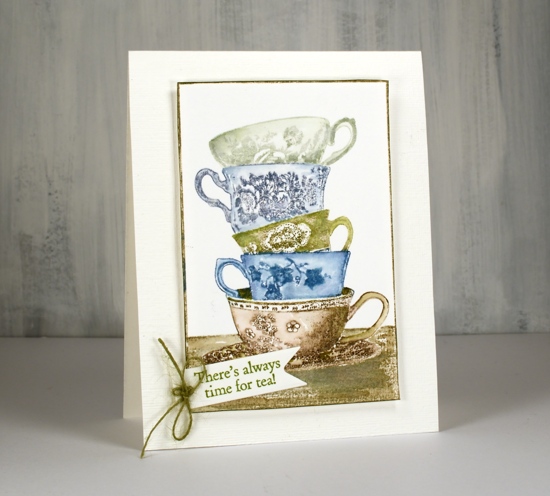
I love this little stack of teacups from Darkroom Door. I have some pretty teacups that belonged to my Nanna, some from my Grandma and some from my mother. I don’t often use them because I like a much bigger cup of tea but I love having them. There are intricate details on the cups on this stamp but I have chosen not to colour the patterns individually, instead colouring each cup a different colour. I kept my colour scheme muted sticking with inks I have been using to stamp forests and trees lately.
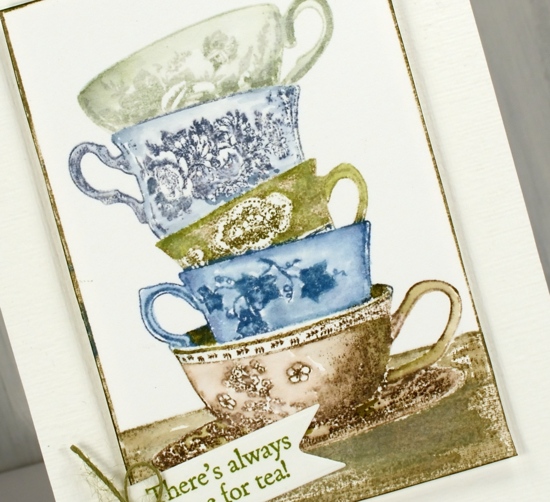
I used a stamp positioner so I could ink one cup at a time. I kept a wet cloth handy to wipe off any ink that ended up on the adjacent cups. after stamping I blended the stamping with a damp brush to gently spread ink into the cup but not dilute the pretty patterns.
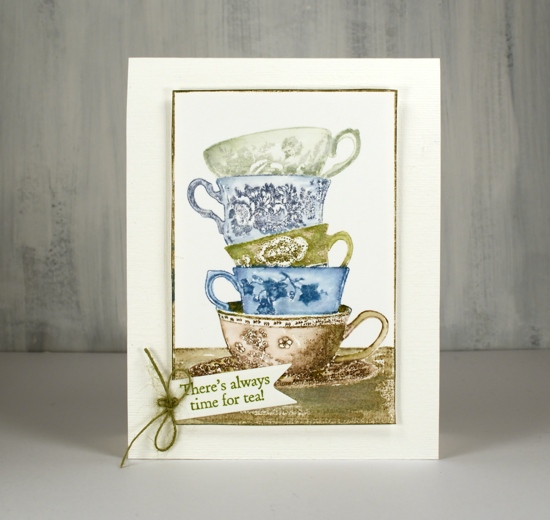
The stamp has its own frame so I trimmed with scissors right next to the frame and ran a peeled paint marker along the edge to make sure it was all inked. I chose my sentiment from another DD tea themed set, ‘Cup of tea” and cut it out with a PB tag die. I had hemp twine which exactly matched so I added a little bow to the tag. The stamped panel is popped up on adhesive backed foam on a textured cardbase.
Hope you have time for tea today, unless of course you are all about the coffee, but that’s a card for another day!
Supplies
Snowy flight
Posted: November 4, 2019 Filed under: plaid, snowy flight | Tags: Concord & 9th, My Favorite Things, Penny Black stamps, Ranger Distress inks 10 Comments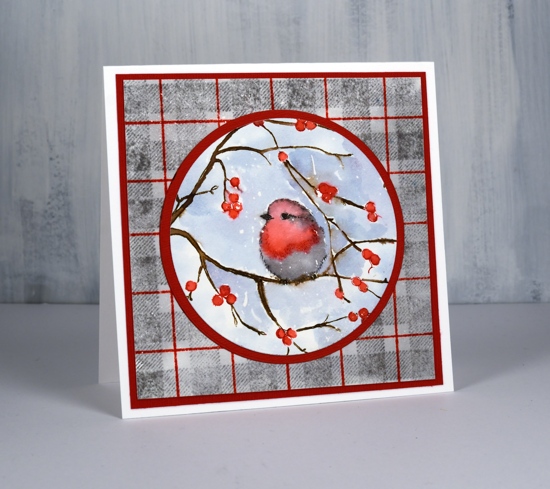
This sweet little bird shivering on a branch is called ‘snowy flight’, it’s a recent stamp from Penny Black. I started by painting and stamping the whole stamp on a larger panel but ended up zooming in with a circle die. I have framed it with a tartan or plaid panel stamped with Concord & 9th’s ‘plaid’ stamp set. I was in two minds about the patterned framing but I like how warm and cozy the plaid looks, a bit of a contrast to the little bird I’m afraid!
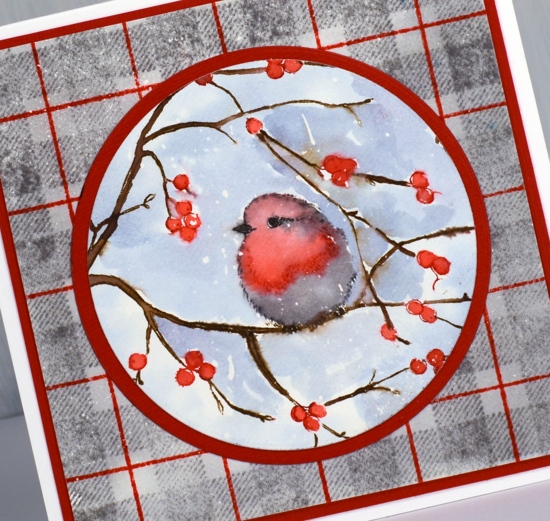
Both the bird and the plaid I stamped on hot pressed watercolour paper that I had splattered with masking fluid earlier. Before stamping the bird I splashed and splotched some diluted ‘chipped sapphire’ distress ink over the panel to create a bit of sky. I added more at the end when I had finished painting the bird, branches and berries. I kept the stamp and panel in the stamp positioner so I could ink the stamp with distress markers, stamp it then blend with a paintbrush. The branches are ground espresso or gathered twigs, the berries and bird’s breast are ‘festive berries’ and the rest of the bird is hickory smoke and black soot.
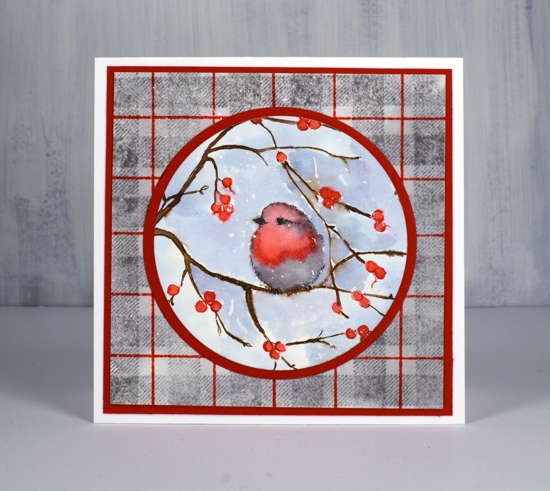
To create the plaid background (does anybody else call it ‘tartan’?) I stamped the large stamp in hickory smoke ink then blended over it with water to soften the look and cover any white areas. Once that was dry I added the red lines with festive berries ink. I definitely did this one in the stamp positioner so I could move the panel and keep the line stamp in one place. Removing the masking fluid is always very satisfying, it revealed tiny white flecks on the plaid and bigger ‘snowflakes’ on the bird panel.
Thank you for dropping by today, you will find all the supplies linked below and if you look closely you will see I provide two options for some products. If you purchase through my links to either the Foiled Fox in the US or Scrap n Stamp in Canada I receive a commission at no extra cost to you. Thank you for supporting my creative endeavours in this way.
Supplies
Holiday Traditions – Christmas Carols
Posted: November 1, 2019 Filed under: Ink to Paper, Peaceful forest stamps, season of joy dies, season of joy stamps | Tags: Ink to Paper, Ranger Distress inks, WOW embossing powders 31 Comments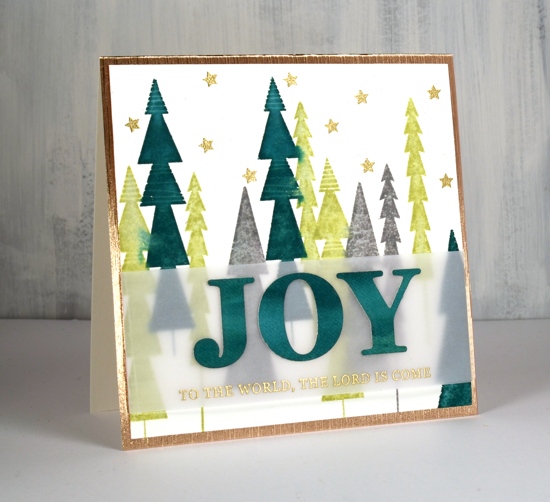
I am excited to tell you about another holiday tradition today. I have teamed up with the Foiled Fox to host a giveaway. All you need to do is leave a comment here on my blog or over on the Foiled Fox telling us about one of your holiday traditions. Do you do the ugly Christmas sweater thing or perhaps decorate your tree with vintage ornaments, do you head to the beach or the mountains or light the fire and cozy up at home? We would love to know!

Thank you again to those of you who have shared holiday traditions in the comments. Not surprisingly food was mentioned quite a few times. Another tradition that came up a more than once was carol singing and that’s what I’m going to share today. If you haven’t left a comment on my blog or the Foiled Fox blog yet please do, we would love to hear from you. Make sure you pop over to the Foiled Fox to read about Shauna’s sweet stocking tradition and see her lovely card.

Here in Canada we have a couple of carol singing traditions. Every December two or three days before Christmas there is carol singing in the park at the end of our street. If we already have snow and cold temperatures then we might be standing on the ice rink with a fire off to the side. On Christmas Eve we go to the carol service at our church, always ending with Silent Night during which we light individual candles.
Carols by candlelight in Australia is very different. Major cities like Sydney and Melbourne have a big event at a large outdoor concert venue with celebrities and all the bells and whistles. Thousands of people bring picnics and blankets and enjoy the concert and carols from early evening until after sunset when everyone lights candles if there isn’t a fire ban! I attended the big event occasionally, more often I attended a local ‘carols by candlelight’ with our church in a nearby park.
Today’s card features a sentiment from one of my favourite carols. I used the Ink to Paper ‘peaceful forest’ stamp set and stamped on hot pressed watercolour paper so I could blend the ink after stamping. I used distress pine needles, shabby shutters and hickory smoke inks, overlapping the trees so there would be some little bleeds from green to green to grey here and there.
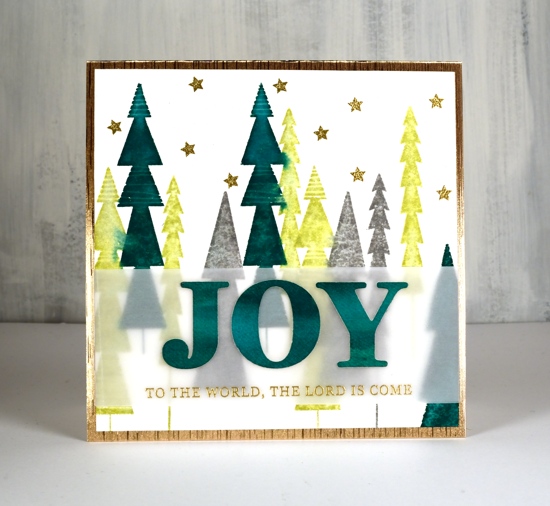
I wanted the die-cut letters to match the trees exactly so I swiped ink across a scrap of watercolour paper then blended it with a wet brush. Once dry I used the ‘season of joy’ dies to cut the word and a stamp from the ‘season of joy’ stamp set to complete the first line of the carol. I used two layers of vellum so the letters and embossed words would stand out from the busy background. I added gold embossed stars and created a textured gold card base from Tonic cinnamon silk specialty cardstock.
Do you have a favourite carol? I have had a few over the years, Joy to the World, O Holy Night and my current fave, In the Bleak Mid-winter.
Supplies
Snow Blanket
Posted: October 31, 2019 Filed under: Penny Black, snow blanket, Stamped Landscapes | Tags: Penny Black stamps, Ranger Distress inks, Ranger Distress stains 12 Comments![]()
This peaceful scene from Penny Black is called snow blanket and such scenery will be welcome in a month and a half but right now my back yard could aptly be named leaf blanket! I mowed less than a quarter of the leaves yesterday before the rain set in. The leaves have been incredibly vibrant this year; every where I’ve turned has been a treat for the eyes.
![]()
As you can imagine the stamp positioner was my friend for this scene, I worked on the tree first, then the fence and finally the background trees. I inked only the large tree to start with; I used a versafine clair nocturne ink for the centre and finished off the extremities with an embossing marker. I embossed in black powder then put the panel back in the corner of the stamp positioner so it would line up again for the rest of the inking. I stamped the whole scene with stormy sky ink so I could see all the elements and add colours over the top. With the tree complete it was time to add a mask for the moon; I used frisket film which is waterproof then I painted the whole sky in stormy sky, weathered wood and chipped sapphire distress stains. Once that was dry I used ground espresso and black soot distress markers to stamp the fence and the same colour inks on my glass mat to paint over the stamping to get solid coverage and blended colour. Painting blue shadows over the snow was a little tricky but the stamped image has lines to show piles of snow on the fence so I used them as my guide and left the snow untouched. Finally I stamped the background trees in forest moss ink.
![]()
I decided against a sentiment but can add one on the inside if needed. I’ll be back tomorrow to chat about another Christmas tradition. Thanks for dropping by.
Supplies
Holiday Traditions – Gingerbread
Posted: October 25, 2019 Filed under: cozy nights, Frosty's flakes, warm reception | Tags: Penny Black stamps, Ranger Distress inks, WOW embossing powders 30 Comments
Here in Canada Thanksgiving is behind us but in the US it is about a month away; Christmas is exactly two months away! With that in mind Shauna, from the Foiled Fox, and I have teamed up to host a ‘Holiday Traditions’ giveaway.
Like me you probably have some Thanksgiving or Christmas traditions, perhaps they were handed down to you or maybe something new you have recently come up with. Either way, we want to hear about them. For the next two weeks you can comment on a holiday tradition post on my blog or the Foiled Fox blog and be entered into a giveaway.

If you haven’t guessed already the first tradition I want to share with you is my gingerbread making tradition. We have been making gingerbread for years. It was not my mother’s Christmas baking tradition, she made yoyos (melting moments), Christmas cake and forcer biscuits (pressed butter cookies). I started making gingerbread when I lived in Australia and the recipe I use is from an Australian chef, Jill Dupleix. Now that we have three people in the family eating gluten free I make gf batches too, usually with a packet mix. I used to mix a gf gingerbread dough but the packet one saves me so much time which I can spend decorating instead. Decorating is the best part, well maybe equal best with eating!

We make stars, hearts, trees, snowflakes, bells, gingerbread men, women and children but we also have a a set of Aussie animal cutters and, would you believe, a ‘gingerdead man’ which cuts out the person shape and then stamps a skeleton impression on the cookie! We have also made gingerbread houses and other structures over the years. If you click over to my other blog you can see gingerbread houses, a church and a tank from years gone by.
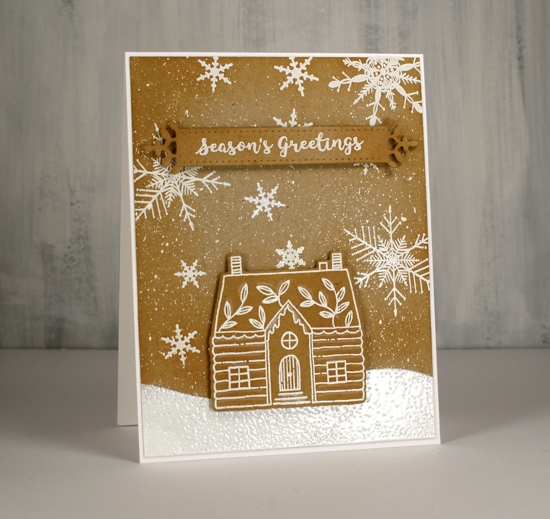
Making gingerbread cards was a bit quicker than the edible version. I used Neenah desert storm kraft cardstock and stamped on it in versamark then embossed with bright white opaque embossing powder. To create the snowy hill I cut a post-it note mask and sponged white delicata ink in a hill shape. The delicata was too delicate, not bold enough for a snow hill so I embossed with more white embossing powder.

After completing all the stamping and embossing I blended tea dye distress ink around the edges of the panels to give everything a nice baked not burnt look. Believe me I have burnt plenty of batches over the years!

The last step was a sprinkling of icing sugar aka splatter of white gesso to complete the snowy look. All the stamps are from Penny Black and are linked below along with the other supplies.
Now it’s your turn. I would love to hear about some of your holiday traditions. What do you do for Thanksgiving or Christmas? It doesn’t have to be something you make; it could be a place you visit, a story you read, songs you sing, food you eat. Let me know in the comments and you’ll be entered in the giveaway. Make sure you visit the Foiled Fox blog also as there will be holiday tradition posts on both of our blogs during the next two weeks.
Supplies
Forests
Posted: October 24, 2019 Filed under: fragile branches, Stamped Landscapes, Winter tree | Tags: Penny Black stamps, Ranger Distress inks, Tsukineko Memento inks 21 Comments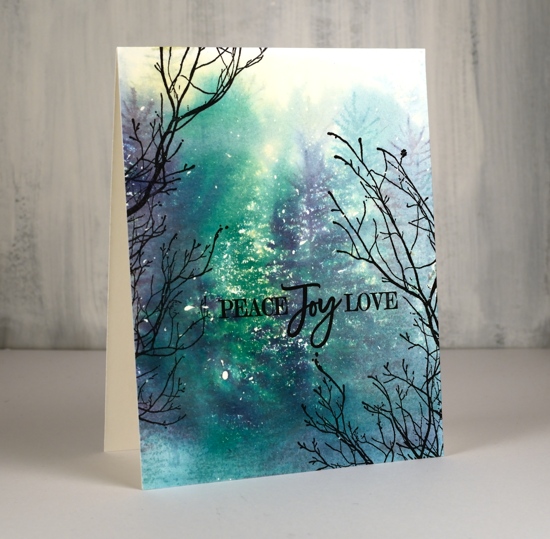
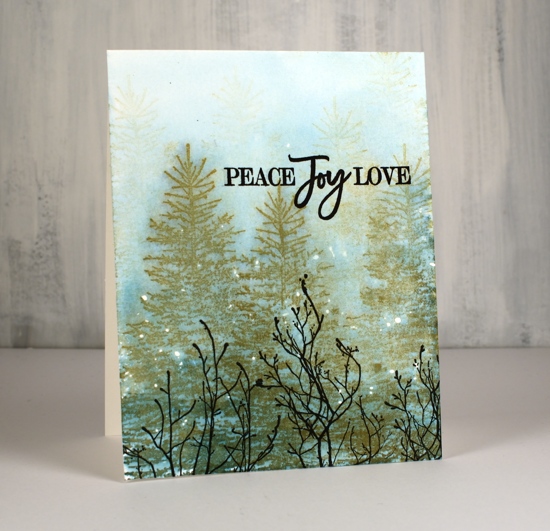
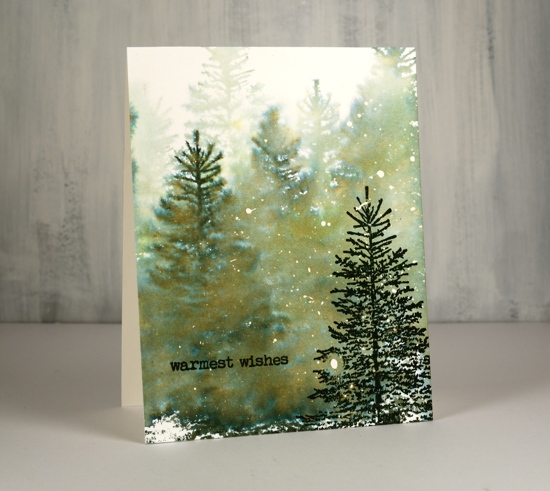
If you are new around here you might not know that I love tree stamps, tree scenes and wintry tree scenes in particular. ‘You can never have too many tree stamps’ are words I live by! So it will come as no surprise to see four different but similar tree cards today. All four are on hot pressed watercolour paper and all had masking fluid splattered on the panels before I began.
To create these first two cards I used the same method, stamping first, spritzing with water second. I stamped the PB ‘winter tree’ stamp in chipped saphpire, shabby shutters and pine needles distress inks then spritzed water generously over the panel so the colours bled into each other. Any where the ink and water was pooling too much I dabbed away with a paper towel. Once the panel was dry I stamped PB fragile branches around the edges to so it appeared that we were looking through to a clearing.
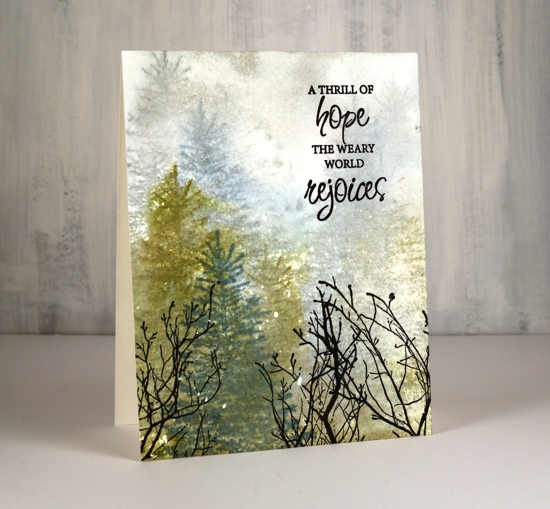
I used the same method for this card but used iced spruce, stormy sky and forest moss distress ink before spritzing with water. After the panel had dried a little but not totally I stamped a foreground tree in forest moss (or maybe a different ink, I’m not sure). After the panel was completely dry I added the fragile branches in black archival ink and in a stamp positioner so I could stamp a few times for a bold impression.
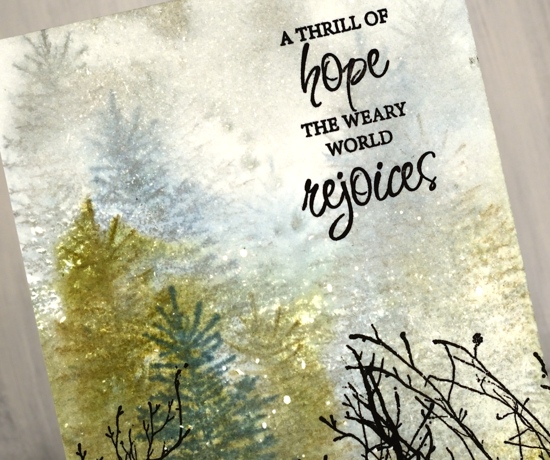
For these last two cards I used the same stamps but switched to a magic ink! Yes, it’s truly a magic ink; on the two cards below I used only one ink (other than the black for sentiment and fragile branches.) The dark green, pale blue, olive green and brown tones all come from the magic ‘northern pine’ memento ink from Tsukineko.
On the panel above I stamped the trees repeatedly in northern pine getting first, second and third generation images then I spritzed the panel so the ink would separate and bleed into the rest of the panel.

On the panel below I wet the panel first and then stamped the trees in northern pine memento ink. The result is blurrier images but beautiful blends of green, brown and blue.
Once the panel above was dry I stamped the tree again in northern pine ink in the right hand corner. One ink, one magic ink!
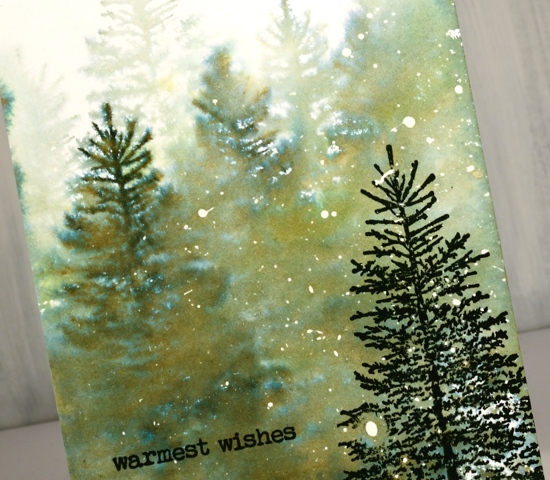
Once all the panels were totally dry I rubbed off the masking fluid to reveal the snow falling, you can use your fingers or an adhesive eraser. I added the sentiments from PB sets (linked below) in black archival ink.
Thanks for dropping by; make sure you come back tomorrow to see what the Foiled Fox and I have dreamed up for you.
Supplies
Ruby Trill
Posted: October 18, 2019 Filed under: ruby trill | Tags: Penny Black stamps, Ranger Distress inks, Ranger Distress stains 11 Comments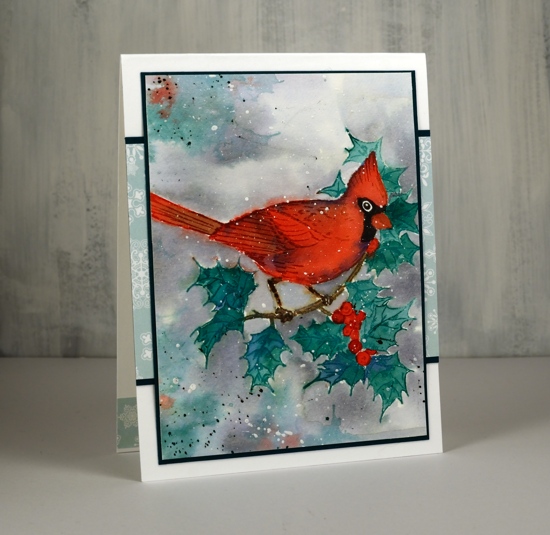
Let me introduce you to ‘ruby trill’ a cardinal stamp from PB; isn’t he a beauty? I wasn’t sure about my colour choices when I started painting these holly leaves but by the time I had finished the whole panel everything seemed to work together. I kept my colour range small as I often do. First I stamped the bird and branch with antique linen so I could do some no-line watercolour. Before painting I stamped some of the leaves with pine needles distress ink so that I could blend the green ink with water as well as add extra if needed. I worked one leaf at a time and also dropped in some blueprint sketch ink for added depth. This is where I doubted my choice; the blueprint sketch looked too blue and I wondered if I should start again. I decided to keep going and painted the berries in candy apple distress ink and the branch in gathered twigs.
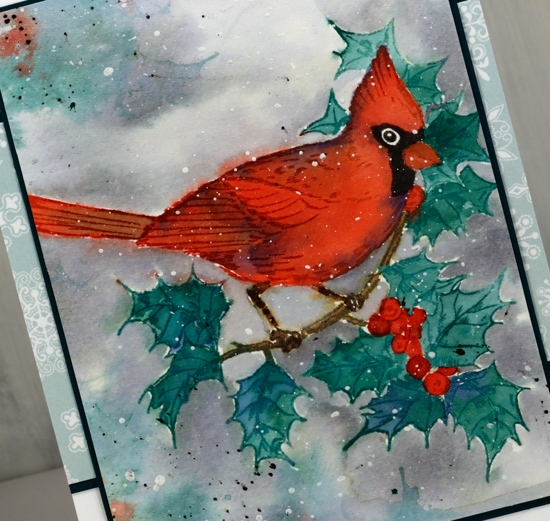
It wasn’t until I started painting the cardinal that the colours looked like they would work. I used the same candy apple distress ink to paint the cardinal but added shadows with the blueprint sketch and the gathered twigs inks. I know I keep saying this but the limited palette really does work! I added the brown on the tail and behind the wing and blue along the back and crest. As I had kept the stamp and watercolour panel in the stamp positioner I was able to ink the black area around the eye and stamp it before blending it with water and extra ink.
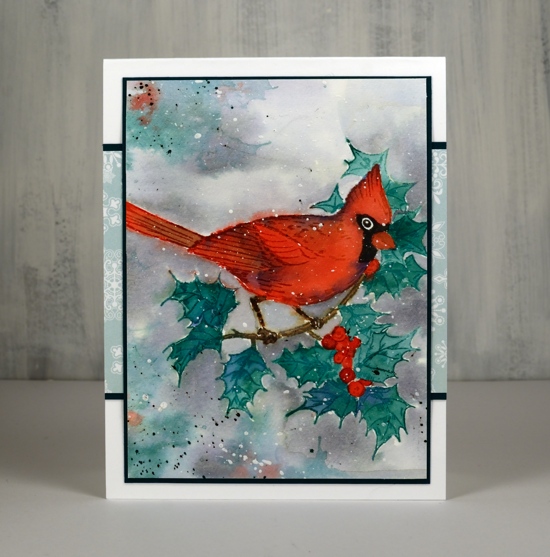
I had reference photos of cardinals on hand to check the colour of the legs and beak. Once all the painting had dried I re-stamped the body of the cardinal in candied apple to darken the details on the back and wings. At this point I had to decide whether I was adding a background or not. In the past I’ve ruined several focal images by adding a background around them. I decided I wanted a grey snowy look so I painted around holly with water and dropped in weathered wood distress stain as I went along. It was fiddly getting in and around the legs and leaves but it’s a loose cloudy look so no fussing about precision. While the background was still wet I inked just a few holly leaves and berries and pressed them onto the wet panel in a few places to look soft and shadowy. I dried everything before splattering some white paint over the whole panel and some black soot in the corners. Even though the mats look black in the photo they are actually teal and the little patterned strip behind is a PB snowflake paper in just the right grey/green colour.
Supplies