Pile of Watercolour Possibilities
Posted: February 27, 2025 Filed under: Classes, Hand painted, sennelier watercolours, Watercolour | Tags: Canson watercolour paper, Classes, Fabriano Watercolour Paper, Kuretake Gansai Tambi watercolour paints, sennelier watercolours 7 Comments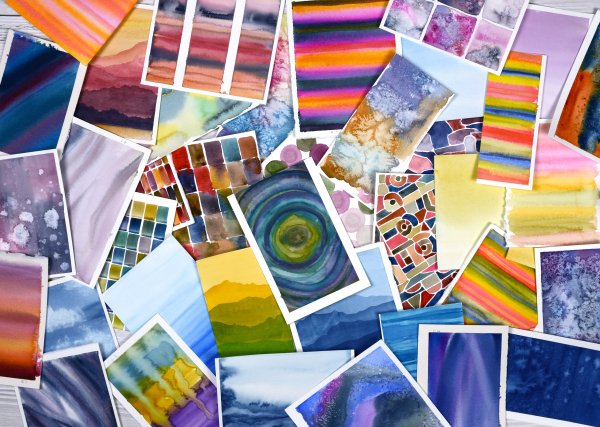
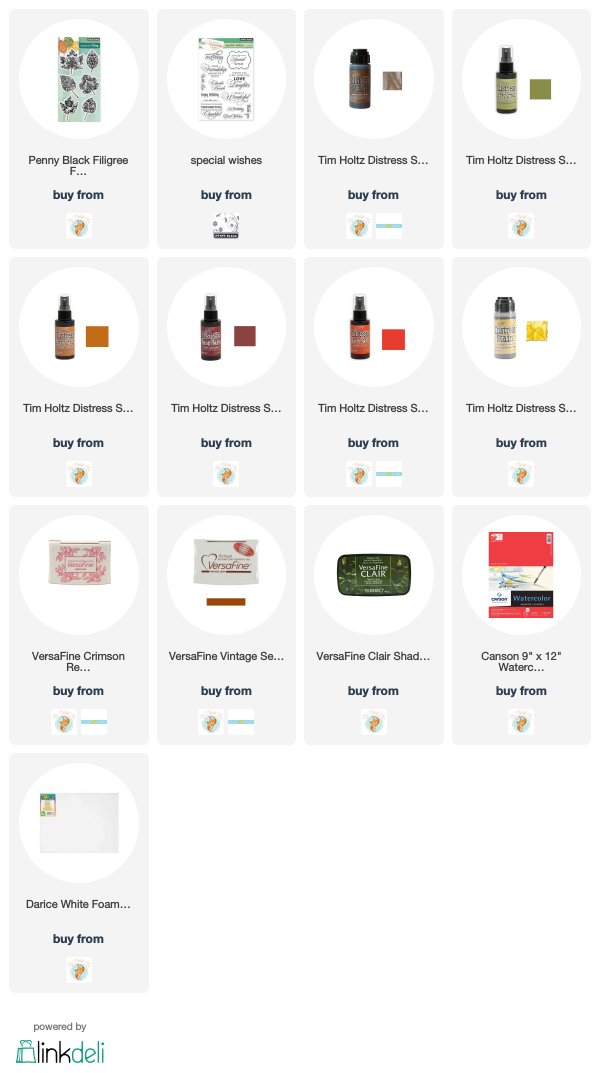
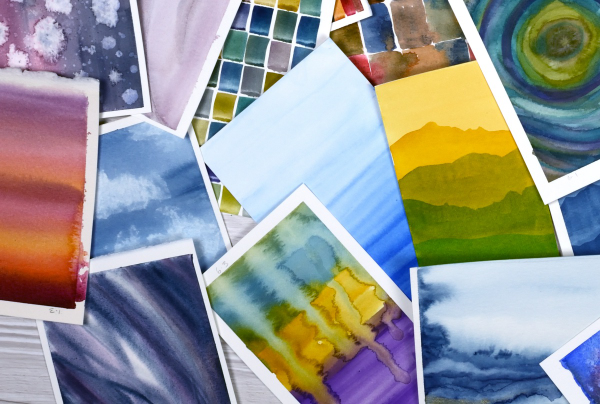
After teaching a couple of watercolour classes lately I have amassed quite the pile of panels. They are full of potential for card making. As well as painting separate panels I’ve also been creating abstract or background watercolours in a couple of art journals.
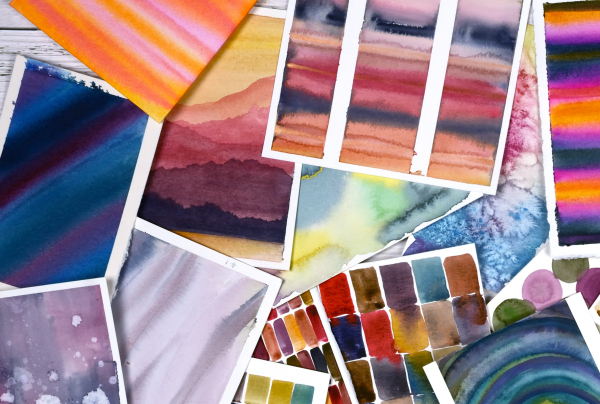
The purpose of the exercise has been two-fold. The main plan was to revisit a range of watercolour techniques in order to share them with others in classes. Additionally I chose to work small so we could complete quite a few practice pieces during class leaving us with ‘card sized’ panels to turn into cards later if we wished.
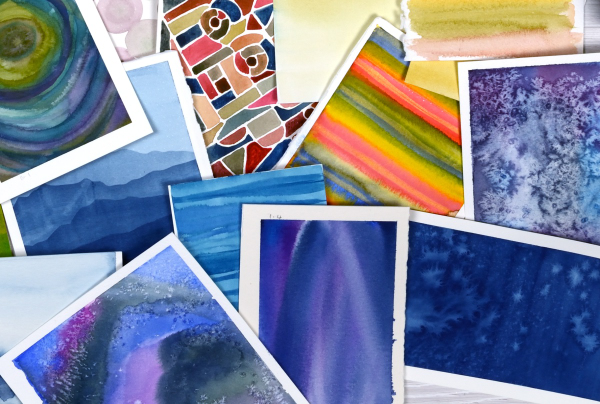
I have enjoyed the preparation and the classes so much that I have almost 100 panels on hand! My next in person class is going back to basics in regard to card making. I will cover assembly tips and tricks as well as design principles in order to create balanced and beautiful card layouts. It is exciting to have all these panels around just waiting to be transformed into cards.
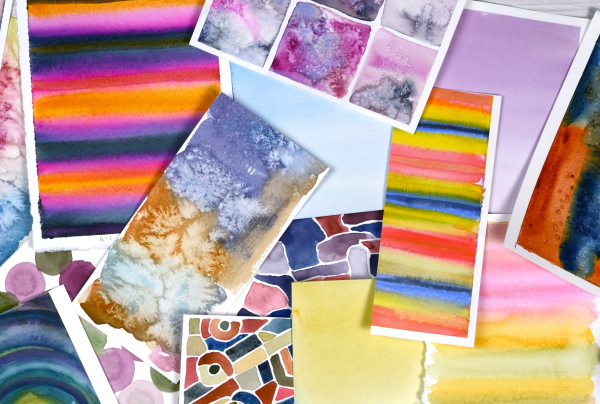
As you can imagine I also have piles of gel prints, alcohol ink panels, collages and patterned papers that could be turned into cards. It’s rather nice to have all these options…
Summer in the city
Posted: July 30, 2018 Filed under: City stacks, City Stacks dies, Concord & 9th | Tags: Canson watercolour paper, Concord & 9th, Inktense 7 Comments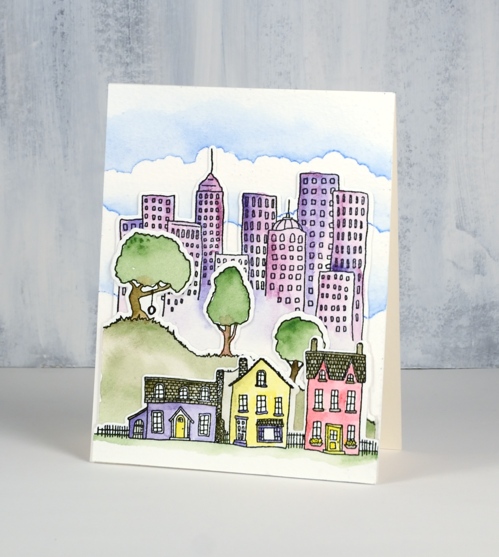
You might not have guessed I would go for this set but I have had so much fun playing with all the possibilities. I am sharing this card and my process over on the Foiled Fox blog today so pop on over there to read about how I made it.
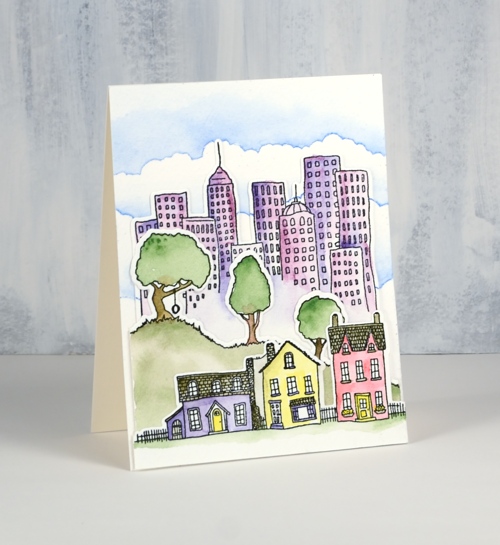
The set is called ‘city stacks’ and there is a matching set of dies to cut out the row of houses, the hill of trees, the collection of skyscrapers and the bank of clouds. This card is definitely a stack of layers, five to be exact including the card base, but I have made a some one and two layer cards with this set also.
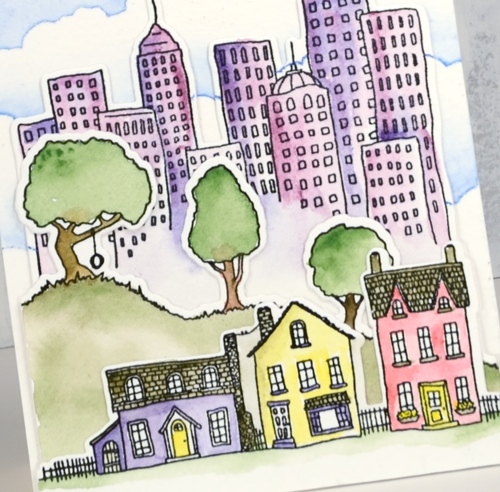
When I saw all the fun that could be had with this set I decided to design a class around it so you can check that out on my upcoming classes page. To see what Laurel Beard dreamed up with this set check out her card on the Foiled Fox blog last week. Now tell me, even if this isn’t your style, can you see why I love this set so much?
Supplies
Stamps: City Stacks (Concord & 9th)

Dies: City Stacks die set (Concord & 9th)
Paper: Canson XL cold pressed watercolour paper, Neenah natural white

Ink
Pencils
Adhesive
Moonlit Rendezvous
Posted: August 31, 2016 Filed under: Rendezvous | Tags: Canson watercolour paper, Penny Black stamps, Ranger Distress stains, Tsukineko Versafine inks 7 Comments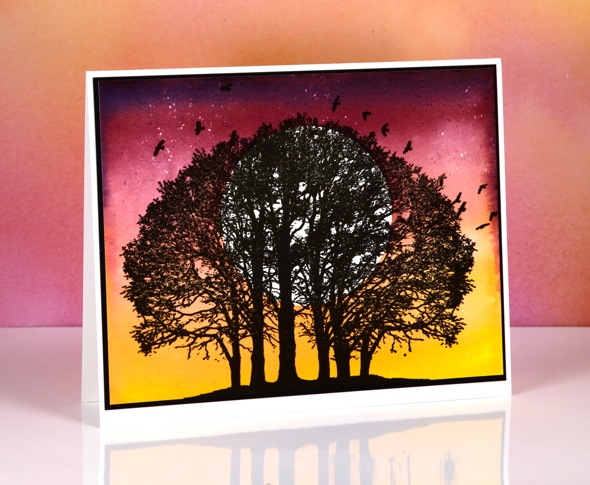
Isn’t this an amazing tree stamp? As I have said before you can never have too many tree stamps and happily the stamp designers at Penny Black seem to agree.
I chose to let this stamp be the star of the card and just made a pretty sky for the background. This was not a tricky card to make but I had to think about the order of operations. First I die-cut a circle from frisket film and firmly attached it to a piece of hot pressed watercolour paper. Frisket film is a clear plastic film with adhesive on one side and is used for masking areas on art work that you want to remain unpainted. After the circle mask was in place I splattered a little masking fluid around the top part of the panel. I wasn’t really wanting it to look like snow on this card, more like stars.
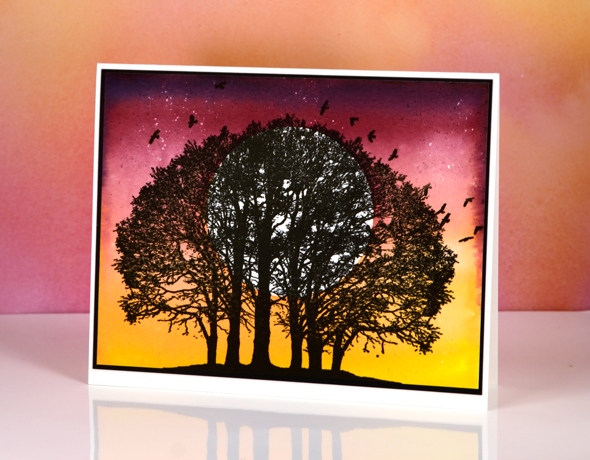
To paint the sunset/moonrise I worked from light to dark always overlapping and blending each colour with the last. I began with mustard seed distress stain, then worn lipstick, festive berries, seedless preserves and finally a little bit of chipped sapphire right at the top.
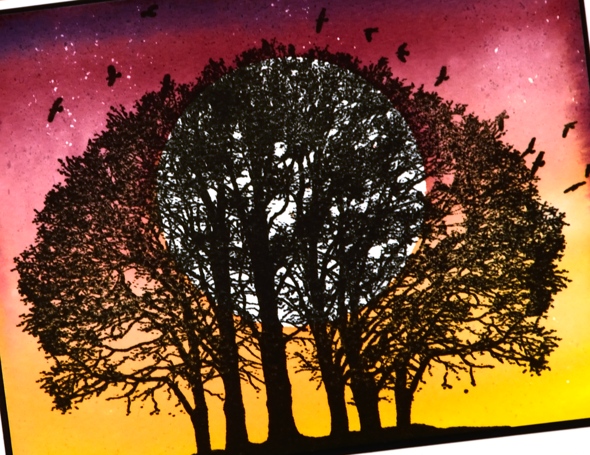
Once the painting was dry I removed the circle mask and masking fluid before stamping the tree. I used my MISTI to stamp because the stamp has very fine detail and the watercolour paper, even though it is hot pressed still has some texture. With the MISTI I was able to stamp and overstamp until I had a solid black tree. I trimmed the panel so the land at the base of the tree touched the edge of the panel and appeared to join up with my black mat. With the tree centred like it is I decided not to add a sentiment. I can’t wait to create other scenes with these beautiful trees.
Supplies
Stamps: Rendezvous (PB)
Ink: Versafine onyx black ink, (Tsukineko) mustard seed, worn lipstick, festive berries, seedless preserves, chipped sapphire distress stain (Ranger)
Paper: hot pressed Canson Moulin du Roy watercolour paper, Neenah Epic black cardstock
Also: Grafix extra tack frisket film, Daler Rowney masking fluid
All is calm
Posted: December 23, 2015 Filed under: All is Bright, Prancers, Soft Whisper | Tags: Canson watercolour paper, Dr Ph Martin Hydrus watercolor paints, Penny Black stamps, Ranger Distress inks, Tsukineko Versafine inks 8 Comments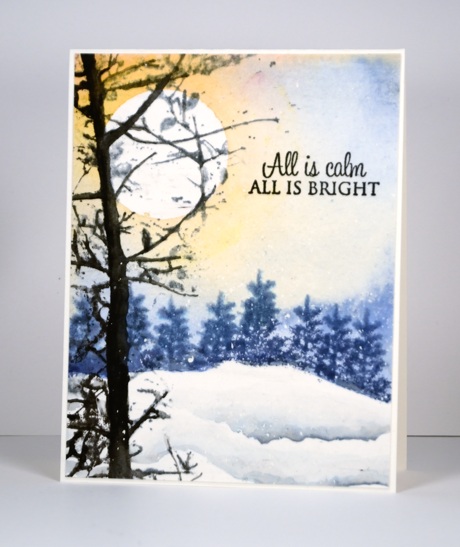
This one went in the mail this morning so there is no way it will get to where it’s going by Christmas but hopefully before new year. I used my new Dr Ph Martin Hydrus watercolours for the sky. I will write more about them once I have done some more experimenting. Sky, background and snow banks were done as described in this post but the black foreground tree was stamped last.

Hope all is calm at your place…
Supplies:
Stamps: Soft Whisper, All is bright, Prancers, (PB)
Inks: Black Soot, Stormy sky distress inks (Ranger) Onyx Black Versafine ink (Tsukineko)
Paint: Dr Ph Martin Hydrus watercolour paints
Cardstock: Canson 100% cotton hot pressed watercolour paper
Also: Winsor & Newton masking fluid
Stamping the Seasons: Fall
Posted: November 26, 2015 Filed under: Joy to All, Stamped Landscapes | Tags: Bister, Canson watercolour paper, Penny Black stamps 5 Comments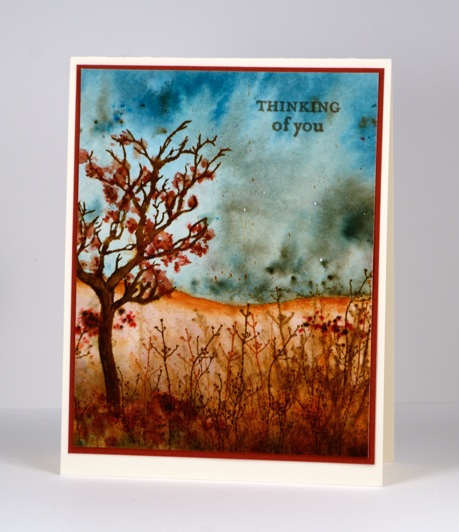
Here is the final instalment in my Stamping the Seasons collection. Although I have added a few extra stamps here and there each design features the tree and twig stamps from the ‘Joy to All’ set.
The earthy tones of my bister powders were perfect for an autumn scene so I began by painting a green and blue sky then painted the brown and red landscape below. While the brown area was stil wet I stamped the twig stamp in three colours of brown over and over filling the foreground with both blurred images and later sharper ones. I positioned the tree on the left this time and bent the trunk a little on the acrylic block. To create leaves I sprinkled bister over the branches and under the tree then added water to activate it.
I didn’t set out to make these four cards so similar in layout and but it has been a interesting challenge to change the colour scheme each time to convey the feeling of each season. I did a similar thing a few years back using the Berry Branch stamp from Penny Black. (Spring & Summer, Fall & Winter, Winter tutorial)
Winter, Spring, Summer and Fall
Supplies:
Stamps: Joy to All, Enjoy Life (PB)
Inks: Rusty Hinge, Barn Door, Gathered Twigs, Vintage Photo distress inks(Ranger)
Cardstock: Canson 100% cotton hot pressed watercolour paper, Burgandy cardstock, Neenah Natural white cardstock
Also: Bister powder
Stamping the Seasons: Spring
Posted: November 19, 2015 Filed under: Flower tags, Joy to All, Stamped Landscapes | Tags: Brusho, Canson watercolour paper, Penny Black creative dies, Penny Black stamps 9 Comments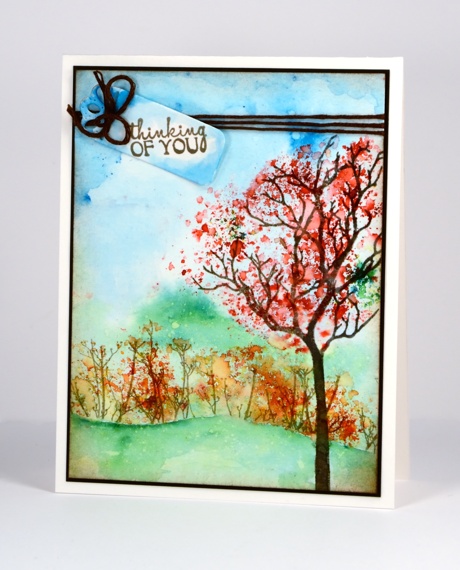
I am back as with a spring card today using the same stamp set as yesterday, Joy to All. Some of my process was the same as for my winter scene but I definitely changed my colour palette. The muted tones of bister powder worked well for yesterday’s chilly scene but the spring scene required the brighter brusho tones.
I began by taping the watercolour panel down then painted water over the whole area. I sprinkled blue and green powder over the wet panel and moved it around with a paint brush until I had a soft background with clouds and trees suggested. Next I stamped the tree in a pigment ink and masked the area around the branches so I could sprinkle red powder over the branches without getting it on the rest of the scene. I spritzed over the powder and watched the grains transform into blossom.
I cut a hill shaped mask which I positioned across the bottom of the panel then stamped the twig stamp to create some flowering bushes with orange brusho. I removed the mask and darkened the edge of the hill with a paint brush and some green brusho mixed with water. I spritzed a fine mist of water over the panel which resulted in some little spots of lighter colour here and there.
To complete the card I added a brown mat and some brown thread to tie a tag stamped and painted to match the sky.
Supplies:
Stamps: Joy to All, A bunch (PB)
Dies: Flower tags
Inks: Versafine vintage sepia (ImagineCrafts/Tsukineko)
Cardstock: Canson 100% cotton hot pressed watercolour paper, dark brown cardstock
Also: Brusho watercolour powder , brown embroidery thread
Stamping the Seasons: Winter
Posted: November 18, 2015 Filed under: Joy to All, Stamped Landscapes, Watercolour | Tags: Bister, Canson watercolour paper, Penny Black stamps, Tsukineko Memento inks, Tsukineko Versafine inks 13 Comments
Stamps that can be used all year round are winners in my opinion and I am always happy to see new tree stamps to use in my stamped landscapes. The ‘Joy to All‘ set contains a tree and some twiggy foliage stamps that I will be using winter, spring, summer and fall. This week and next you can see the Penny Black design team using new products to ‘stamp the seasons‘.
To create today’s wintry scene I splattered some masking fluid over the watercolour panel, let it dry then taped the panel to a firm surface to prevent warping. I used blue bister powder to paint the sky and snow banks then added the background trees in memento nautical blue ink while the sky was still damp. I stamped the tree from Joy to all in black ink then added shadows for all the trees in blue ink. To finish the scene I stamped the twig stamps from the same set in the foreground in black. Once all the ink was dry I removed the masking fluid then chose one of my favourite sentiments from the new release and a narrow black mat to frame the panel.
If you come back tomorrow you will see my spring scene using the same ‘Joy to All’ set.
Supplies:
Stamps: Joy to All, Season’s Gifts, Prancers (PB)
Inks: Memento Nautical Blue & Tuxedo Black, Versafine Onyx Black (ImagineCrafts/Tsukineko)
Cardstock: Canson 100% cotton hot pressed watercolour paper, Neenah epic black
Also: Winsor & Newton masking fluid, Bister powder
Twilight Trees
Posted: November 12, 2015 Filed under: Joy to All, Stamped Landscapes | Tags: Canson watercolour paper, Penny Black stamps, Ranger Distress inks 12 Comments
When I first featured this tree stamp I said I would be back with more designs but then forgot this one was waiting in the wings. I started this one with masking fluid, quite a bit, splattered over the panel. Once the masking fluid was dry I stamped the trees in brown dye ink then painted masking fluid on some of the branches. When that was dry I positioned a mask two thirds down the panel so I could brayer the sky with blue and pink inks. I removed the horizon mask and used smaller masks below the tree trunks to sponge some snow drifts. I looked for a place to add a sentiment but decided to leave it blank on the front and add something later inside.
I am happy to report here in Ottawa there are no scenes even remotely resembling this. We have made a start on leaf collection but still have half the backyard to finish. The weather has been kind.
Supplies:
Stamps: Joy to All (PB)
Inks: Chipped Sapphire, Worn Lipstick, Vintage Photo distress inks, (Ranger)
Cardstock: Canson 100% cotton hot pressed watercolour paper, Neenah natural white
Also: Winsor & Newton masking fluid
All is calm under a brusho sky
Posted: November 9, 2015 Filed under: Brusho, Gleeful | Tags: Brusho, Canson watercolour paper, Penny Black stamps, Tsukineko Versafine inks 13 Comments
I have painted quite a few expansive coloured skies lately. On Saturday I taught the last of my Merry & Bright class which included a bister night sky over a die cut tiny town. As I demonstrated the technique all of my skies were different and class participants also created unique and beautiful skies. Today’s card is similar in layout to the class card but instead of bister I used brusho and instead of die cutting I painted the little street with the help of a stamp from the ‘Gleeful’ set. I stamped the town first in versafine vintage sepia then added brusho and water to the sky area. I didn’t need to use much because the powder is so potent. I blended the blue and green with a brush and painted right up to the roof tops then let it dry. I used brown, blue, green and yellow brusho to paint the buildings and trees then finished the foreground with black brusho which separates into several colours. I added a tiny sentiment in versafine onyx black, removed the masking fluid to reveal stars then matted with a couple of co-ordinating colours.
Thanks for dropping by; I hope you have a great week.
Supplies:
Stamps: Gleeful, Holiday Snippets (PB)
Mediums: Brusho powders, Versafine Onyx Black ink
Cardstock: Hotpressed Canson watercolour paper, Neenah avon brilliant white, brown and teal cardstock
Thanksgiving mini cards
Posted: October 12, 2015 Filed under: Filigree Foliage | Tags: Canson watercolour paper, Penny Black stamps, Ranger Distress stains, Tsukineko Versafine inks 9 Comments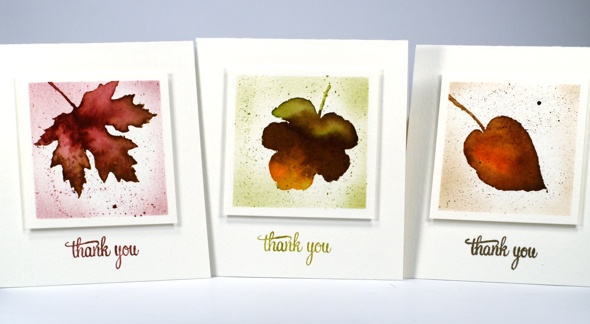
Happy Thanksgiving to all the Canadians; chances are you are enjoying leaves in pretty colours like I am these days. I keep reaching for the filigree leaves set at the moment because it has six lovely leaves which can be stamped simply to feature the pretty filigree patterns or used as I have here to stamp an outline which can be painted for a more realistic leaf look.
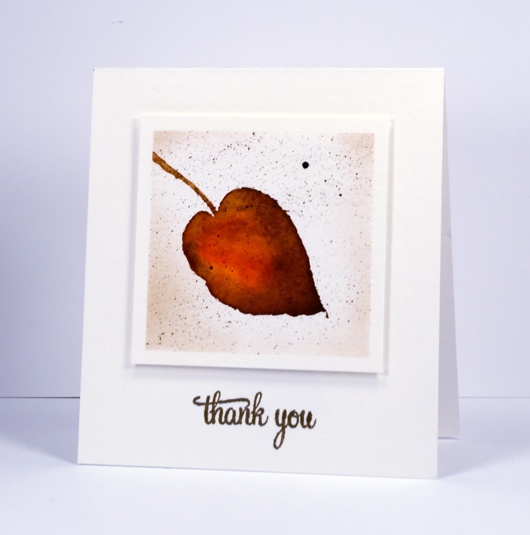
My process for creating these three mini cards was as follows. I masked a square on cold pressed watercolour paper then inked the leaf stamps with two or three distress stains. I stamped then used a paintbrush to blend the colour and fill the leaf. Where necessary I added water but I worked quickly enough to mainly just move the stain. When the leaf dried I splattered some stain over the top and once that dried sponged a little ink around the perimeter to frame the leaf. (I did film myself on periscope using this technique and these stamps. Please be aware that the quality on periscope is not like youtube but you can get the idea of this process at the beginning of the broadcast)

Each card is 4″x4.5″ and the squares have 2 7/8″ sides and are popped up on fun foam.

I stamped the sentiment with versafine inks rather than distress because they do such a good job with fine lines.
I hope you are having a wonderful day; thanks for visiting.
Supplies