Pinecones & joy
Posted: December 19, 2019 Filed under: Darkroom Door, Ink to Paper, jumbo joy, Penny Black, pine cones, season of joy stamps | Tags: Darkroom Door stamps, Fabriano Watercolour Paper, Ink to Paper, Kuretake Gansai Tambi watercolour paints, Penny Black creative dies, WOW embossing powders 11 Comments
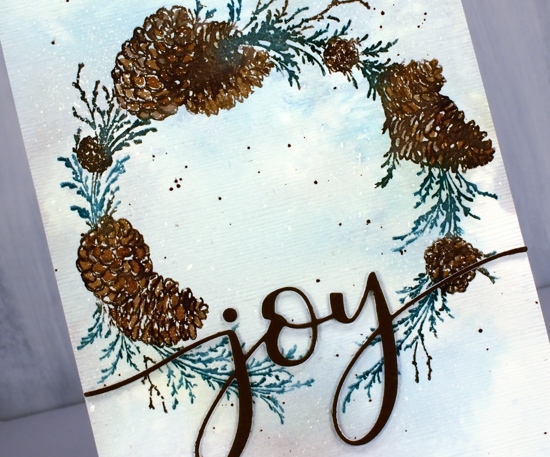
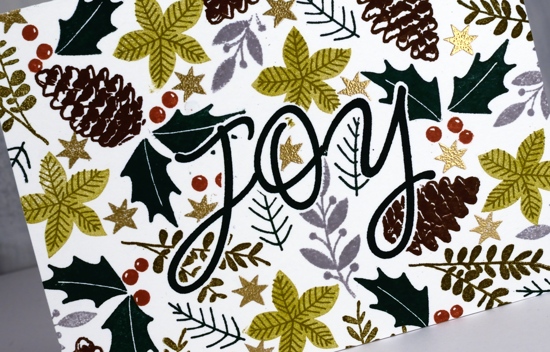
The pine needles and pine cone stamps I used for this card are from Darkroom Door and I love how realistic they are. The stamps are quite large and there are several sizes and shapes of cones which makes for lovely feature images and fillers as well. I used one pine cone stamp but two of the pine needle stamps and worked on hot pressed watercolour paper which had been splattered with masking fluid. If you look at the close up below you can see large white dots as well as tiny ones; they’re all made by the masking fluid.
I stamped the pine cone three times using a stamp positioner and four different brown distress inks. A spritz of water started the browns blending and I did a little blending with a paint brush as well.

I stamped the green pine needles with forest moss and evergreen bough distress inks and the fine needles in the background with iced spruce. I added some green splatter then some gold splatter using one of the gansai tambi starry colours. I used the ‘jumbo joy’ die from Penny Black to cut out the word joy from the stamped panel and cut three layers from shimmer gold cardstock as well so I could stack them up just a little offset so the gold peeps out on the side.

I stamped the rest of the Christmas carol lyric using a stamp from Ink to Paper’s ‘season of joy’ set and some gold embossing powder. The overall pattern may be a little messy but it reminds me of what I see if I look up into the branches of the very messy pine tree in my front yard, which is currently covered with snow but not gold splatter!
I have been blessed to receive some beautiful handmade Christmas cards in the mail this week and I am enjoying them on my window ledge. I hate to say it but as yet I have not sent a single one! As I’ve said before there are twelve days of Christmas so I haven’t run out of time yet!
Supplies

Pink poinsettia poem
Posted: December 17, 2019 Filed under: poinsettia poem, xmas poinsettia cut out | Tags: brutus monroe embossing powder, Fabriano Watercolour Paper, Papertrey ink, Penny Black creative dies, Penny Black stamps 4 Comments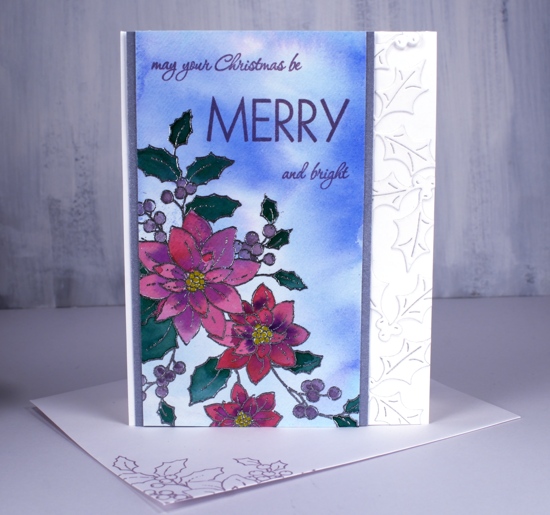
I have a less traditional colour scheme for you today featuring pink and purple on this pretty poinsettia stamp from Penny Black. I wasn’t set on being non-traditional when I started but it headed that way as I progressed. I started by smooshing tumbled glass and blueprint sketch distress stains on my glass mat, adding water then swiping a piece of hot pressed watercolour paper through it to create a soft background. Once it dried I used my stamp positioner to stamp and emboss the ‘poinsettia poem’ stamp in silver embossing powder.
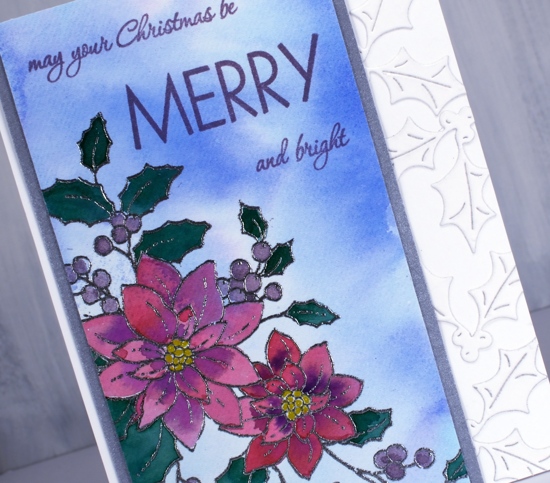
I smooshed papertrey ink cubes onto my glass mat to use as watercolours and painted the flowers in scarlet jewel and royal velvet, the leaves in pine feather and the berries in winter wisteria. I used a gold gel pen to colour the centres. The card is not quite so bold as the photo suggests but even so I wanted some light and bright features alongside the painted panel so I framed it in silver and added some die cut holly to the white card base.
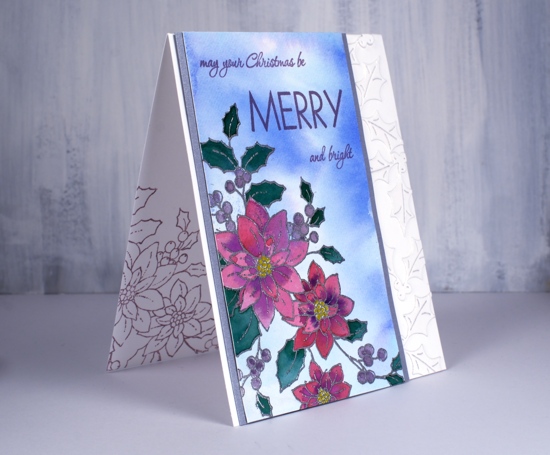
In keeping with my resolve I stamped inside the card and on the envelope with winter wisteria ink and add the sentiment in the same.
Supplies
Winter Woodland
Posted: December 9, 2019 Filed under: Papertrey Inks, Penny Black, Spread Cheer, winter woodland | Tags: Koh-I-Noor, Papertrey ink, Penny Black stamps, Tsukineko Versafine inks 9 Comments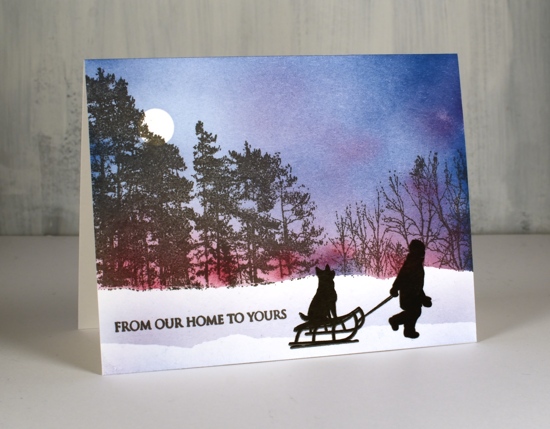
You know I love tree stamps so when this beauty from Penny Black appeared I had all sorts of plans for it. My first inking was to create these peaceful scenes to share here and on the Foiled Fox blog. The background stamp is called ‘winter woodland’ and the foreground stamp is from an older set ‘spread cheer’.
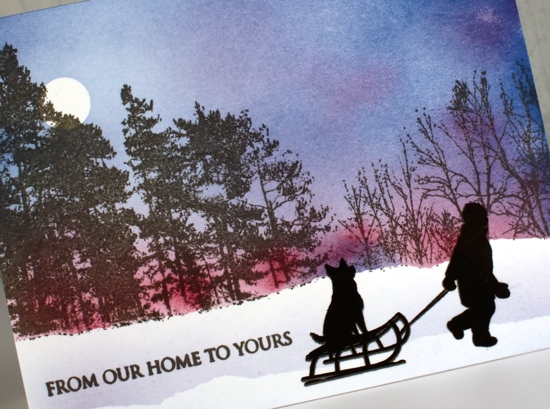
Both these cards were made on smooth bright white bristol cardstock which shows off the detail of the tree stamp beautifully. I made an improvement the second time I made this card so I will share my ‘better method’ with you here. I suggest stamping and embossing the child and sled first, that way any inking and blending done after will be resisted because of the embossing. When I tried just stamping in black after blending the sky there was a difference in the blackness of the child image because of the blended ink underneath.
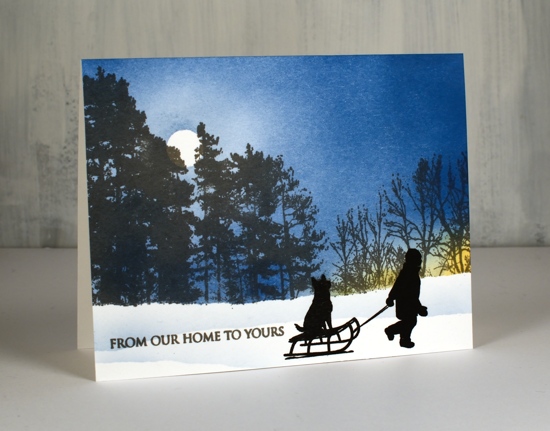
After stamping the foreground image I positioned a torn post-it note mask over lower portion of the panel and stamped the winter woodland stamp in hickory smoke versafine ink. I love the different trees in this image; it is so like the scenes around here. I punched a small circle from masking paper and positioned it over the trees to make a moon. I used Papertrey ink and blending brushes to do the sky and a trick I learned from Jennifer McGuire. Doing blending on a glass mat makes sense because the ink you waste by starting off the panel is on the glass mat and can be picked up by the brush and transferred to the panel. I started by blending a strip of scarlet jewel ink along the horizon of one panel and an even smaller section of harvest gold ink on the other panel. I kept the blending light around the moon in blueberry sky ink and darker around the edges.
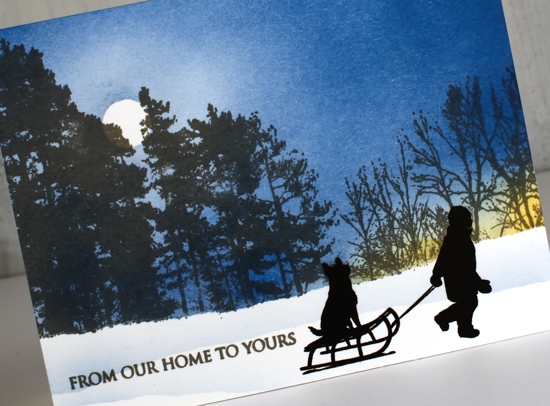
After I removed the moon mask and then horizon mask I repositioned the torn edge lower down to add some more snow banks with a pale layer of ink still in the blending brush. I finished the cards with a sentiment from PB ‘merry up’ in hickory smoke ink. Make sure you click over to the Foiled Fox blog for more tips about this card plus a blog full of inspiration from other designers.
Supplies

Wreath & wreath
Posted: December 4, 2019 Filed under: conifer wreath, homespun, Penny Black | Tags: Fabriano Watercolour Paper, Finetec artist mica watercolour paint, Penny Black creative dies, Penny Black stamps, Ranger Distress inks, Ranger Distress stains 4 Comments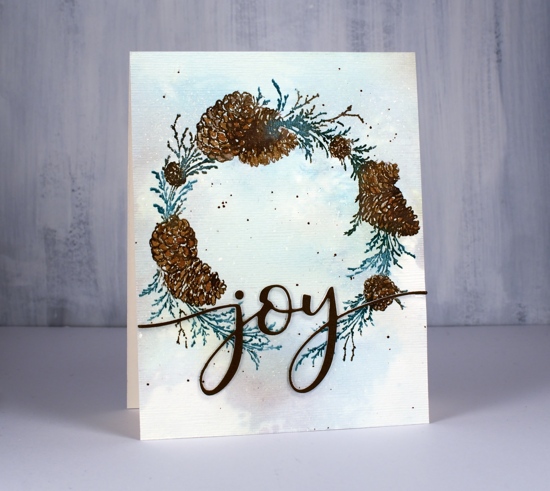
I have two more wreaths to share today; I don’t think I’ve ever made so many wreath cards. This year I did them in a class and I’ve done them here at home more than a few times with little stamps and big stamps. The fact that Penny Black came out with such beautiful wreaths this year kept the inspiration going.
The stamp above is called ‘conifer wreath’ and the stamp below ‘homespun’. I used the same technique for both. Working on hot pressed watercolour paper (psst Foiled Fox has Fabriano in stock now!!) I splattered masking fluid over the paper before I started stamping or painting so I would have dots of snow appear at the end. Once the masking fluid was dry I used my glass mat and spread some pine needles, evergreen bough and gathered twigs distress stain over the mat. I diluted it with water then swiped both panels through the stain to pick up pale green and brown blurry colour.
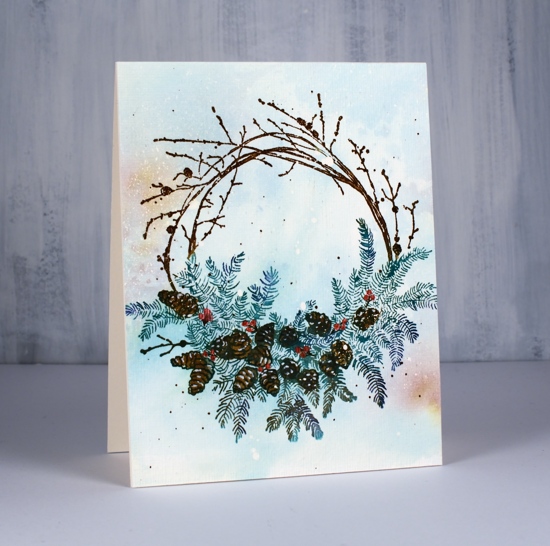
Once the background ink dried I used the stamp positioner to stamp the wreaths colour by colour using pine needles and forest moss distress inks for the foliage, gathered twigs and black soot for the twigs and pine cones and chipped sapphire for some added depth. I drew a few berries on the wreath below with a festive berries marker then painted over them with red from the finetec pearlescent paint set.
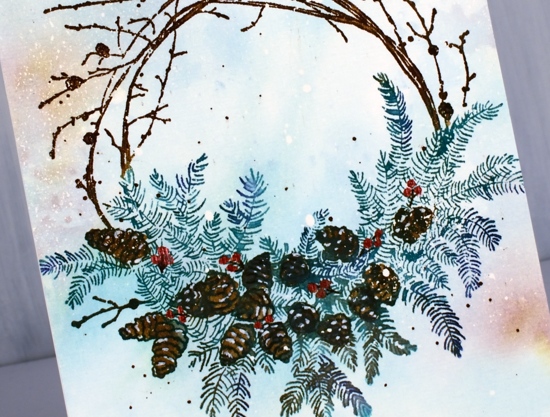
To add a little snow to the pine cones I used a white gel pen then splattered some green and brown ink around the wreaths. Once all the ink was dry I removed the masking fluid then added some texture to the panel with the clever SU embossing folder ‘subtle’.
To add a sentiment to the conifer wreath I die-cut a few ‘joy’ words with the PB die, ‘merry & joy’, stacked them and added them over the bottom of the wreath. Now what I really need to get done is a wreath to hang over my fireplace!
Supplies
Merry Misty Melody
Posted: December 2, 2019 Filed under: misty melody, Papertrey Inks, Penny Black, Wendy Vecchi | Tags: Papertrey ink, Penny Black creative dies, Penny Black stamps, Ranger Distress inks 6 Comments
I am thrilled to be over on the Foiled Fox blog again, sharing these sweet little birds. They are from a new Penny Black set, ‘Misty Melody’ and I’ve paired them with one word from the PB ‘…bright’ die for a wintry scene. By the way there happens to be a 15% discount sale happening until the end of Dec 2 so now is a good time to visit.

I worked on hot pressed watercolour paper as I planned to do a bit of blending on the birds. I made a mask for the birds on the branch by stamping it on some masking paper and cutting it out. For someone who dislikes fussy cutting I seem to have warmed to it a little. With the stamp in my positioner I stamped the birds on branch stamp on the watercolor paper in smokey gray versafine ink and on masking paper.
I chose the Papertrey ink cubes that I have been using over and over to stamp little wreaths and foliage patterns. To watercolour with them I squished dark chocolate, Americana and scarlet jewel onto the glass mat where I could add a drop of water and pick up colour with a paintbrush. I found an image of a European Robin as my guide and painted the breast with the two red inks, the Americana was too brown, the scarlet jewel too pink but the mix was ideal. For the wings and tales I used a mix of Americana and dark chocolate and the rest of the body I painted with distress hickory smoke. I went over the beak and eyes with a black micron pen and then painted the branches in a mix of dark chocolate and black soot. Once that dried I went over the birds’ feet with the micron pen.

With all the bird and branch painting done I had to decide whether to paint the background sky or blend it with blending brushes or sponges. As I had the mask ready to go I chose blending brushes and positioned the mask to protect the painted birds and branch. I splattered masking fluid over the whole panel and let it dry. To create snow banks in the foreground I tore the edge off a piece of post-it note to mask just under the birds.
I stuck with the Papertrey ink cubes for the blended sky using mainly ‘blueberry sky’ and a bit of ‘royal velvet’. As I blended over the masking fluid I could see I was going to have a nice snowy sky. Once the sky color was a deep blue I repositioned the torn mask lower down three more times and blended over it for a soft ‘snowbank’ look. I didn’t have to pick up more ink as there was plenty still on the bristles of the blending brush.
Once all my painting and blending was complete I removed the masking fluid gently by rubbing it with my fingers; it is always very satisfying to see the snowy sky appear. To finish the card I cut two layers of the word MERRY from red cardstock backed with stick-it adhesive sheet and stuck them over the snowbanks. As you can see the letters come out of the die individually, I used the negative piece of cardstock and my magnetic ‘staytion’ and ruler to position them all correctly.

Thank you for dropping by today, all the supplies I used are linked below. I will be back here and on the Foiled Fox blog very soon.
Supplies
Snowflake garland
Posted: November 20, 2019 Filed under: crystalline, snowflake tag | Tags: Penny Black creative dies 12 Comments
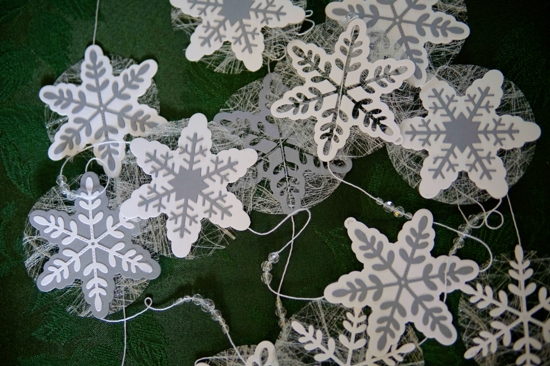
At the risk of boring you silly I will mention once again that I have a booth in an art market in four days! One of the items I wanted to make for the market was garlands. I thought the new ‘snowflake tag’ dies from Penny Black would be lovely with some sparkly beads and they are but it took me a lot longer than anticipated to put it all together. I almost left it at one but decided a pair might be nice; the second one was much quicker as I had thought it all through.
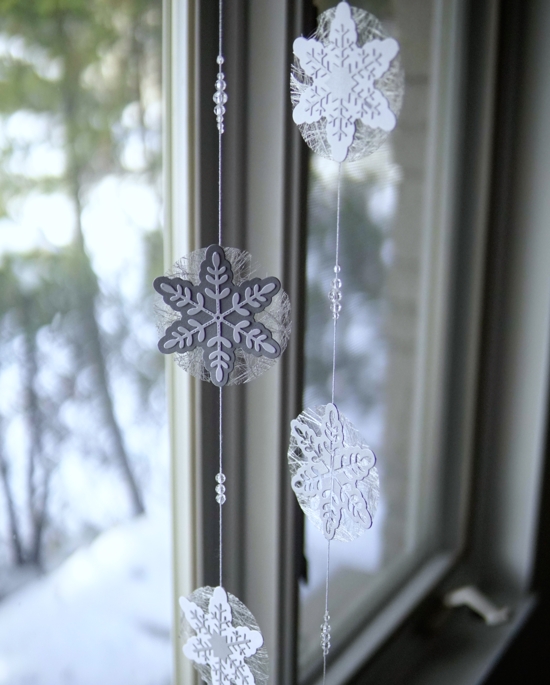
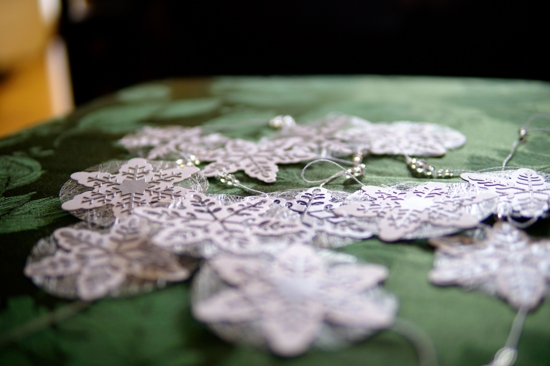
I used white cord with a silver thread through it, clear facet cut beads, a mix of shimmer silver and white cardstock and a spiderwebby silver fabric (from France).
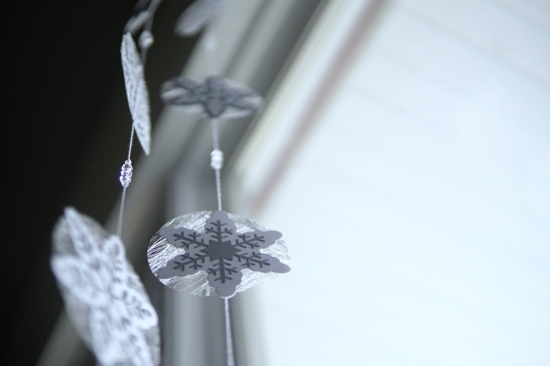
I ended up with six snowflakes on each garland with clear beads grouped on the twine in between the snowflakes. Each snowflake is actually double sided so the twine is glued in between the two and for some I glued a contrasting snowflakes on each side.
The spiderwebby fabric is apparently interfacing for dress making but its silver colour makes it perfect for adding a little shimmer and shine to paper craft projects.
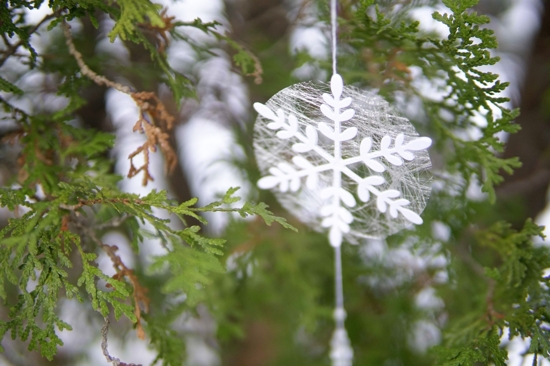
Despite being photographed in a tree the snowflake garland is a delicate thing and should not be used outdoors!
Supplies
https://linkdeli.com/widget.js?1559654439292
That Joy, Joy, Joy, Joy
Posted: November 18, 2019 Filed under: floral Christmas, framing florals Christmas, Ink to Paper, season of joy dies, season of joy stamps | Tags: Ink to Paper, One-Layer cards, Ranger Distress inks 5 Comments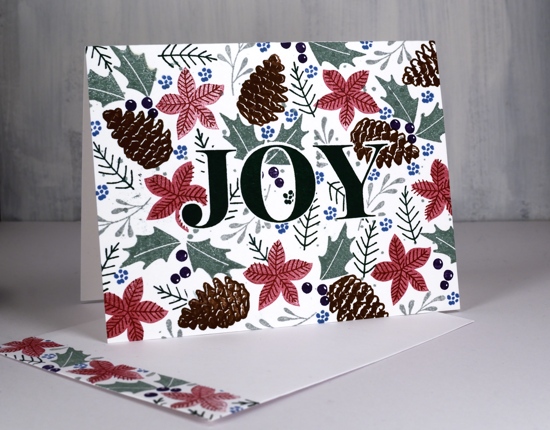
If you went to Sunday School when I did you will probably know which song my title alludes to. Maybe you even sang the tongue twister verse as well! You will probably recognise some of these stamps from two posts I did last week. I can’t seem to leave them alone. For someone who usually doesn’t do much with the little bitty stamps I have certainly taken to these ones.
Today’s cards are once again one layer cards although they almost weren’t right at the end! I often say at my classes that I make the mistakes so you don’t have to! Should I have stamped the word Joy on both cards before I did anything else? Yes! But instead of doing that I die-cut masks of the letters using dies from the Ink to Paper ‘Season of Joy’ co-ordinating die set. I centred the masks on my card bases carefully with the help of my ‘stay-tion‘ magnetic board and then I stamped all over them.
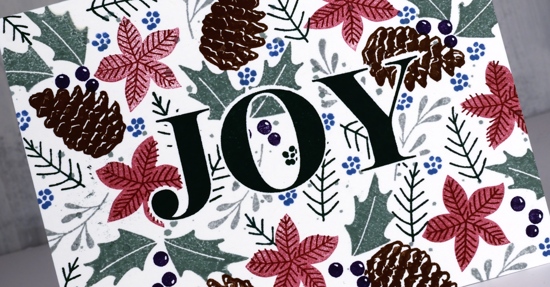
When creating a busy all over pattern it is important to stamp your elements in order of size, big ones like pinecones first and little ones like stars last. I failed to recognise that the letter stamps from the Ink to Paper ‘Season of Joy’ stamp set were the biggest elements of all. It still worked because I had my masks in place but lining up the letters inside the masked area at the end was a wee bit tricky. (Yay stamp positioner!) If I had stamped the letters then covered them with masks I would have had the same effect without the trickiness! Now you know, just in case you might try this fun exercise yourself.
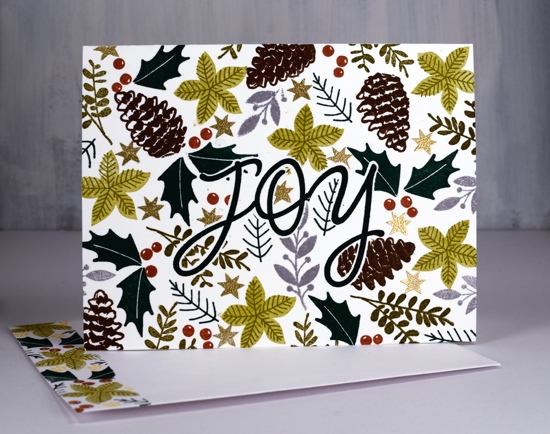
It really is fun working with all the little foliage stamps from the ‘floral Christmas’ and ‘framing floral Christmas’ sets from Ink to Paper. I have now used them for wreaths, bands, circles, hanging swags and these ‘all over’ designs. Once again I used the Papertrey ink cubes along with a few distress inks and versamark just for the gold embossed stars.
I guess you can see I am sticking to my resolution of stamping envelopes at the same time as cards. These ones are ready to be packaged for this weekend’s ‘WALL CANDY Art Expo‘ in Ottawa. If you are in the area please come to Aberdeen Pavilion at Landsdowne and visit Liane and me at the Paper Duet booth. The Expo will be full of amazing art so you might get a little Christmas shopping done.
Of course if you are shopping for yourself you can find all the links below. Thanks for dropping by.
Supplies

A happy anniversary
Posted: November 15, 2019 Filed under: Hand lettered, numbers, Penny Black, spontaneous joy | Tags: Finetec artist mica watercolour paint, Hand lettering, Penny Black creative dies, Penny Black stamps 9 Comments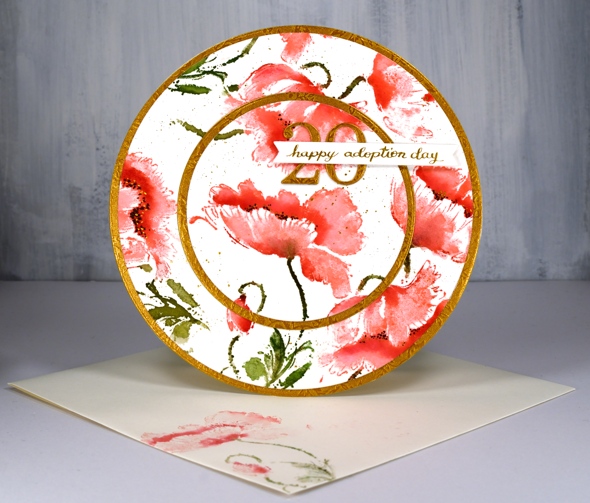
What a treat it was to design and make this card at the request of a friend of mine. Her daughter, also a friend of mine celebrated the 20th anniversary of her adoption day yesterday so an extra special card was needed. Inspired once again by the beautiful round card made by Peet Roeven I chose the PB stamp ‘spontaneous joy’ and a red and gold colour scheme. I worked in a stamp positioner to add colour to the flowers gradually beginning with worn lipstick distress ink for the petals then candied apple distress ink for extra depth and shadow. I blended a little with a paintbrush and water but I didn’t want to lose the detail by blending over all the stamping.
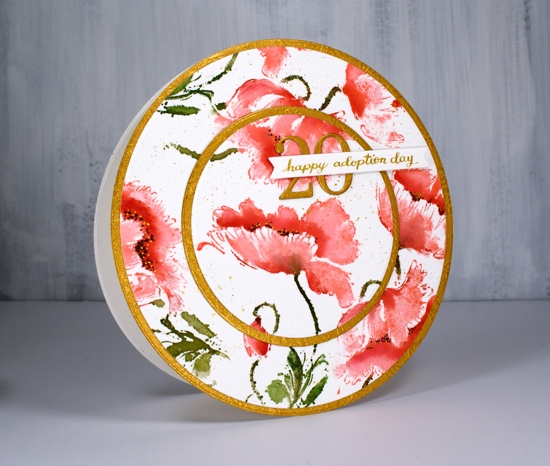
I used mowed lawn and peeled paint distress ink for the stems and leaves; two greens adds interest even on those small areas. I added black dots to the centres of the flowers then some gold dots with finetec pearlescent paint. To finish it off I splattered some of the same gold paint. I have been pulling out my finetec paints quite often recently, not so much for the main elements but for details and finishing touches. I used the same gold and a pen & nib to write my own sentiment strip.
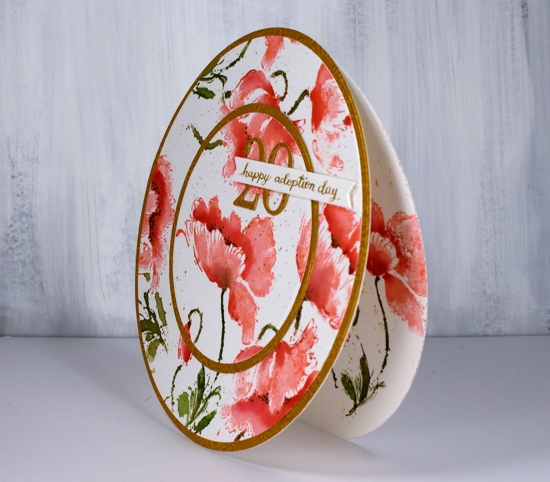
While all the inks were out I stamped a flower on a second panel of watercolour paper and on an envelope. I used a set of circle dies to cut the main panel and back panels into large circles and to cut a circle out of the centre of the front panel. I used a piece of embossed gold cardstock to cut extra circles and the number ’20’ using the PB ‘numbers’ die set.
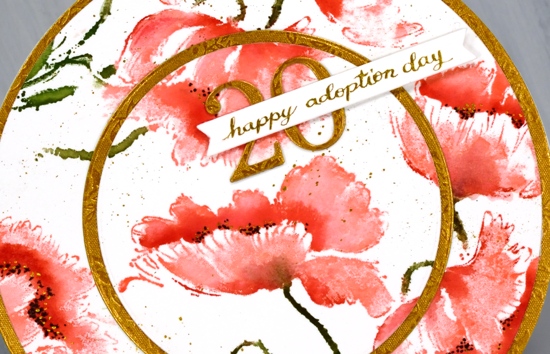
To assemble the card I scored across the top of the the back circle, applied adhesive above the score line and attached the two panels together. Having the score line on the back panel means the front decorative panel doesn’t need to bend at all. I also sliced a very slim bit of the bottom of the back circle so the card will stand up and not roll away!
Thanks for dropping by today, I hope you have a lovely weekend.
Supplies
https://linkdeli.com/widget.js?1559654439292
One Layer Florals + Winners
Posted: November 12, 2019 Filed under: floral Christmas, framing florals Christmas, framing florals Christmas dies, Ink to Paper | Tags: Finetec artist mica watercolour paint, Ink to Paper 7 Comments
I mentioned in my last post that I would be back with more cards featuring the ‘floral Christmas’ and ‘framing floral Christmas’ sets from Ink to Paper. These sets are so much fun to play with. Today’s cards are true one layers, I stamped straight on the neenah solar white card base and inside the card base, I haven’t done that in a while. But before I gab on about my cards you I’m sure you all want to know who the winners of the Holiday Traditions giveaway are! Thank you again for sharing your holiday traditions both on my blog and the Foiled Fox blog. We really enjoyed reading about traditions from around the world. Some were close to my family’s traditions others were totally new to me and had me intrigued. I am thrilled to announce that Pat Moore and Lois Hecksel are the winners of gift certificates to the Foiled Fox online store. Enjoy shopping ladies! (You will get an email from Shauna at the Foiled Fox with the details.)

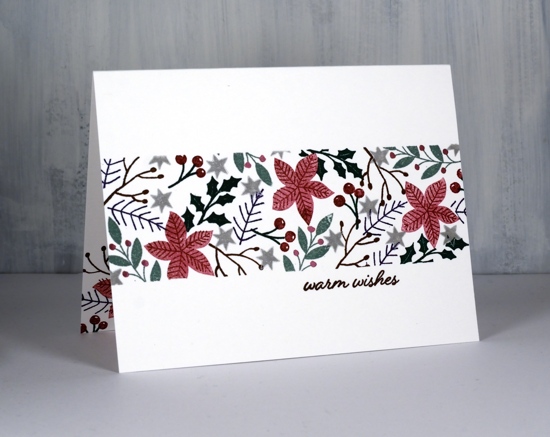
I worked on these two cards side by side on my glass mat. I taped the second one down with post-it tape using the grid on my mat to get the tapes lined up so they would mask off a band across the card front. On this first card I just taped down a couple of corners to keep the card steady. The only time I used my stamp positioner was to add the sentiments at the end. For the card above and close up below I used an earthy colour scheme of greens, brown, red and pops of gold. I used Papertrey ink cubes ripe avocado, pine feather, dark chocolate, Americana and distress barn door. It made sense to start with the poinsettias as they were the biggest, next the larger leaf sprays and finished with the berries and little flowers. I added finetec gold paint over the berries on the green leaf sprays to add some shimmer and make the berries stand out. There are matching dies for these sets so I cut a poinsettia shape from a post-it note to do a little masking when I wanted to pop leaves behind.
For the second card I used a cool colour scheme keeping only the pine feathers green and adding scarlet jewel, ocean tides, dark indigo and delicata silver. I still worked from large elements to small and used a finetec shimmery pink ink to add berries to one of the leaf sprays. Finishing with a small stamp such as the flower (above) or the star (below) makes it easier to fill all the nooks and crannies with colour and pattern. As always it was satisfying to carefully pull back the masking tape to reveal a clean edge.
I have resolved to stamp matching envelopes at the same time I make my cards from now on and if I am adding something to the inside of the card I need to do that also while the inks and stamps are out. I have always known this makes sense but usually haven’t done it. I am currently prepping for a market in less than two weeks and have spent hours pulling out stamps to make matching envelopes for existing cards. Hopefully this new habit will stick.
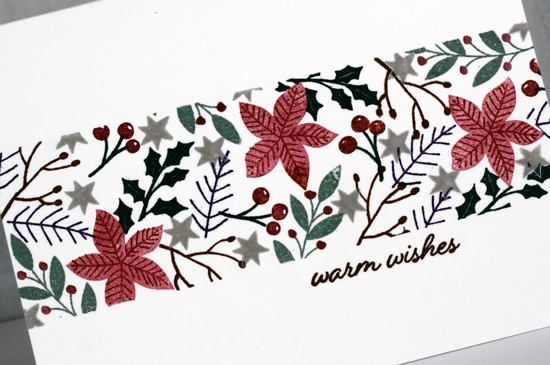
The little sentiment is from Ink to Paper’s Just sentiments: Be Merry set, cute and sweet like the stamps.
Supplies
A couple of little wreaths
Posted: November 8, 2019 Filed under: floral Christmas, framing florals Christmas, Ink to Paper, Papertrey Inks | Tags: Finetec artist mica watercolour paint, Ink to Paper, Papertrey ink 9 Comments
I am having fun with two sets from ‘Ink to Paper’. When I first saw the ‘floral Christmas’ and ‘framing florals’ sets I knew exactly what I wanted to do with them: a little wreath making! I also have in my hands some new inks from ‘Papertrey Ink’ so I put them to work on these two wreaths. So far I’m impressed but they will of course need to go through watercolour testing too!

Even though I didn’t need to I stamped both these wreaths on hot pressed watercolour paper, habit I guess. I drew a light pencil circle as a guide for the wreath above and used the pine circle stamp to start the wreath below. The stamps are all small enough to fit on a little acrylic block so I used that rather than a stamp positioner. On the pine cones above you can see that I didn’t get the second outline stamp lined up perfectly with the filler stamp, I actually like it a little offset as it looks like snow on the pine cone (something I now have in my driveway!) I stamped the berries in ‘Americana’ ink but then painted over the top with some shimmer red from my Finetec pearl set of paints. The red frame is also shimmer cardstock . To complete the card I added a little red bow and a sentiment banner popped up over the top.
For this second wreath I stamped the pine circle stamp from the ‘ framing florals Christmas stamp set’ but I didn’t ink the whole circle. I left gaps which gave me spaces to stamp the pine cones. I used all ‘ink to paper’ inks again except for one twiggy element I stamped in golden glitz delicata. All the inks are listed below. Once again I finished off the wreath with a little bow and some gold shimmer cardstock.

The sentiments for both cards are from ink to paper’s ‘Be Merry mini’ set. Oh, and they both got the splatter treatment too.
Stay tuned because you will be seeing more from these sweet sets!
Supplies