
Moonlit Rendezvous
Posted: August 31, 2016 Filed under: Rendezvous | Tags: Canson watercolour paper, Penny Black stamps, Ranger Distress stains, Tsukineko Versafine inks 7 Comments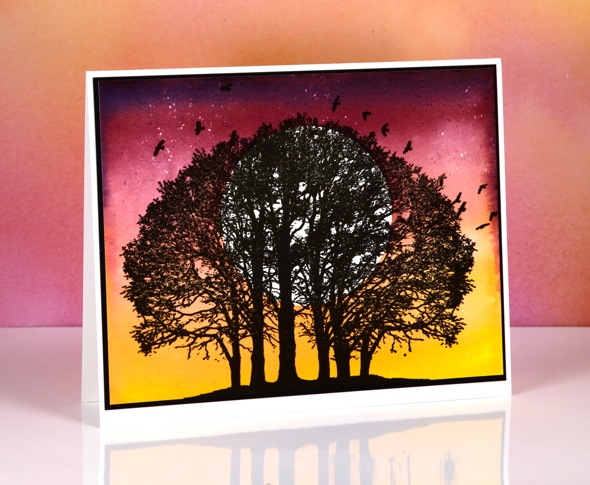
Isn’t this an amazing tree stamp? As I have said before you can never have too many tree stamps and happily the stamp designers at Penny Black seem to agree.
I chose to let this stamp be the star of the card and just made a pretty sky for the background. This was not a tricky card to make but I had to think about the order of operations. First I die-cut a circle from frisket film and firmly attached it to a piece of hot pressed watercolour paper. Frisket film is a clear plastic film with adhesive on one side and is used for masking areas on art work that you want to remain unpainted. After the circle mask was in place I splattered a little masking fluid around the top part of the panel. I wasn’t really wanting it to look like snow on this card, more like stars.

To paint the sunset/moonrise I worked from light to dark always overlapping and blending each colour with the last. I began with mustard seed distress stain, then worn lipstick, festive berries, seedless preserves and finally a little bit of chipped sapphire right at the top.

Once the painting was dry I removed the circle mask and masking fluid before stamping the tree. I used my MISTI to stamp because the stamp has very fine detail and the watercolour paper, even though it is hot pressed still has some texture. With the MISTI I was able to stamp and overstamp until I had a solid black tree. I trimmed the panel so the land at the base of the tree touched the edge of the panel and appeared to join up with my black mat. With the tree centred like it is I decided not to add a sentiment. I can’t wait to create other scenes with these beautiful trees.
Supplies
Stamps: Rendezvous (PB)
Ink: Versafine onyx black ink, (Tsukineko) mustard seed, worn lipstick, festive berries, seedless preserves, chipped sapphire distress stain (Ranger)
Paper: hot pressed Canson Moulin du Roy watercolour paper, Neenah Epic black cardstock
Also: Grafix extra tack frisket film, Daler Rowney masking fluid
A day of woodland beauty
Posted: August 30, 2016 Filed under: Nature's Silhouettes, Stamped Landscapes, Woodland Beauty | Tags: Fabriano Watercolour Paper, Penny Black stamps, Ranger Distress stains, Tsukineko Memento inks 10 Comments
As this tree is one of my favourite stamps from the new Christmas release I decided to create a day scene and a night scene as part of my ‘Top Three’ feature on the Penny Black blog this week. For the night scene I painted the sky before stamping the tree, on this panel I did the opposite.
I began as I often do by splattering some masking fluid on a piece of hot pressed watercolour paper. I did some partial stamping with the tree stamp so I could make the base of each tree look like it was stuck in a snow bank. To do partial stamping or ‘faux masking’ I ink the stamp then remove some of the ink with a wet wipe, in this case I removed the base of the tree so no trunk showed and the bottom edge was a little different each time I stamped it. I chose memento northern pine ink again because the colour separates when I spritz a little water over it (which I did each time before stamping).
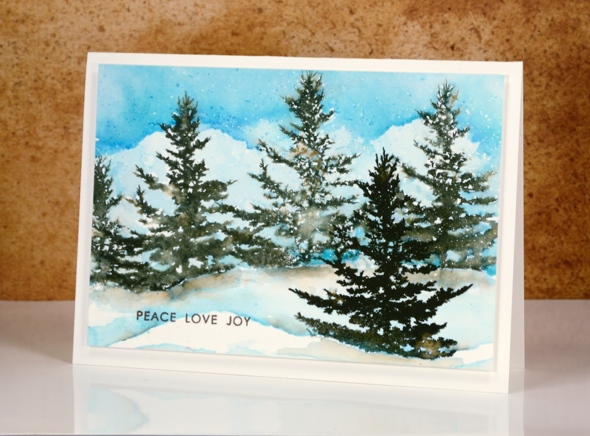
I let the trees dry then painted the sky in three blue stains blending and removing colour to make it look like there were clouds. I used a small round watercolour brush and painted right up to and sometimes over the edge of the branches so there would be some blending of colour as well as some white spaces which end up looking a bit like snow.
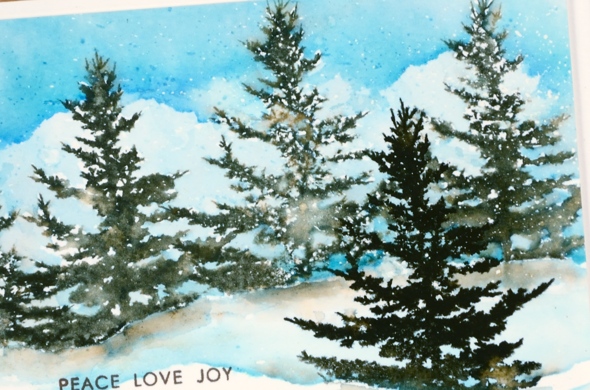
Once all the sky was dry I stamped a single tree in the foreground and made it darker by re-stamping in the same colour. I painted a snow bank either side of the foreground tree with stain then added some shadows at the base of the trees using diluted northern pine ink as my paint. To finish I removed the masking fluid, added a sentiment in brown then popped it up on a cream card base.
If you didn’t catch my night time scene with this stamp, you can find it here along with a video tutorial.
Supplies
Stamps: Woodland beauty, Nature’s Silhouettes (PB)
Ink: memento northern pine (Tsukineko) tumbled glass, broken china, salty ocean distress stain(Ranger)
Paper: hot pressed Fabriano watercolour paper
Also: Daler Rowney masking fluid
Glimpses
Posted: August 17, 2016 Filed under: CAS, Into the sky, Nature's Silhouettes, Prancers | Tags: Brusho, Penny Black stamps, Ranger Distress stains, Tsukineko Versafine inks 24 Comments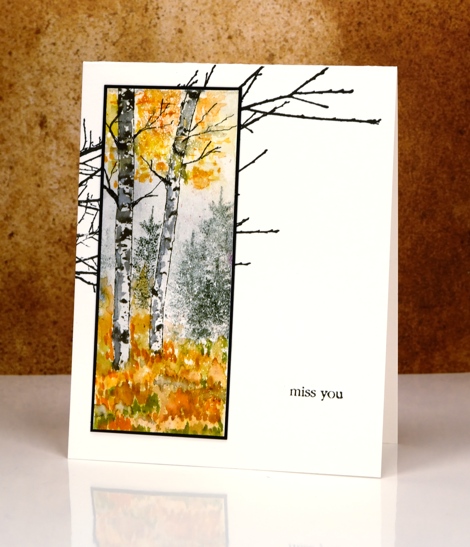
You have probably already caught up with the fact that Penny Black has two new collections of stamps and dies. When I first receive new stamps my head fills with ideas and designs to try and this time was no exception. I had a little pile of bookmark sized watercolour paper strips on my table so I decided to try some of my ideas on mini projects rather than full sized panels. That way I was able to play with a few stamps and several ideas in a short space of time. The strips I worked on have become the cards I’m sharing today and tomorrow. I have also had a chance to develop some of the designs into full sized panels. On the strip above I used an old favourite, the little tree stamp from the ‘Prancers’ set as background for the new birch trunk stamps.
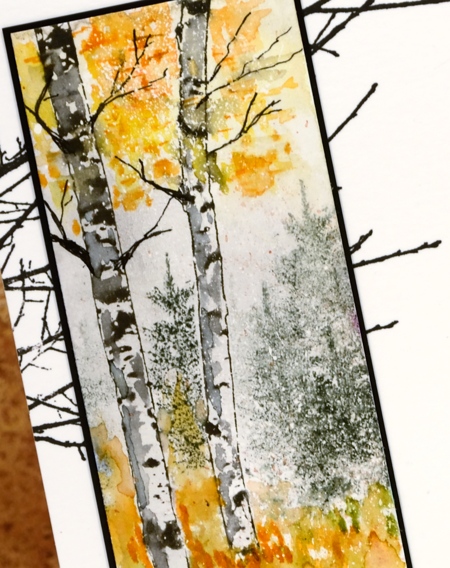
I stamped the two trunks from the new ‘Nature’s silhouettes’ transparent set on watercolour paper already covered in spots of masking fluid. I masked the trunks with post-its while I stamped the fir tree in the background then painted colour at the top and bottom of the panel with a combination of brusho and distress markers. I added some shadow and twigs to the trunks to make them look more tree like.
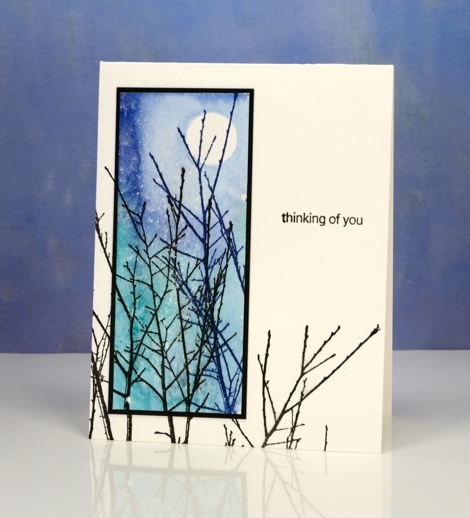
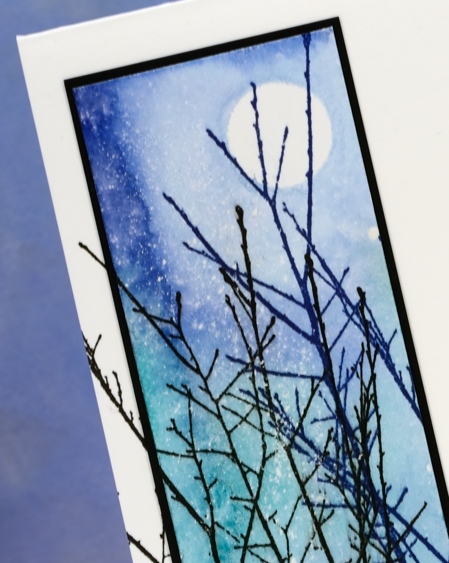
On my second mini panel I masked a moon with masking tape then used distress stains to paint a blue and green sky over the splatters of masking fluid. I turned this into a little scene by adding the ‘Into the Sky’ stamp in blue and black ink. I love this delicate stamp of branches and decided to stamp it on both the bases for today’s cards. It mimics the twiggy branches on the birch trees above and continues some of the upward reaching branches in the panel below.
Supplies:
Stamps: Nature’s Silhouettes, Prancers, Into the sky, Snippets (PB)
Paints: Brusho powders (Colourcraft)
Inks: Versafine Majestic Blue & Onyx black ink (Tsukineko) Black Soot, Rusty hinge, Spiced marmalade, Peeled paint distress markers, Evergreen Bough & Blueprint sketch distress stains (Ranger)
Cardstock: Fabriano 100% cotton hot pressed watercolour paper, Neenah epic black cardstock
Also: masking fluid, masking tape
Limberlost card
Posted: July 8, 2016 Filed under: Butterfly trio, Color Burst, Time, Wondrous | Tags: color burst, Penny Black stamps, Ranger Distress stains 28 Comments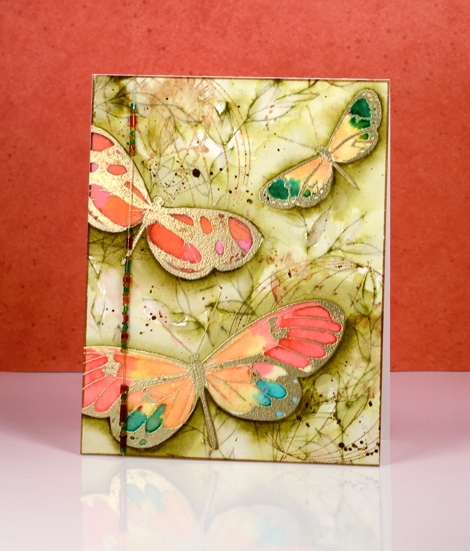
Earlier in the week I posted my art journal page inspired by ‘A Girl of the Limberlost‘. After completing the page I wanted to create a card with a similar feel. When I created my first book inspired journal page (The Lion, the Witch and the Wardrobe) I created the card first then expanded the scene into a double page. This time I am working the other way round.
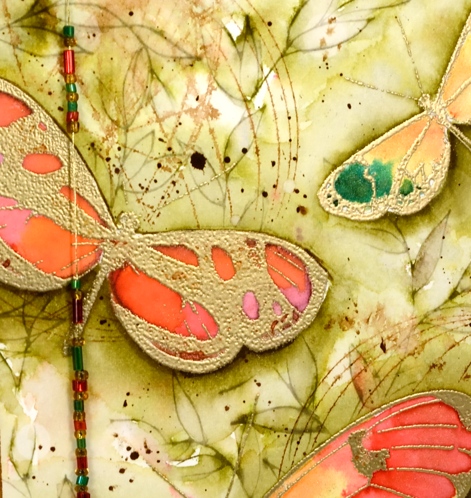
I created the butterflies the same way as shown on the video but directly on the watercolour panel. I used gold embossing powder and changed the colour palette for the wings. I stamped the butterflies again on label paper and cut them out to make masks to protect the painted butterflies while I stamped and coloured the background foliage. This panel was my colouring for day#3 of Kathy Racoosin’s 30 day colouring challenge.
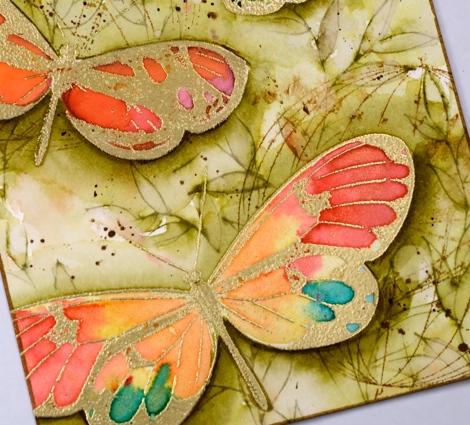
I used the large leafy outline stamp, Wondrous, inked with forest moss distress stain to fill the background with leaves then painted forest moss stain in and around the leaves. I painted extra layers around the edges of the butterflies to lift them a little. When that all dried I stamped on of the new ‘time’ stamps and spritzed it so it would bleed into the background. To finish the background I splattered some dark brown stain and some water.
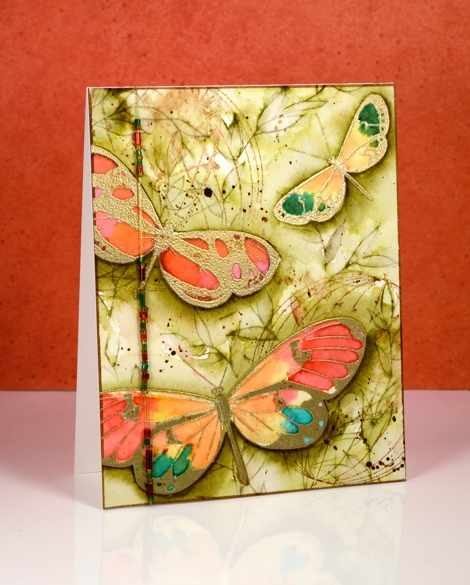
The panel was already quite large so I decided not to mat it in a co-ordinating colour. Instead I chose to string some beads on a gold thread and attach that down the side of the card. Thank you for all your generous comments this week. I am thrilled you enjoy what I share here and always love to hear from you. I was very interested to read that several of you enjoyed ‘A Girl of the Limberlost” as much as I did.
Supplies
Stamps: Butterfly trio, Time, Wondrous (PB)
Ink: Versamark ink, (Tsukineko) vintage photo, forest moss distress ink and stain
Paints: Colorburst alizarin crimson, merlot, tangerine, phthalo green and liquid metal yellow gold, iron oxide (Ken Oliver)
Paper: hot pressed Fabriano watercolour paper, Neenah Epic black cardstock, vellum
Also: gold embossing powder, gold thread, seed beads
Vintage Jubilance
Posted: June 7, 2016 Filed under: CAS, Jubilance | Tags: CAS, Penny Black stamps, Ranger Distress inks, Ranger Distress stains 17 Comments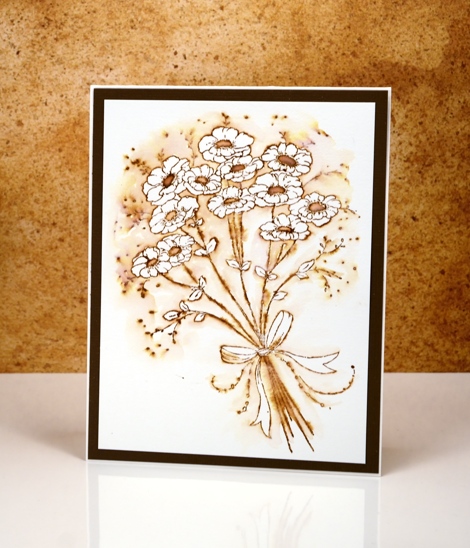
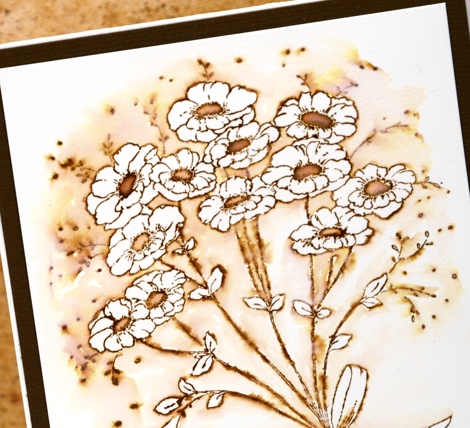
More vintage flowers on display today with a slightly different technique to try. As with my previous vintage style watercolours (birdhouse, butterflies, tulips) I stamped the image in vintage photo distress ink. Other water based dye inks in brown would probably work but I like the ease with which I can dilute and spread the vintage photo ink or stain.
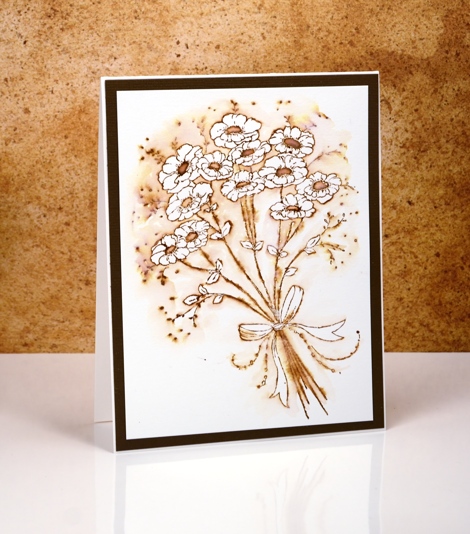
After stamping, instead of pulling ink from the outline into the flowers and leaves, I pulled ink out into the background leaving the flowers and leaves white. The contrast of brown with white makes the flowers pop and look whiter than they would if they were not surrounded by colour. It is a simple technique you could try with any colour ink.
I would love to hear if you try some ‘vintage style watercolour’. Thanks for dropping by.
Supplies:
Stamps: Jubilance (PB)
Inks: Vintage Photo distress ink,Vintage Photo distress stain (Ranger)
Cardstock: Hot pressed Fabriano watercolour paper, brown cardstock
Umbrellas
Posted: May 27, 2016 Filed under: April Showers | Tags: Penny Black stamps, Ranger Distress stains 10 Comments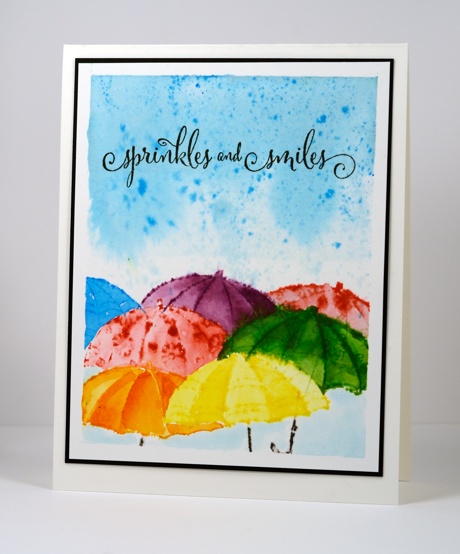
I love pretty umbrellas and umbrella motifs in general so when I created this card I wanted to give them all bright colours. I did some masking to get all my umbrellas in amongst each other then watercoloured each one a different colour. I painted the sky first wet into wet then splattered some blue stain over it when it was almost dry but not quite. The umbrella scene is framed in white from the initial taping with masking tape then matted in black and attached to a natural card base.
At present I only have a black umbrella but there are such lovely coloured ones as well as the cute ones with paintings and the like on them; I think it is time for a new one. Ideally I’d choose a red raincoat(with polka-dot lining), red boots and a red and white polka-dot umbrella. In actual fact I don’t have any of those things!
Supplies:
Stamps: April Showers, Sprinkles and Smiles ( PB)
Inks: Mowed Lawn, Festive Berries, Ripe Persimmon, Salty Ocean, Tumbled Glass, Scattered Straw, Seedless preserves, Spiced marmalade distress stains (Ranger)
Cardstock: Fabriano 100% cotton hot pressed watercolour paper, Neenah Classic Crest Natural White 110lb smooth, Neenah Epic Black
Lilac Roses – a tutorial
Posted: May 19, 2016 Filed under: Scented Beauty, Tutorial | Tags: Penny Black creative dies, Penny Black stamps, Ranger Distress inks, Ranger Distress stains, Tombow dual brush pens, Tutorial, video 20 Comments
The new scented beauty rose stamp from PB is such a pretty stamp. I have tried a variety of mediums and styles with it so far and will share a few different cards at the end of this post. First let’s talk about this card. Can you believe this is my second video this month? I’m hoping to continue this pattern, but I know I’ve said that before.
I am fairly new to tombow dual brush pens; I bought a few for lettering but recently I added to my collection and started using them for stamping as well. They blend nicely with each other and with water on watercolour paper. For this card I only used two colours but managed to vary the intensity of colour by diluting with water. As is often my habit I didn’t think about the sentiment until the end and felt that a stamped sentiment messed up the balance of the design too much. Instead I settled on one of the thinnest die-cut sentiments I have which stretched across the base of the card keeping things balanced left to right but maybe a little bottom heavy!
I used tombow dual brush pens in the video but you could use stamp pads or distress markers for similar results.
Supplies:
Stamps: Scented Beauty (PB)
Dies: Many Thanks
Inks: Light Olive-126, Dark Plum-679 Dual Brush pens (Tombow)
Cardstock: Fabriano 100% cotton hot pressed watercolour paper, olive green cardstock
Below are a few more cards featuring ‘Scented Beauty’. The technique is similar to that shown in the video but with different mediums. I varied the amount of water added and did not always ink the whole stamp.
Supplies:
Stamps: Scented Beauty, Treasured Sentiments (PB)
Inks: Dried Marigold, Pine Needles distress stain (Ranger)
Cardstock: Fabriano 100% cotton cold pressed watercolour paper,green cardstock
Supplies:
Stamps: Scented Beauty, Treasured Sentiments (PB)
Inks: Picked raspberry distress marker (Ranger) Versafine onyx black (Tsukineko)
Cardstock: Fabriano 100% cotton cold pressed watercolour paper, black cardstock
Supplies:
Stamps: Scented Beauty, Treasured Sentiments (PB)
Inks: Mowed Lawn, Ripe Persimmon, Spiced Marmalade, Forest Moss, Spun Sugar, Weathered wood distress stains (Ranger)
Cardstock: Fabriano 100% cotton cold pressed watercolour paper, purple cardstock
Blue bird houses
Posted: May 16, 2016 Filed under: Good neighbours | Tags: Penny Black creative dies, Penny Black stamps, Ranger Distress stains, Tsukineko Versafine inks 13 Comments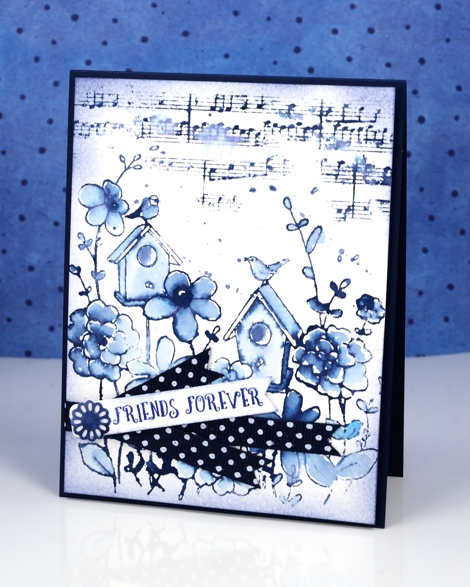
It’s all about blue on my card today. I used chipped sapphire distress ink for all but the sentiment and managed to get different blues by diluting some areas more than others. I inked the stamp with distress stain which made the print very juicy and perfect for the watercolour effect. I used a wet paintbrush to pull the colour in from the stamped outline. I also stamped the music in chipped sapphire ink and splattered a few drops of water to soften the notes and staff. To frame the panel I sponged around the edges. I stamped the sentiment in versafine majestic blue because versafine does sentiments so very nicely. I had some polka dot ribbon on hand so cut the sentiment strip and ribbon ends to match and layered them with a die cut flower on top.
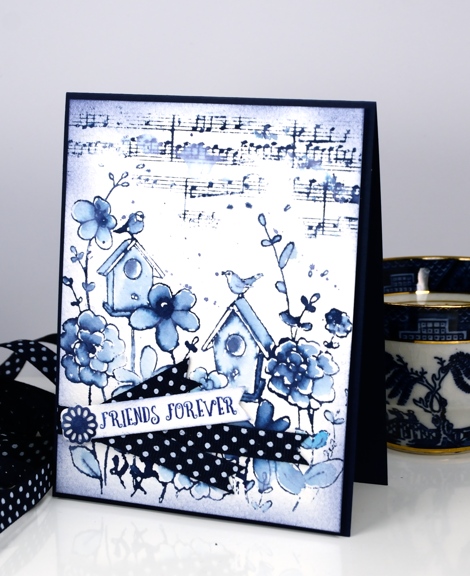
The colour scheme reminded me of the willow pattern china bowl my mother often used for fruit salad (probably still does) I wasn’t sure whether I owned any willow pattern but I checked my tea cups and saucers and found one which I popped in the background of the second photo.
Supplies:
Stamps: Good Neighbors, Happy Snippets, Footnotes (PB)
Dies: Layered Flower (PB)
Inks: Chipped Sapphire distress stain and ink (Ranger) Majestic Blue Versafine ink
Cardstock: Fabriano 100% cotton cold pressed watercolour paper, Neenah patriot blue cardstock
Also: Polka dot ribbon
Poppy Pattern Party
Posted: May 3, 2016 Filed under: Color Burst, Poppy Pattern | Tags: color burst, Penny Black creative dies, Penny Black stamps, Ranger Distress stains 15 Comments
It’s the poppy pattern stamp’s turn to be featured today. I have a variety of colour schemes but only two mediums. The most subdued version is the one above done with forest moss, worn lipstick and scattered straw distress stains plus a black marker to add definition to the poppy centres once the stains had dried a little. I used a MISTI to add colours one at a time.
The remaining cards were all done with colour burst powders dropped onto water stamping. You lose a lot of definition with this technique but you achieve some gorgeous bold colours and in some cases some magical blending. Above I used phthalo green, lemon yellow and merlot (I think). Below it was probably alizarin crimson.
The bright purple panel below was the one section I saved from the large stamped image. I stamped it with water but when I went to sprinkle violet colorburst powder I got a little more than I bargained for. I let it dry, then chose one section to touch up, trim and turn into a card.
Supplies:
Stamps: Poppy Pattern, Special Wishes, Friendship, Sentiment Collection (PB)

Dies: Deco Frame (PB)
Mediums: Versafine onyx black (Tsukineko) distress stains (Ranger) Colorburst powders (Ken Oliver)
Cardstock: Fabriano 100% cotton hot & cold pressed watercolour paper, Neenah Epic Black cardstock
Shaded Canopy
Posted: May 2, 2016 Filed under: Shade Canopy, Stamped Landscapes | Tags: Fabriano Watercolour Paper, Penny Black stamps, Ranger Distress stains 3 Comments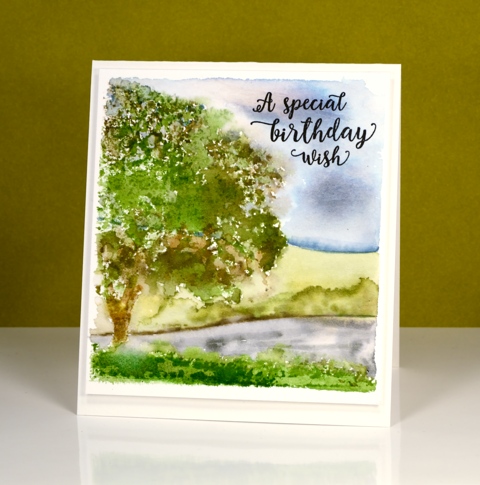
‘Shaded Canopy’ is another lovely (and versatile) stamp from the new ‘A Little Bit of Sunshine’ release. My scene today could be spring or summer depending on where you live. When I first moved to Canada I could not believe how bright green the summers were. Where I lived in Australia I was used to pale muted colours in summer because everything became very dry.
I used distress stains and inks for stamping and for painting the background leaving a space around the scene to frame it then popping up the panel on the same colour card base.
I am teaching a class this month in Ottawa where we will use this stamp to create four cards, one for each season.
Supplies:
Stamps: Shade Canopy, Words of Kindess(PB)
Inks: Forest Moss, Peeled Paint, Weathered Wood, Tumbled Glass, Mowed Lawn, Vintage Photo distress stains (Ranger)Versafine Onyx black (Tsukineko)
Cardstock: Fabriano 100% cotton hot pressed watercolour paper


