
Vintage Watercolour tutorial
Posted: May 4, 2016 Filed under: Fly High, Playful, Tutorial | Tags: Faber-Castell Albrecht Durer Watercolour pencils, Penny Black stamps, Ranger Distress inks, Speedball elegant writer, Tutorial, video 31 Comments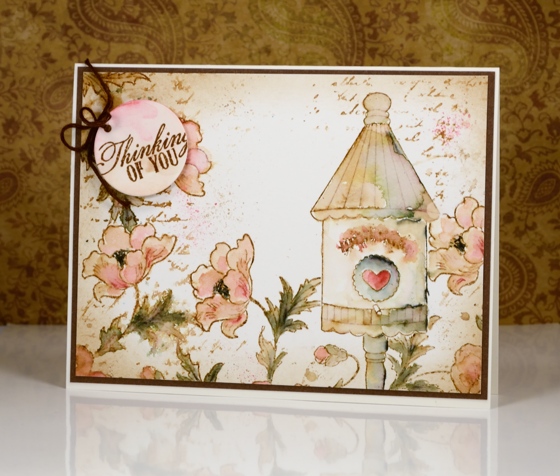
I have a tutorial for you today (gasp) which I made for SplitcoastStampers. In it I show my technique for creating a vintage style watercolour. By vintage style I am referring to muted sepia tones in this case with some blurred script and watermarks to give it an even more aged look.
I chose a birdhouse from the Fly High set and paired it with the Playful stamp using masks to stamp all my elements before I started watercolouring.
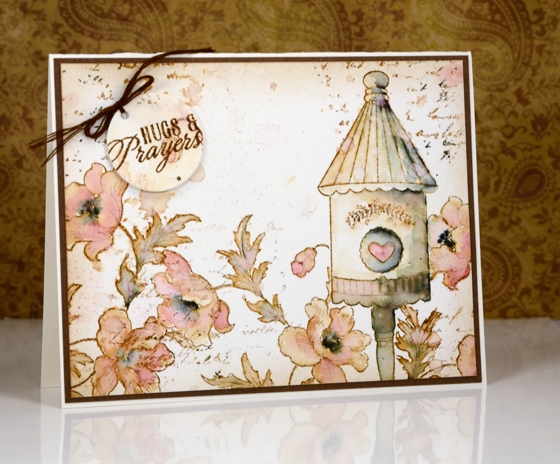
The two examples above are fairly similar; I changed the sentiment and naturally the watercolouring is not exactly the same. If you visit Splitcoaststampers you can see the stepped out photo tutorial or you can watch my video tutorial below.
This video came together quite smoothly (with the help of my son and my husband) so here’s to more!
Thank you for being so kind in your comments. You really are such an encouragement to me. I hope you try some vintage style stamping; all you need is some brown ink and a few watercolour pencils. The fun of the elegant writer pen is entirely optional.
Supplies:
Stamps: Playful, Fly High, Soar (PB)
Inks: Vintage Photo distress ink (Ranger)
Cardstock: Hot pressed Fabriano watercolour paper, brown cardstock
Also: elegant writer (Speedball) Albrecht Durer watercolor pencils 142, 180 (Faber-Castell)


I love this vintage look. The colors and technique are beautiful. Thank you for the video.
I saw that this morning, oh Famous One. :). You are a wonderful artist and teacher, above all, a good human being. Thank you.
This is beautiful Heather and thank you for the video tutorial. x
This is stunning…I have to come over to your blog and sub…thank you again..
GORGEOUS card Heather…..enjoyed the video and seeing how you achieved the vintage look!!!! Thanks so much for sharing your artistry!
Paper Hugs,
Jan
Your card is wonderful – thanks so very much for the video! Your card is very inspiring and I love the look of it! Thank you!!!
This is one of my favorites of your works so far. I loved the easy-to-follow video as well.
I love the soft look of your beautiful card. Thank you for the tutorial.
You continue to inspire me! It is beautiful and you make it look easy! Thanks for sharing! Thanks also to your husband & son for helping with the video!
Just watched the video tutorial…that was wonderful and very helpful! Okay…now I can’t wait to use my Elegant Writer pen…I could see just how to use it without having it overpower the scene! Thank you for the inspiration and thanks to your family for helping with the video presentation.
Heather, this is such a gorgeous technique, and I LOVE both cards! Thank you so much for the step-outs and the video on SCS! It really helped me, and you make it look so much easier. I love all the tips and hearing your sweet voice! Thank you so much!! Stunning cards from an amazing artist, sweet friend! Hugs!
[…] Vintage Watercolour tutorial → […]
Brilliant video, thank you so much! Both the cards are fabulous, I really like the vintage look of them xxx
Wow! Just love your artwork.
I found a number of black Elegant Writer pens in my stash. I don’t know if it’s because they are old or what, but they look purple. One looks black. All definitely bleed out in purple tones – not the pink and green that you are getting. Rats. But, I’ll still give it a go. Or, make do with some watercolors.
Absolutely Love this Heather!!! U r such an inspiration!
So beautiful!
Love this technique and will use again and again. I didn’t have the birdhouse so I replaced it with three butterflies. Hope you will come to Montreal again
Very beautiful, also.
[…] {Card originally posted to Heather’s blog HERE.} […]
Beautiful and elegant cards, Heather. Thanks for the video tutorial. I loved watching how you achieved the vintage look.
[…] I have some more vintage style watercolour cards to share this week. Last month I posted a video tutorial showing a method for creating a vintage look with brown dye ink and watercolour pencils. I have created a few more cards along the same lines dreamed up some variations as well. To see the original card and video tutorial click here. […]
[…] today with a slightly different technique to try. As with my previous vintage style watercolours (birdhouse, butterflies, tulips) I stamped the image in vintage photo distress ink. Other water based dye inks […]
Absolutely gorgeous! Thanks for all of the detail in the video!
[…] a little accent on the side. You can find my earlier ‘vintage watercolour’ cards here:birdhouse, butterflies, tulips, jubilance, […]
[…] the square ‘flower box’ stamp. I completed this panel using the technique shared in my video tutorial. I stamped the image with vintage photo ink and added black here and there with the ‘elegant […]
What a great tutorial! Thanks for that. With your background stamp – one thing I also do with this is ink up my stamp then lightly blot off a little in random spots with a paper towel. It doesn’t get rid of it all, but lightens it and helps with the effect you were going for! LOVE, love LOVE your card Heather! 😉
Thank you for the tutorial, Heather. I am learning more about Distress Inks and this is helping me to explore more of how to use them 🙂
So gorgeous Heather, thanks for the great video too!
This is amazing ! Just found your blog in search of people who watercolour as well as I do on my site! I love the vintage about this all! Well done
[…] earlier in the week. I returned to a style I have featured on the blog several times this year, a vintage appearance. To achieve the aged look I stamp first in vintage photo distress ink then blend the stamped ink […]