
Parade of flowers
Posted: March 7, 2018 Filed under: Parade of flowers | Tags: Dr Ph Martin Hydrus watercolor paints, Penny Black creative dies, Penny Black stamps, Ranger Distress inks, Tsukineko Versafine inks 5 Comments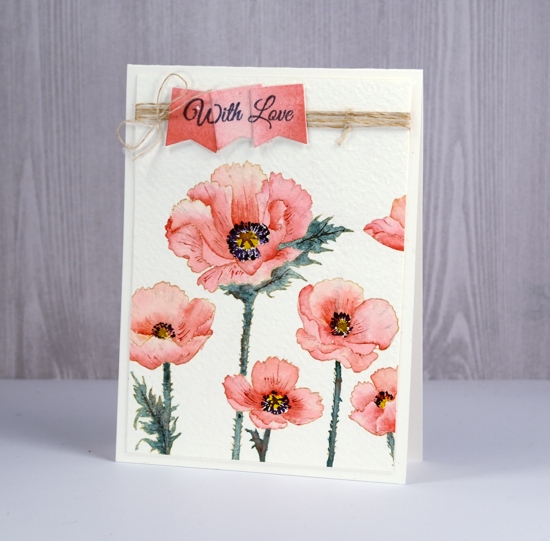
The flowers continue to bloom across my blog this week and it’s making me pretty keen for spring to arrive. Today’s poppies are as realistic and detailed as you are likely to see from me! A little different from my distress stain loose and watery florals. I used a stamp positioner to stamp ‘parade of flowers’ in antique linen distress ink on cold pressed watercolour paper; because of the texture of the cold pressed paper I stamped a few times to guarantee a complete image.
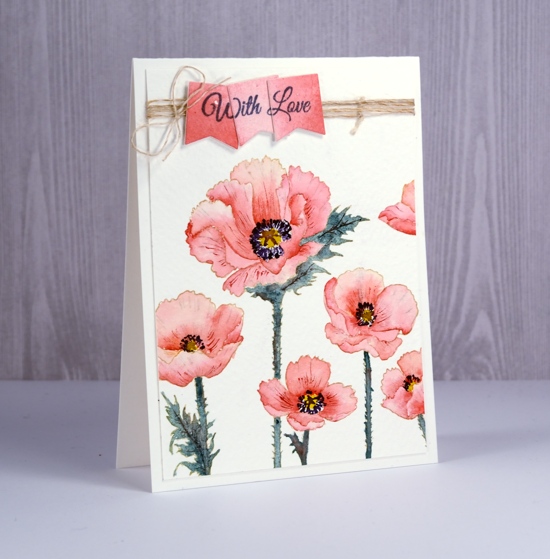
All the painting was done with Dr Ph Martins Hydrus watercolours. When undiluted the colours are very vibrant so I put only a drop of each colour in a palette then added water. To keep the colour scheme muted and cohesive I limited my paint choices. The petals are painted with ‘deep red rose’ and the leaves and stems a mix of phthalo green, deep red rose and Venetian brown. The centres of the flowers are gamboge, with dark details added in ultramarine and Venetian brown.
I worked on one petal at a time painting first with water then dropping in some deep red rose paint. I blended the colour to the edges then added more paint if necessary to create shadow or deeper colour near centre of flower. While each petal dried I worked on a non-adjacent one. When all the petals were dry I added some more red here and there to create a bit more depth and when that dried I used a very fine tipped brush to paint veins on some of the petals. I wanted to stamp the sentiment on a matching panel so I painted diluted deep red rose paint on a scrap of hot pressed watercolor paper the die cut three tags using die from ‘gift card pocket’ set. With the stamp postioner I was able to stamp ‘With Love’ sentiment from ‘special wishes’ set on tags one at a time so when together they would over lap each other.
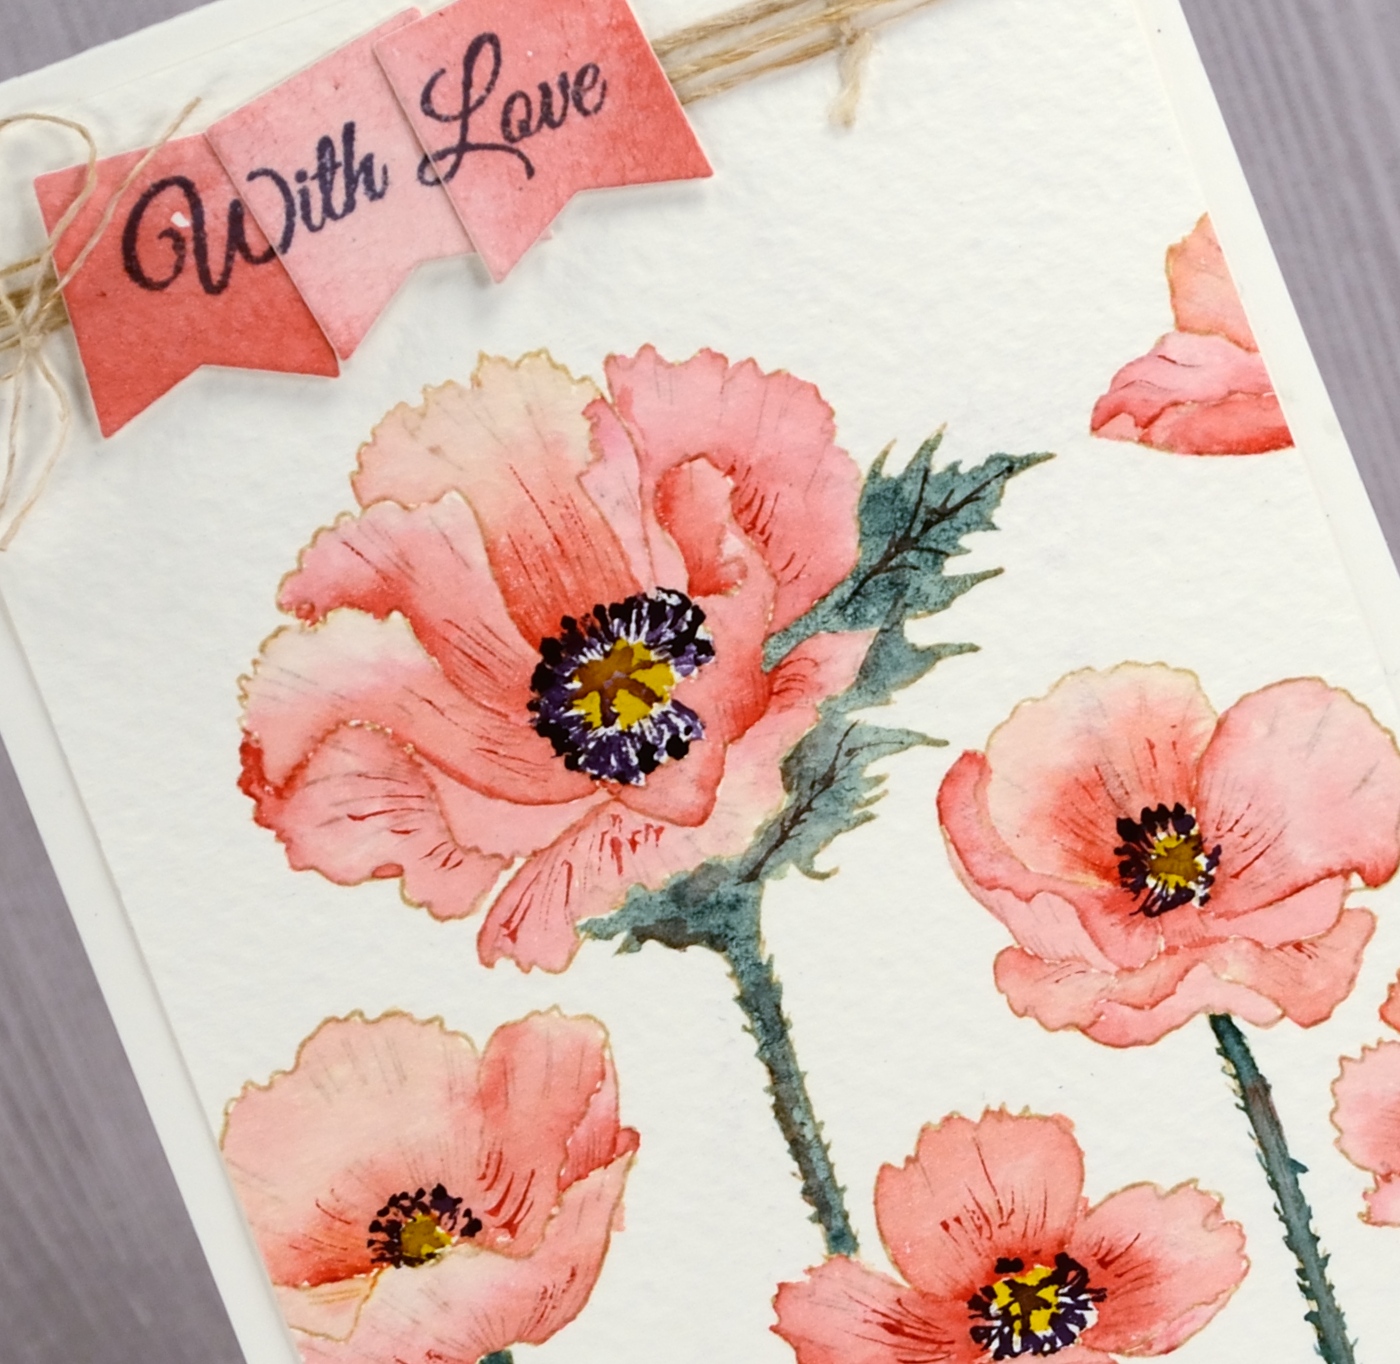
I wrapped twine around top of painted panel, attached the three sentiment tags over the top and attached the panel to a natural coloured card base.
Don’t forget to pop over to the ‘Sparkle with Us’ challenge hosted by The Foiled Fox and me. There is already some sparkly inspiration linked up but we’d love to see more.
Supplies
Stamps: parade of flowers, special wishes


Die: gift card pocket

Paper: rough 100% cotton watercolour paper, hot pressed watercolour paper


Ink: antique linen distress ink, imperial purple versafine ink

Paints: deep red rose, gamboge, pthalo green, Venetian brown, ultramarine Dr Ph Martins Hydrus watercolors (soon to be available at The Foiled Fox)
Also: antique hemp twine
tulip bouquet
Posted: March 6, 2018 Filed under: Brusho, tulip bouquet | Tags: Brusho, Penny Black stamps, Ranger Distress inks 3 Comments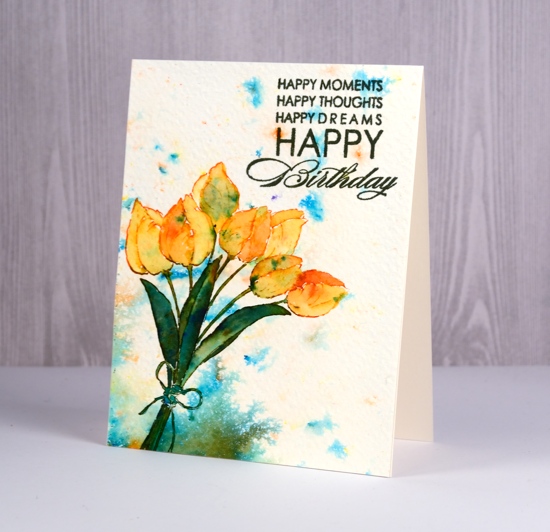
Here are some more blooms to spur on the spring feelings. I worked on an abstract brusho background, one of the panels I mentioned back in an earlier post created with some sprinkled and spritzed brusho. I took my colour cues from the brusho and stamped the stems and leaves in forest moss distress ink and petals in spiced marmalade.
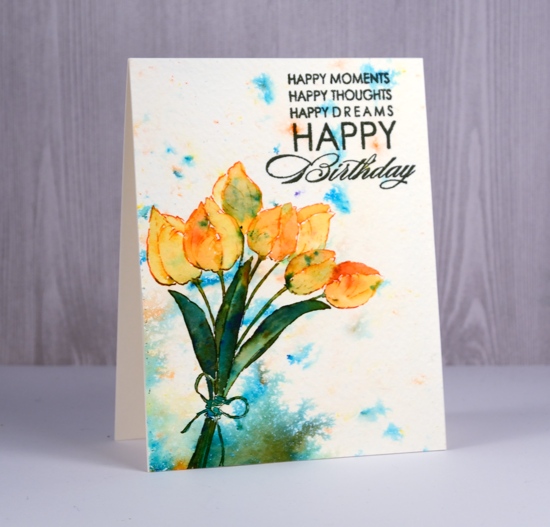
Next I sprinkled very small amounts of gamboge brusho in the tulips and activated it with a damp brush. I did one petal at a time to stop them all just blending into the same shade. I made sure some areas stayed dark and others were more diluted and light. I did the same thing for the stems and leaves but used turquoise and olive green brusho.
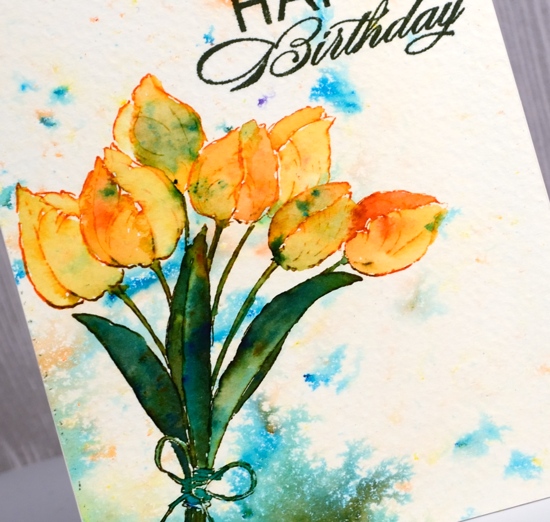
The panel is cold pressed watercolour paper so there is some texture to it. Have you tried stamping over a brusho background? I enjoyed the way the brusho dictated the colour scheme for me but didn’t take over the whole panel.
Supplies:
Stamps: tulip bouquet, smile today!


Paper: cold pressed watercolour paper, neenah natural white


Inks: spiced marmalade distress ink, forest moss distress ink, olympia green versafine ink


Paints: gamboge, turquoise, olive green brusho


Tools: Stamping platform

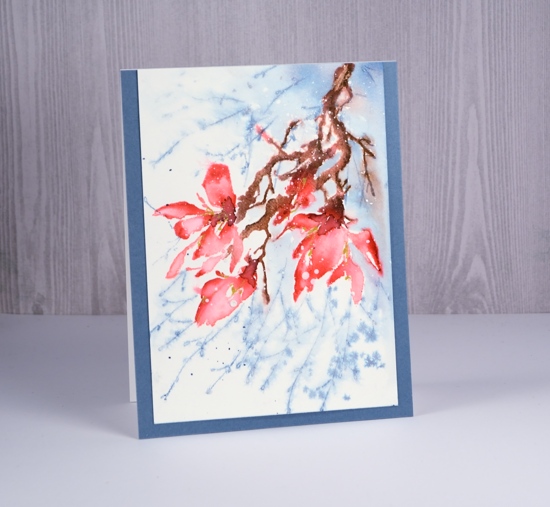
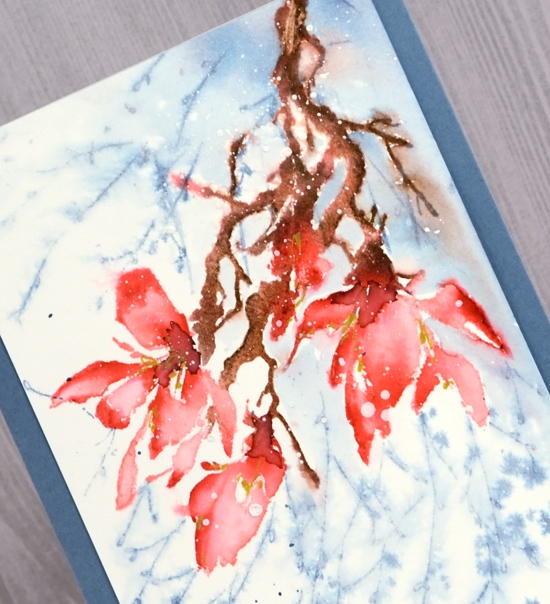
Blossom branch video tutorial
Posted: March 5, 2018 Filed under: blossom branch | Tags: Penny Black stamps, Ranger Distress inks, Tsukineko Versafine inks 14 Comments
I am happy to be sharing all manner of sweet spring goodness here and on the Penny Black blog this week. Starting the week is this gorgeous blossom branch stamp and a video tutorial. Blossom branch is a brushstroke stamp so I was after a hand painted look on my finished project. In my previous video I used distress stains applied to the stamp. For this project I worked with distress inks and markers, once again a water-soluble medium but in a format that can be applied with more accuracy than distress stains. The result is more detail on the final image.
I worked in a stamp positioning tool so I could add one or two colours at a time, three shades of green for the leaves and several pinks for the petals. You can see my process in the video. At one point the camera cut out without me realising so you don’t see all the blending of petal. I used the same process for all the flowers though, so you can get the idea from all that was filmed. I included a tip for a quick matching envelope too.
Hope you have fun with this technique. See you tomorrow.
Join my online card class COLOUR CLUES to create floral beauties!
Supplies
Stamps: blossom branch, choose happy


Inks: versafine vintage sepia, shabby shutters, crushed olive, peeled paint marker,


worn lipstick, abandoned coral, barn door marker, gathered twigs marker


Paper: hot pressed watercolour paper
Also: MISTI, gold signo gel pen


Woodlands
Posted: February 20, 2018 Filed under: French Script, Woodgrain, Woodlands | Tags: color burst, Darkroom Door stamps, Ranger Distress inks, Tsukineko Versafine inks, WOW embossing powders 4 Comments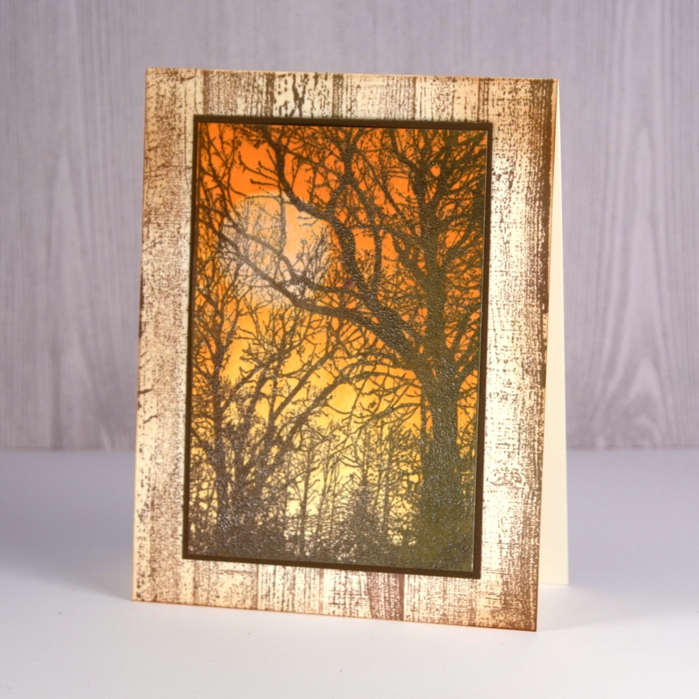
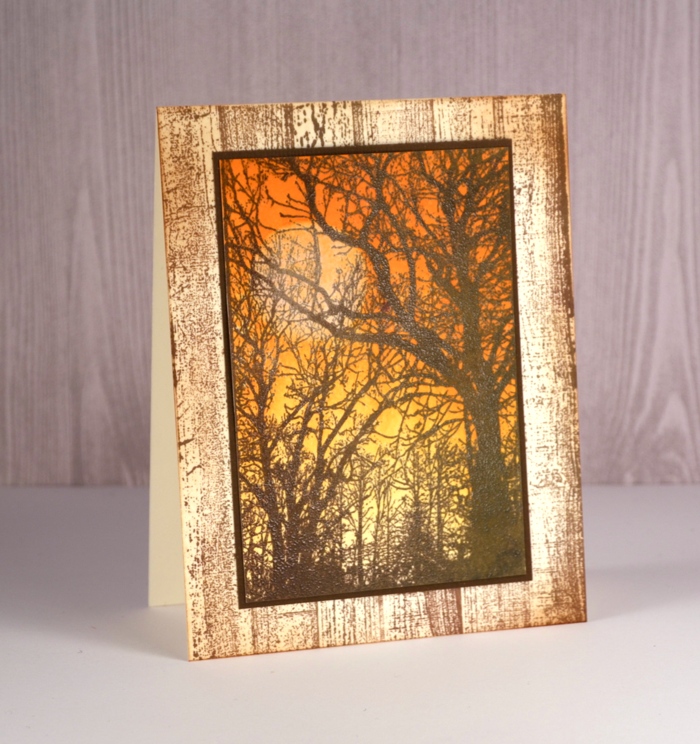
I had a lovely time with this new photo stamp from Darkroom Door. It’s called Woodlands and was perfect for creating an autumn scene, a winter scene and a sunset. Step by step instructions and a complete list of supplies are available on the Darkroom Door blog
The autumn scene involved brayering and distress inks.
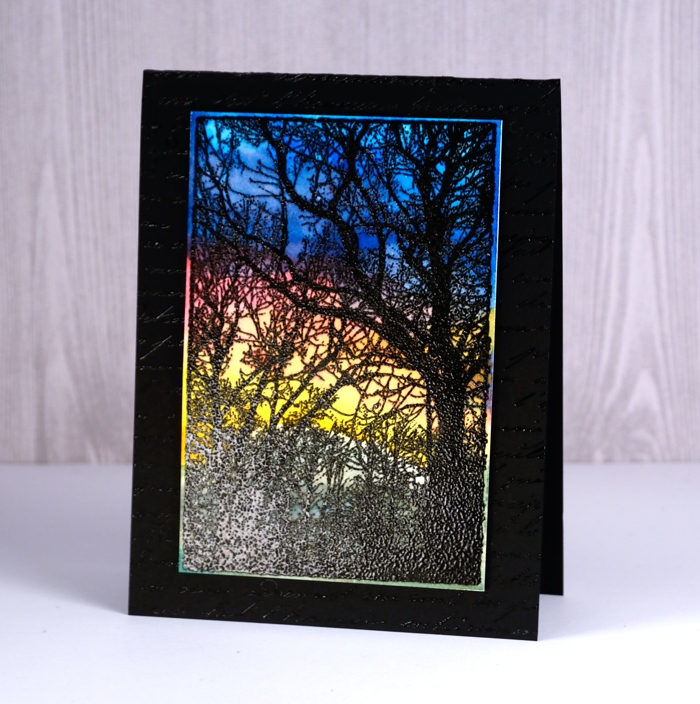
The sunset features the bright hues of colorburst powders over embossing.
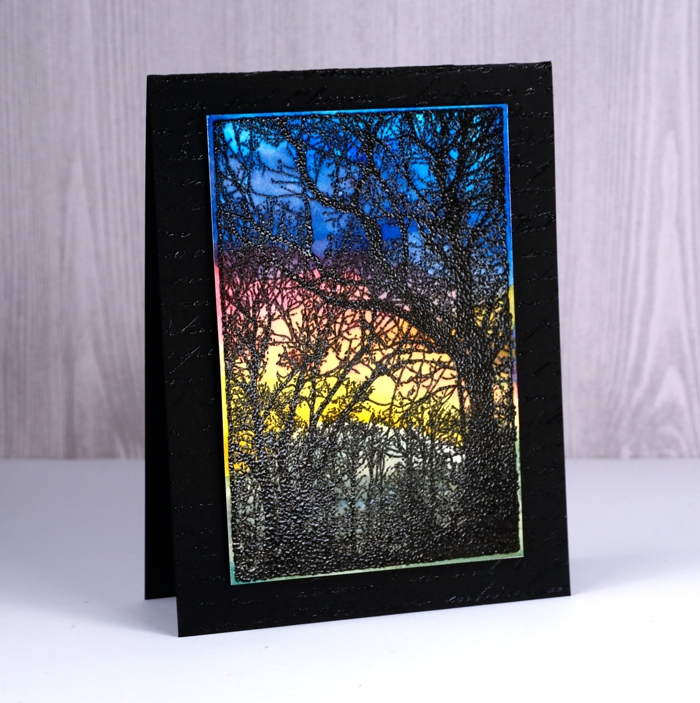
The winter scene below, which might be my favourite, was painted with distress inks.
I used a cool technique with a stamp positioner to get a layer of snow on the branches; if you’re interested pop over to Darkroom Door and check it out.
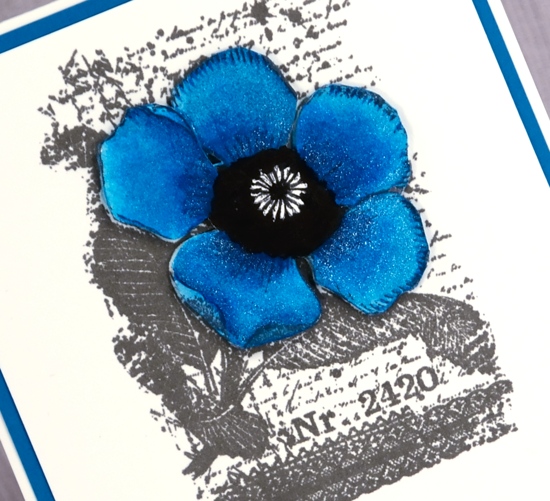
Botanical script
Posted: February 11, 2018 Filed under: Botanical Script | Tags: Darkroom Door stamps, Ranger Distress inks, Tsukineko Versafine inks 7 Comments
I am very happy to be sharing these two cards over on the Darkroom Door blog today. Both cards feature a floral collage stamp from the new Botanical Script set. You can find all the instructions over at Darkroom Door. My first card is done in a vintage style with distress inks.

My second card is bolder and brighter with a sparkly blue and white colour scheme.
I layered this one by cutting out and painting an extra flower. All the steps and supplies are listed on the Darkroom Door blog. While you’re there you can see the other pretty stamps from the Botanical Script set.
Snow blooms
Posted: February 8, 2018 Filed under: a little secret, Effulgent | Tags: Penny Black stamps, Ranger Distress inks 12 Comments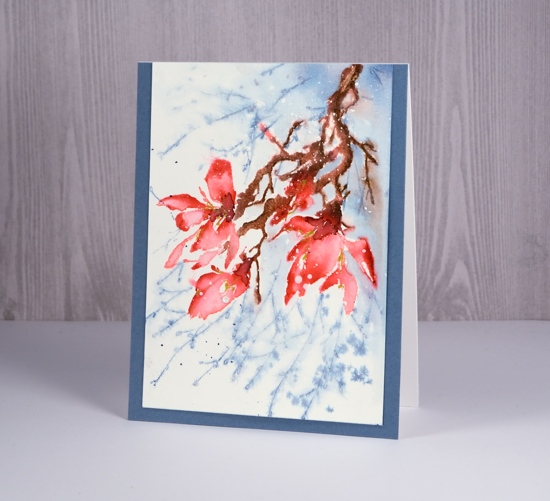
I sense a bit of a theme in this week’s cards; do you think maybe I’m thinking about spring? I am surrounded by gorgeous floral stamps in my workroom but by six foot snow banks outside. So today’s card started out as just a pretty pink magnolia but ended up caught in some flurries.
My plan was to build up colour step by step, keep it controlled and neat (not loose and watery). I stamped the whole stamp in worn lipstick ink then coloured the darker areas of the petals with a festive berries marker, the sepals in forest moss marker and the twigs in gathered twigs marker. I then blended the colour with water on a small brush so it was still fairly neat.
I wanted some extra foliage in the background and that’s when things started to go a little freestyle. I masked the flowers with a post it and stamped the ‘a little secret’ stamp a couple of times in stormy sky ink. The two stamps did not really look like they belonged together so I left behind my ‘neat’ plan and started spritzing the water around. The background softened but not quite enough so I painted some stormy sky into the background also. As I painted stormy sky right up to the edge of the branch the brown bled into the blue, things got loose and watery and, in my opinion, more appealing. I added some aged mahogany ink to the the centres of the flowers and some gold gel pen highlights. Then I wanted some snow as well so I splattered white gesso over the petals. I found a co-ordinating blue to frame the panel and kept it without a sentiment for now.
Supplies
Stamps: effulgent, a little secret


Distress inks and markers: worn lipstick, festive berries, forest moss, gathered twigs, stormy sky, aged mahogany


Paper: hot pressed watercolour paper,
Paint: white gesso

Also: gold gel pen
Vintage Rose
Posted: January 17, 2018 Filed under: Red blush, Textures | Tags: Brusho, Penny Black stamps, Ranger Distress inks, Tsukineko Versafine inks 8 Comments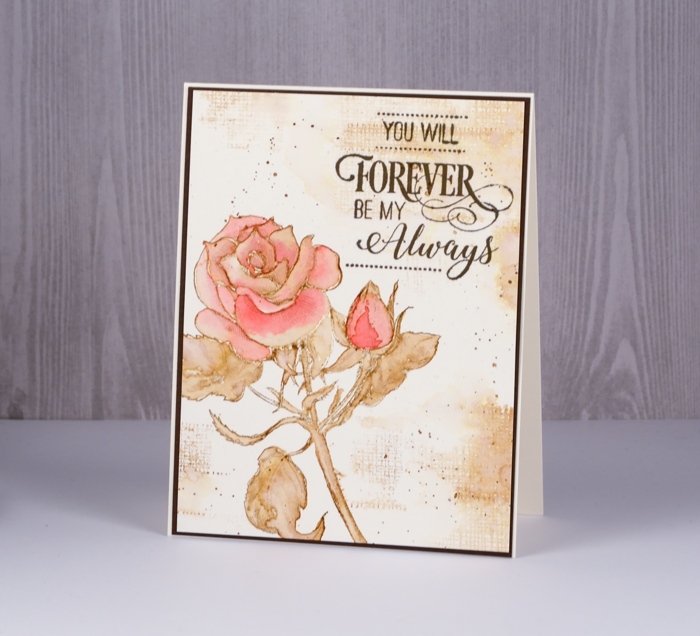
I am over on The Foiled Fox blog today sharing this vintage rose card. You have seen me work with this sort of colour scheme before; I enjoy painting with the ink from a stamped image. In this case the stamp is the Penny Black, ‘red blush’. Although I worked mainly in vintage photo distress ink, I did give it a red blush with some Ost. Red brusho watercolour paint. You can read my whole process over on the Foiled Fox blog. 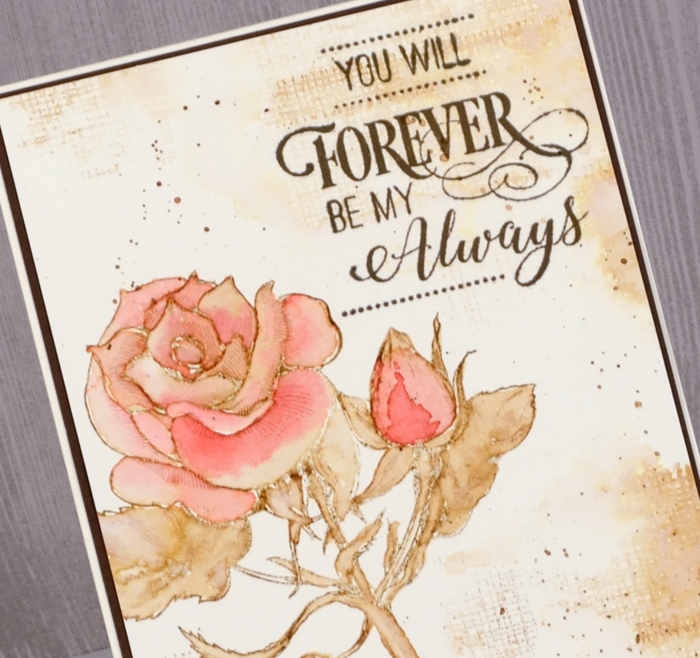
Supplies
Stamps: red blush, textures, forever & always


Inks: vintage photo distress ink, versafine vintage sepia

Paint: brusho
Paper: hot pressed watercolour paper, neenah natural white, brown cardstock

Ferns
Posted: January 16, 2018 Filed under: ferns, Leaves, Stencils | Tags: Darkroom Door stamps, Darkroom Door stencils, Ranger Distress inks, Tsukineko Stazon inks 4 Comments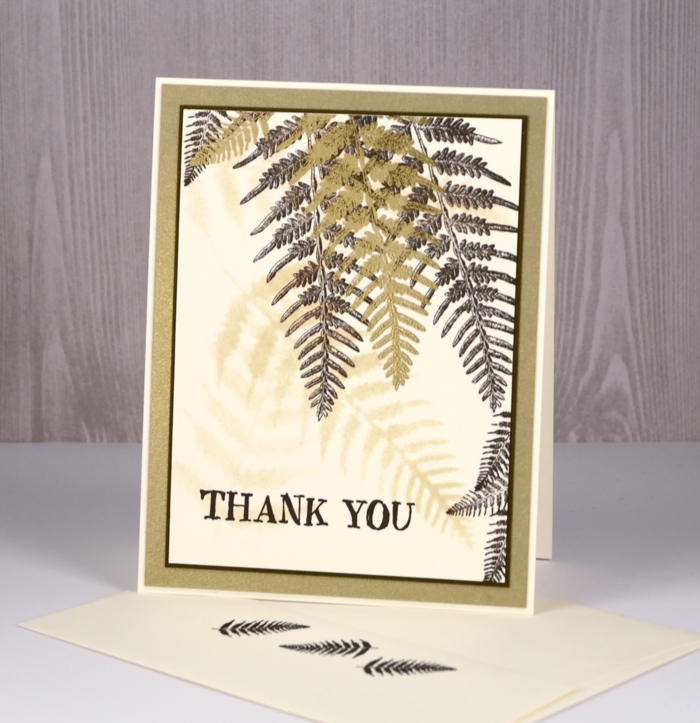
Darkroom Door has a wonderful range of stencils that co-ordinate with quite a few of their stamps. I used the ferns stencil to create a soft background for the fern stamps from the ‘leaves’ set. I used neenah natural white paper and sponged with the antique linen distress ink through the stencil. I did it three times to create a few soft background images.
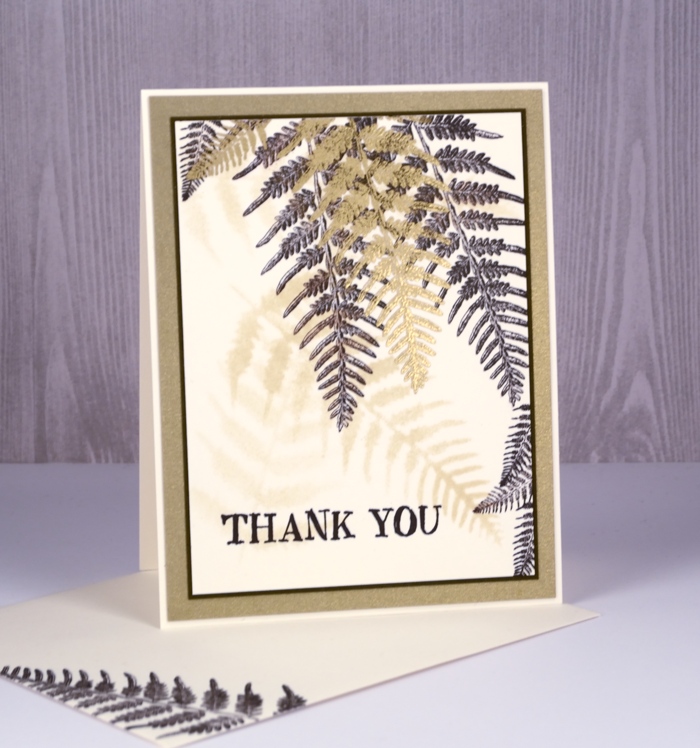
Over the top I stamped both the large and small ferns from the leaves set in stazon ganache ink. I have been pulling out the stazon inks whenever I’m working with the fine details of some of the Darkroom Door stamps. Initially I bought the stazon inks to pair up with my alcohol ink backgrounds but they are very good for fine detail stamping.
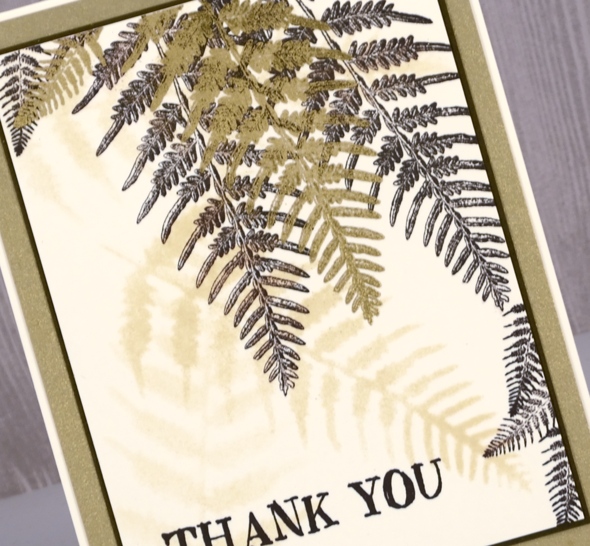
Once I had stamped quite a few ferns in ganache ink I stamped one large fern and one small in versamark then embossed them in gold. The sentiment and ferns on the envelope are stamped in stazon ganache. I added a narrow dark brown mat and a wider brushed gold mat also and attached it all to a natural white card base.
Supplies
Stamps: Leaves, Thank you


Stencil: ferns

Paper: neenah natural white, brushed gold, textured brown
Inks: antique linen distress, stazon ganache, versamark
Also: metallic gold rich embossing powder
Winter sky
Posted: January 12, 2018 Filed under: dressed in snow, peaceful winter, snowy village, Stamped Landscapes | Tags: Brusho, Penny Black stamps, Ranger Distress inks, Tsukineko Memento inks 8 Comments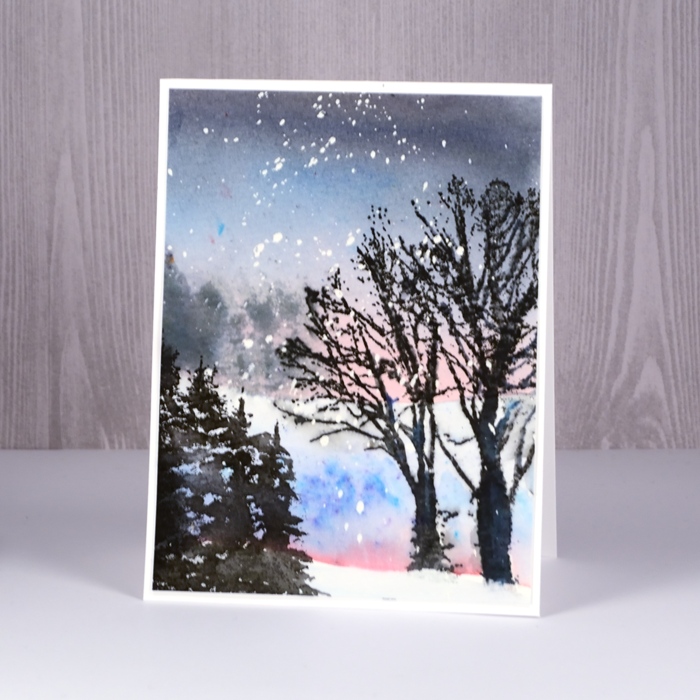
It’s taking me a while to get back into gear here on the blog but I have been busy planning my next class. Living as I do surrounded by winter beauty I often look a the sky or the landscape and wonder how I can turn it into a card. This is one such attempt. I looked at the sky one afternoon, because the sun sets in the afternoon around here, there is no waiting for evening! There was a pale pink glow above the horizon, a little blue then grey reaching up. I was managing to create some subtlety with this scene right up until the brusho shook out of the bottle rather more generously than intended! No matter, a lot of water and paper towel calmed things down again.
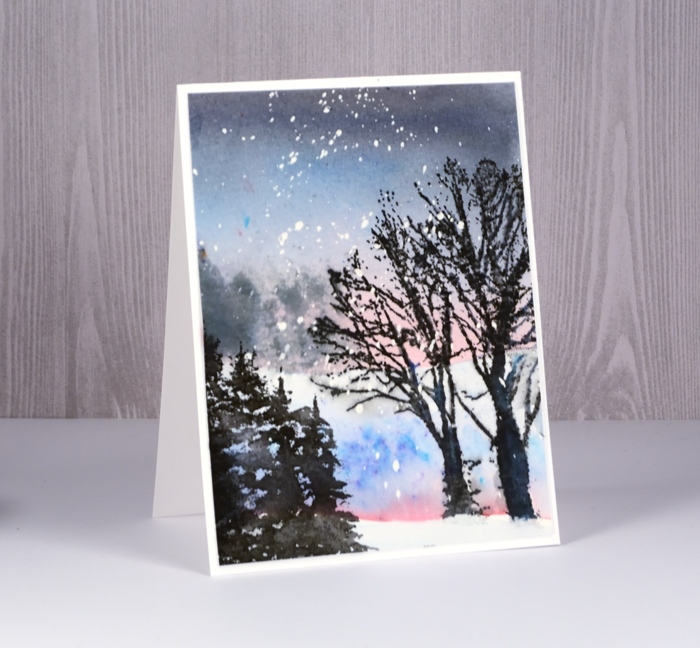
I started with a panel of hot pressed watercolour paper splattered with masking fluid. I painted some water across the panel where the horizon would be then sprinkled a little ost. red brusho above and blended it in with a paintbrush. Next I added grey brusho and blended that to fill the sky and finally some ost. blue brusho for some blue tones. I kept adding, blending and diluting until I was happy with the soft gradation of colour. While the sky was still damp I pressed just the small tree part of a landscape stamp out of the PB peaceful winter set repeatedly across the horizon inked with memento London fog ink.
I used the stamping platform to stamp and restamp the trees on the right from the PB snowy village set in black soot distress ink. As distress ink is water soluble I was able to paint over the stamping with water to make the image bolder and darker. I added a little blue brusho as I painted to give the tree some light and shadow. I dried the panel before painting another line of water, this time across the panel in line with the base of the tree trunk. Again I added the same brusho colours but got a bit more blue than I’d bargained for.
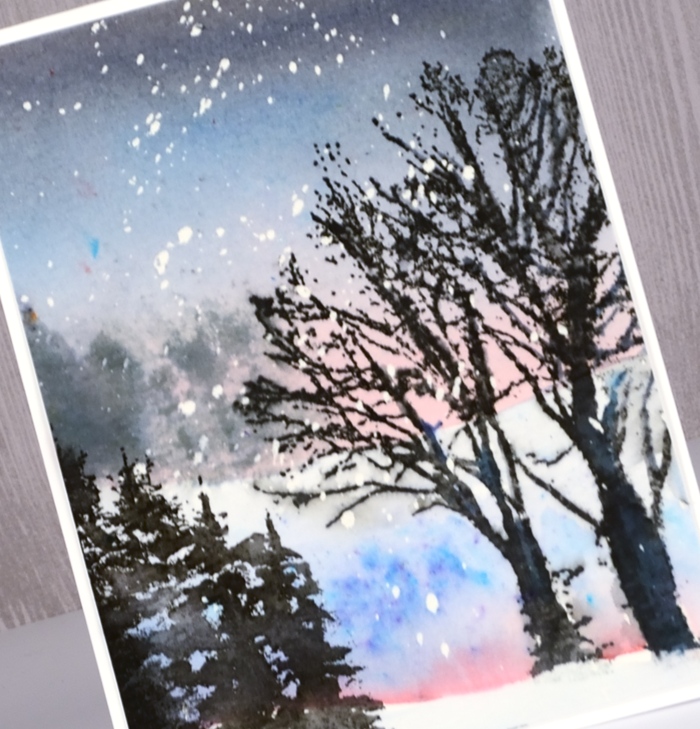
After drying that section I stamped just the left hand trees from the PB dressed in snow stamp again in black soot ink. I used a paintbrush to darken the stamped image and extend the trees a little more on the right. To finish I rubbed off the masking fluid and mounted the panel onto a white card base. All the supplies are linked below. I hope you have had a great week.
Supplies
Stamps:


Inks: black soot distress, London fog memento


Paint: brusho
Paper: hot pressed watercolour, neenah solar white

Also: masking fluid

A blessed gift
Posted: January 2, 2018 Filed under: Berry speckled | Tags: Penny Black stamps, Ranger Distress inks, Ranger Distress stains, WOW embossing powders 3 Comments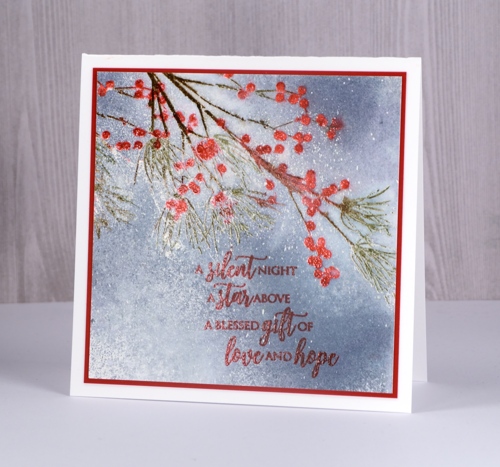
On the ninth day of Christmas I am returning to the blog. I’ve been enjoying some time with family and friends, relaxing, reading but I have not been creating cards! This panel started out as a practice for another project but I ended up turning it into a card anyway. I began with a panel of hot pressed watercolour paper with masking fluid splattered over it. I used a stamp positioner to stamp the different coloured elements of the berry branch in distress inks then embossed over the image with embossing powder. Unfortunately when you put embossing powder over masking fluid it sticks so the panel became very textured and very speckled with ‘snow’. I painted weathered wood distress stain over the background added a sentiment but was not able to remove much of the masking fluid as I had ‘glued’ it there with heat embossing!
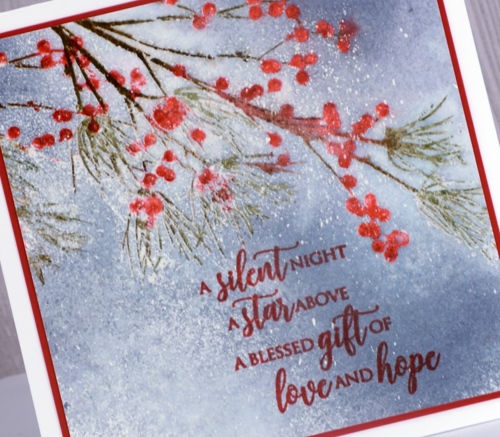
As this was a practice panel I changed my order of operations when I made the next card, stamping and embossing first then splattering masking fluid second. I hope your 2018 is off to a great start. I have been busy keeping up with Dressember details which I will post more about later but I’ll just add a quick thank you here to all who have donated to this worthy cause; you have really encouraged me.
Supplies
Stamps: berry speckled, peace & love


Inks: versamark, crimson red versamark, weathered wood distress stain


Distress Markers: festive berries, gathered twig, barn door, forest moss
Paper: Neenah solar white cardstock, hot pressed watercolour paper, neenah red pepper cardstock


Also: stamping platform, masking fluid, WOW clear gloss superfine embossing powder


