
The Washing Line
Posted: April 10, 2024 Filed under: City stacks, Concord & 9th, Echidna Studios, gel press, washing line | Tags: Concord & 9th, Echidna Studios, gel press, gel printing 2 Comments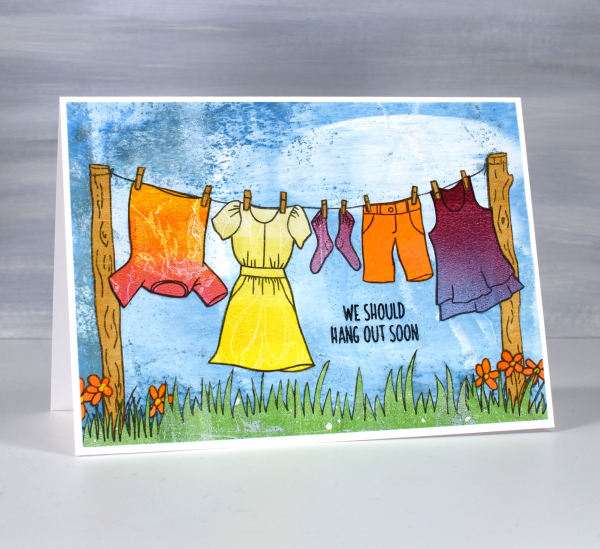
I’m not sure that this is strictly collage although it is all made from cut out papers glued together. I guess it is more like paper piecing, something I rarely do. But gel printing has me looking for all sorts of ways to use my printed papers. The ‘washing line‘ is a digital stamp from Echidna Studios and cutting out all the clothes took me way back to my paper doll days. I printed the washing line image on the seven different coloured gel prints then proceeded to pick colours for all the clothes.
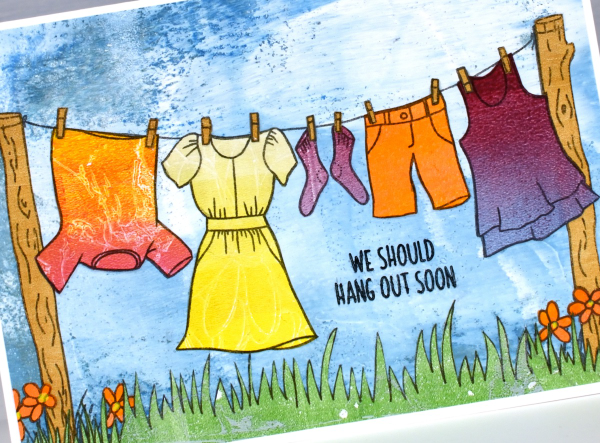
I looked through my gel prints; I have quite a few sorted into folders by colour. Most of the prints used for this panel were from my Gel Print Journey online class. The yellow dress was cut from a gradated print with a faint white daisy pattern on it. The pink and orange ‘tie dye’ was a print achieved my pressing cling wrap on the gel plate, the socks and top were from a blue & burgandy blended gel print. The blue background print was a patchy blue and white print where I hadn’t rolled off my brayer before rolling resulting in the big white blob of paint – just right for a cloudy blue sky. When it came to gluing everything onto the blue background I just adhered the cut-outs over the printed outline.
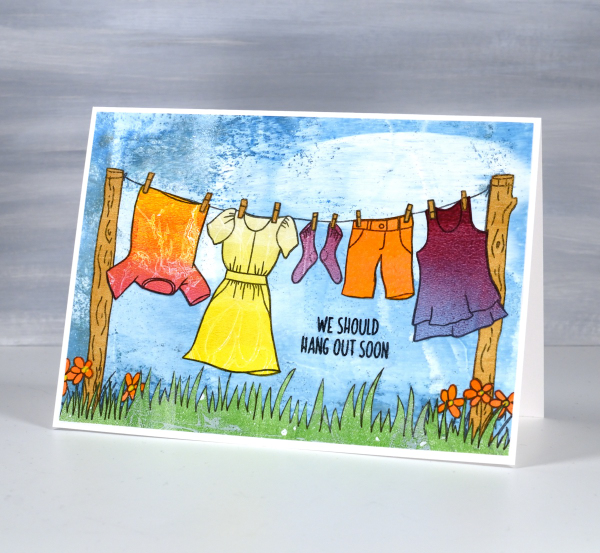
The digital image includes two patches of grass below the posts but I wanted more so I drew another strip of grass on a green gel print and filled the stretch under the washing line. I just happened to have the perfect sentiment from the Concord & 9 ‘City Stacks‘ stamp set. This post includes affiliate links from Foiled Fox. If you buy through these links I receive a small commission at no extra cost to you. If you buy from Echidna Studios my daughter and I get very excited!
Gel Printed Pods
Posted: March 25, 2024 Filed under: artsy stems, framed fern, gel press, Lavinia, online class, Penny Black, Tim Holtz | Tags: gel press, gel printing, Lavinia, online class, Penny Black creative dies, Tim Holtz 3 Comments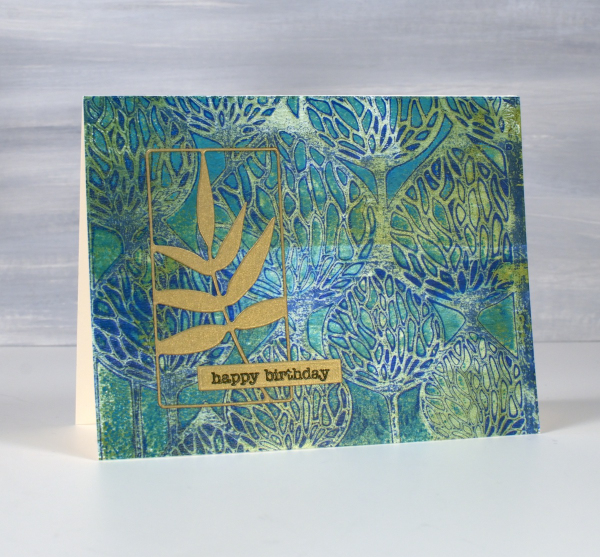
It’s been a while since I gel printed but that there is no lack of gel prints to show you. I currently have boxes of prints and and a stash of cards made from prints.

These two cards were made from the same stencil print, one of the examples from my Gel Print Journey online class (which is on sale along with all my online classes until March 29; just use the code LEAPYEAR40 at checkout)
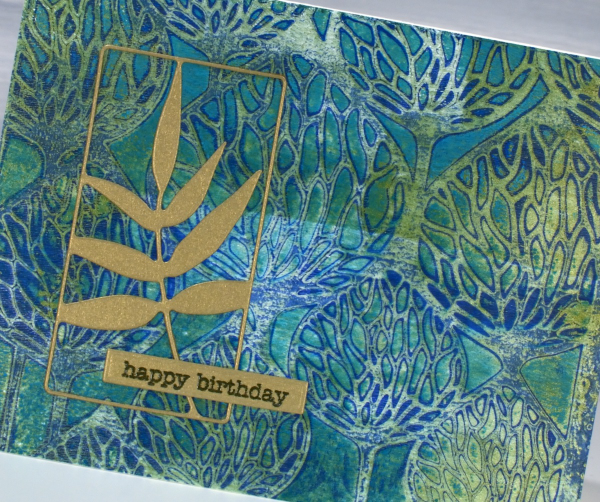
If you are a fan of Lavinia stencils like I am you probably recognise the ‘Pods’ stencil used for this print. I printed on a 6″x 6″ gel plate giving me a print big enough for two cards. It’s hard to see in the photo but some of the paint was metallic so the print has some shimmer and shine on it.

I looked through my botanical dies and gold cardstock in order to fine co-ordinating elements for the cards. On the card above I used the ‘framed fern’ die from Penny Black and on the card below the die featured is from Tim Holtz artsy stems die set.

I hear my gel plate calling to me so hopefully I will soon dedicate a few days to happy printing. If you are looking for a beginner gel printing class or a refresher please check out Gel Print Journey. This post includes affiliate links from Ecstasy Crafts, Foiled Fox and Scrap’n’Stamp . If you buy through these links I receive a small commission at no extra cost to you.
Scrappy Journal Challenge
Posted: March 18, 2024 Filed under: Darkroom Door, gel press, global postmarks, Handmade book | Tags: Darkroom Door stamps, gel press, gel printing, Handmade book 6 Comments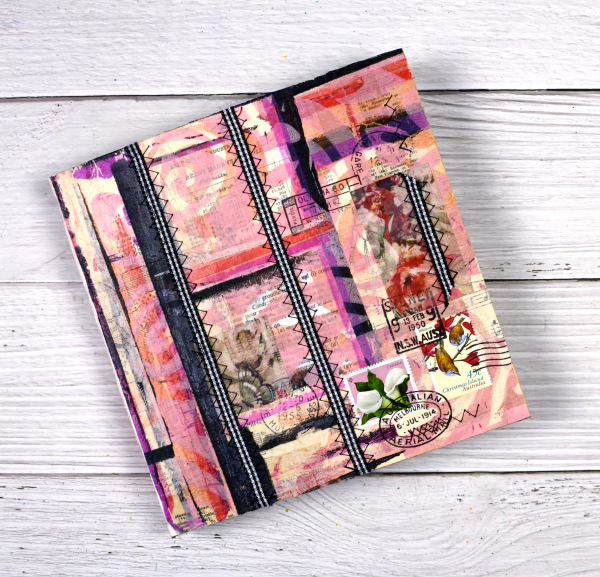
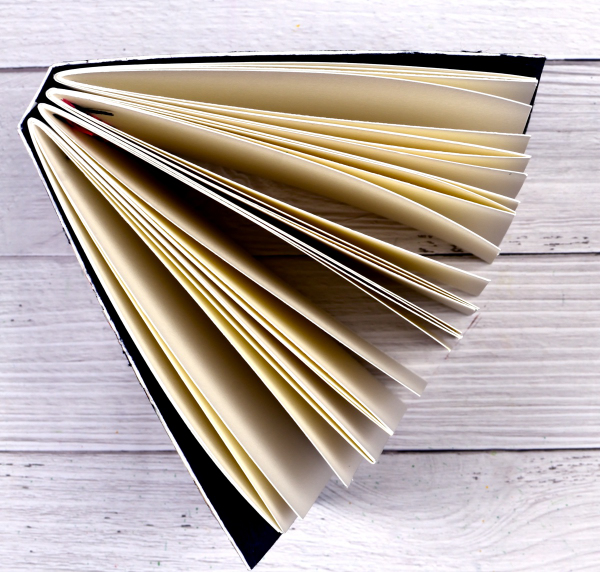
I’ve mentioned the Handmade Book Club before because I enjoy the 5 Day Challenges they offer. The most recent challenge was held last week and was called the ‘Scrappy Journal Challenge‘. The designer and teacher of the challenges, Ali Manning, came up with a tall narrow design which was very attractive. I changed the shape for mine because I will soon need a new art journal and the challenge was the perfect opportunity to get one made. The zig-zag sewing of the signatures was initially tricky but I soon got into a satisfying rhythm and finished them with only one early unpicking incident.
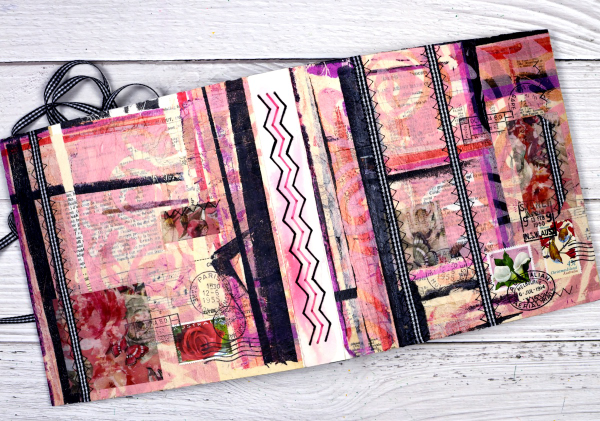
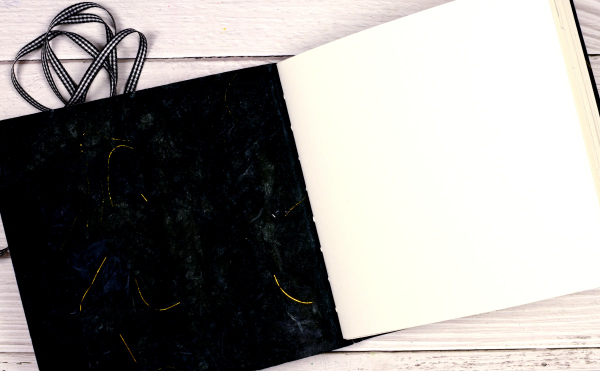
Other than the size of the book and the type of paper in the pages, I followed all the instruction from Ali. She is one of the best teachers I have had the privilege to learn from. I used watercolour paper for my pages and a heavy watercolour paper for the cover. I collaged the cover with vintage papers, then gel printed tissue, fabric washi tape and used postage stamps. The last details added were the gingham ribbon sewn onto the cover with a sewing machine.

The first photo in this post shows the front cover, next the full cover and spine, above is the back cover and below you can see the top view and four signatures.
After sewing the ribbon onto the cover there were random lines of stitching on the inside of the cover so I glued black mulberry paper with gold thread in it over the complete inside cover. After I’d taken the photos I decided to add gingham ribbon ties to both the front and back covers to tie the book closed.
This is the third challenge I have completed with the Handmade Book Club. Here are the links to the other books I’ve made. Mixed Media Journal, Small Coptic Journal, 7×7 Coptic Journal
Roses Stencilled
Posted: January 29, 2024 Filed under: Alcohol Ink, Echidna Studios, gel press, Roses digital stamp set | Tags: Alcohol Ink, Darkroom Door stamps, Echidna Studios, gel press, gel printing, Taylored Expressions 2 Comments
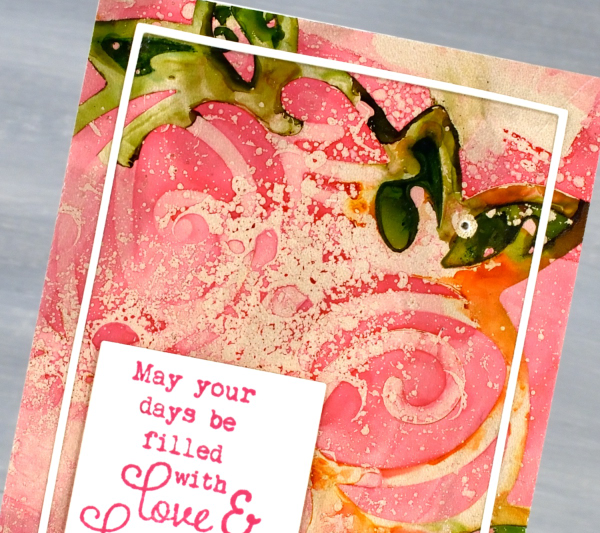
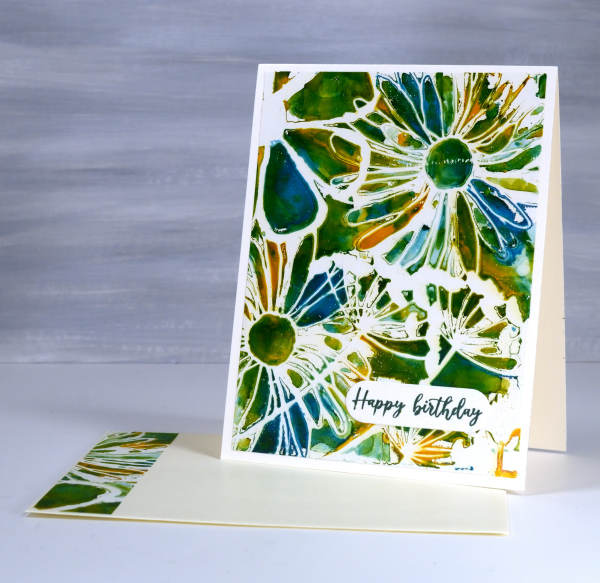
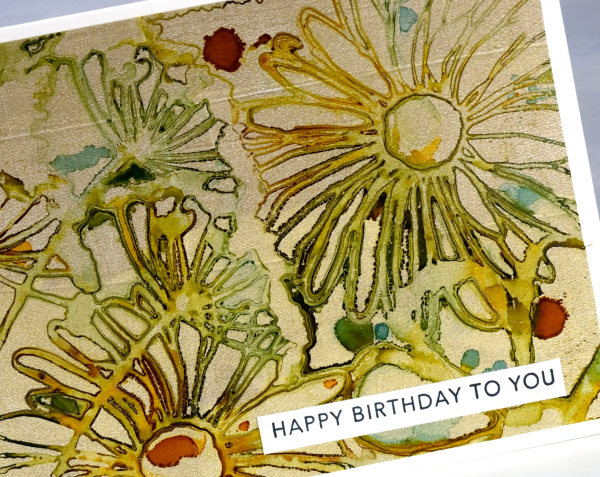
Last week I featured the Roses digital stamp set from Echidna Studios by cutting the rose trio from cardstock with my cricut. I have also cut dura-lar stencils with the same digital files. I cut them in different sizes for gel printing, blending or working with alcohol inks. To create both the pink and the orange panel I used alcohol inks on a gel plate and either dropped the rose trio stencil on top of the alcohol inks or lay the stencil down on the gel plate then added the inks. Both techniques work but by adding the alcohol ink after the stencil you have a bit more control of your ink placement. But you know alcohol inks; they kind of have a mind of their own.
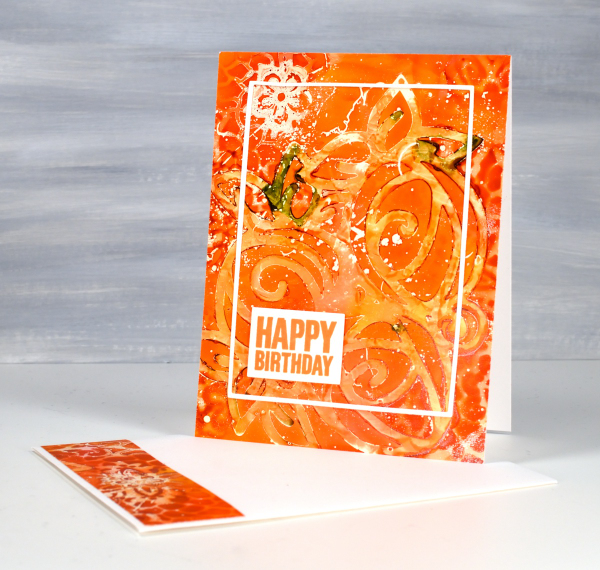
On the card above you can see two patterns. The roses stencil was laid down on the inked gel plate first so you can see the whole design. The Finnabair/Prima ‘floral net’ stencil was laid over the top so there are snatches of that pattern around the edges where it made contact with the alcohol inks. If you are interested in using alcohol inks on the gel plate, check out my video here.
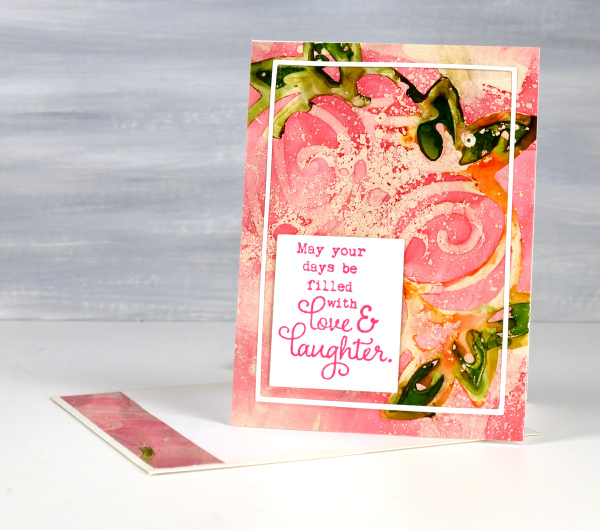
You can see from the photo at the top of the post that the pink one is a smaller card; it’s 5″ x3¾. This print doesn’t include a second stencil pattern but does have some isopropyl alcohol splatter adding interest. The sentiment is from Taylored Expressions ‘In & Out Birthday’ set.
The sentiment below is from the Darkroom Door ‘Happy Birthday‘ set.
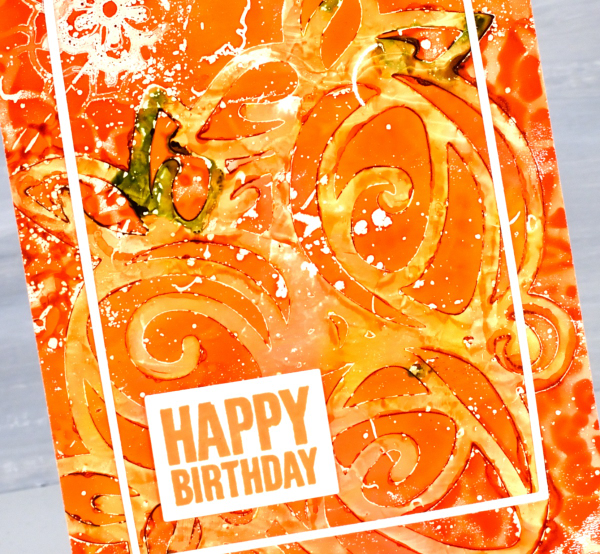
I used Waffle Flower A2 layers and Additional A2 layers die sets to cut the narrow border frames. These two sets have been so useful for cutting out panels and sentiments and adding very neat and correctly sized mats.

I’ll be back tomorrow to show you my project from Craft Roulette. Thank you to those of you who tuned in on youtube. It was lovely to have you there. Today’s post features affiliate links to The Foiled Fox. If you buy through these links I receive a small commission at no extra cost to you.
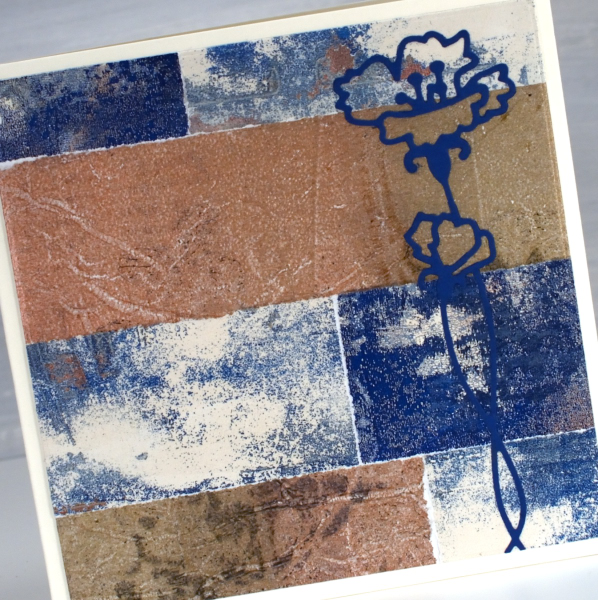
Roses on gel printed collage
Posted: January 25, 2024 Filed under: Echidna Studios, gel press, Mixed Media, Roses digital stamp set | Tags: Echidna Studios, gel press, gel printing, Mixed Media, Penny Black stamps 3 Comments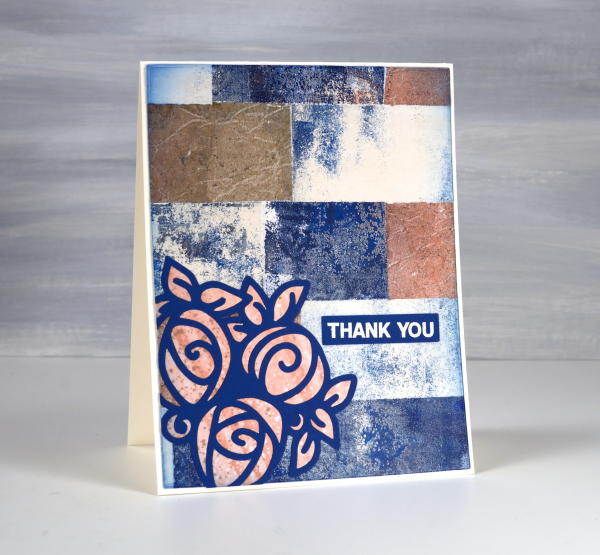
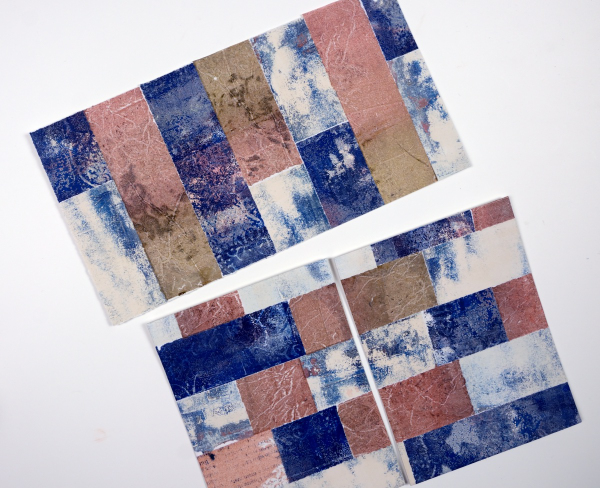
Unsurprisingly I have built up quite a supply of gel prints. Recently I turned a bunch of them into collaged panels. You can see in the photo below the simple collage I created by gluing torn strips of three different prints in a brick-like arrangement. To make things easy I tore the strips the width of my ruler so they are all 1¼” wide.
Once I trimmed the collage panel to card sized pieces I chose a trio or roses that I designed for printing and cutting and cut it from blue cardstock using my cricut. It is one of three designs in a set called ‘Roses‘ which is available in the Echidna Studios etsy store.

When you cut a design on the cricut or with a die you often have inside pieces you can discard or use to fill in the cut out shape. I cut the rose trio from dark blue and from pink patterned paper then saved the inside pieces from the pink to inlay the blue outline.

I added embossed sentiments from the Penny Black set ‘ever thanks‘ and some embossing around one of the panels with Ranger rose gold embossing powder.
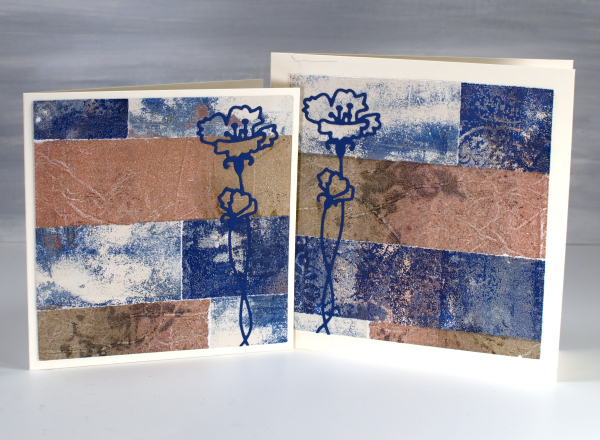
I was able to cut two smaller square panels which I also make into cards featuring the Penny Black die, ‘harmonious’. When you look at the gel prints themselves they don’t look all that fancy but when combined this way I really like the play of colours and textures.
I created a few more A4 panels from collaged gel prints and they are waiting for inspiration. I will share them here once I have a plan for them. Today’s post features affiliate links to the following companies. If you buy through these links I receive a small commission at no extra cost to you. The Foiled Fox & Scrap’n’Stamp.
Framed Flowers
Posted: January 24, 2024 Filed under: framed flowers stencil, gel press, The Crafters Workshop | Tags: Alcohol Ink, gel press, gel printing, Ranger Alcohol Ink 5 Comments
These bold bright flowers were printed using alcohol inks and the TCW stencil ‘framed flowers’ on the gel plate. I created several prints from one application of alcohol ink and each print became lighter and less distinct than the last. I have a video on my youtube channel showing the same process using a different stencil and ink colours. (Speaking of YouTube, I’m a guest on Craft Roulette this week! Just click here on Friday round 7:30 EST
Today I am posting two rather different results but the application of alcohol ink was done only once, with isopropyl alcohol added to dilute the remaining ink on subsequent prints. I have posted another print from the same session, you can see it here.

Today’s prints do look very different and that is not only because this muted one pulled less ink from the plate. The first print at the top of the post was pulled with white acrylic paint which shows the colours at their brightest. This second print was pulled with gold paint which leaves a subtle shimmer on the panel and dulls the colours of the inks. I love playing with the variables and the fact that I get very different results from one application of ink.
Whether I used a 5″x7″ or a 6″x6″ gel plate I can usually save a strip of printed pattern for my envelope. Today’s post features affiliate links to the following companies. If you buy through these links I receive a small commission at no extra cost to you. The Foiled Fox & Scrap’n’Stamp.
See you on Friday in the Craft Roulette chat!
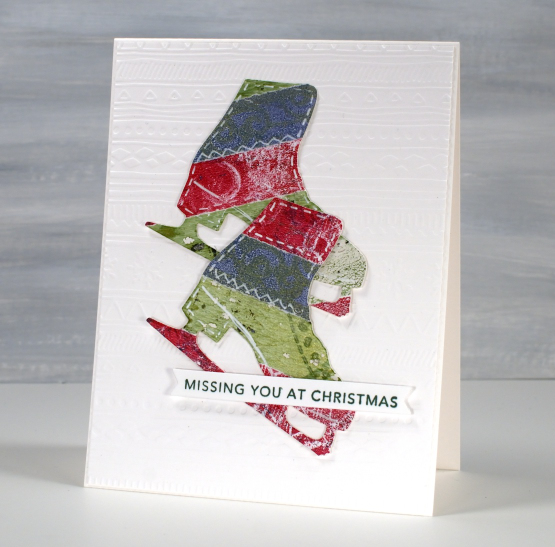
Collage Skates
Posted: December 13, 2023 Filed under: Dies, gel press, let's skate, Penny Black | Tags: gel press, gel printing, Penny Black creative dies, Taylored Expressions 1 Comment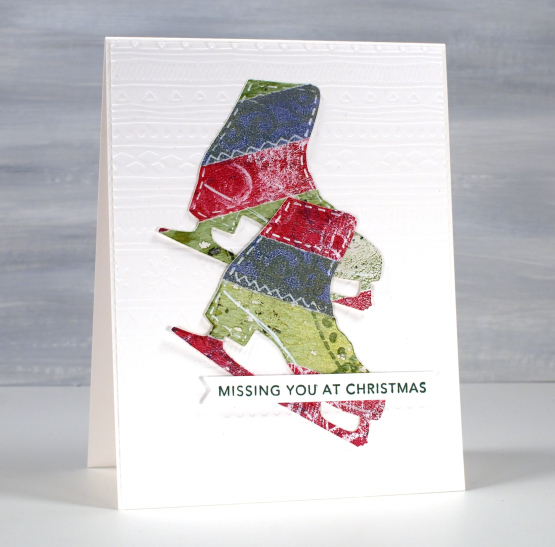
This was one of last year’s Christmas cards made during my collage Christmas card class. All the strips of colour are from gel prints. If you look closely you can see some grungy texture and pattern. None of the prints were amazing by themselves but when combined I quite liked the mix and pattern.
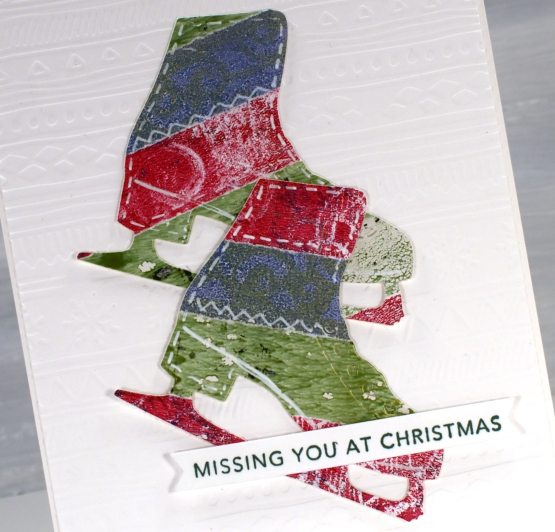
I used the Penny Black die set ‘let’s skate’ to cut two skates from the collage panel then popped them up on an embossed panel and added a Taylored Expressions sentiment from her ‘simple strips’ Christmas stamp.
I made many collage cards last year because I have so many gel prints to collage and many dies that worked for cutting. There were trees, bells, stars, poinsettia, stockings, baubles and more trees! I hope this is another idea you’ll try with your gel prints or any patterned papers or tapes. Washi tapes work well because the adhesive is already there!
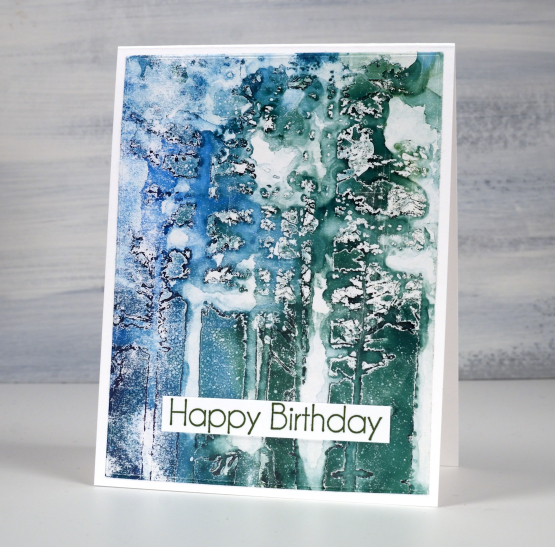
Tree Canopy
Posted: November 7, 2023 Filed under: Alcohol Ink, gel press, The Crafters Workshop, tree canopy | Tags: Alcohol Ink, gel press, gel printing, The Crafter's Workshop 8 Comments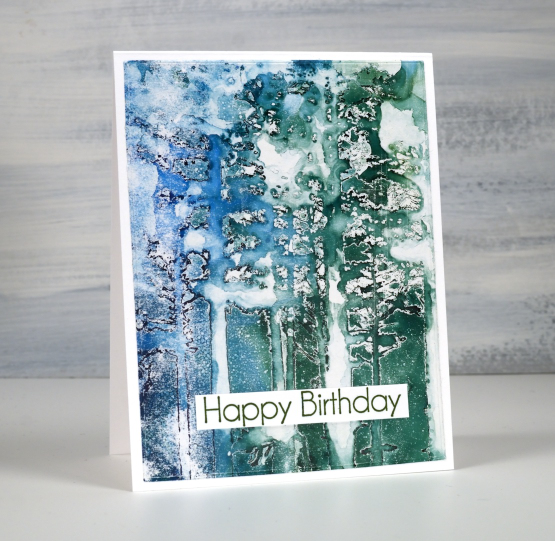
Some might say this print didn’t work and I admit, that was my first thought when I looked at it. On later inspection I decided I really liked its imperfection and incomplete nature. The technique is alcohol ink through a stencil on a gel plate. Once the alcohol ink dries I pull the print with acrylic paint. (I have several videos on my youtube channel showing the technique)

When applying alcohol ink through a stencil onto a gel plate I have had the most success when using stencils full of fine lines not large solid spaces. The tree canopy stencil from The Crafter’s Workshop has some very fine lines but quite a lot of solid tree trunks also. The alcohol ink pools under the expanse of stencil plastic and takes quite a while to dry. If you move the stencil before the ink dries it starts moving again. I don’t believe I waited long enough for the ink to dry so I have some distinctly tree-ish bits in my print and some very abstract blobby bits. Despite the indistinct image I love the atmosphere of the print which I pulled with white acrylic paint. The stencil is 6″x6″ and so is the gel plate I used so I chose the best part of the print to make my 4.25″x5.5″ card. The sentiment is from Taylored Expressions ‘In & Out birthday’ set.
So let me know, is this too abstract for you or do you see a bit of whimsical forest atmosphere in there?
Today’s post features affiliate links to the following companies. If you buy through these links I receive a small commission at no extra cost to you. The Foiled Fox & Scrap’n’Stamp
Printed Baubles – short video
Posted: October 24, 2023 Filed under: Alcohol Ink, Echidna Studios, entwined, gel press | Tags: Alcohol Ink, Echidna Studios, gel press, Penny Black stamps, Stampin Up, Taylored Expressions 6 Comments
Last month I posted a sped up video on instagram showing how I printed alcohol ink patterns through the entwined stencil onto my 5″x7″ gel plate. I planned to add it to youtube as a vertical ‘short’ because not all my blog readers and youtube followers are on instagram. Sadly I discovered a ‘short’ on youtube must be 60 seconds or shorter. My sped up video was #shortnotshort at 77seconds. I decided to post it on horizontally on youtube anyway so I could share it here along with the cards I made from the panel.
The print you will see in the video above shows how I created the alcohol ink pattern through a stencil then pulled the print on printer paper with acrylic paint. I know there is no narration along with this very short sped up video but I go through the process in more detail with less speed in a couple of other recent videos here and here.

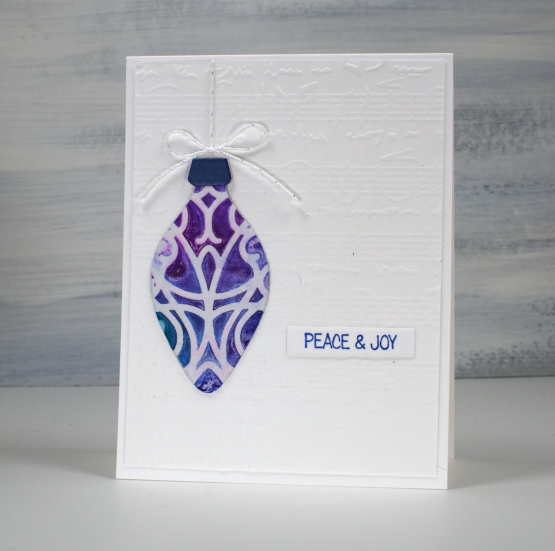
To make the print sturdy enough to die cut I used double sided adhesive to attach the print to thick cardstock. I used dies from a stampin up set ‘holiday ornaments’ which is possibly retired. I borrowed the set because I thought the finial style suited the symmetry of the print.
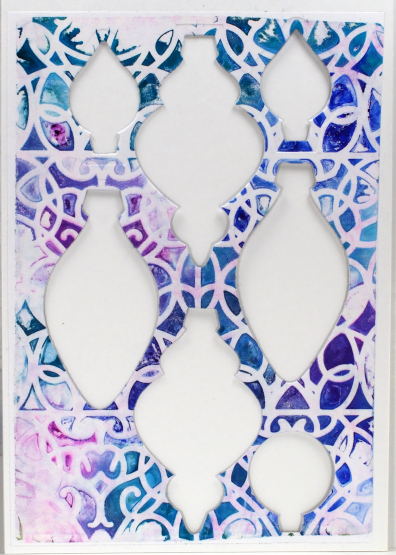
As I often do with a patterned busy element I embossed white panels to be the background. I used Taylored Expressions sheet music embossing folder, an Spellbinders in the pines folder and the one below that I don’t know the name of. The little sentiments from my well used Penny Black set, ‘holiday snippets’.

The card bases and embossed panels are Neenah solar white 110lb cardstock. That is four more cards added to my Christmas card pile which is definitely not a big enough pile just yet. At class today a few people said they had finished all their Christmas cards, but others were yet to start so I feel happy somewhere in the middle!
Today’s post features affiliate links to the following companies. If you buy through these links I receive a small commission at no extra cost to you. The Foiled Fox & Scrap’n’Stamp
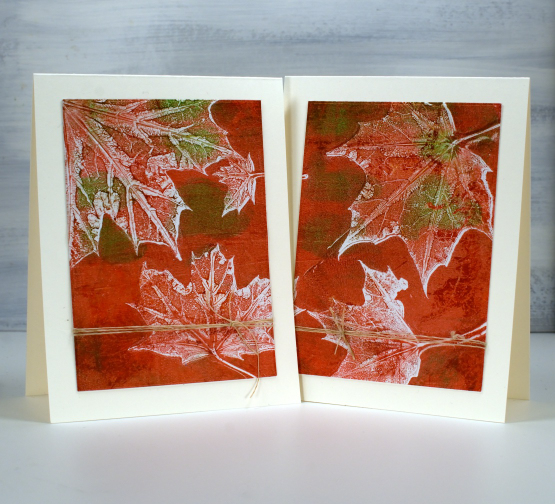
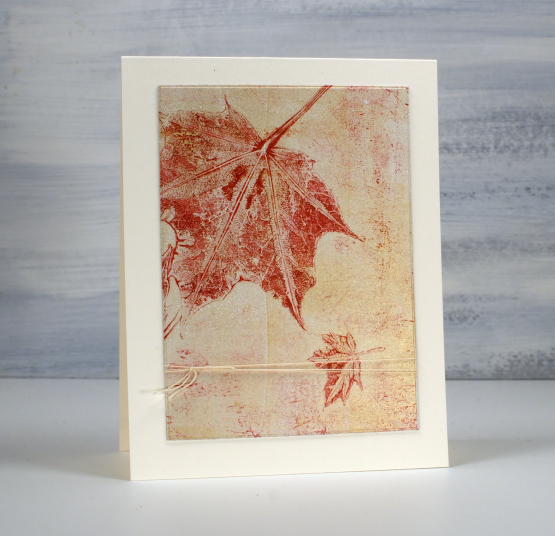
The leaves are turning – video
Posted: October 16, 2023 Filed under: Echidna Studios, gel press, Mooneys Trees, Stampin Up, timber embossing folder, Tutorial | Tags: Echidna Studios, gel press, gel printing, Tutorial, video 7 Comments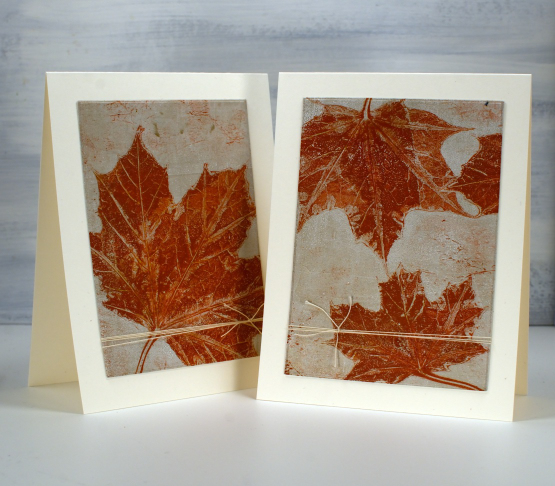
As the leaves start to turn around me I brought a few green ones to the gel plate and printed them in the colours of autumn. I filmed as I printed so you can see a few different techniques. There is a brief appearance of backyard wildlife that must have come in on the freshly picked leaves. Let me know if you know what it was.
As you will see in the video I used a 5″x7″ gel plate and a mix of liquitex, decoart and sennelier acrylic paints to pull prints on printer paper.
Recently I have been turning 5×7 inch prints into card fronts with a strip left for a matching envelope. For today’s cards I attached the whole print to cardstock then used WaffleFlower rectangle dies to cut panels from each print, added twine to both panels then attached them to cream card bases. There are no strips left for the envelopes but twice as many cards. I have left them without sentiments but if needed I can tie a little sentiment tag onto the twine.
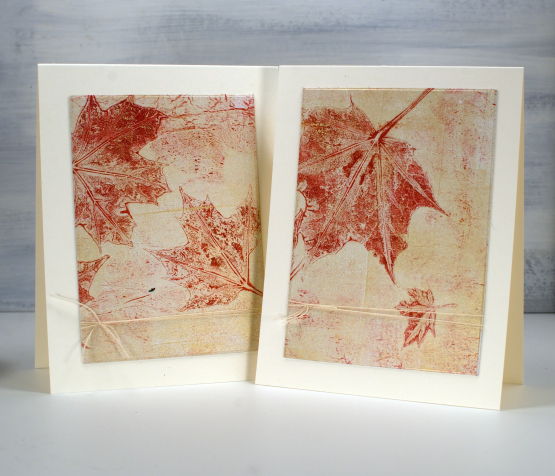
The print below is also featured in the video. I thought it would be fun to print leaves onto the Mooneys Trees cut out. I used the digital cutting file to cut from cream cardstock then picked up the leaf print from the gel plate. My new timber embossing folder from SU was the perfect background.

The close up below is the two step print, pulling first the background with the leaves still on the plate, then the leaf texture after they have been removed.
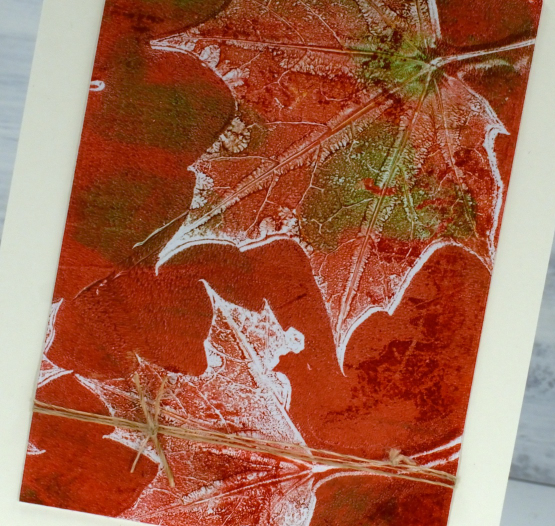
I think this final card might be my favourite. I didn’t plan it this way but it looks like that little leaf is falling away from the bigger one.
Today’s post features affiliate links to the following companies. If you buy through these links I receive a small commission at no extra cost to you. The Foiled Fox & Scrap’n’Stamp


