
Surf’s Up
Posted: October 17, 2023 Filed under: Echidna Studios, Surf's Up | Tags: digital stamps, Echidna Studios, Penny Black creative dies 2 Comments
What do you think of today’s funky van from Echidna Studios? A few months back I watercoloured the vintage VW beetle and it’s still one of my favourite digital images from the store. The new Surf’s Up image is equally cool and made me reach for some marbled paper that would make it all the more fun! The digital stamp set includes three surfboard images that can be positioned with the van or used on their own.
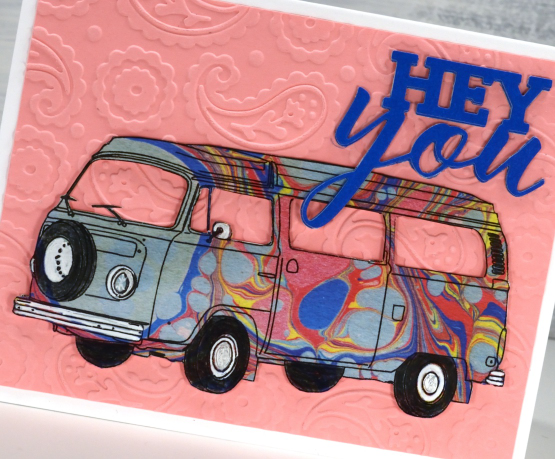
The paper I had was a 6″x6″ square which I was able to manually feed through my printer. I imagine some of you are wondering if I fussy cut this because I have been vocal in my dislike of fussy cutting in the past. Surprisingly I did cut it out and also an extra roof and van body from cardstock to tuck behind to lift and strengthen the cut out. I coloured directly on the marble paper with a black pencil, and white and silver gel pens.
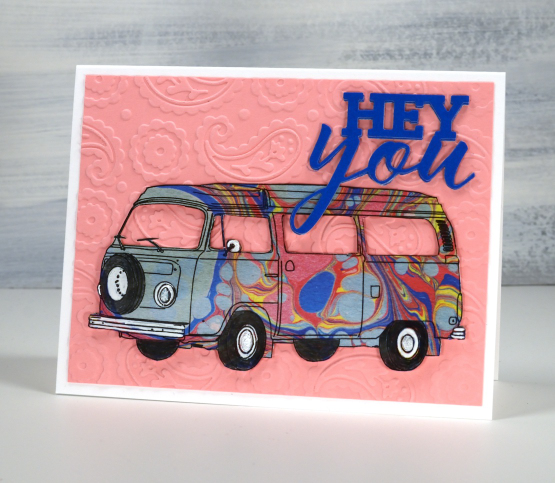
Naturally a marbled van wanted a paisley backdrop so I embossed some pink cardstock with a cuttlebug folder I recently picked up at a garage sale. The bold die cut sentiment is from Penny Black. Hope you have a groovy day!
Happy Thanksgiving
Posted: October 9, 2023 Filed under: Echidna Studios, Mooneys Trees | Tags: digital stamps, Echidna Studios, sennelier watercolours 3 Comments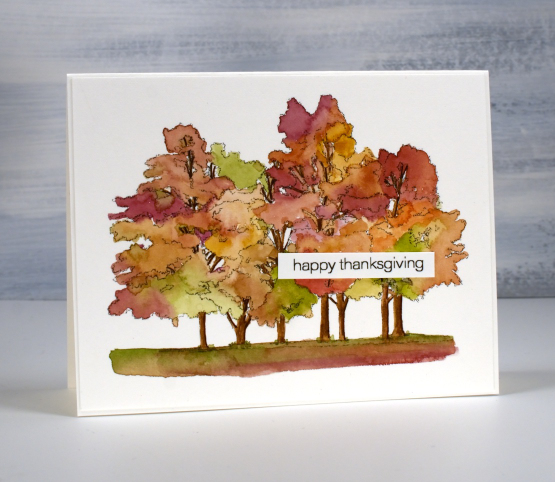
Happy Thanksgiving to all my Canadian readers. Hope you’re having a relaxing weekend maybe enjoying some autumn colour.
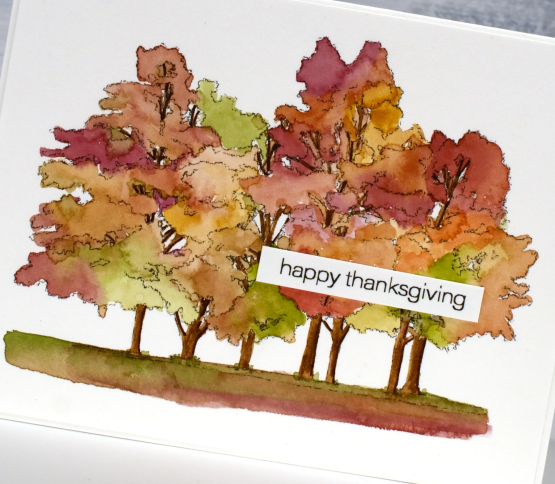
These trees are a digital image based on trees in a park not far from our home. What a treat to have such a personal image to paint. I used the simplified cut-out image in Friday’s blog post; this is the sketch version of Mooneys trees from Echidna Studios.
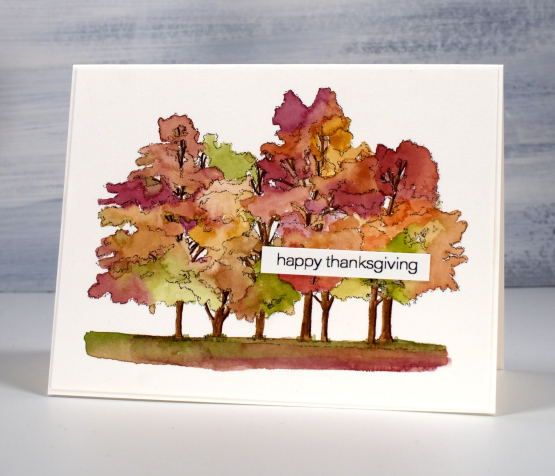
To see these trees beautifully painted with bister watercolour powders pop over here.
Gazebo
Posted: September 8, 2023 Filed under: Coloured pencil, Echidna Studios, gazebo | Tags: digital stamps, Echidna Studios, Faber-Castell Polychromos Colour Pencil 5 Comments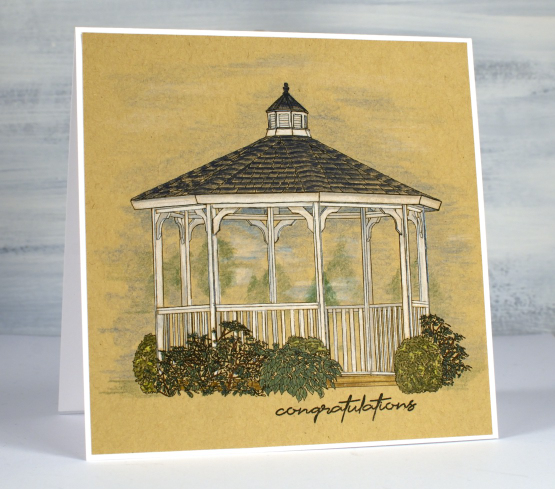
This dreamy gazebo image is the latest digital stamp from Echidna Studios. As I coloured it I had summer gatherings in mind but it would be pretty in autumn colours too.
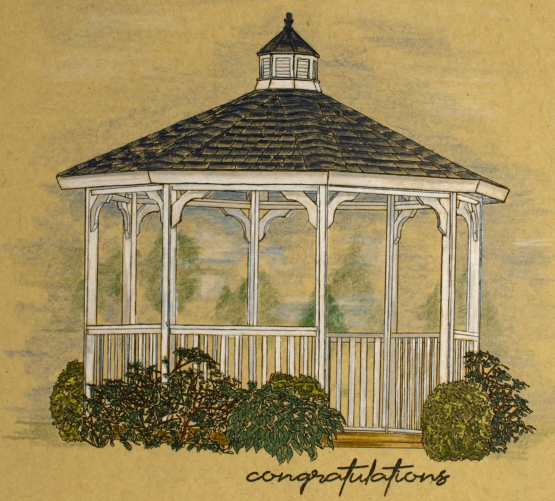
As I’ve mentioned before with a digital stamp it is possible to print it any size so I printed this one to fit a 5.5″ square and the gazebo itself is 4.25″ across. It is printed on a heavy weight kraft paper because I enjoy using coloured pencils on kraft. I really did want a white gazebo so it seemed the obvious choice. This particular kraft paper has a warmer look than the desert storm kraft cardstock I sometimes use. As you can see I coloured the gazebo and plants with enough pressure to fill the outlines and used the side of the sharpened pencil tip to add shading to the background and sky area.
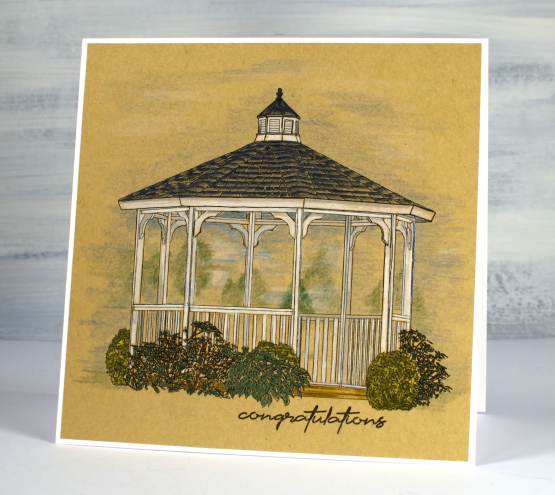
I added a sentiment from the Simply Graphic set ‘English sentiments‘ then attached the panel to a white card base. We went to a wedding many years ago where the bride and groom stood in a gazebo and the guests gathered round to watch which made me think a ‘congratulations’ sentiment fitted nicely.
There are fifty items in the Echidna Studios store now; please pop over and have a look around.
At the Garden Gate
Posted: March 24, 2023 Filed under: Echidna Studios, garden fence, Inktense pencils | Tags: digital stamps, Echidna Studios, Inktense, Penny Black stamps 5 Comments
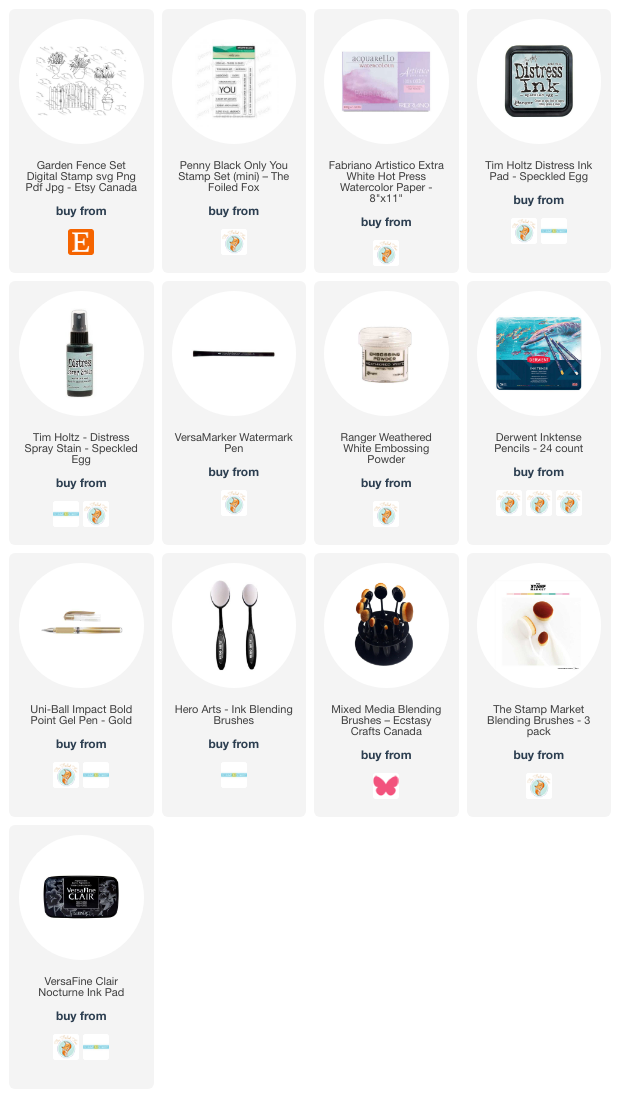
This little front fence is a new digital stamp from Echidna Studios. It’s a set of five images that you can arrange yourself. Each image is opaque (or stackable) which means when you arrange them before printing you can put the plants in front of the fence and in front of each other. The five stamps are the fence, the triple topiary, the flowers in the grass, the flowers in the pot and another pot not featured on this card.
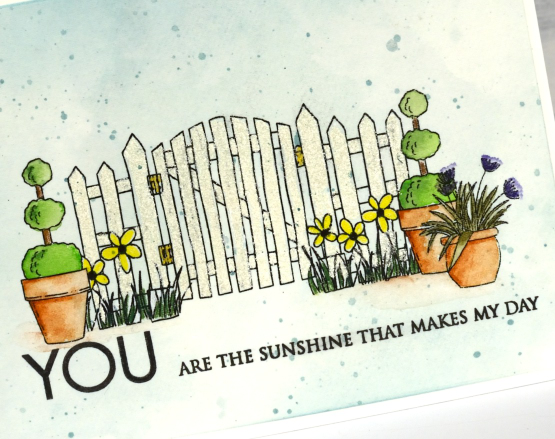
I had great fun arranging these images to create this little scene. After finalising the scene I printed it on hot pressed watercolour paper and coloured the images with Derwent inktense pencils. I use inktense pencils it two ways; sometimes I colour directly on the paper then blend with a wet paintbrush, other times I pick up ink from the sharpened tip of the pencil with a paintbrush and then paint.
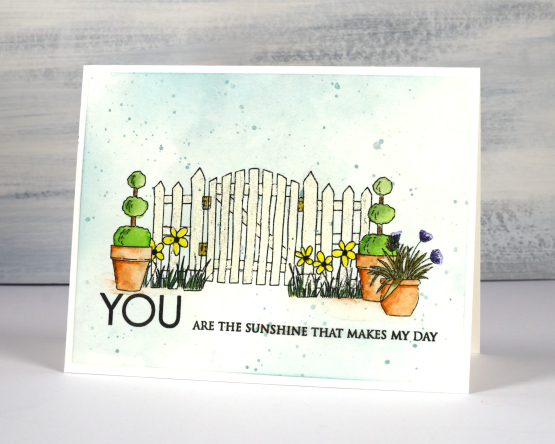
After colouring the pots and the plants I had to decide how to colour the fence and gate because it wasn’t going to stand out if I left it white. The problem was that I wanted a white picket fence. I ended up colouring the fence and gate with an embossing pen then embossed with Ranger weathered white embossing powder which is textured and creamy coloured. It’s subtle but it does make the fence stand out a little. I coloured the hinges with a gold gel pen.
To add some sky I blended speckled egg distress ink here and there, then splattered some over the scene. The sentiment is from Penny Black’s ‘only you’ set and all the links can be found below.
Thank you to all of you who have left such kind messages about my daughter’s digital design etsy store. Thank you to those who have popped over to purchase some of her digital stamps. We would both love to see what you have done with the images. You can attach an image when you comment in the store or even use the contact button to send her a message.
(Compensated affiliate links from Foiled Fox, Scrap n Stamp)
Seedlings
Posted: March 2, 2023 Filed under: Echidna Studios, seedlings, sennelier watercolours, Simply Graphic | Tags: digital stamps, Echidna Studios, Fabriano Watercolour Paper, sennelier watercolours, Simply Graphic 8 Comments
If you are a plan ahead – plant ahead person then you might have some seedlings growing somewhere in your house or green house. These are the only seedlings I have at this point but I must say they are looking quite healthy.
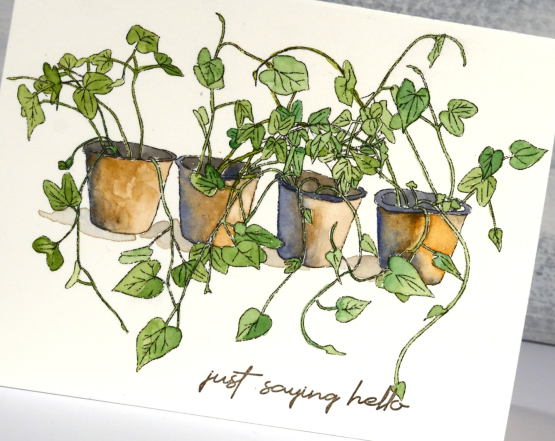
This is a digital stamp designed by my daughter and available in her etsy store Echidna Studios. I printed it so that it just fitted on an A2 card front but I think it might be nice to print it larger and feature only one or two pots on a card front with the shoots and leaves coming off the edge of the panel.
I printed on hot pressed watercolour paper and used my Sennelier pan paints for all the colouring. I used a mix of greens for the greenery and a mix of blue and brown for the pots. I really like blue and brown combos these days, something that I wouldn’t have imagined a few years back.
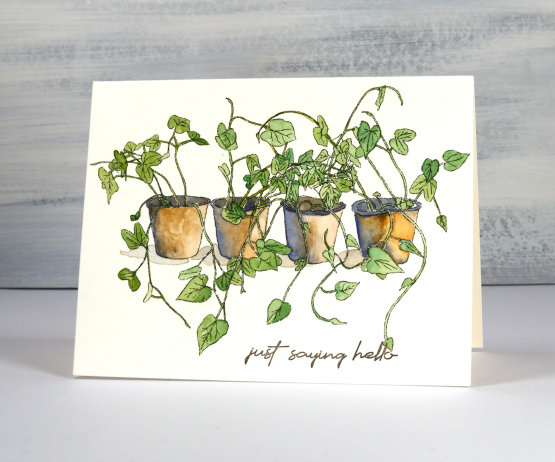
The sentiment is from Simply Graphic’s ‘English Sentiments’ set; I like the handwritten look and the size of the words. I know I could be handwriting a few sentiments myself here and there but I always add the sentiment last and by that time I don’t want to mess up a otherwise completed card with a crooked or uneven sentiment. That being said I think I should try a few handwritten sentiments on upcoming cards…
(Compensated affiliate links from Foiled Fox, Scrap n Stamp)
Mini Tree
Posted: December 21, 2022 Filed under: decorated holiday mini tree, Echidna Studios, Finetec paints, sennelier watercolours | Tags: digital stamps, Echidna Studios, Fabriano Watercolour Paper, Finetec artist mica watercolour paint, sennelier watercolours 2 Comments
Another festive (digital) beauty from my daughter’s etsy store, Echidna Studios. Do you recognise the inspiration for this little tree? You probably see them in the grocery store; it’s a little pot of rosemary, shaped like a tree. The design is available already decorated or in a set with separate tree and decorations. It is only a few days before Christmas so of course I am featuring the already decorated one!
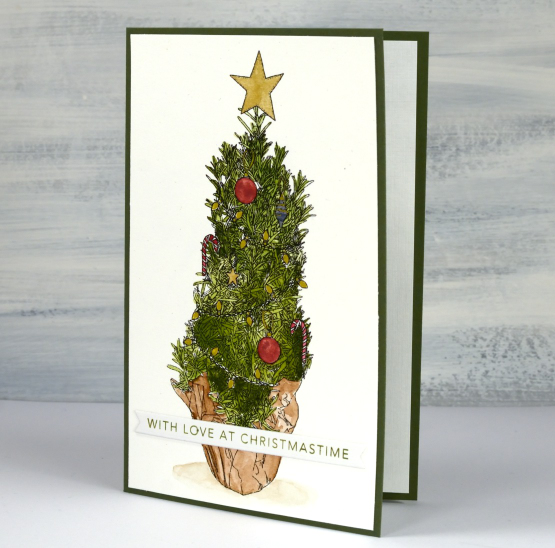
I printed the tree on hot pressed watercolour paper and painted the paper wrapping and tree with Sennelier watercolour paints. Several people asked me about printing on watercolour paper. Up until recently I had no success; I would manually feed it into the printer but the ink would smudge off. A friend told me about the preferences settings when clicking to print and now I choose ‘manual feed’ and ‘heavyweight paper’ and no more smudging!
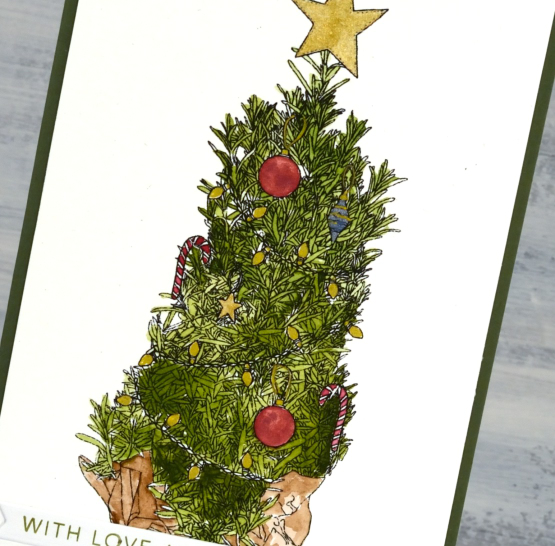
I switched to Finetec pearlescent paints and a gold gel pen to do the decorations so they have a little shimmer and shine to them. I reached into my little box of pre-stamped, pre-cut sentiments and pulled out one to suit the colours and the recipient. It’s a tall skinny tree (a bit like our family) so the card isn’t my usual size. It’s a 6¼” x 4″ olive green card base.

My life size tree is also decorated in red and gold this year. I always pick a slightly different colour scheme so this year all the red baubles came out, the tartan ribbon and the individual decorations in red, gold or wood. Do you change your colours from year to year?
(Compensated affiliate links from Foiled Fox & Scrap n Stamp)
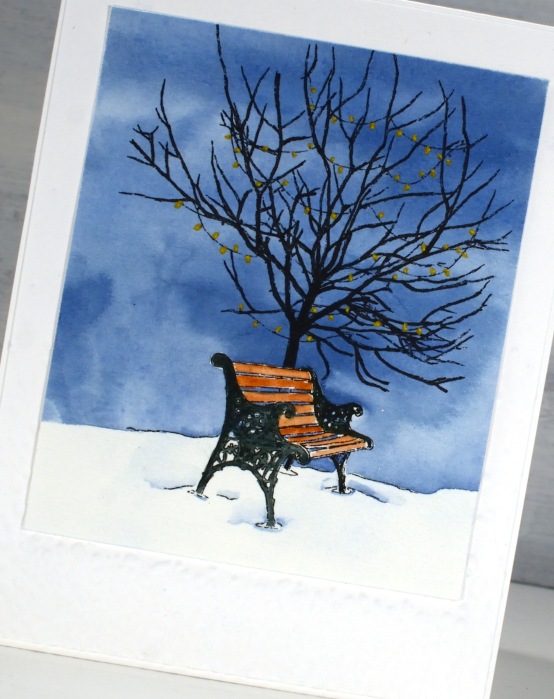
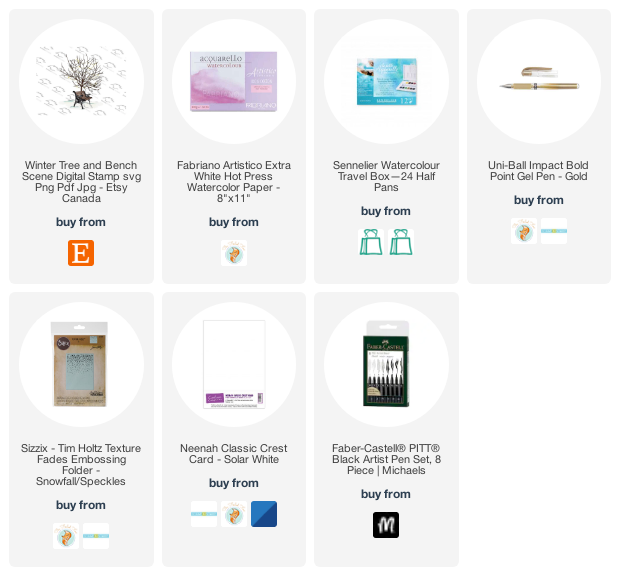
Winter tree
Posted: December 19, 2022 Filed under: Echidna Studios, winter tree & bench | Tags: digital stamps, Echidna Studios, Fabriano Watercolour Paper, sennelier watercolours 15 Comments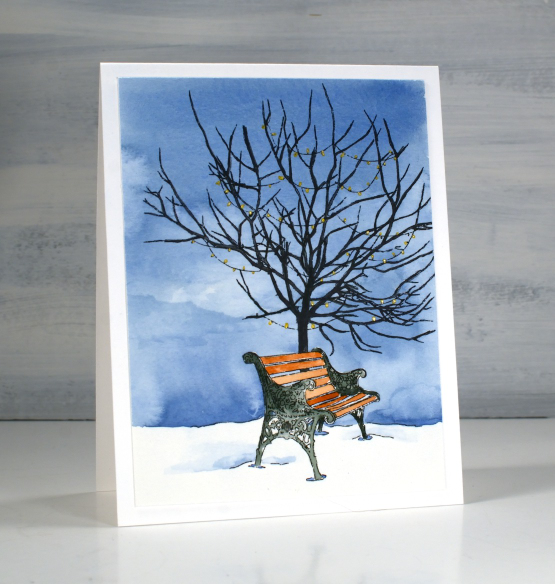
This sweet scene is based on a real tree and a real bench. It’s another design by my daughter and available as a digital stamp in her etsy store, Echidna Studios. I printed it twice on hot pressed watercolour paper. One image almost fills a 4¼” x 5½” card and the other is smaller leaving room to be framed by the snowfall embossed panel.
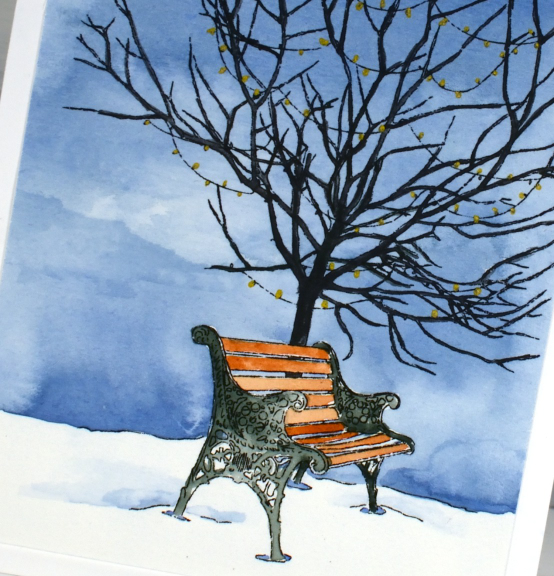
One of the nice things about digital stamps is the way they can be printed any size you want. I used Sennelier watercolour paints to paint the blue sky across the panel working my way around the bench but painting over the top of the tree. Once the sky was dry I painted the bench with brown and grey paint then the tree with black. Some of the branches are quite thin especially on the smaller version so I used a fine tip Pitt pen to colour them.
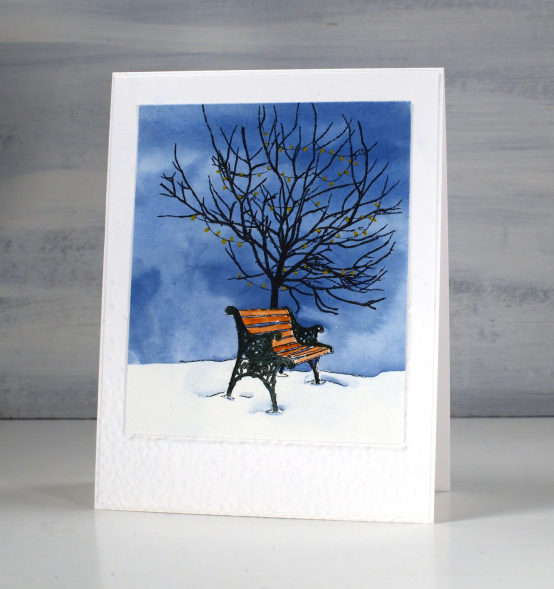
When the painting was all dry I coloured over the lights with a gold gel pen. Now that I have tried the image a couple of times I want to go more slowly and see if I can get those lights to glow a bit more. It is a calm pretty image but if I was trying to reflect the last few days of weather here in Ottawa both tree and bench would be covered in snow!
(Compensated affiliate links from Foiled Fox, Scrap n Stamp)
Stockings from Narnia
Posted: December 16, 2022 Filed under: Christmas stockings digital stamp set, Echidna Studios, sennelier watercolours | Tags: digital stamps, Echidna Studios, sennelier watercolours 8 Comments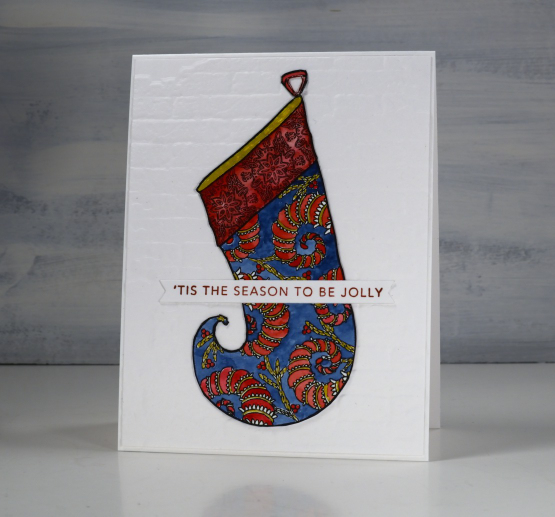
This set is simply called Christmas Stockings, but I definitely think you might see one of these hanging over Mr Tumnus’ fire place or maybe in the Beaver’s lodge. I have watercoloured two of the stockings from the set of three digital stamp my daughter designed and uploaded to her etsy store, Echidna Studios.
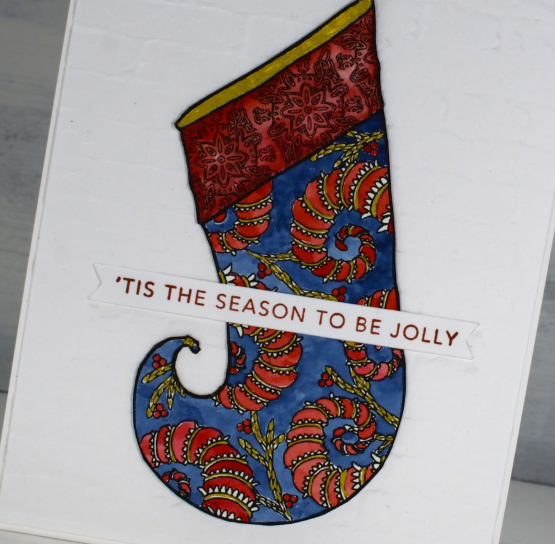
I printed the image on watercolour paper then used Sennelier watercolours paints and a gold gel pen to fill in the design. I took a little more time on the stocking above painting all the curly fronds whereas for the one below I blended a blue and a green paint to fill the patterned stocking.
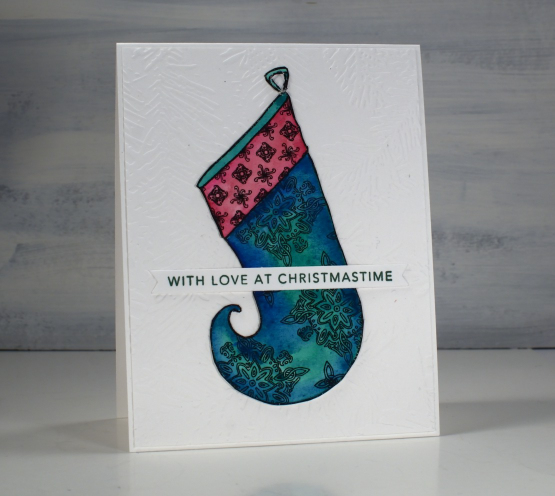
I attached both stockings to embossing folders, one with pine needles, the other bricks. I am very taken with embossing folders at present both for creating backgrounds and for making my own gel printing texture plates.
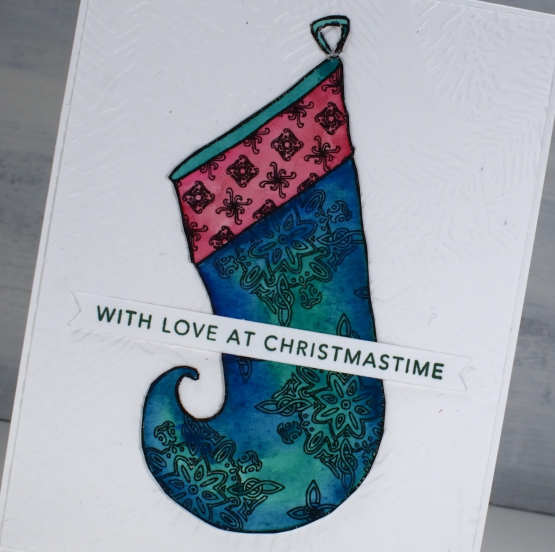
The handy dandy sentiments are from Taylored Expressions. At the beginning of my Christmas card making season I stamped the one stamp of 18 sentiments in a range of colours, cut them with the matching die and kept them in a little box which I have been able to reach into over and over. These two are among my last few Christmas cards but there will be more winter themed cards and Christmas thank you cards to come. My contents of my craft room are still spread around the house but I am making progress putting it back together!
(Compensated affiliate links from Foiled Fox, Scrap n Stamp)

Let’s Skate
Posted: November 22, 2022 Filed under: birds and banners, Brutus Monroe, Dies, Echidna Studios, Foiling, layered Xmas wreath die set, let's skate, Penny Black, silver sketch deco foil, snowflake digital stamp set, stocking stuffers | Tags: Brutus Monroe, brutus monroe embossing powder, digital stamps, Echidna Studios, Foiling, Penny Black creative dies, Penny Black stamps 4 Comments
Don’t let that blog post title trick you. I won’t ever be the one saying, “Let’s Skate”! I will happily say, “Let’s make cute cards with skates on them.” My less than stellar skating experience ended when my children became proficient and I realised I didn’t have to get out on the ice and wobble around any more.

These lovely skate dies are from Penny Black and I was thrilled when I saw them. I have been using them in the Christmas card class I’ve been teaching but decided to make a few vintage looking pairs with various pieced layers. Quite unusual for me to piece layers but I do like how they turned out. On card above I filled them with die-cut foliage.
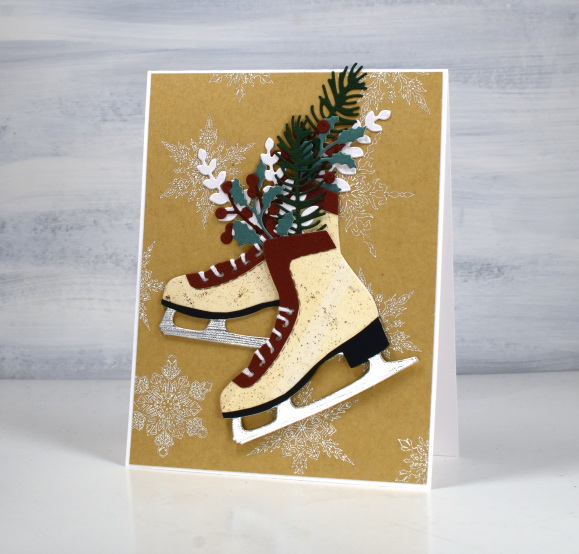
Both pairs of skates are popped up on snowflake backgrounds printed then foiled from my daughter’s snowflake designs available in her Etsy store. I printed the file on kraft paper on my laser printer then foiled in white on the piece above and Brutus Monroe silver foil on the design below.

The vintage style cream colour I used for the boot is a gel print, black cardstock for the heel, silver for the blade and some burgandy for the trim. Fiddly but worth it in the end.
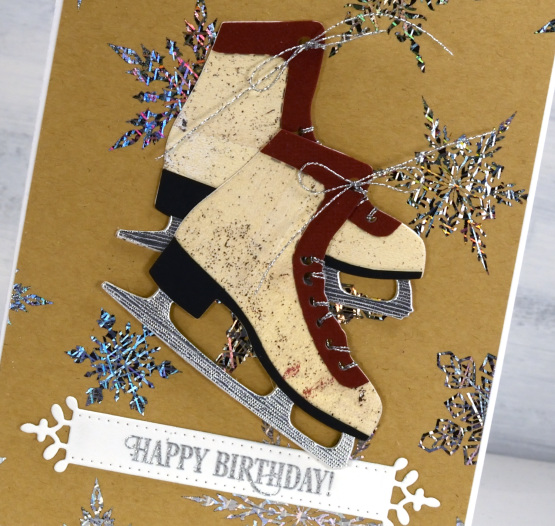
These skates look really cute cut from patterned or collaged paper too. Not cute enough to make me want to skate though!

(Compensated affiliate links from Foiled Fox, Scrap n Stamp & Ecstasy Crafts)


