
Imagine
Posted: November 30, 2015 Filed under: Soft Wings | Tags: Fabriano Watercolour Paper, Kuretake Gansai Tambi watercolour paints, Penny Black creative dies, Penny Black stamps 8 Comments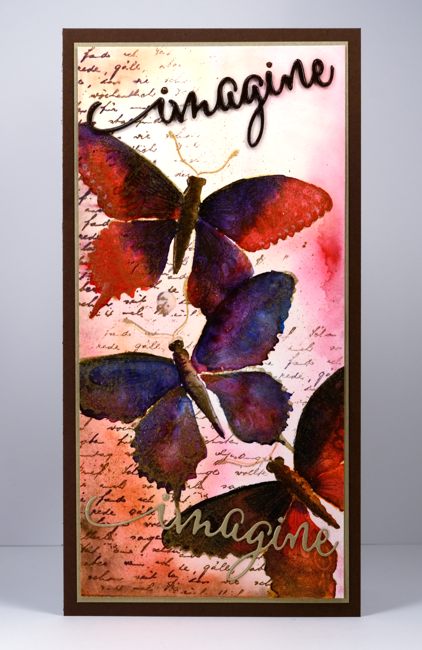
Many of you are familiar with the fabulous online stamping community ‘Splitcoaststampers‘. I have been a member for years and have appreciated the wealth of resources provided and the warm interaction and encouragement of the members. I was honoured to be invited at the beginning of this year to be a member of the Splitcoast design team, The Dirty Dozen. While a ‘Dirty Girl’ I was tasked with creating six projects each month inspired by a monthly theme. Back in April these projects were for fan club members only. It is one of the ways Splitcoast says thank you to fan club members for their financial support. Splitcoast membership is free but by paying a yearly subscription to the fan club you enjoy more resources and privileges while contributing to the running costs.
I was thrilled to be asked to join the ‘Dirty Dozen’ but I was a little apprehensive about thinking up a bunch of projects each month on a set theme. Themed challenges have a way of freezing up my creative juices! But a challenge is meant to be just that, a challenge and the results can be surprising. I met each challenge and was so happy to be taken outside my comfort zone. Each month I was blown away by the projects created by the rest of the team.
I enjoyed all the months but my favourite ended up being the ‘Imagine that’ challenge. I have turned the projects from that month into a story book week here on my blog. I’ll be back tomorrow with the first story book inspired card.
Supplies:
Stamps: Soft Wings, Letter background (PB)
Dies: Envision (PB)
Inks: Versamark, Rich Cocoa (Tsukineko)
Cardstock: Fabriano 100% cotton hotpressed watercolour paper, gold cardstock, brown cardstock
Also:Water colour with Gansai Tambi paints, gold embossing powder
Greatest of these
Posted: September 9, 2015 Filed under: Love Chapter, Soft Wings | Tags: Penny Black stamps, Ranger Distress inks, Ranger Distress stains, Tsukineko Memento inks 7 Comments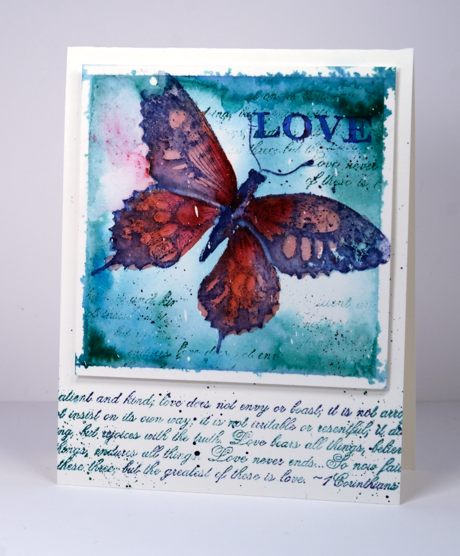
Today’s card is an example of wet into wet watercolour with some stamping added later for definition and texture. I wet the taped panel of watercolour paper then stamped a pale butterfly to give me an outline to paint over. I painted in pinks and purples and added background colour in teal. When it was dry I restamped in dark blue and did some partial stamping with the text stamp from the ‘love chapter’ transparent set.
I love watching the colour blend and blur when I stamp onto wet watercolour paper. If you haven’t tried it you should; it’s fun and you can always stamp over it if it is just too loose and flowy for you! I mentioned Periscope in my last post; if you’d like to know more about it I found this helpful tutorial.
By the way the latest One Layer Simplicity challenge is up and running with Ardyth. It’s all about numbers; check it out.
Supplies:
Stamps: Soft Wings, Love Chapter (PB)
Inks: Pine needles, Chipped Sapphire, Aged Mahogany, Worn Lipstick distress stains and inks (Ranger) Summer Sky memento ink (Tsukineko)
Cardstock: Fabriano 100% cotton hotpressed watercolour paper
Also: Winsor & Newton masking fluid
Birthday Bister
Posted: August 3, 2015 Filed under: Bister, Footnotes, Soft Wings | Tags: Bister, Penny Black stamps, Ranger Distress stains 16 Comments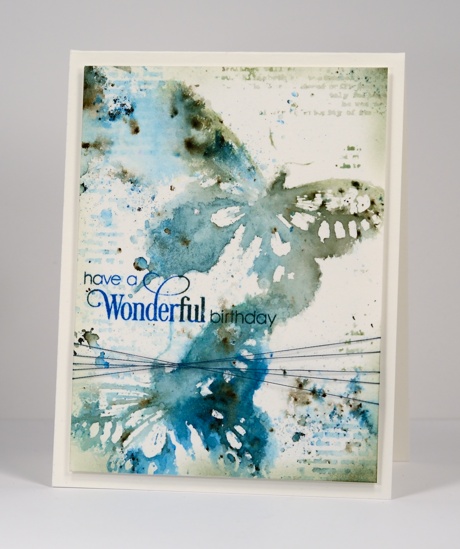
For my daughter’s 21st birthday card I chose blues, greens and the ‘soft wings’ butterfly stamp I always enjoy using. A reader commented a while back that bister and color burst work well with butterflies so it was time to try. I stamped the butterfly in a mix of distress stains which created a watery imprint I could add the blue and green bister powder to. I did multiple impressions then left them to dry while I added some texture around the rest of the panel. I used distress stain on the text stamp from ‘footnotes’ to add the patterns and did some splattering and spritzing with both stains and pearl-ex spray. Once the whole panel was dry I added the sentiment then trimmed and sponged some darker colour around the edges before adding some thread and popping up the panel on a watercolour paper card base.
Supplies:
Stamps: Sprinkles & Smiles, Soft Wings, Footnotes (PB)
Inks: Bundled Sage, Pine Needles, Evergreen Bough, Salty Ocean Distress Stains (Ranger) Deep Lagoon & Olympia Green Versafine inks (Tsukineko)
Paint Powder: Blue and Green Bister
Cardstock: Canson hot pressed 100%cotton watercolour paper
Also: home made interference blue pearl-ex spray, machine embroidery thread
Butterfly on a Wall
Posted: April 11, 2014 Filed under: Brick Wall, Soft Wings, Twirls, Watercolour | Tags: Faber-Castell Albrecht Durer Watercolour pencils, Fabriano Watercolour Paper, Penny Black stamps, Tsukineko Memento inks 16 Comments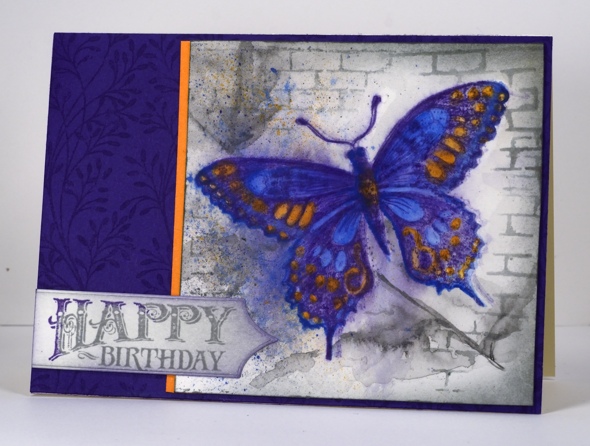
I sat and coloured with watercolour pencils the other night while watching Skyfall. I started with the butterfly stamped in Memento Angel Pink to give me a pale outline for colouring. Once the colouring and blending was finished I restamped the butterfly over the top, this time in Memento Grape Jelly. I wasn’t sure what to add as background so I painted a grey wash first then sketched a shadowy stem with leaves. It still wasn’t quite what I wanted so I added some bricks by masking the butterfly and stamping the brick wall stamp. Of course I splattered a bit of blue, orange and grey around too. I realize now that either the butterfly is huge or the bricks are way in the background.
The panel I had created was basically square so I decided to make a larger than usual card for me. I added just one strip of orange then framed it with a purple cardbase. Ardyth just reminded me the current Card Concept challenge is a butterfly one so I will link up there. I am not sure that this card fits neatly into a particular style but the closest is probably shabby chic & vintage.
Supplies:
Stamps: Soft Wings, Sentimental, Brick Wall
Inks: Memento Grape Jelly, London Fog, Angel pink (Tsukineko)
Pencils: Albrecht Durer Blue Violet 137, True Blue 148, Medium Grey 197, Prussian Blue 151 Light Orange 113 (Faber-Castell)
Cardstock: Fabriano 100% cotton hot pressed watercolour paper, Purple Mountain mix & match paper, Summer Sun mix & match paper (Penny Black)
Watercolour butterfly tutorial
Posted: January 25, 2014 Filed under: Background Stamps, Schizeas, Soft Wings, Tutorial, Watercolour | Tags: Penny Black stamps, Tsukineko Memento inks, Tutorial 21 Comments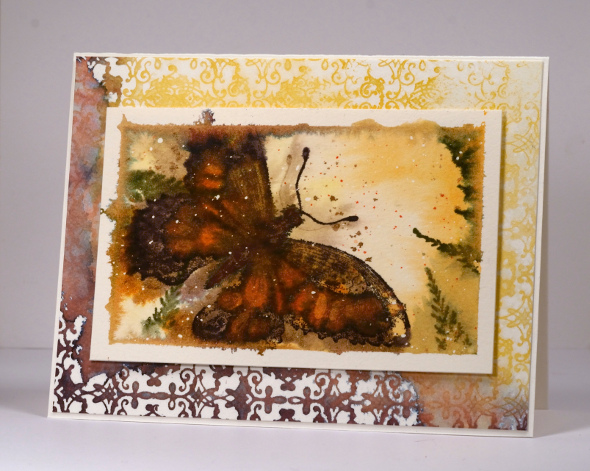
Believe it or not here is my second tutorial for the year and it’s still January! You will see in the video I am using a different watercolour block to the one I usually use. It is 7″x 10″ so I divided it into four panels to create four little watercolour pictures. Only two will end up on the blog, this one and a little snowscape. The other two were tossed. I flicked masking fluid over the watercolour paper before I began filming the tutorial. Embarrassingly the panel was not centred at the beginning of the video but I corrected it after a minute or so. You can see that some of the ink seeped under the painter’s tape I masked with. I didn’t crop that out because I thought it added to the whole “vintage-found it in the attic” feel of the card. As you know usually I would not mat with a patterned panel but I just wanted more of the lovely elderberry & cantaloupe colour combo so it is a little busier than my usual.
Supplies:
Stamps: Soft Wings, Decadence, Schizea (PB)
Inks: Memento Dandelion, Cantaloupe, Tangelo, Rich Cocoa, Elderberry, Olive Grove (Tsukineko)
Cardstock: CartieraMagnani 100% cotton hot pressed watercolour paper
Also: Winsor & Newton Masking Fluid
OLW 158 Fly away with me
Posted: September 18, 2013 Filed under: CAS, OLW, Soft Wings 13 Comments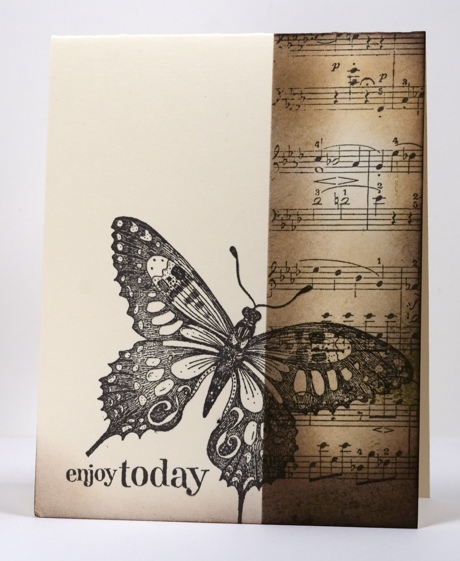
This week’s One Layer Wednesday challenge is to feature something with wings on your card. I chose this beautiful butterfly stamp and a palette of browns.
I masked the left hand side of the card front so I could sponge and stamp the right hand side. I have roughly used the rule of thirds for my stamped panel. The butterfly is stamped over both sides directing the eye from left to right. I also added a little sponging to the bottom edge in keeping with the vintage feel of the card.
OLW 158 Rules
1. A one-layer card is defined as a single layer of card stock folded in half. No other layers of paper allowed.
2. Make a card with wings on it. It could feature birds, butterflies, planes, mosquitos ; anything with wings.
3. Post your card somewhere online and link back to it here using the InLinkz button on the sidebar. If linking to a blog post, please be sure to link to the specific post and not your blog’s home page.
4. The most important rule of all…HAVE FUN!

Butterfly Die
Posted: June 28, 2013 Filed under: CAS, Delicate Wings, Dies, Soft Wings 21 Comments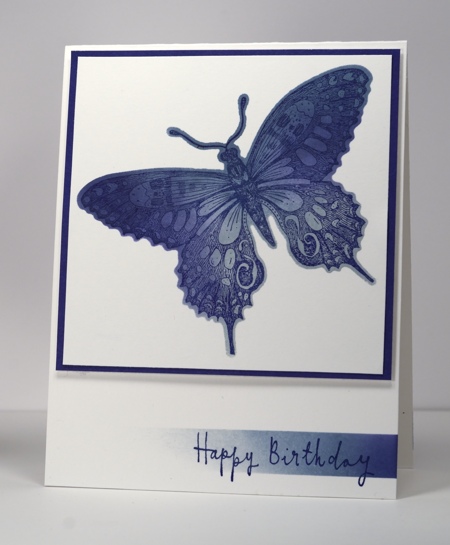
After a week of sneak peaks, Penny Black’s new Creative Dies are now available in the store. What a treat to have all these beautiful dies to which co-ordinate with some of my favourite stamps. I chose the Delicate Wings die to cut a mask out of a post-it so I could sponge a background of blue for the soft wings stamp. I sponged Versamagic chalk inks in three shades of blue then used a stamp positioning tool to add the detailed stamp in Versafine Majestic Blue. I used two post-its as masks so I could sponge a base of colour to stamp my sentiment over.
Visit the Penny Black blog for this week’s sneak peaks and links to the design teams creations using the new dies.
Supplies:
Stamps: Soft Wings, Reflection (PB)
Inks: Versamagic Night Sky, Sea Breeze and Aegean Blue, Versafine Majestic Blue(Tsukineko)
Dies: Delicate Wings
Emerging Butterfly
Posted: April 8, 2013 Filed under: CAS, Delicate Florals, Soft Wings 22 Comments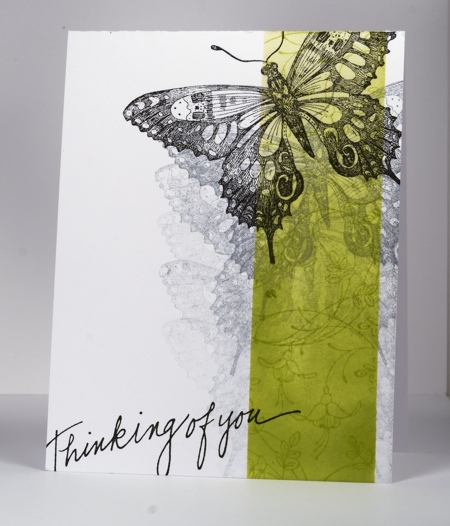
Yet another card from me which ended up looking totally different to the original plan! But never mind that, I ended up with a card which fits the Less is More challenge this week to use Lime Green and Black.
I began by masking the sides of the vertical strip with post-it notes. In the strip I repeatedly stamped a flower from Delicate Florals then sponged over the top getting gradually darker towards the bottom. The Soft Wings butterfly was stamped five times in grey before the final one and the sentiment were added in black.
Supplies:
Stamps: Soft Wings, Delicate Florals, Thinking of You (Penny Black)
Ink: Memento Pear Tart, London Fog & Versafine Onyx Black (Tsukineko)
Lace and a butterfly
Posted: June 10, 2012 Filed under: CAS, Soft Wings 8 CommentsFor inspiration today I browsed through my Handmade Cards board on Pinterest. I have over 100 beautiful cards pinned and they feature a range of styles and techniques. The one I chose to CASE today is a gorgeous vintage style card by Cindy Lawrence. My colour scheme is similar to hers and so is the layout but I switched the technique slightly and the stamps.

To create a textured background I embossed the Floral Thread background stamp in clear on ivory cardstock. I then sponged over the embossing with Wheat Versamagic Chalk Ink and a little Memento Rhubarb Stalk.
The butterfly is stamped in Rhubarb on ivory, the letter back ground in Desert Sand and the sponging done in both colours. The edges of the butterfly panel and it’s mat are distressed. I found some vintage lace to put behind the butterfly and one burgandy button (which unfortunately looks dark brown in the photo!) to finish it off.
Supplies:
Stamps: Floral Thread, Soft Wings 40-099, Letter Background, Lace Delight (PB)
Inks: Memento Rhubarb Stalk & Desert Sand, Wheat Versamagic Chalk ink and Versamark (Tsukineko)
Also: Clear embossing powder, vintage lace and a button
Double sponging tutorial
Posted: May 18, 2012 Filed under: CAS, Penny Black, Soft Wings, Tutorial 37 Comments
On Wednesday I posted a card featuring a little square filled with a butterfly and some music. Today I have a tutorial showing the technique on a new card with a bigger image panel.
First I sponged three colours randomly over a piece of white cardstock. Careful blending is not important because the sponging will be stamped over and responged.

I stamped the music background over the stamping in a darker colour.

It’s hard to see but next I embossed the butterfly in clear embossing powder.

The final step is to sponge over the whole panel in a dark colour and watch the butterfly emerge.


Thanks so much for dropping in today; to see more thank you cards pop over to the Penny Black blog
Supplies:
Stamps: Music Background, Soft Wings 40-099, Flourish Thank You 4175F(PB)
Inks: Memento Paris Dusk, Cantaloupe, New Sprout, Summer Sky and Versamark (Tsukineko)
Cardstock: Penny Black Mix and Match papers – Clear Skies, Periwinkle
Also: Clear embossing powder


