
Postage Stamp Tulips
Posted: February 7, 2024 Filed under: Darkroom Door, Elizabeth Craft Designs, global postmarks, online class, Penny Black, postage stamps, splendiferous | Tags: Darkroom Door stamps, Elizabeth Craft Designs, Fabriano Watercolour Paper, online class, Penny Black stamps 11 Comments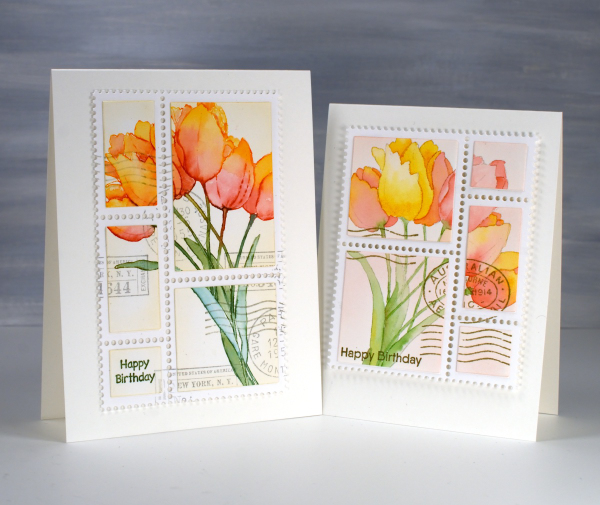
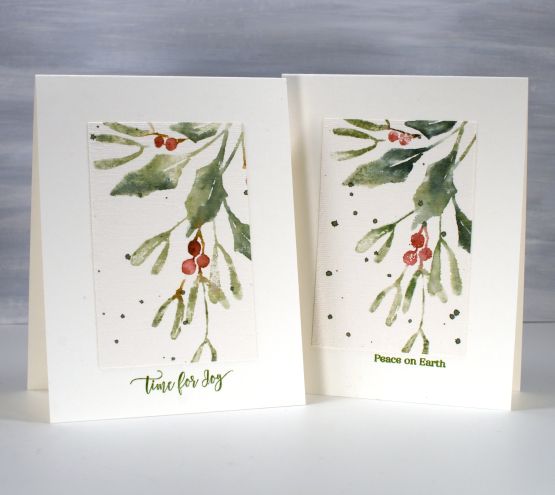
I’ve been inspired so many times by my talented friend Stamping Matilda, aka Godelieve Tijskens including her delightful faux postage stamps. I’ve wanted to make some for a while so I treated myself to a fancy die from Elizabeth Craft Designs. There are many ways to make faux postage stamps including with a clever tracing wheel usually use for sewing.

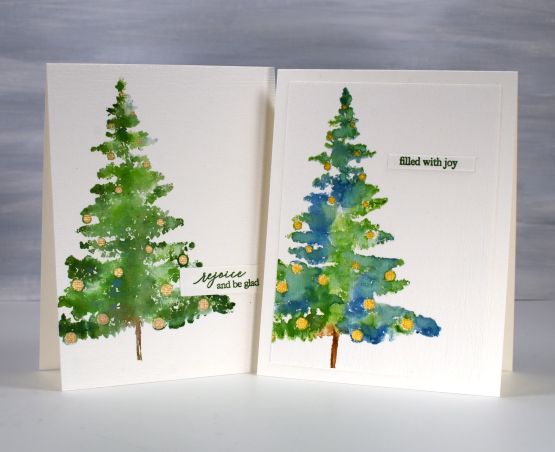
Once I had my die on hand I had to decide what to make my stamps from. I decided not to stamp something especially for the faux stamps. Instead I started using patterned papers and stamped panels that were sitting around looking pretty but not serving any other purpose. The two tulip panels featured on today’s cards were made for my online class Floral Faves. There is a lesson in the class where I show a range of methods for no-line watercolour. In designing and filming the class I created quite a few no-line watercolour panels that were never turned into cards…until now. I stamped the tulips using the Penny Black stamp, ‘Splendiferous‘.

The ‘postage stamps‘ die cuts a large panel of perforated stamps all joined together. There are also small dies in the set that cut rectangles to attach inside the perforated sections. Once I had my tulip sections attached I used Darkroom Door set, ‘global postmarks‘ to add postmarks. I popped up my faux postage stamps on one A4 card and one slightly smaller card. Of course I proceeded to search my pile of possibility for more panels to turn into faux stamps! Today’s post features an affiliate link to Scrap’n’Stamp. If you buy through this link I receive a small commission at no extra cost to you.
Happy Birthday, Happy Camper
Posted: January 31, 2024 Filed under: ...is coming, campers, Penny Black, trio of trees | Tags: Penny Black creative dies 3 Comments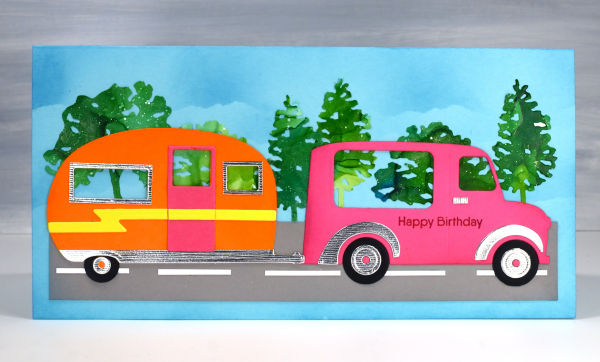
Today’s card has already travelled to a girl who just turned 8! It’s not my usual style but it was definitely fun choosing the colours and cardstock to put this one together. The die sets are both from Penny Black and although they weren’t released at the same time, they are the same scale which made this cute little scene possible. One set is called ‘Campers‘ and the other ‘…is coming‘
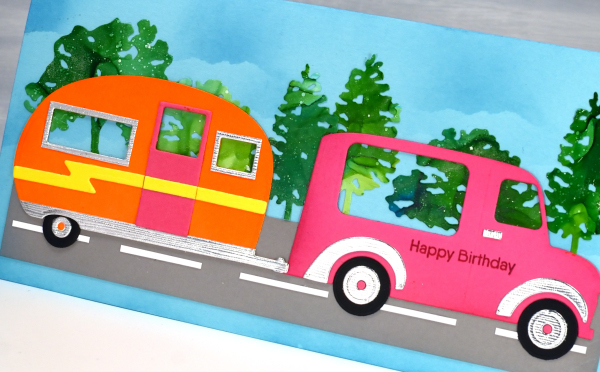
The blue card base and the pink, yellow and orange cardstock was all from my stash so I couldn’t say what the colours are but the cool lined silver is from Tonic Studios. The trees are also a PB set called ‘Trio of trees‘ and I cut them from an alcohol ink gel print.
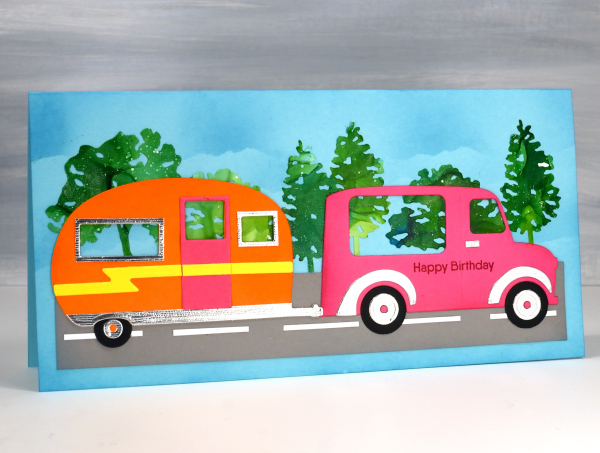
I tore a post-it note edge to mask some clouds as I blended broken china ink over the base. I’ve used the little truck/van a couple of times before; you can see those cards here and here. Today’s post features affiliate links to the following companies. If you buy through these links I receive a small commission at no extra cost to you. The Foiled Fox & Scrap’n’Stamp.
Mini Festive Fragrance
Posted: December 28, 2023 Filed under: festive fragrance, Penny Black, Sizzix | Tags: Penny Black stamps, sizzix embossing folder 5 Comments
Today’s card features ‘festive fragrance‘ a Penny Black brushstroke stamp, which I think could be used all year round especially if you choose colours accordingly. I used the following distress inks (either ink pads or markers) to ink the stamp: brushed corduroy, forest moss, rustic wilderness, mowed lawn, festive berries, aged mahogany, candied apple. I spritzed the stamp lightly before stamping on hot pressed watercolour paper. After stamping once I reapplied ink to the stamp if necessary to get more coverage but in some cases all that was needed was some blending with a paintbrush to fill the leaves or berries.
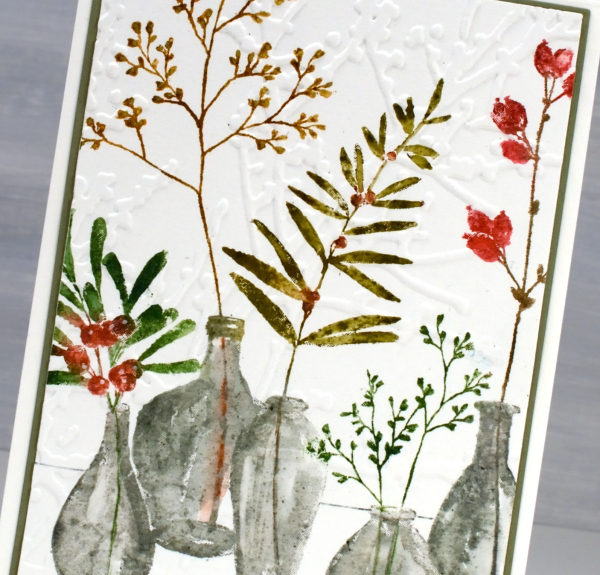
I definitely did more blending on the vases then ruled a thin line behind the vases to ground the image. You may have noticed on some of my recent cards I have embossed the panels after stamping and watercolouring. I did so on this one with the twiggy embossing folder from Sizzix/Tim Holtz (sorry I don’t know the name). I knew I was taking a risk embossing a perfectly good panel with a large non-symmetrical embossing folder but I think it worked.
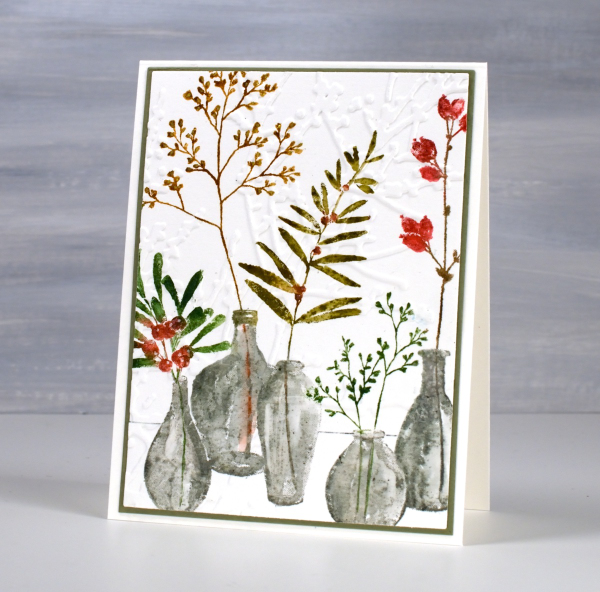
You can’t tell from the photo but this is a smaller card than my usual A2 cards. This one is 5″x 3¾”, which is half an inch smaller in height and width. I’ve chosen to make some cards this size because I have some envelopes this size to use up and sometimes smaller is cuter. To see the image on an A2 card take a look at an earlier card here. Today’s post features affiliate links to the following companies. If you buy through these links I receive a small commission at no extra cost to you. The Foiled Fox & Scrap’n’Stamp.
The Brushstroke Binge – Christmas 2023
Posted: December 22, 2023 Filed under: Penny Black, winter gem | Tags: Penny Black stamps, video 2 Comments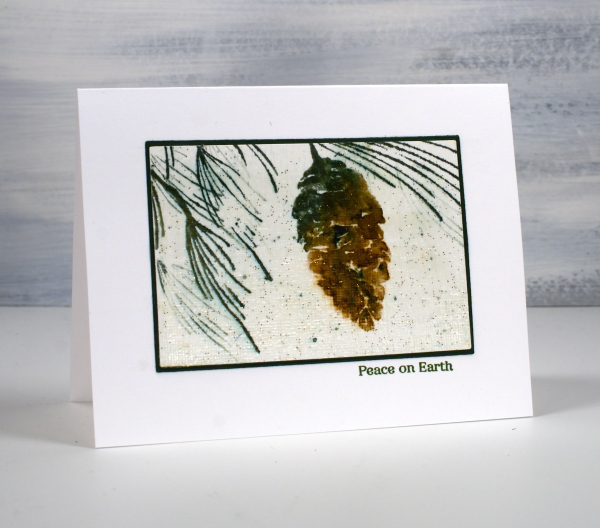
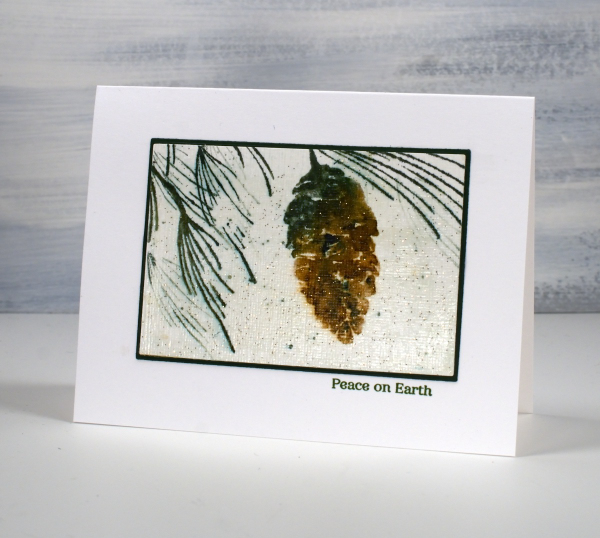
During my brushstroke stamping binge over the last few months I stamped this Penny Black stamp, winter gem, a few times, both the full stamp and just a portion as shown here. I made four cards very similar to this one changing only the colours in the pinecone and they were pretty but needed a little extra something. It just so happens I had uncharacteristically bought something sparkly after watching Tim Holtz say it reminded him of formica tables! It is a texture paste with sparkle in it but smooth, not at all gritty like glitter can be. I swiped it across all the little pinecone panels and they were pretty as can be. I did stamp the pinecone in distress inks so when I spread the texture paste across the panel the distress inks bled a bit but not so much as to spoil anything.

I made a short video of most of this year’s brushstroke Christmas cards and because it is short and not the usual Youtube orientation I can’t seem to embed it in this blog post but you can click over to watch it here. You’ll see the other versions of this card on the short video.
Most of the cards in the video have been featured on the blog but there are a few that didn’t appear here. I hope you enjoy my collection of brushstroke stamped. Thank you for dropping in to see what I have been creating. I hope your Christmas is full of joy and peace.
Today’s post features an affiliate links to Scrap’n’Stamp. If you buy through this link I receive a small commission at no extra cost to you.
Bauble Beauty – video
Posted: December 20, 2023 Filed under: bauble beauty, Penny Black, Tutorial | Tags: Penny Black stamps, video 7 Comments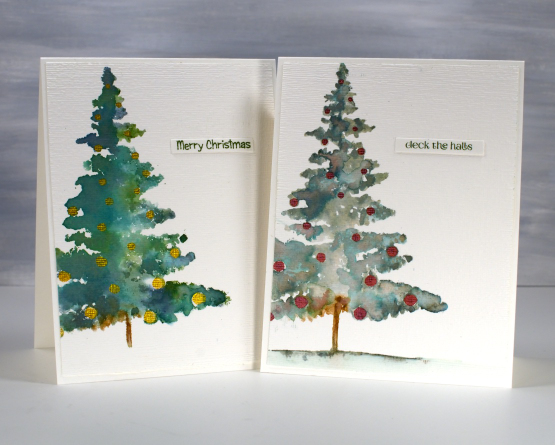
I have mentioned more than once my ‘brushstroke binge’ on this year’s Christmas cards. The Penny Black ‘bauble beauty‘ stamp was one I used several times and decided to make a video of my simple dye-ink watercolour technique. Keep in mind I worked on hot pressed watercolour paper; the inks don’t react the same way on regular cardstock.
Brushstroke stamps are so called because they appear to be stamps made from painted images. I often use dye inks when stamping them so I can add some water to the stamping and get a watercolour look. On the cards featured here I used a range of different inks but also vary the amount of water added on the stamp and at the blending stage. The card below features only one ink for the foliage, the magical northern pine memento ink. All the rest of the cards were stamped with the blue and green distress inks.
You can see on the two cards below I was more generous with water on the left hand card blending the ink over the whole tree shape. On the right hand card I left patchy areas unblended which kept the green inks more separate and made the tree slightly see through.
I painted pearlescent baubles on all the trees after the ink had dried. As the video shows some of the baubles disappeared at the stamping stage when the diluted ink spread over most of the tree shape. In those cases I filled the baubles I could see and added pearlescent circles on top of the blended tree where I thought more baubles should go.
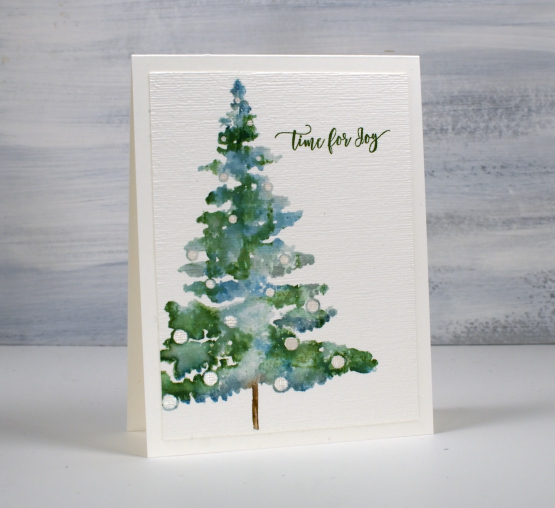
The finishing touches on all the cards included die-cutting then embossing with the retired stampin up ‘subtle’ embossing folder. It creates a nice linen/canvas look; maybe there are other folders available that do a similar thing. I chose small sentiments from Penny Black sets, some stamped directly on the watercolour panel; others on little die-cut strips.
Today’s post features affiliate links to the following companies. If you buy through these links I receive a small commission at no extra cost to you. The Foiled Fox & Scrap’n’Stamp.
Collage Skates
Posted: December 13, 2023 Filed under: Dies, gel press, let's skate, Penny Black | Tags: gel press, gel printing, Penny Black creative dies, Taylored Expressions 1 Comment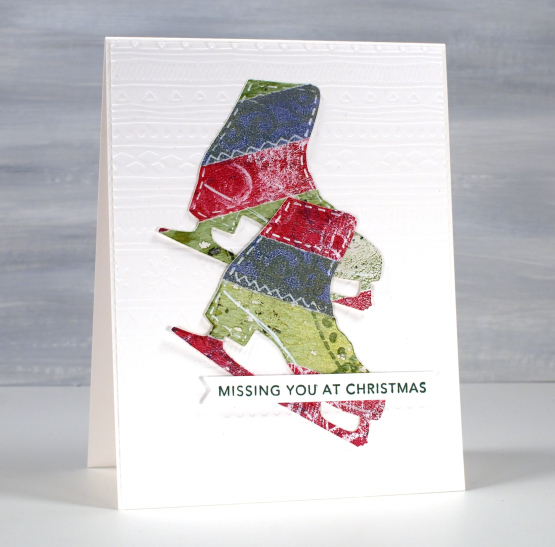
This was one of last year’s Christmas cards made during my collage Christmas card class. All the strips of colour are from gel prints. If you look closely you can see some grungy texture and pattern. None of the prints were amazing by themselves but when combined I quite liked the mix and pattern.
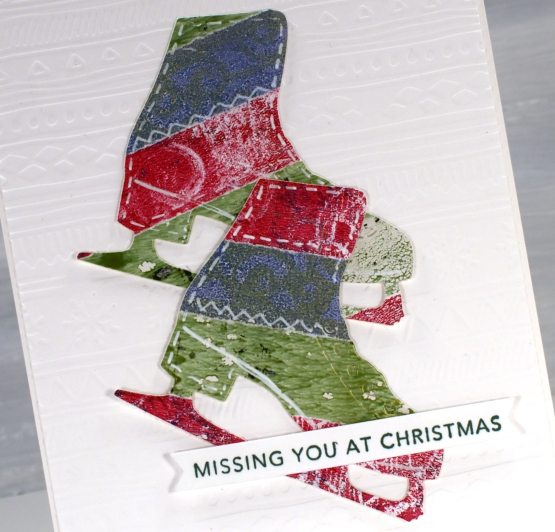
I used the Penny Black die set ‘let’s skate’ to cut two skates from the collage panel then popped them up on an embossed panel and added a Taylored Expressions sentiment from her ‘simple strips’ Christmas stamp.
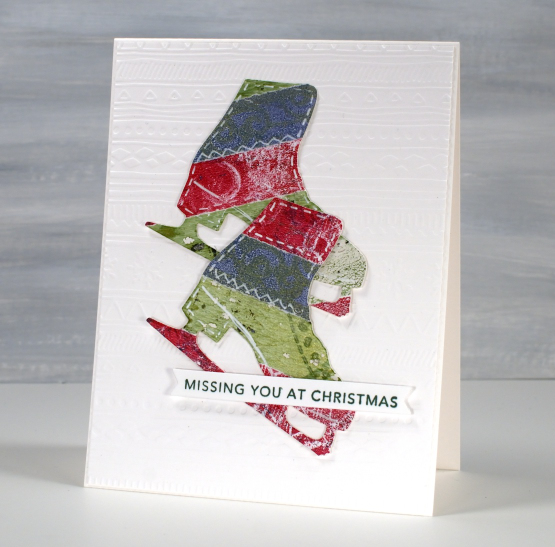
I made many collage cards last year because I have so many gel prints to collage and many dies that worked for cutting. There were trees, bells, stars, poinsettia, stockings, baubles and more trees! I hope this is another idea you’ll try with your gel prints or any patterned papers or tapes. Washi tapes work well because the adhesive is already there!
Berry Branches
Posted: December 11, 2023 Filed under: a berry branch, Penny Black | Tags: Fabriano Watercolour Paper, Penny Black stamps, Ranger Distress inks 10 Comments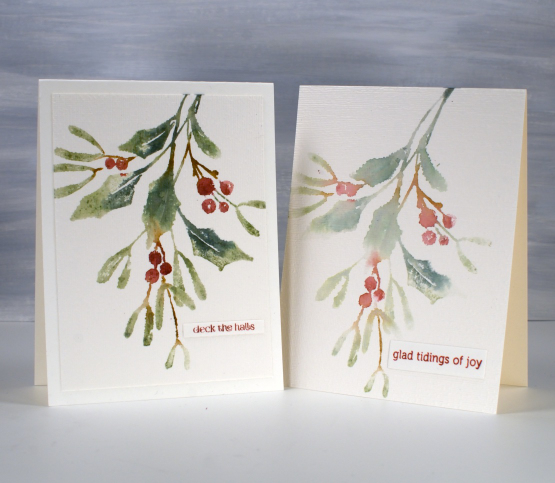
It’s another old favourite, maybe I say that a lot but when it comes to Penny Black brushstroke foliage stamps need I say more? This one is called ‘a berry branch‘ and I’ve featured it once a few years back on two different cards. How is that possible? I know it did turn up in classes a few years back and it was definitely part of this years ‘Painting with Stamps’ in-person class. Some of my previous posts have shown first and second generation prints from the same ‘inking’ and the two cards above are another example.
I keep the stamp in the stamp positioner and after stamping one panel I place another one in the same corner, spritz the still inky stamp and then stamp a paler more diluted impression. Often the second one ends up being my favourite. I used distress inks which work so well with added water.

When using this technique you can’t always control where the colours will blend into each other but I don’t let that worry me. I quite like the areas where green blends into brown into red.

Some of the panels got the splatter treatment, all were embossed with the canvas embossing folder and I added small PB sentiments either to the panel or just underneath it. Just one stamp but definitely a pretty one! Today’s post features affiliate links to The Foiled Fox. If you buy through these links I receive a small commission at no extra cost to you.
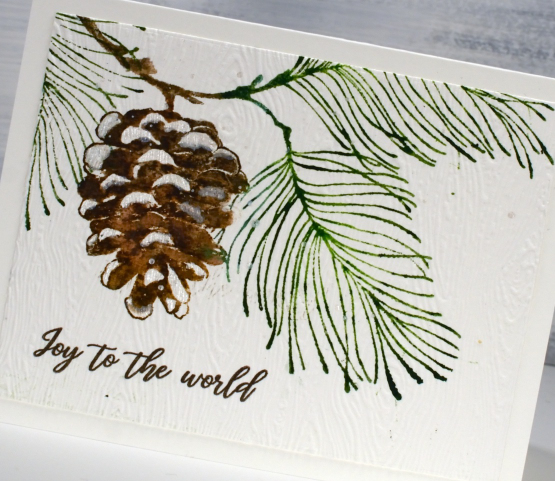
Pines and Pinecones
Posted: December 4, 2023 Filed under: Brush Pines, Penny Black, treasured pine | Tags: Kuretake Gansai Tambi watercolour paints, Penny Black stamps 9 Comments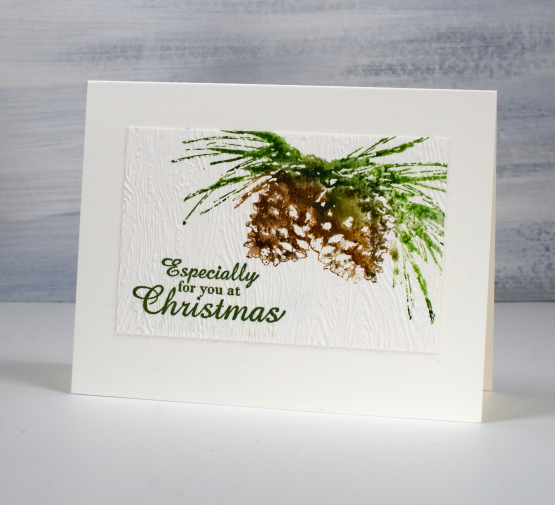
I have a couple more simple one stamp cards to share today. This style has been the main contributor to my stack of Christmas cards this year. I love brushstroke stamps and always enjoy using watercolour techniques with them. The stamp above is from Penny Black and is called ‘brush pines‘. It is a small stamp so you could stamp it more than once to fill a card front or combine it with a berry stamp. I chose to position it in the corner of a watercolour paper panel, ink the stamp with a couple of green and a couple of brown distress inks, spritz the stamp then press it onto the paper. The ink moves and blends a little and if I want more blending I use a paintbrush and water.
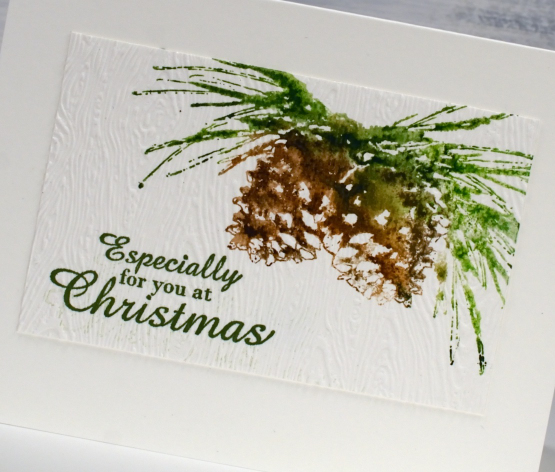
Because it is a simple design I embossed the little panel (after stamping the sentiment) with a woodgrain embossing folder. I like the differentiation between the panel and the card base not by colour, but by texture.
By the way, on Friday I posted a card that is part of the Scrap’N’Stamp Christmas Critters blog hop. There is a prize to be given to a commenter as well as some discounts and a free gift to read about. Make sure you pop back to my post to comment yourself into the draw.
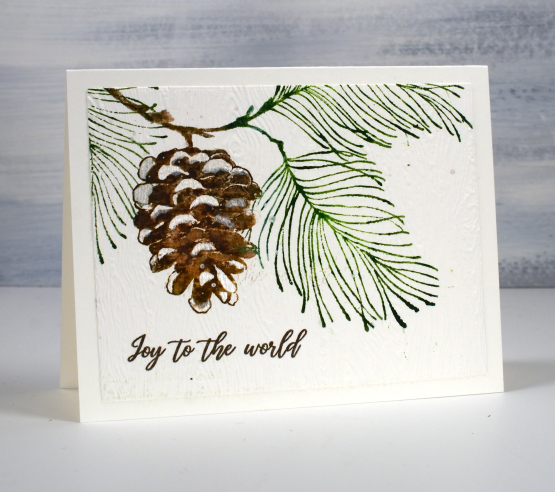
I gave the same treatment to the PB ‘treasured pine‘ stamp which is larger but still a simple cone and needles design. After stamping I added some pearlescent white paint to the design where there might be snow sitting on the pine cone. I used the same Stampin Up ‘woodgrain’ embossing folder to add texture after the sentiment from PB ‘Christmas sentiments‘ was added. (PB treasured pine is available at both Foiled Fox and Scrap’N’Stamp)
Today’s post features affiliate links to the following companies. If you buy through these links I receive a small commission at no extra cost to you. The Foiled Fox & Scrap’n’Stamp
Christmas Critters blog hop
Posted: December 1, 2023 Filed under: Penny Black, robin's christmas | Tags: Penny Black stamps, Ranger Distress inks 17 Comments
I am happy to be participating in Scrap’N’Stamp Christmas Critters Inspiration Hop today. You will be able to find oodles of critter inspiration on the blogs included in this hop. With eleven different stops on the hop there is sure to be something for everyone. Be sure to leave comments at each stop along the way- a winner will be randomly selected from those comments to win a $50 gift certificate to the SNS online store & announced on the SNS blog December 26. If you are looking for critters of any kind make sure you check out the 20% off Critters Sale.

When invited to a Critters themed hop I knew I would be stamping a bird and this sweet Penny Black robin was just the thing. The stamp is called Robin’s Christmas and you get the whole scene in one lovely stamp. Kind of similar to a one a one pot meal – always a winner in my book!
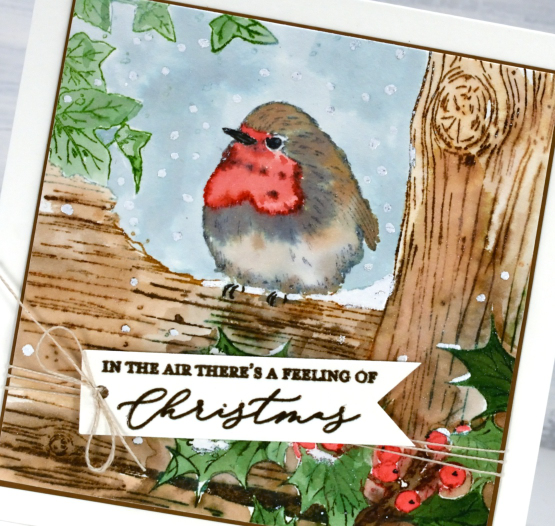
I stamped the bird on hot press watercolour paper first with speckled egg distress ink which is a nice pale blue which I could easily stamp over with darker colours. With the outline image stamped I used speckled egg ink from a re-inker to paint the sky behind the bird. Once that was dry I continued to work in a stamp positioner with one or two ink colours at a time stamping all the other elements. I used evergreen bough and rustic wilderness for the leaves, tea dye and walnut stain for the wood, candied apple for the berries and feathers and weathered wood and tea dye for the bird’s feathers.
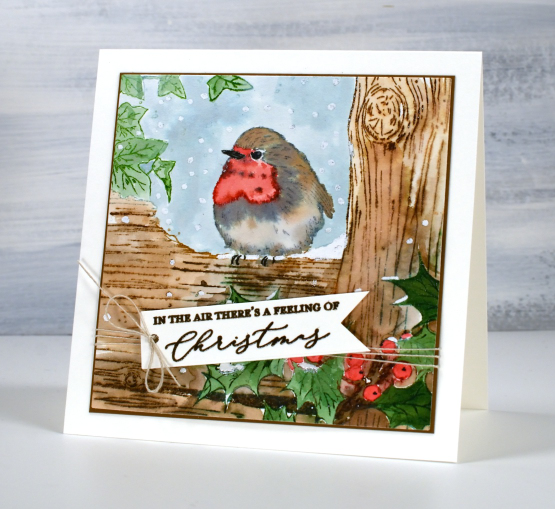
The sentiment is from the PB set ‘feeling of Christmas‘. To finish the scene I used an embossing pen and white embossing powder to add snow here and there.
Thanks for visiting my stop on the hop. If you want to start from the beginning click over to the Scrap’N’Stamp blog. If you are looking for the next stop after me click over to the incredibly talented Dina Kowal.
Of course there’s also a SALE 20% off Critters until December 7, so have fun shopping after you hop! As a bonus, while supplies last you can get a Christmas Critter stamp for FREE with any purchase over $50! Just look for this cute penguin stamp and add it to your shopping cart!

Today’s post features affiliate links to Scrap’n’Stamp. If you buy through these links I receive a small commission at no extra cost to you.
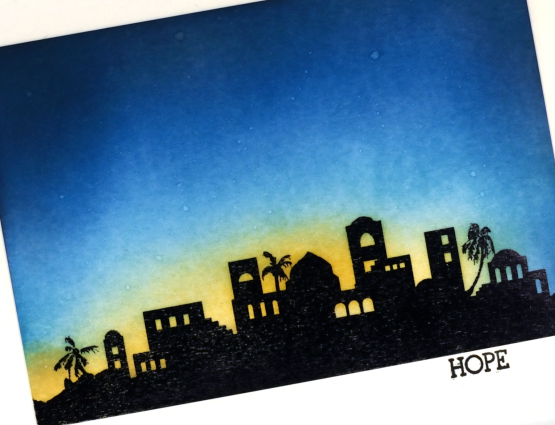
Bethlehem Skyline
Posted: November 30, 2023 Filed under: Bethlehem skyline, cricut, Echidna Studios, Penny Black, Silent Night | Tags: cricut, Echidna Studios, Minc, Penny Black stamps, sennelier watercolours 9 Comments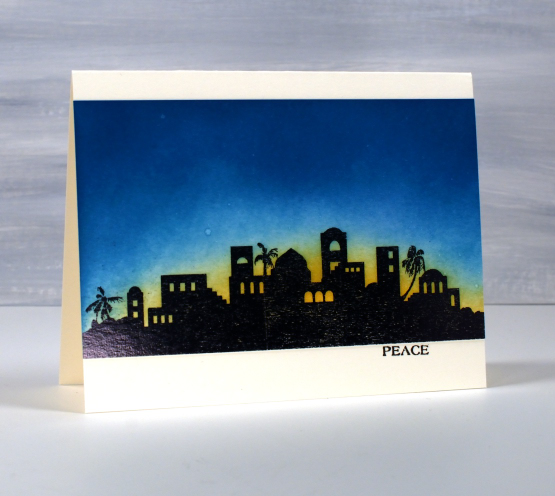
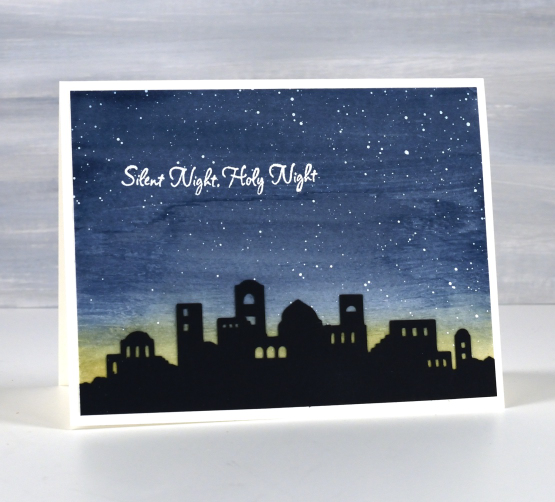
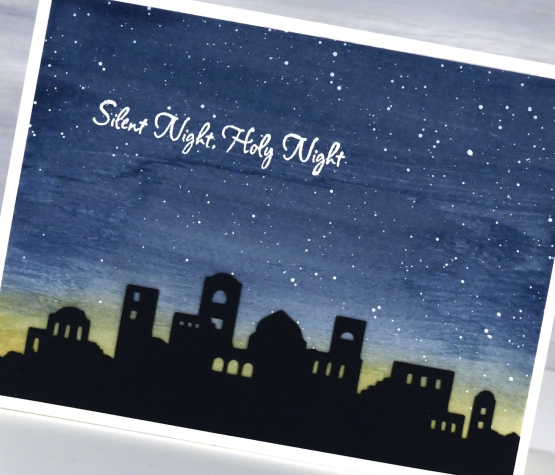
Today’s post is another long one full of photos. I hope you enjoy seeing the different styles and techniques applied to the new Echidna Studios digital set ‘Bethlehem Skyline‘. I requested this image and I think my daughter did a beautiful job with her design. The set includes a black silhouette and an outline image featured further down this blog post.
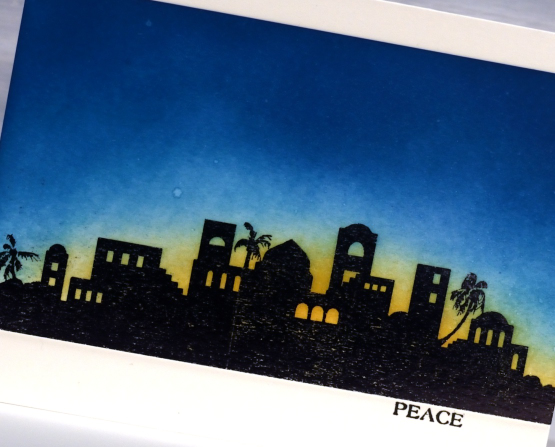
To create these first two cards I printed the silhouette image on white cardstock then foiled over the top with black foil. Using blending brushes I blended first scattered straw distress ink then broken china, and finally uncharted mariner for the deep blue sky. I wanted the colours to blend into each other but I didn’t want too much green where the blue and yellow met so I went carefully in that area.
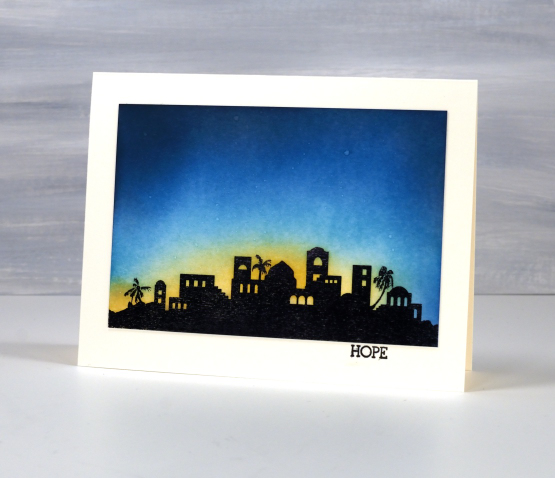
The sky was dark but I wanted a bit darker so blended just a bit of black soot ink around the edges and top of the panel. You might have noticed the image is the same but a different size in each card; that’s the beauty of a scalable digital image. To add stars to the blended sky I spritzed a fine spray of water on the panel and then dabbed it dry with a paper towel. The stars are subtle but they are there. The words Hope and Peace are once again from the PB ‘holiday snippets’ set.
The next style of card features a cut out of the Bethlehem skyline once again using the digital svg file but cut from black cardstock with the cricut. After cutting the silhouette a couple of times we realised the trees were too small for a card sized cut out so added a tree-less image to the set.
I painted a blue and yellow sky with Sennelier watercolour paints then, once dry splattered white acrylic ink over the blue area. When that was dry I attached the black silhouette and embossed a sentiment from the PB set, ‘silent night’.
When cutting the silhouette from black cardstock I also cut a larger one which I have wrapped around cylindrical glass vase. I put a candle inside the vase and lit it but I am not sure whether the candle is bright enough. I am going to keep experimenting and if I can get a good photo I will share it here on the blog. I think the image would look great cut from vinyl and attached to a wooden panel as a nativity sign. Oh the possibilities!
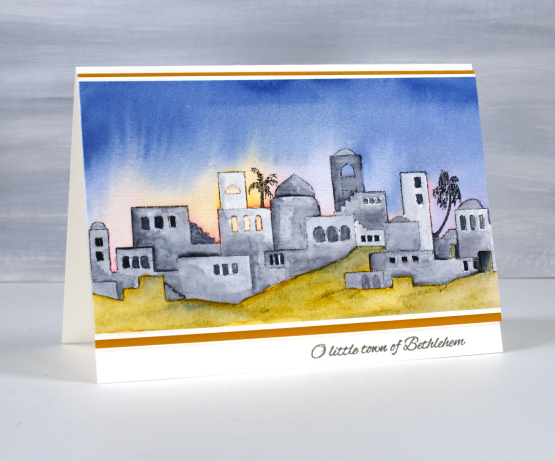
The final card features the other image in the set, an outline of the Bethlehem skyline. I printed it on hot pressed watercolour paper then painted over the buildings with liquid frisket to mask them. The masking made it possible to paint the sky with wet watercolour layers of blue, pink and yellow while preserving the town to paint after the sky dried. To get the soft bleed of pink and yellow into blue I set the panel upside down on the top edge to dry so gravity helped me get the glowing light effect.
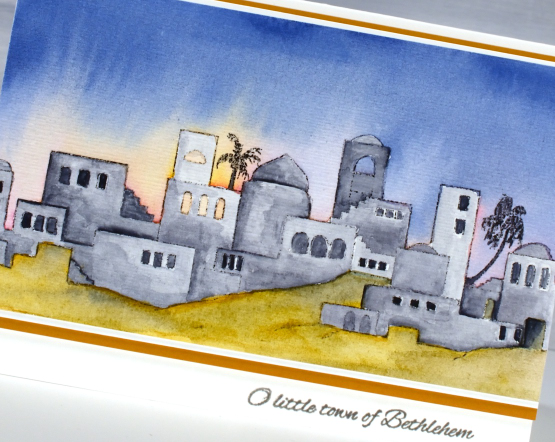
I used a mustard yellow to paint the foreground but it was too bright so I added some of the same blue from the sky to give it some shadow. With both the sky and ground completed I removed the liquid frisket(masking fluid) and painted the buildings with Payne’s grey.

I finished the card with a mat of white then a mat of mustard brown and a little PB sentiment in versafine clair ‘morning mist‘ ink. Thanks for reading this far. I hope you enjoyed my different techniques with this lovely image. I think you’ll be seeing it again; its a new fave!
Today’s post features affiliate links to the following companies. If you buy through these links I receive a small commission at no extra cost to you. The Foiled Fox & Scrap’n’Stamp


