
Leaves and Flowers-Cut & Printed
Posted: April 29, 2024 Filed under: gel press, Tim Holtz, vault wildflowers | Tags: gel press, gel printing, Tim Holtz 9 Comments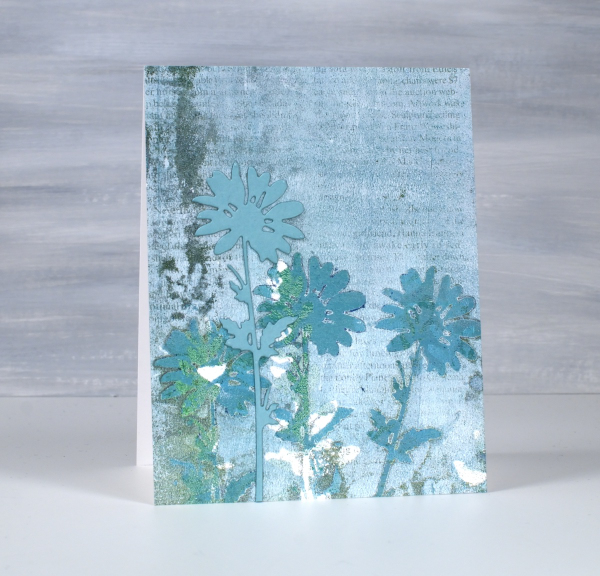
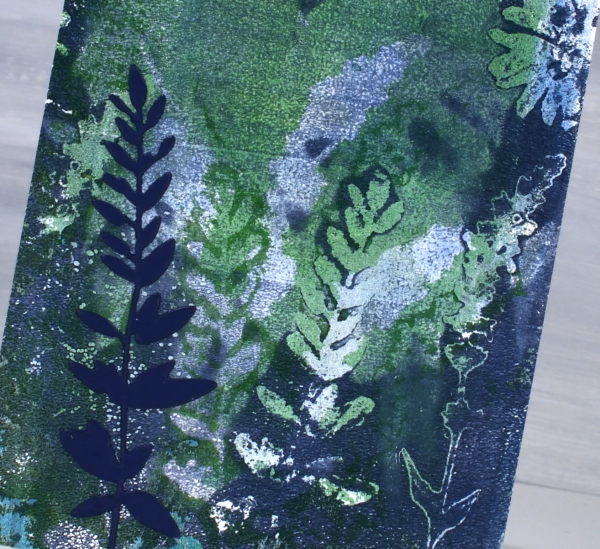
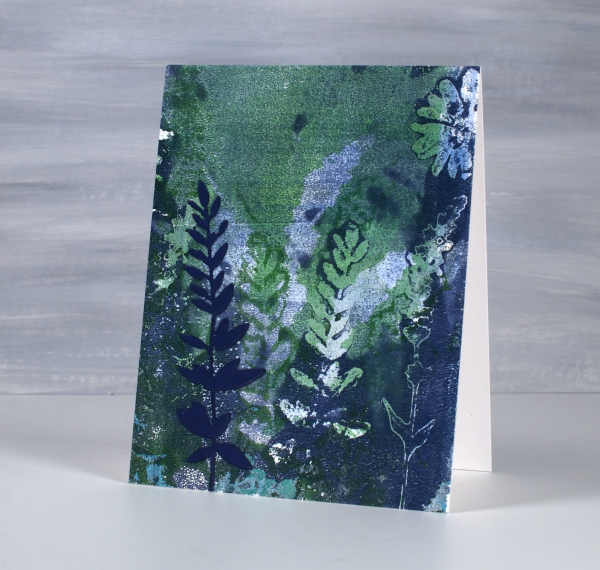
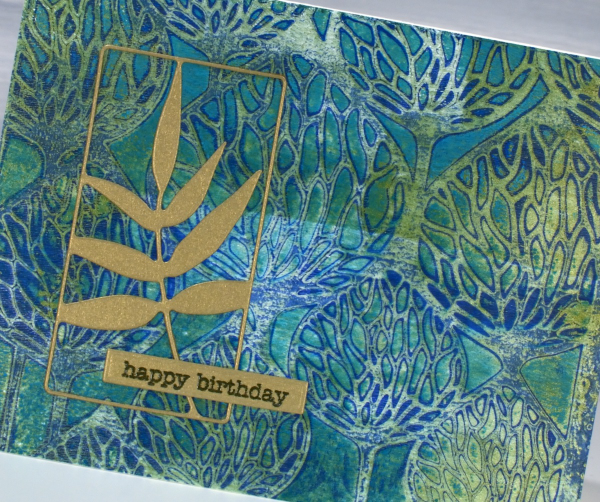
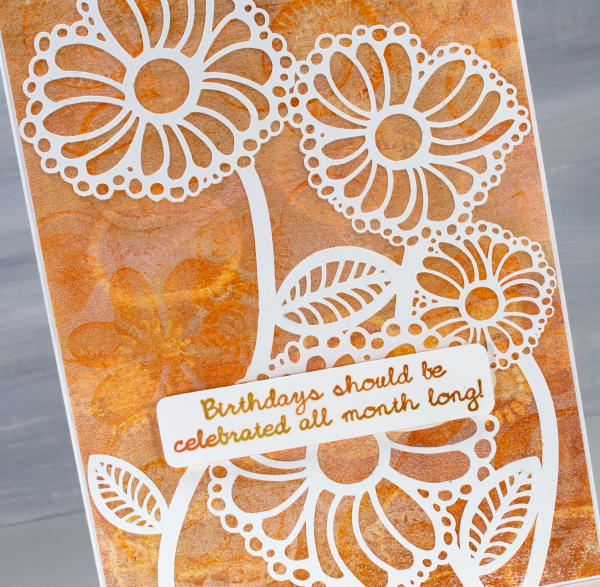
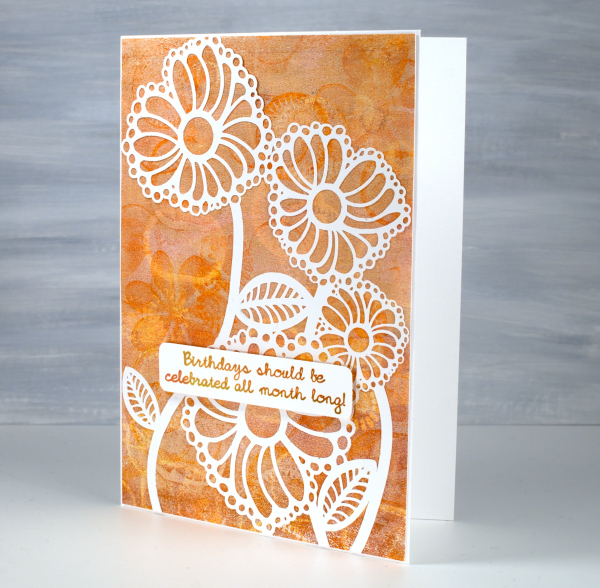
When fresh flowers for gel printing are not readily available, there are always the die-cut ones. In making today’s cards I gel printed patterns using die-cut flowers and leaves and a mix of blue, green and white paints.

Both the flowers on the card above and the stem of leaves on the card below are from Tim Holtz ‘vault wildflowers’ die set. The prints are grungy because I built up some layers of outlines on the plate before adding an image transfer text layer to the final print.
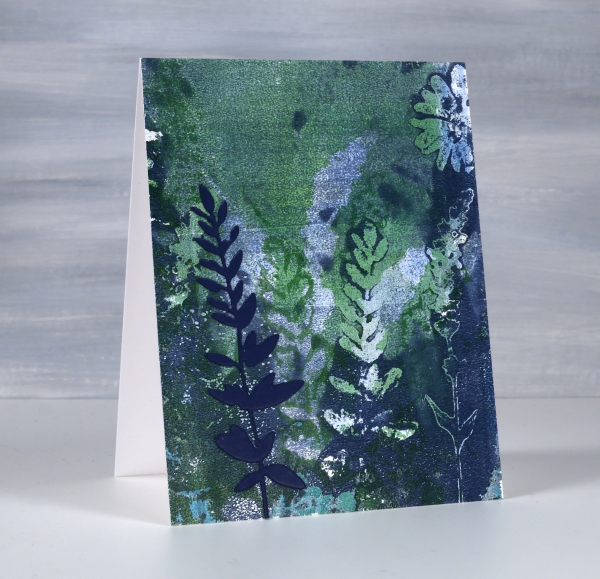
To finish the cards I added a cardstock flower or stem of leaves to match the partial prints in the background.
I did both prints on paper not cardstock then attached them to card bases with double sided adhesive. When I am spending a day or half day gel printing I will often do many prints on paper and a handful on cardstock or thicker paper. I never know which ones are going to be the favourites but I do know the session will be full of ‘just a couple more prints’ moments.

You can see when comparing these two cards the impact of adding some white paint to the mix. I used the same blue and green acrylic paints for both panels but the one above was toned down with white brayered onto the gel plate with the green and blue. So while you to print fresh flowers, die-cut yourself some from paper or duralar and see what you can come up with.
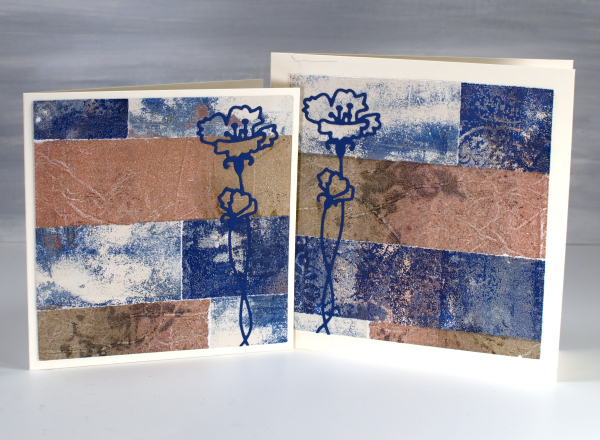
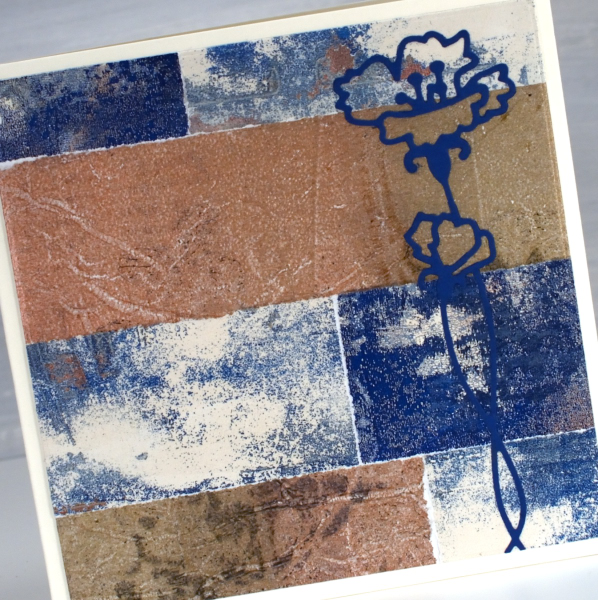
Tiles
Posted: April 26, 2024 Filed under: Collage cards, gel press, Tim Holtz, vault wildflowers | Tags: gel press, gel printing, Penny Black stamps, Tim Holtz 5 Comments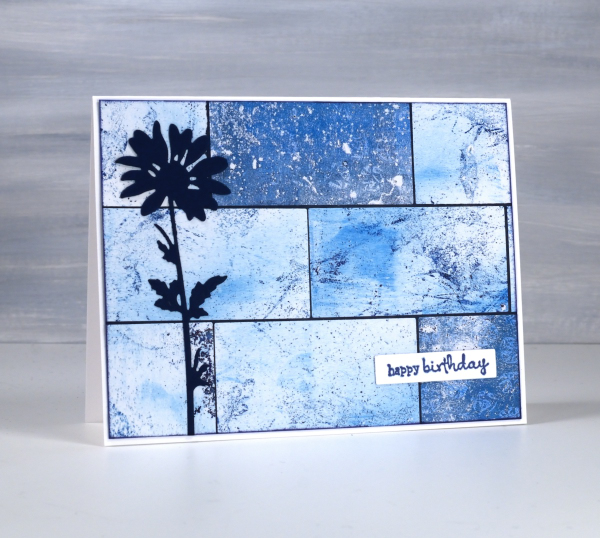
Do you have more gel prints than you know what to do with? Are some of them not very interesting or only partial prints? I definitely answer yes to both those questions. I keep finding though, that the grungy prints make really nice backgrounds for journal pages and cards.

I have many of my gel prints sorted by colour so I pulled several 6 x 6 prints from the blue folder and used them on a few different cards. I also had green, yellow and gold toned prints on hand to make some multicoloured cards; I’ll share them another day. To create this card I cut the blue gel prints with a rectangle die then arranged them like tiles over a navy background before trimming end to fit.
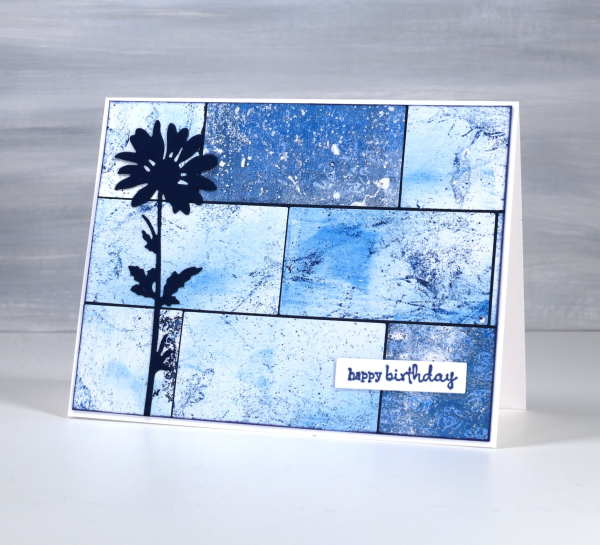
I added a die-cut flower from the Tim Holtz vault wildflowers set and a little Penny Black sentiment. If you like blue then maybe this multi-print collage will please you as much as it did me! This post includes affiliate links from Foiled Fox. If you buy through these links I receive a small commission at no extra cost to you.
Butterfly Journal Page
Posted: April 22, 2024 Filed under: gel press, grafix, Handmade book, perspective butterfly die, Tim Holtz | Tags: gel press, gel printing, grafix, Handmade book, Tim Holtz 6 Comments
It’s been ages since I posted a journal page here. I think some catching up is in order. This double spread is in my handmade 7″x 7″ journal. I did not sit down with an open journal and a plan for this page. After a productive gel printing session I had a butterfly print and a stripe and stencil print made with the same paint colours. To use them on cards I would have had to cut them up and I really didn’t want to.

When gel printing I will often print with the same handful of paint colours for a while before switching them. It makes it easier to keep printing as I have a few paint tubes on hand but more importantly I end up with a stack of prints which co-ordinate with each other because the colours and sometimes patterns are repeated.

I used the Tim Holtz ‘perspective butterfly‘ die to create a reusable duralar mask for gel printing. The circle patterns were made with the Carabelle Studio ‘accumulation de ronds’ stencil. The ‘corduroy’ looking pattern on both the butterfly and the circle page was made with a piece of textured wall paper. I completed this page quite a while ago but didn’t know if it was finished as I hadn’t added any words anywhere. Maybe that will change one day but I love it just the way it is. What you can’t see is the warm gold shimmer from the gold acrylic paint used to pull the prints.

The butterfly print was on paper but the circle and stripe print was on tissue and was fairly fragile. I was able to glue most of it down successfully with gel medium but I don’t mind the ragged edges where it tore. This post includes affiliate links from Foiled Fox and Scrap’n’Stamp . If you buy through these links I receive a small commission at no extra cost to you.
Hello Leaves and Lines
Posted: April 19, 2024 Filed under: cricut, Echidna Studios, gel press, leaves and lines | Tags: cricut, Echidna Studios, gel printing, gelli plate, Penny Black creative dies 2 Comments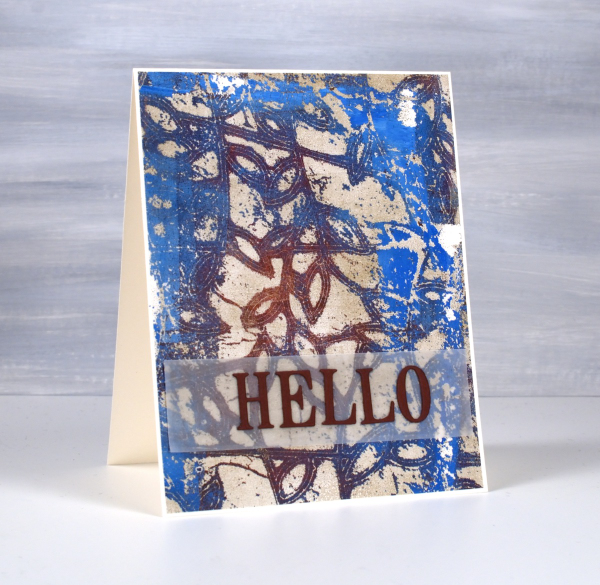
This distressed multicoloured look is one of my favourite gel printing looks. I don’t know that I could recreate it but I usually get at least a couple of these aged looking prints during a gel printing session. The pattern is achieved using a stencil laid over paint on the gel plate. This stencil is called ‘leaves and lines‘ and the digital file is available from Echidna Studios etsy store. To make today’s card I cut a 5″x 6″ stencil from Grafix matte duralar using my Cricut. I also cut it as a larger stencil which I used for a print you can see here.
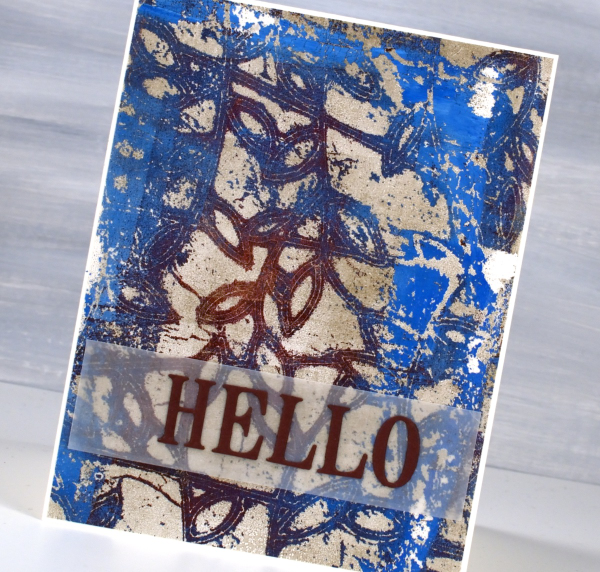
You can see on this print that I used a maroon paint and a bright blue paint; the darker blue is a mix of the two colours. I pulled the print with a pale gold paint so the surface has a bit of shimmer to it.
Because the background is very busy I placed the Penny Black ‘hello’ die-cut sentiment on a strip of vellum to stop it from getting lost in the leaves and lines. This post includes affiliate links from Foiled Fox. If you buy through these links I receive a small commission at no extra cost to you.
The Washing Line
Posted: April 10, 2024 Filed under: City stacks, Concord & 9th, Echidna Studios, gel press, washing line | Tags: Concord & 9th, Echidna Studios, gel press, gel printing 2 Comments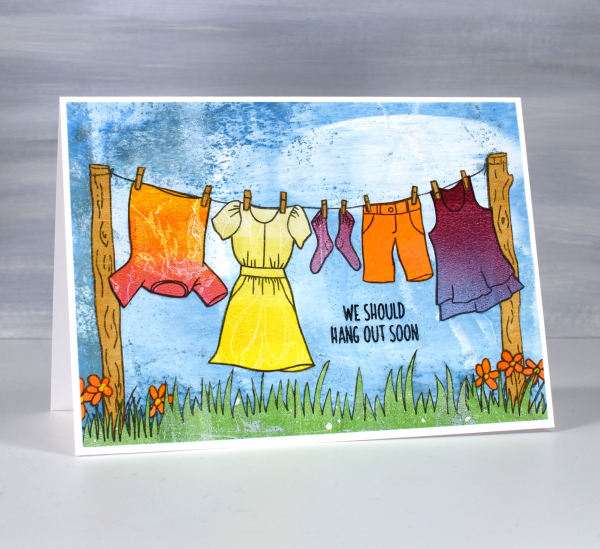
I’m not sure that this is strictly collage although it is all made from cut out papers glued together. I guess it is more like paper piecing, something I rarely do. But gel printing has me looking for all sorts of ways to use my printed papers. The ‘washing line‘ is a digital stamp from Echidna Studios and cutting out all the clothes took me way back to my paper doll days. I printed the washing line image on the seven different coloured gel prints then proceeded to pick colours for all the clothes.
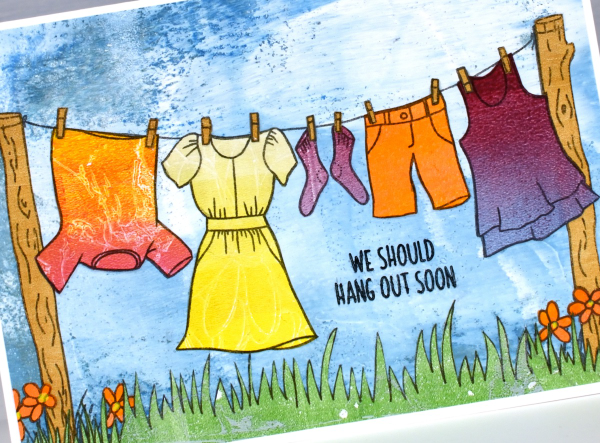
I looked through my gel prints; I have quite a few sorted into folders by colour. Most of the prints used for this panel were from my Gel Print Journey online class. The yellow dress was cut from a gradated print with a faint white daisy pattern on it. The pink and orange ‘tie dye’ was a print achieved my pressing cling wrap on the gel plate, the socks and top were from a blue & burgandy blended gel print. The blue background print was a patchy blue and white print where I hadn’t rolled off my brayer before rolling resulting in the big white blob of paint – just right for a cloudy blue sky. When it came to gluing everything onto the blue background I just adhered the cut-outs over the printed outline.
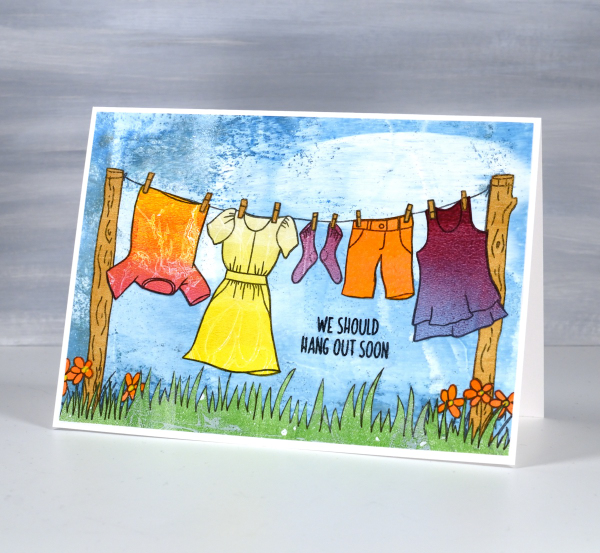
The digital image includes two patches of grass below the posts but I wanted more so I drew another strip of grass on a green gel print and filled the stretch under the washing line. I just happened to have the perfect sentiment from the Concord & 9 ‘City Stacks‘ stamp set. This post includes affiliate links from Foiled Fox. If you buy through these links I receive a small commission at no extra cost to you. If you buy from Echidna Studios my daughter and I get very excited!
Gel Printed Pods
Posted: March 25, 2024 Filed under: artsy stems, framed fern, gel press, Lavinia, online class, Penny Black, Tim Holtz | Tags: gel press, gel printing, Lavinia, online class, Penny Black creative dies, Tim Holtz 3 Comments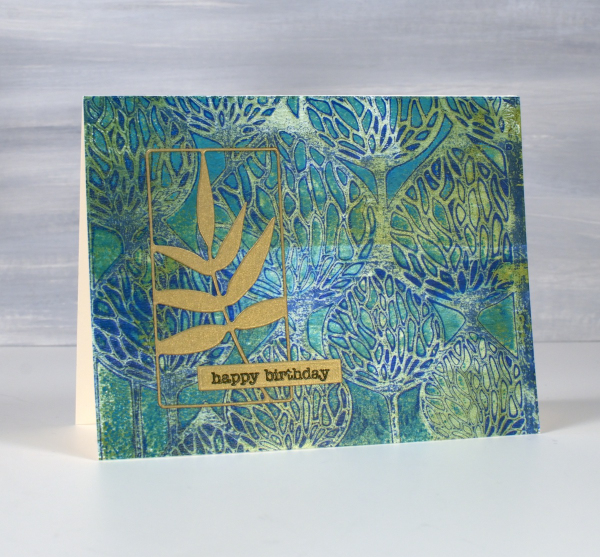
It’s been a while since I gel printed but that there is no lack of gel prints to show you. I currently have boxes of prints and and a stash of cards made from prints.

These two cards were made from the same stencil print, one of the examples from my Gel Print Journey online class (which is on sale along with all my online classes until March 29; just use the code LEAPYEAR40 at checkout)
If you are a fan of Lavinia stencils like I am you probably recognise the ‘Pods’ stencil used for this print. I printed on a 6″x 6″ gel plate giving me a print big enough for two cards. It’s hard to see in the photo but some of the paint was metallic so the print has some shimmer and shine on it.

I looked through my botanical dies and gold cardstock in order to fine co-ordinating elements for the cards. On the card above I used the ‘framed fern’ die from Penny Black and on the card below the die featured is from Tim Holtz artsy stems die set.

I hear my gel plate calling to me so hopefully I will soon dedicate a few days to happy printing. If you are looking for a beginner gel printing class or a refresher please check out Gel Print Journey. This post includes affiliate links from Ecstasy Crafts, Foiled Fox and Scrap’n’Stamp . If you buy through these links I receive a small commission at no extra cost to you.
Scrappy Journal Challenge
Posted: March 18, 2024 Filed under: Darkroom Door, gel press, global postmarks, Handmade book | Tags: Darkroom Door stamps, gel press, gel printing, Handmade book 6 Comments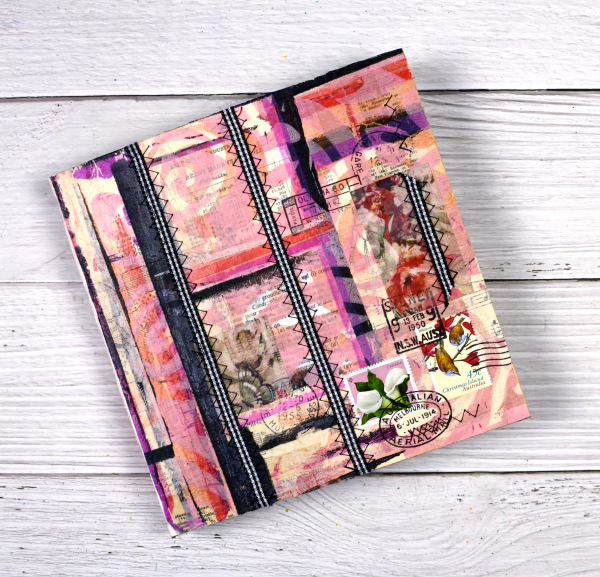
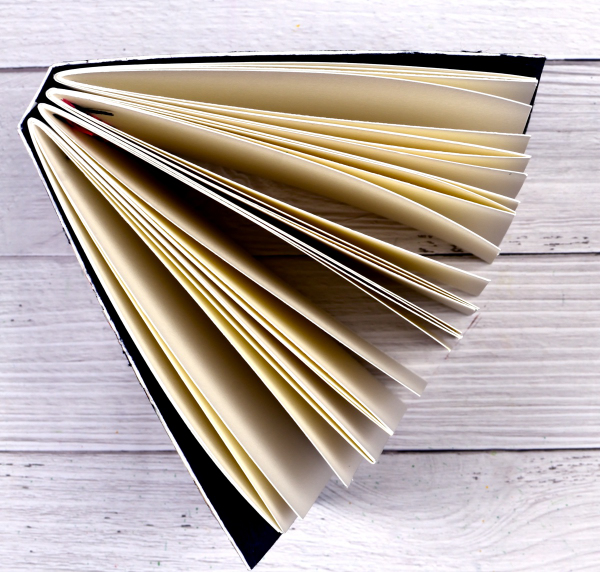
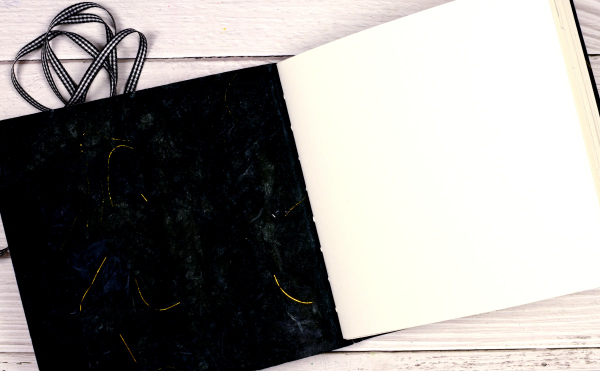
I’ve mentioned the Handmade Book Club before because I enjoy the 5 Day Challenges they offer. The most recent challenge was held last week and was called the ‘Scrappy Journal Challenge‘. The designer and teacher of the challenges, Ali Manning, came up with a tall narrow design which was very attractive. I changed the shape for mine because I will soon need a new art journal and the challenge was the perfect opportunity to get one made. The zig-zag sewing of the signatures was initially tricky but I soon got into a satisfying rhythm and finished them with only one early unpicking incident.
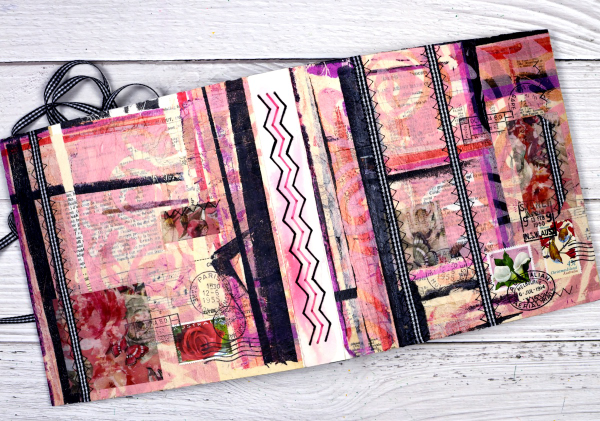
Other than the size of the book and the type of paper in the pages, I followed all the instruction from Ali. She is one of the best teachers I have had the privilege to learn from. I used watercolour paper for my pages and a heavy watercolour paper for the cover. I collaged the cover with vintage papers, then gel printed tissue, fabric washi tape and used postage stamps. The last details added were the gingham ribbon sewn onto the cover with a sewing machine.

The first photo in this post shows the front cover, next the full cover and spine, above is the back cover and below you can see the top view and four signatures.
After sewing the ribbon onto the cover there were random lines of stitching on the inside of the cover so I glued black mulberry paper with gold thread in it over the complete inside cover. After I’d taken the photos I decided to add gingham ribbon ties to both the front and back covers to tie the book closed.
This is the third challenge I have completed with the Handmade Book Club. Here are the links to the other books I’ve made. Mixed Media Journal, Small Coptic Journal, 7×7 Coptic Journal
Bubble Flowers
Posted: February 29, 2024 Filed under: bubble flowers, cricut, Echidna Studios, gel press, grafix, Taylored Expressions | Tags: cricut, Echidna Studios, gel printing, grafix, Taylored Expressions 3 Comments
Aren’t these happy flowers? The design is called ‘bubble flowers‘ for obvious reasons and is one of mine. I was inspired by a vintage brooch. The digital design is available in the Echidna Studios etsy store and can be cut on a digital cutting machine as I have for today’s cards. It can also be printed, foiled and cut as a stencil for blending or gel printing. Do you get the idea you’ll be seeing more of the bubble flowers?
I cut the bubble flowers from thin white cardstock and you can probably tell there are some tiny cuts necessary. If I went much smaller than this I started to lose some of the bubbles so I kept it big enough for a 5″x7″ card.
The backgrounds for both cards are gel prints. The multicoloured one above was created with alcohol inks then pulled with white acrylic paint. It was so pretty I didn’t want to cut it up or cut it down, hence the large card with a layer over the top.
The second background panel was all done with acrylic paints and a selection of objects to add texture. I can see one of my die-cut stamps, some chocolate tray shapes, lid shapes and other found textures. I cover a wide range of techniques in my Gel Print Journey class and I think this might have been a print I did just as we finished filming. All my online classes are currently on sale 40% off by using the code LEAPYEAR40 at checkout or by simply clicking the link above.
Because the bubble flowers are a delicate and detailed cut-out I used Grafix Artist Tac to glue them down. Once I had pressed the image onto the background I ran it through my die-cutting machine to burnish it. (quicker than doing it by hand). The sentiment is one I totally agree with and is from Taylored Expressions ‘In & Out Birthday’ set. Thank you for your lovely messages about our family’s February festivities; it was fun to share them with you in my previous post.
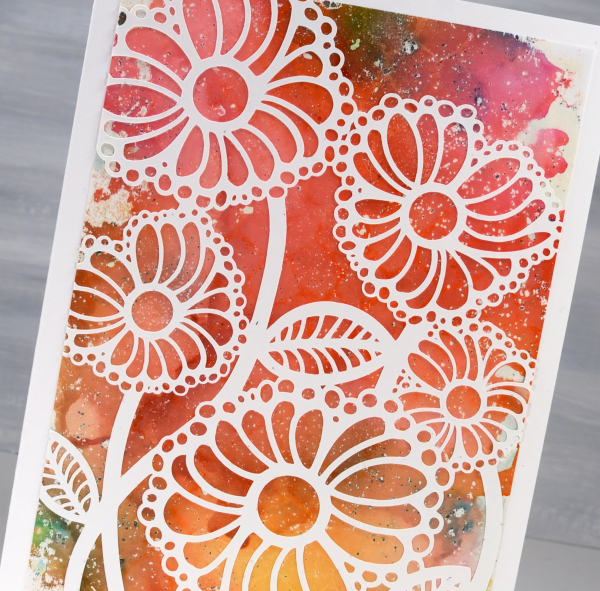
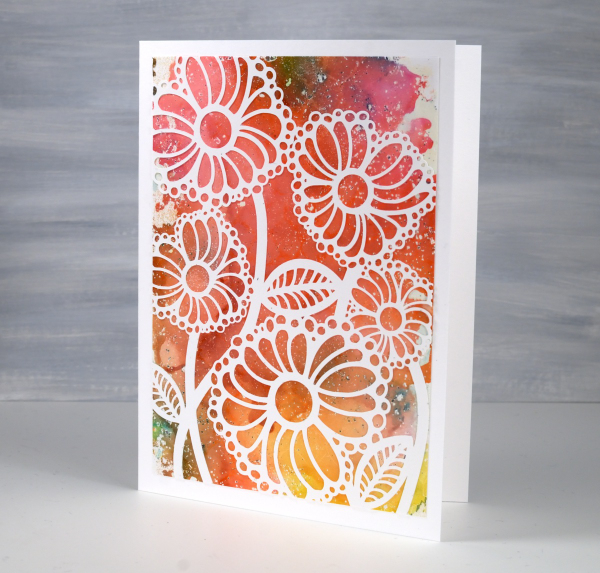
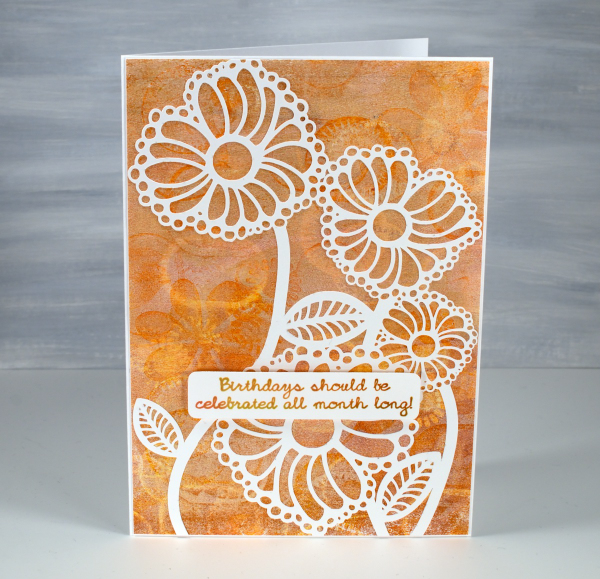
Roses Stencilled
Posted: January 29, 2024 Filed under: Alcohol Ink, Echidna Studios, gel press, Roses digital stamp set | Tags: Alcohol Ink, Darkroom Door stamps, Echidna Studios, gel press, gel printing, Taylored Expressions 2 Comments
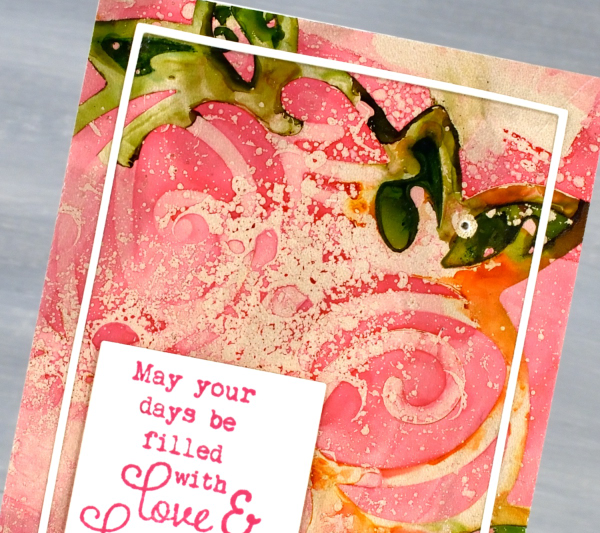
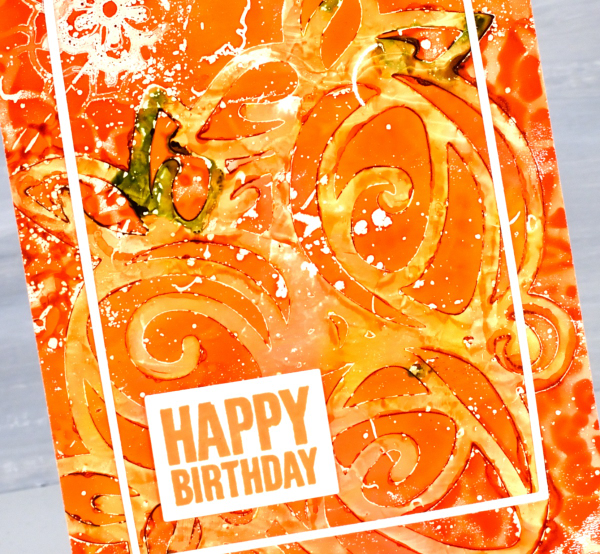
Last week I featured the Roses digital stamp set from Echidna Studios by cutting the rose trio from cardstock with my cricut. I have also cut dura-lar stencils with the same digital files. I cut them in different sizes for gel printing, blending or working with alcohol inks. To create both the pink and the orange panel I used alcohol inks on a gel plate and either dropped the rose trio stencil on top of the alcohol inks or lay the stencil down on the gel plate then added the inks. Both techniques work but by adding the alcohol ink after the stencil you have a bit more control of your ink placement. But you know alcohol inks; they kind of have a mind of their own.
On the card above you can see two patterns. The roses stencil was laid down on the inked gel plate first so you can see the whole design. The Finnabair/Prima ‘floral net’ stencil was laid over the top so there are snatches of that pattern around the edges where it made contact with the alcohol inks. If you are interested in using alcohol inks on the gel plate, check out my video here.
You can see from the photo at the top of the post that the pink one is a smaller card; it’s 5″ x3¾. This print doesn’t include a second stencil pattern but does have some isopropyl alcohol splatter adding interest. The sentiment is from Taylored Expressions ‘In & Out Birthday’ set.
The sentiment below is from the Darkroom Door ‘Happy Birthday‘ set.
I used Waffle Flower A2 layers and Additional A2 layers die sets to cut the narrow border frames. These two sets have been so useful for cutting out panels and sentiments and adding very neat and correctly sized mats.

I’ll be back tomorrow to show you my project from Craft Roulette. Thank you to those of you who tuned in on youtube. It was lovely to have you there. Today’s post features affiliate links to The Foiled Fox. If you buy through these links I receive a small commission at no extra cost to you.
Roses on gel printed collage
Posted: January 25, 2024 Filed under: Echidna Studios, gel press, Mixed Media, Roses digital stamp set | Tags: Echidna Studios, gel press, gel printing, Mixed Media, Penny Black stamps 3 Comments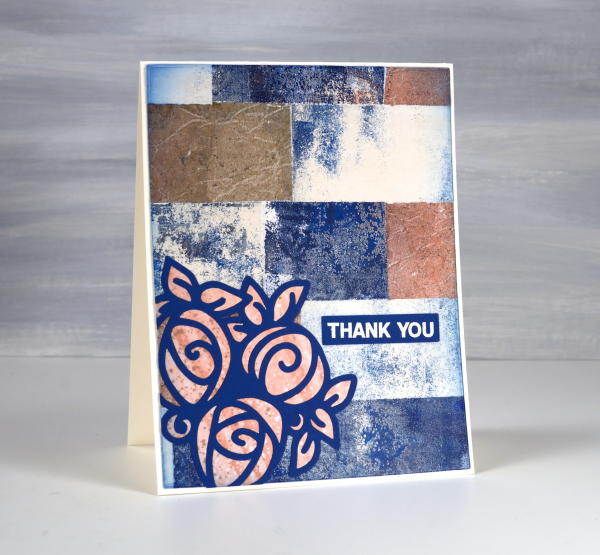
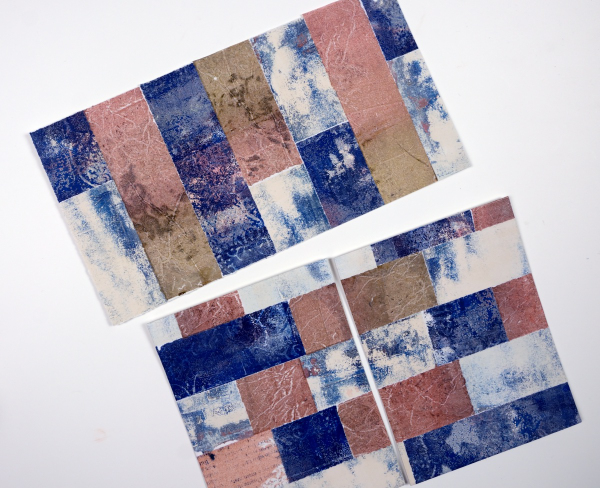
Unsurprisingly I have built up quite a supply of gel prints. Recently I turned a bunch of them into collaged panels. You can see in the photo below the simple collage I created by gluing torn strips of three different prints in a brick-like arrangement. To make things easy I tore the strips the width of my ruler so they are all 1¼” wide.
Once I trimmed the collage panel to card sized pieces I chose a trio or roses that I designed for printing and cutting and cut it from blue cardstock using my cricut. It is one of three designs in a set called ‘Roses‘ which is available in the Echidna Studios etsy store.

When you cut a design on the cricut or with a die you often have inside pieces you can discard or use to fill in the cut out shape. I cut the rose trio from dark blue and from pink patterned paper then saved the inside pieces from the pink to inlay the blue outline.

I added embossed sentiments from the Penny Black set ‘ever thanks‘ and some embossing around one of the panels with Ranger rose gold embossing powder.
I was able to cut two smaller square panels which I also make into cards featuring the Penny Black die, ‘harmonious’. When you look at the gel prints themselves they don’t look all that fancy but when combined this way I really like the play of colours and textures.
I created a few more A4 panels from collaged gel prints and they are waiting for inspiration. I will share them here once I have a plan for them. Today’s post features affiliate links to the following companies. If you buy through these links I receive a small commission at no extra cost to you. The Foiled Fox & Scrap’n’Stamp.


