
One-Layer Simplicity Challenge #7: Wave the Flag
Posted: July 1, 2014 Filed under: CAS, Maple Leaf, One-Layer Simplicity challenge | Tags: Fabriano Watercolour Paper, Penny Black stamps, Ranger Distress stains 6 Comments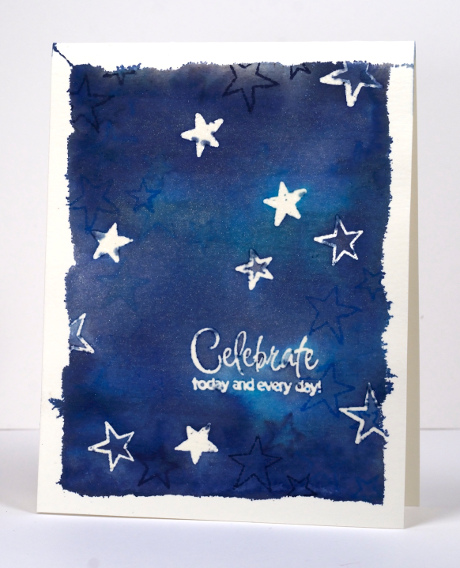
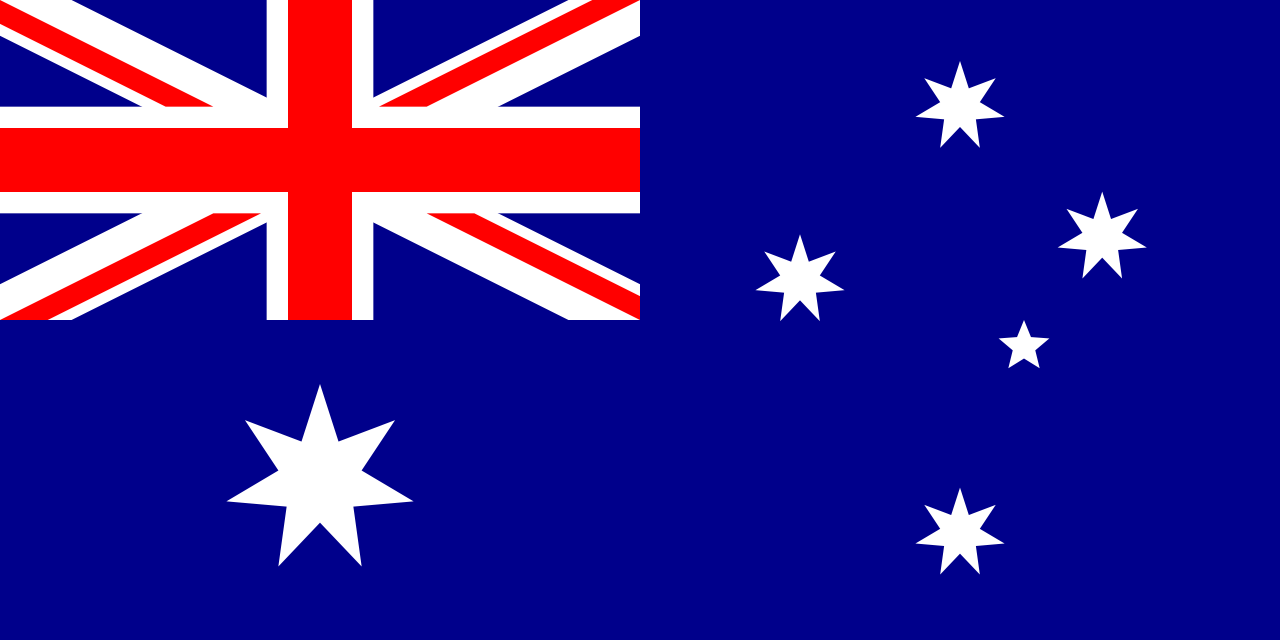
I am hosting the July challenge at One Layer Simplicity. In honour of Canada Day (July 1st) and American Independence Day (July 4th) I decided to make the challenge about flags. I want you to take a look at your country’s flag and find some inspiration there. It could be the colours, the layout, the patterns or the images. I created two cards because I have lived my life in two countries. I was born and raised in Australia and lived there for the first 35 years of my life. I married my Australian husband and both my daughters were born there. When they were 4 & 6 our family moved to Canada and seven weeks after we arrived my son was born. We have lived here ever since which will be 14 years next month. The card above is inspired by the Southern Cross on the Australian flag. I miss seeing the Southern Cross when I look up into the sky at night.

I cut a card base from watercolour paper as I planned to make it quite wet with distress stains and water. To frame the stars I tore the edge off some masking tape and taped the card base to a cutting mat. Once taped I stamped stars of different sizes and the sentiment in versamark then embossed with clear powder. I swiped three blue distress stains across the watercolour paper filling the whole space with colour. To blend it I spritzed a generous amount of water mixed with pearl-ex powder. You can see the sparkle of the pearl-ex powder below. After the panel had dried a little I stamped some more stars, this time in blue inks. When dry I removed the tape and ironed the panel embossed side down onto computer paper to melt and remove the embossing.

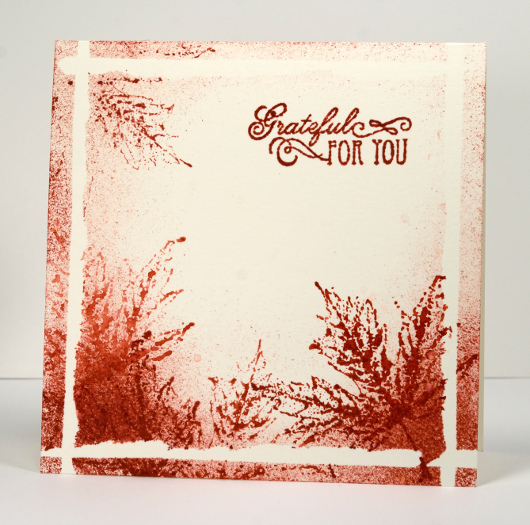
My second card is inspired by both the colour and the image on the Canadian flag. The beauty of the maple trees in autumn is something I look forward to every year. To create my second card I used the torn off bits of masking tape to make a narrow torn frame around the square front below. I then sponged red ink around the borders and stamped a maple leaf several times over the sponging. I can’t wait to check out your flag inspired cards and see how many countries end up being represented in our challenge
Supplies:
Stamps: Hello Winter , Sweet Wishes, To You, Foliage Fancy, Maple Leaf (PB)
Inks: Versamark (Tsukineko) Chipped Sapphire, Tumbled Glass, Broken China Distress Stains and Chipped Sapphire, Salty Ocean and Fired Brick distress inks (Ranger)
Cardstock: Fabriano 100% cotton hot pressed watercolour paper
Also: clear embossing powder, Pearl Ex
Tweet Wishes
Posted: June 30, 2014 Filed under: CAS, Tweet Wishes, Watercolour | Tags: Faber-Castell Albrecht Durer Watercolour pencils, Fabriano Watercolour Paper, Penny Black stamps 8 Comments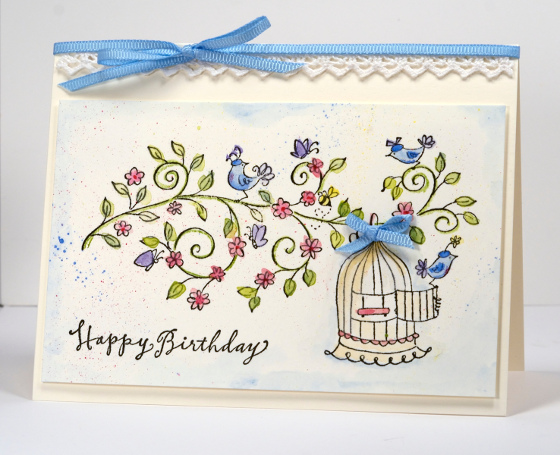
It has been a while since I pulled out my watercolour pencils so it was fun to colour a simple outline image today. I stamped the branch from ‘Tweet Wishes’ in Versafine Onyx Black ink then painted the image using a waterbrush to pick up colour from my watercolour pencils. I splattered a little colour around and painted a rough border of blue. To finish it off I added some natural cotton lace and a narrow blue ribbon.
Thank you very much for your kind comments about my daughter and her prom dress. We were both very pleased with how it turned out and very touched by your lovely words. It has now turned rather hot here so it was wonderful to spend yesterday relaxing with friends by a lake where there was a breeze and of course the water to keep us cool. I’ll be back tomorrow with a brand new One Layer Simplicity Challenge.
Supplies:
Stamps: Tweet Wishes (PB)
Pencils: Albrecht Durer Watercolour pencils Apple Green 170, Pine Green 267, Rose Carmine 124, Prussian Blue 151, Gold Ochre 183, Blue Violet 137, Lemon 107, Light Carmine 127, Light Blue 147 (Faber-Castell)
Inks: Versafine Onyx Black (Tsukineko)
Cardstock: Fabriano 25% cotton hot pressed watercolour paper, Neenah Classic Crest Natural White 110lb smooth
Also: narrow grosgrain ribbon, natural cotton lace
The reason why
Posted: June 26, 2014 Filed under: After Glow, Bamboo Branch | Tags: Fabriano Watercolour Paper, Penny Black stamps, Ranger Distress stains, Tsukineko Radiant Neon inks 21 Comments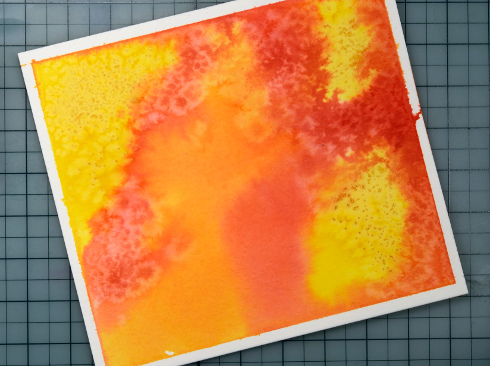
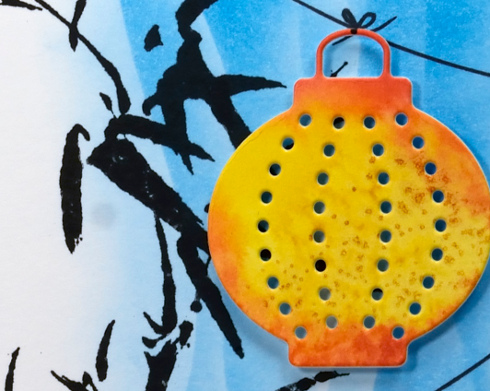
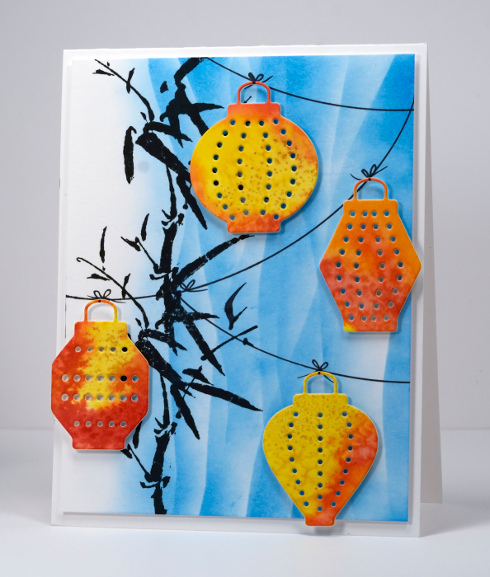
June has been a busy month for our family leaving very little time for stamping and cardmaking. Today I finally made it back to my craft table and found a watercoloured panel from a class I taught a few weeks ago. To create the panel I taped a piece of watercolour paper down and wet the whole panel. I then painted distress stains onto the wet surface and tilted the panel to let the colours run and blend. While it was still wet I sprinkled salt over the panel resulting in the patterns you see below. For the class we stamped over the patterns but I decided this leftover panel would be perfect for the little lanterns from the “After Glow” die cut set.
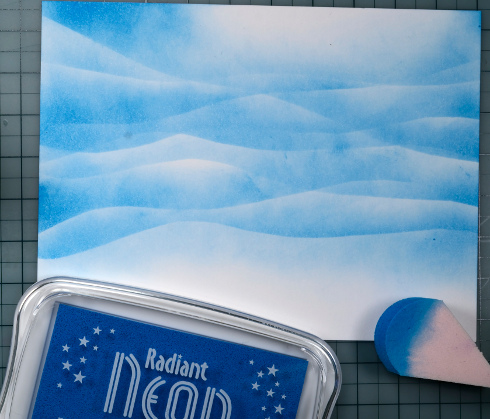
I used Radiant Neon Electric Blue ink to create the background below. My intention was to create an abstract sky so I used a wavy mask cut from masking paper and sponged over it numerous times. When I started arranging the lanterns I changed my mind about the sky and turned the blue panel on its side and added bamboo as a side border.
I added strings for the lanterns with Pitt Artist Pens and popped up the lanterns with dimensional tape. I found a sentiment I wanted to add but there was no room on the front so I will add it inside.
Supplies:
Stamps: Bamboo Branch (PB)
Dies: After Glow (PB)
Inks: Versafine Onyx Black, Radiant Neon Electric Blue (Tsukineko) Barn Door, Spiced Marmalade, Mustard Seeds Distress stains (Ranger)
Markers: Pitt Artist Pen (Faber Castell)
Cardstock: Neenah Classic Crest Avon Brilliant White 110lb smooth , Fabriano 100% cotton hot pressed watercolour paper
Even though I have not been making cards over the last week or so I have been busy creating. My daughter went to her prom last night in a dress I made for her. The bodice is a pale pink textured brocade and the skirt is four layers of tulle over satin. I did enjoy sewing again but perhaps I should allow a little more than 12 days next time I take on a formal gown!
Fronds over at Simon Says Stamp
Posted: June 22, 2014 Filed under: Dies, Fronds, Penny Black | Tags: Penny Black creative dies, Penny Black stamps 4 CommentsI am guest designing over at Simon Says Stamp Blog today. To see the whole card and a description of the process pop over there.
Summer Sun Collaboration with Faber Castell
Posted: June 12, 2014 Filed under: Fresh Breeze, Fuchsia, Gelatos, Mixed Media, Tutorial | Tags: Faber Castell gelatos, Faber Castell Paper Crafter Crayons, Faber Castell Textural Accents, Penny Black creative dies, Penny Black stamps, Tutorial 4 Comments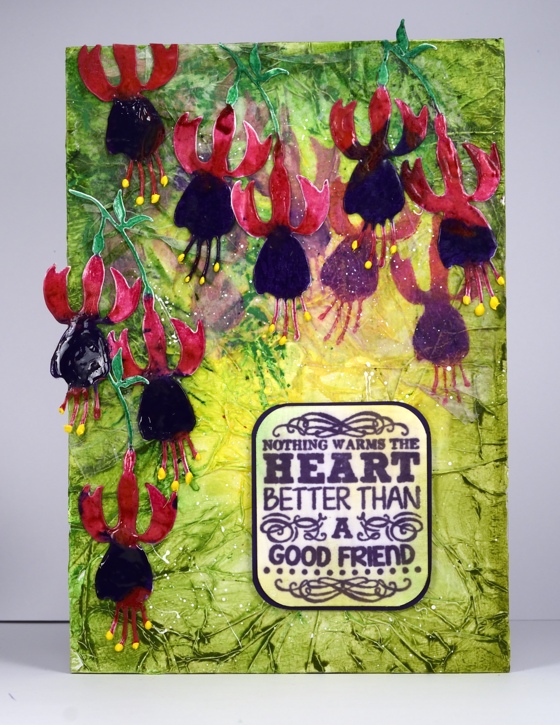
All this week there is a special collaboration occuring between Faber-Castell Design Memory Craft and Penny Black. There are projects on the PB blog using Paper Crafter Crayons and Double Scoop Gelatos AND you’ll find projects from the Faber-Castell Design Memory Craft designers on their blog featuring PB stamps. Visit both Penny Black and Faber Castell Memory Craft for details of giveaways.
.
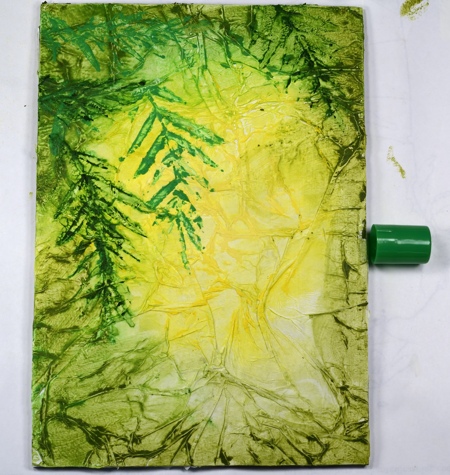
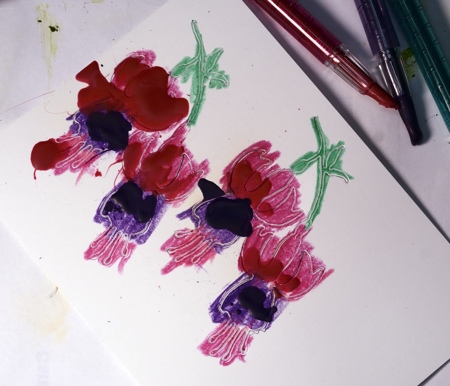
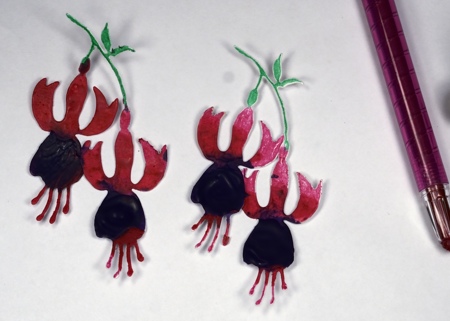
I decided to create a mixed media panel, a rare occurrence for me. I really enjoyed playing with the Textural Accents and the gorgeous colours in the Paper Crafter crayons and gelatos. (if you click on the tutorial pictures you will see more detail)
Next I spritzed with water and blended the colours with my fingers.
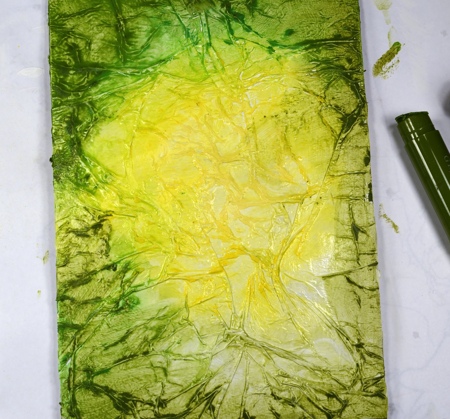
Using stencil plastic I created a stencil using the Fresh Breeze die. (I can’t find the packaging for the stencil plastic so I am not sure what brand but it was sold specifically for creating your own stencils. In order to cut it with a Big Kick I used a metal shim in the sandwich) I applied colour through the stencil with gelatos.
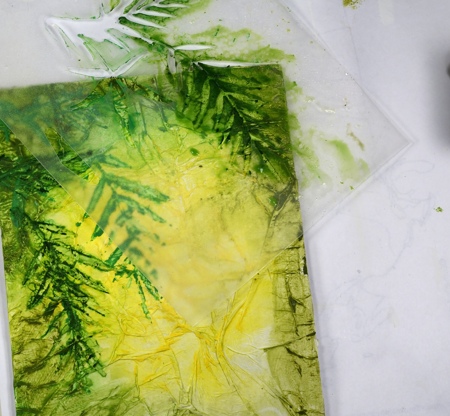
Next I spritzed with water and blended the greens with my fingers through stencil.
I created another stencil using the Fuchsia die and applied colour to tissue paper with lime, lavender, grape and guava gelatos, then blended with my fingers.
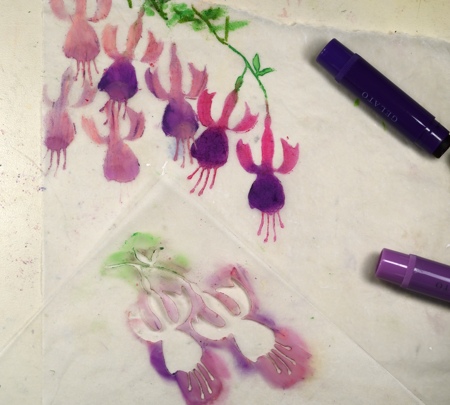
I stenciled some Fresh Breeze leaves with green gelatos on tissue paper and attached both tissue panels to the main panel with Gel Medium. The gelatos on tissue gave the flowers a background misty look that was exactly what I was after.
In other related and creative news, there is likely to be another lull here on the blog in the next few weeks. My daughter’s prom is in two weeks and the dress making countdown starts today! If I have a chance I will update you otherwise please understand that I am creating with tulle and silky fabric instead of paper and cardstock for the next little while.
Supplies:
Stamps: Truly Great (PB)
Creative Dies: Fuchsia, Fresh Breeze (PB)
Gelatos: Faber Castell
Paper Crafter Crayons: Faber Castell
Textural Accents: Gesso, Gel Medium, Glaze (Faber Castell)
Paper: Thick natural coloured cardboard, White 140lb smooth, Tissue paper, PB Mix & Match Periwinkle Paper
Nature’s Song
Posted: June 3, 2014 Filed under: Heathers, Nature's Song | Tags: Penny Black creative dies, Penny Black stamps, Tsukineko Memento inks 5 Comments
I know there has been very little activity here lately. The season of track meets, soccer tournaments and end of year events is upon us! I created this one a while ago thinking it could squeak by as a masculine card. I know it has flowers in the background but the colour scheme is more about foliage than petals!
I inked the ‘Heathers’ background stamp with Memento Pistachio & Olive Grove inks, spritzed them so they would blend a little then stamped on a white panel. I cut the branch from Olive Grove paper using the ‘Nature’s Song’ die and added a sentiment in Olive Grove ink.
Thanks for stopping by.
Supplies:
Stamps: Heathers, Wishing You (PB)
Inks: Memento Olive Grove, Pistachio (Tsukineko)
Creative Dies: Nature’s Song (PB)
Cardstock: Neenah Classic Crest Solar White 110lb smooth, Penny Black Olive Grove Mix & Match paper
Stamp & Doodle
Posted: May 28, 2014 Filed under: Floral Tapestry, Tutorial | Tags: Fabriano Watercolour Paper, Penny Black stamps, Ranger Distress stains, Tutorial 16 Comments
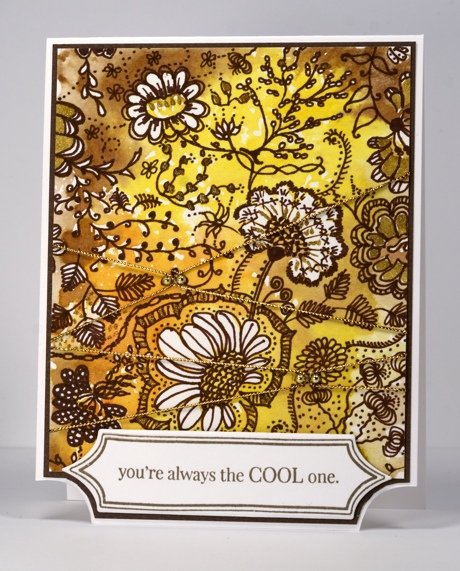
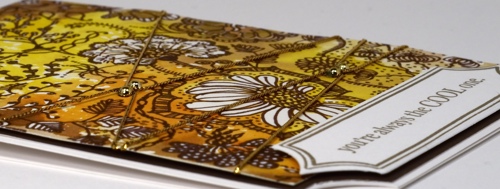
I created this card from a stamped panel that was sitting around on my work table waiting for inspiration. I stamped the “Floral Tapestry” background stamp in Distress stains on watercolour paper. After stamping once I spritzed the stamp and stamped again on another piece of paper, then did it again so I had several panels sitting around, each one a little paler than the previous one. I think this one was the palest panel but it still had plenty of colour and the negative images of the flowers and leaves were clear enough to doodle around. If you watch the video you will see my doodling process. I did not have a plan; I just defined the flower shapes and added leaves, twirls and squiggles in and around them. When I was almost finished I decided a few gold highlights would be nice so I added them with a Wink of Stella pen.
I trimmed the floral panel and criss-crossed some gold cord over it. I added two gold half pearls in each place where the cord crossed and stuck the cord down with glossy accents. The cord did not want to stay in place but with a little pressure on top it finally did! After die-cutting the banner I decided to trim the dark brown mat and cardbase to co-ordinate.
Supplies:
Stamps: Floral Tapestry, Amazing! (PB)
Dies: Triple Banner (PB)
Inks: Versafine Vintage Sepia (Tsukineko) Vintage Photo, Spiced Marmalade, Mustard Seeds Distress stains (Ranger)
Cardstock: Neenah Classic Crest Avon Brilliant White 110lb smooth , Fabriano 100% cotton hot pressed watercolour paper
Family & Friends
Posted: May 26, 2014 Filed under: Dots & Swirls, Dotted Fusion, Pinwheel, Tweet Thing 9 CommentsThis week it’s all about Family and Friends on the Penny Black Blog and Facebook. Visit both for a chance to win stamps and get inspired. The design team have family and friendship themed projects prepared for the week. I’m sharing a card today with a message I’ll be happy to send to one of my family or friends.
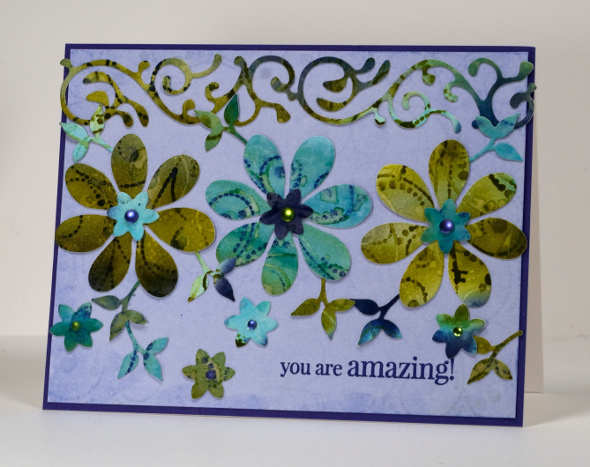
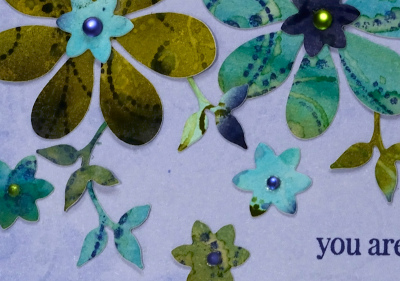
There are two main processes in making this card. First I created my own patterned water colour paper. Secondly I die cut a bunch of images and arranged them into a design for the card.
I swiped three different colours of distress stain across a piece of watercolour paper, spritzed and tilted it to let the colours blend then let it dry. Once dry I painted water onto the Dotted Fusion background stamp and pressed it onto the watercolour paper. Nothing shows up immediately but as it dries you can see a watery print of the stamp.
After the ‘water print’ dried I stamped Dotted Fusion again, this time in blue and green stain. Once the watercolour paper was totally dry I die cut flowers, leaves and swirls from the panel and arranged them on a pale purple background. You can just make out a pale print of the Dotted Fusion on the background also. (I made two water colour panels using the same technique but the stains were spread differently)
I also added some half pearls coloured to match with Spectrum Noir markers.
As you can imagine there are countless possibilities with this technique. Let me know if you try it I’d love to see what you come up with.
Supplies:
Stamps: Dotted Fusion, Amazing (PB)
Dies: Tweet Things, Dots & Swirls, Pinwheel (PB)
Inks: Faded Jeans, Peeled Paint, Pine Needles, Broken China Distress Stains (Ranger) Memento Paris Dusk (Tsukineko)
Cardstock: Neenah Classic Crest Solar White 110lb smooth, Periwinkle Mix & Match Paper ( PB), Fabriano 100% cotton Hot Pressed Watercolour paper
Also: Half pearls
Flourished Twirls
Posted: May 23, 2014 Filed under: CAS, Celebrations, Twirls 8 Comments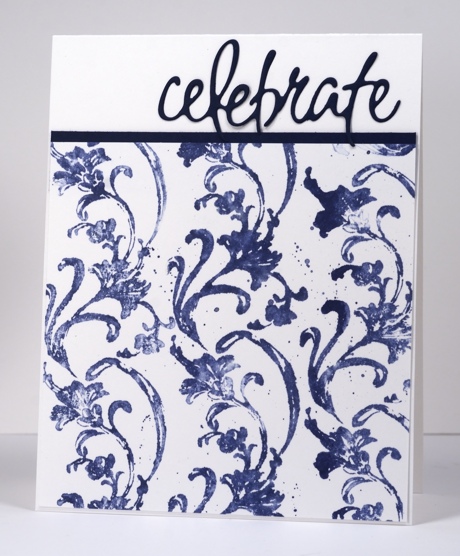
I think navy and white can be very elegant. I was aiming for simple but elegant when I created this card. The flourish pattern from the Penny Black “Twirls” set is stamped in Chipped Sapphire distress stain (I stamped off on scrap paper first so the imprint wasn’t too wet). To finish I flicked a little stain over the pattern after stamping, added a navy strip of card stock and the die cut sentiment. This design might work as a wedding card especially if you knew the colour scheme to follow.
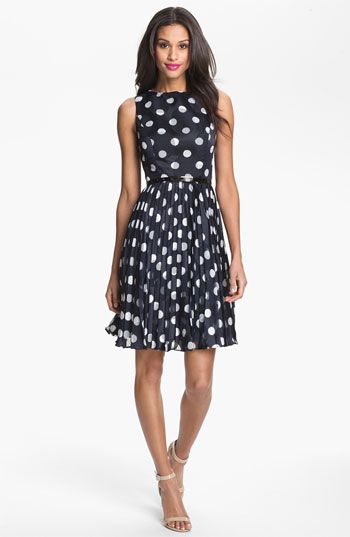
Using navy and white reminds me of a polka dot dress when I was nine; I loved it. I wouldn’t mind having a navy and white polka dot dress again. Perhaps something like this one I pinned recently:
Supplies:
Stamps: Twirls (PB)
Dies: Celebrations (PB)
Inks: Chipped Sapphire Distress stains (Ranger)
Cardstock: Neenah Classic Crest Solar White 110lb smooth, Navy cardstock
Lookin’ Good
Posted: May 20, 2014 Filed under: Above Par, Watercolour | Tags: Faber-Castell Albrecht Durer Watercolour pencils, Fabriano Watercolour Paper, Penny Black stamps 2 Comments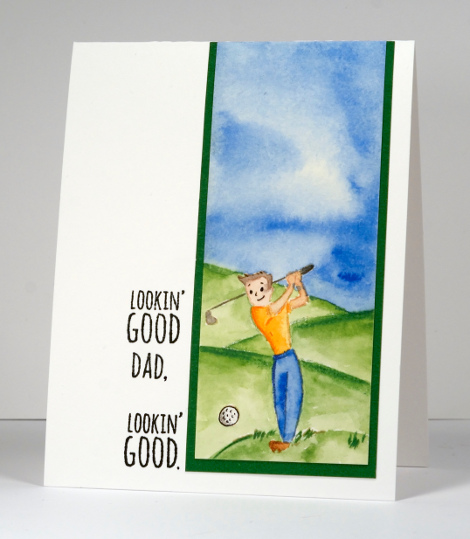
To colour this little golfer I stamped first in Memento Desert Sand ink to give myself a pale outline I could easily paint over. I then picked up colour from my watercolour pencils with a waterbrush and painted the golfer, the greens and the sky. I added a few little details with a 0.05mm fine line marker before I matted the panel in green and added a sentiment.
There will be inspiration for masculine cards all week on the Penny Black blog. (Make sure you check yesterday’s post; Cathy’s Potting Shed card is superb) If you are like me you probably don’t make enough masculine cards; I really need to build up my supply. This one won’t work for me as my Dad does not play golf; my husband doesn’t either so my children won’t be needing to grab it. They can get creative themselves for Father’s Day in Canada; I have until September to create something for Father’s Day in Australia.
Supplies:
Stamps: Above Par, …Lost Without You (PB)
Inks: Memento Desert Sand,(Tsukineko) Black Soot Distress ink ( Ranger) Prismacolour Fine Line Marker
Pencils: Albrecht Durer Watercolour pencils (Faber Castell)
Paper: Fabriano 100% cotton hot pressed watercolour paper, Neenah Classic Crest Solar White 110lb smooth, PB Mix & Match Spring Meadow Paper


