
Christmas red or white
Posted: December 28, 2018 Filed under: Christmas red | Tags: Penny Black stamps, Ranger Distress inks, Ranger Distress stains 13 Comments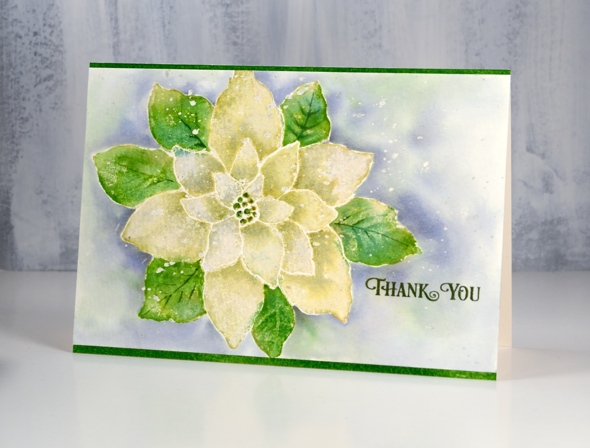
Ever since I received this stamp way back when the weather was warm, I wanted to try it as a ‘white poinsettia’ rather than the traditional red. The first card I made with it was red and when I used it in my Christmas class we stamped it red but now as a Christmas thank you I’ve made it white, or to be precise a yellowish, greenish white! I am sharing it over on the Foiled Fox blog today also. Make sure you pop over there to see enjoy all the beautiful wintry cards they have shared lately. Scroll back to see three gorgeous poinsettia cards made by Shauna Todd posted during December.

To create my ‘white’ poinsettia I stamped the whole ‘Christmas Red’ stamp from Penny Black in shabby shutters distress ink on hot pressed watercolour paper (which I had splattered with masking fluid earlier). With the stamp in the MISTI I inked the outer leaves with mowed lawn distress ink and stamped again. Shabby shutters ink is a pale green to start with so when I diluted it by blending with water I was able to make it a little paler. I blended one petal at a time and dabbed it with a paper towel while it was wet to remove more colour. Before the petals dried I picked up some extra shabby shutters ink off my glass mat and added some shadow where the petals were overlapped by another. I blended the leaves with water also and when they were dry added some definition with a fine brush and mowed lawn ink. I stamped the centre with mowed lawn ink and added some gold with a wink of stella pen.
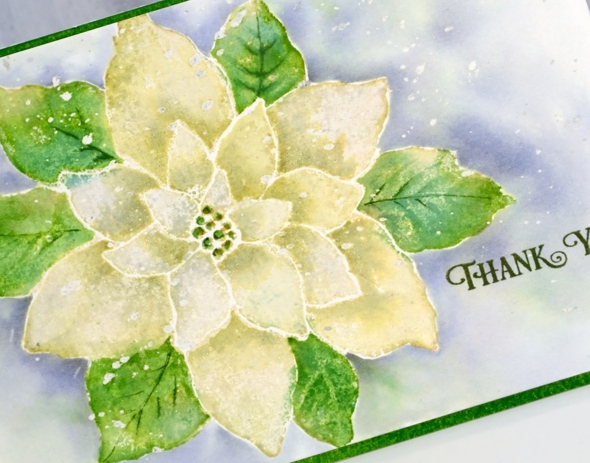
Once the flower was dry I painted around the edges with water then dropped in weathered wood distress stain and blended it to surround the whole image. I also dropped in some green ink here and there while the background painting was wet. When everything dried I removed the masking fluid and added clear wink of stella to all the petals to give them some shimmer. I stamped the ‘thank you’ from the PB ‘banner sentiments’ set in versafine clair shady lane ink. I am very happy to be making thank you cards as I have close to thirty donors to thank so far in my Dressember campaign raising money for the fight against human trafficking.
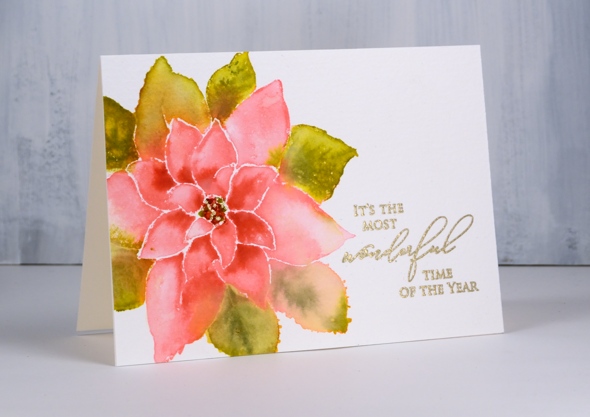
I am adding my pink and green poinsettia to the post just for interest and comparison. I used a similar process to the one described above but kept the background white as a base from some gold embossing. Thank you for dropping in today.
Supplies
Stamps: Christmas Red, banner sentiments (PB)


Inks: shabby shutters ,mowed lawn distress inks, versafine clair shady lane ink


Stain: weathered wood distress stain

Paper: hot pressed watercolour paper, neenah natural white


Also: gold wink of stella, clear wink of stella, masking fluid

![]()

Tools: MISTI, glass mat


Simple and Elegant
Posted: December 21, 2018 Filed under: lighting the way, three kings | Tags: Alexandra Renke cardstock, Penny Black stamps, WOW embossing powders 8 Comments
At this time of year any Christmas card making I’m doing has to be pretty simple and straightforward. But that doesn’t mean it can’t still be elegant or eye catching. I paired metallic embossing with richly coloured papers for these three nativity cards.
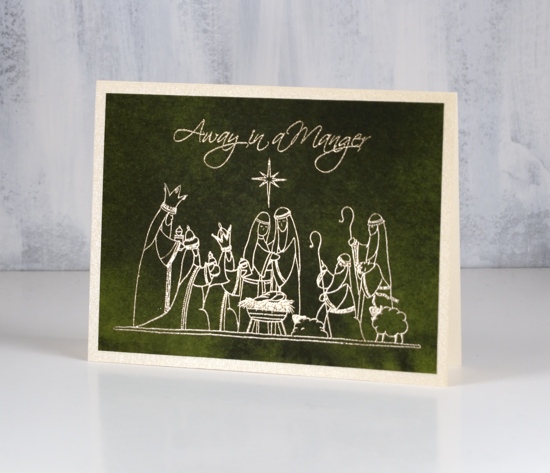
These papers from Alexandra Renke are solid colour but with the variation of a watercolour wash. They have enough interest to look like a sky but not fight with the detail of the picture stamps from Penny Black.

I always have a bit of a task matching a gold cardstock with gold embossing powder. On the top card the gold embossing powder on the dark red appeared to be an ‘old gold’ so I matted with a dark gold. On the last card I used a light gold card with the same embossing powder. The middle card features platinum embossing and a platinum mat around the deep green paper.
I hope you are further along than I with your Christmas card sending but as I say most years, December 25 is the first day of Christmas, there are twelve in total so I still have time to get my cards sent!
Supplies
Stamps: lighting the way, peaceful season, three kings (PB)


Paper: Alexandra Renke dark green, red and scarlet papers


Cardstock: neenah natural white, platinum shimmer, gold shimmer, pale gold shimmer
![]()
Ink: versamark ink

Embossing powder: gold metallic rich, platinum


A little more paint pouring
Posted: December 11, 2018 Filed under: Dies, paint pouring | Tags: paint pouring, Penny Black creative dies, Yupo Paper 9 Comments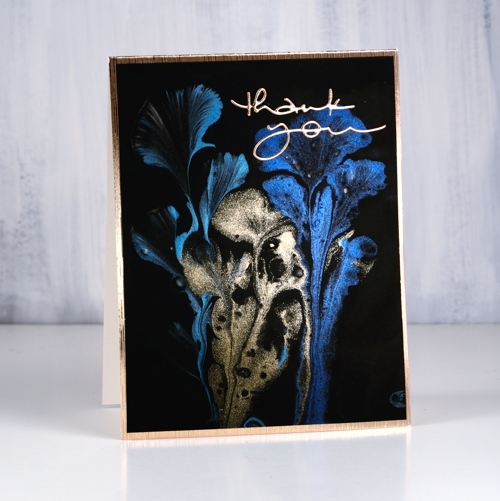
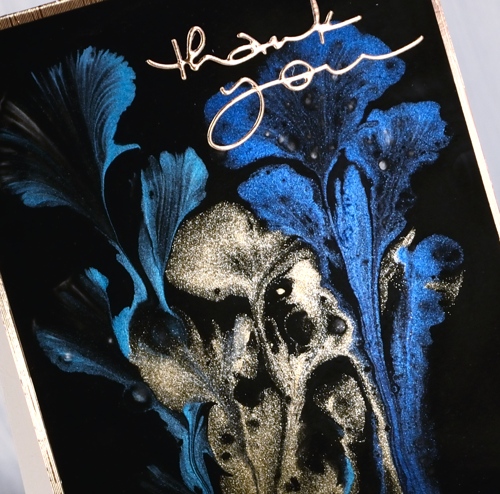
Yes, I have more from my paint pouring adventure to share! This one was done with metallic paints as you can see. When you pour or in this case ‘drag’ them onto the base colour the metallics don’t look very shiny but as they dry, well, you can see how lovely they are. To turn this one into a card I searched through my gold cardstock to find a match with the gold paint. I am a bit fussy with gold cardstock, some is too coppery, some too brown, too yellow, too light, too dark; you get the idea. The one that matched the best this time is a textured gold made by Tonic and it has a white back so I turned it into the card base. I also die-cut a ‘thank you’ from the same cardstock.
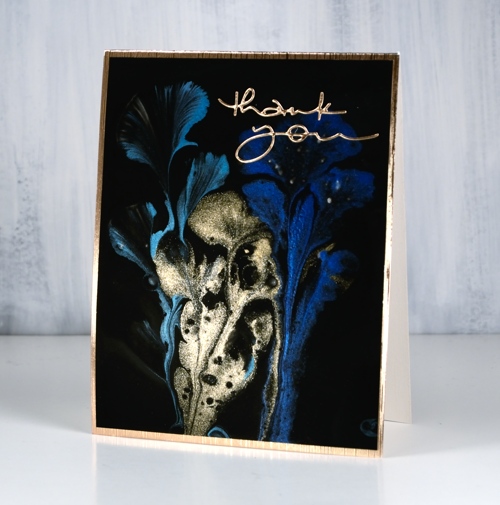
As I mentioned yesterday I won’t go into the how-to of paint pouring this time around but if I keep doing it I will definitely share what I learn. For those of you who have done some paint pouring this one was done by dipping some crochet thread in coloured paint, laying it on a base of black paint and gently pulling it through the black paint and off the panel.
I’m not sure of the brand of paints as I don’t own any (yet) but the matte colours came from a dollar store and the metallics from an art store. I was pleasantly surprised to find how many of the supplies could be bought from a dollar store or hardware store.
I have another paint pourer to recommend today and as I said yesterday be prepared to disappear into youtube land for quite some time! Mixed Media girl’s paintings are also mesmerising.
Supplies
|

https://linkdeli.com/widget.js?1549439153802
Paper: heavy weight yupo (legion), gold satin cardstock (tonic)


Die: many thanks (PB)

Also: stick it adhesive sheets (for the little die-cut)

More skies & dies
Posted: December 6, 2018 Filed under: berry flourish, Brusho, deer in tree, holly flourish, winter berry branch | Tags: Brusho, Penny Black creative dies, Penny Black stamps 4 Comments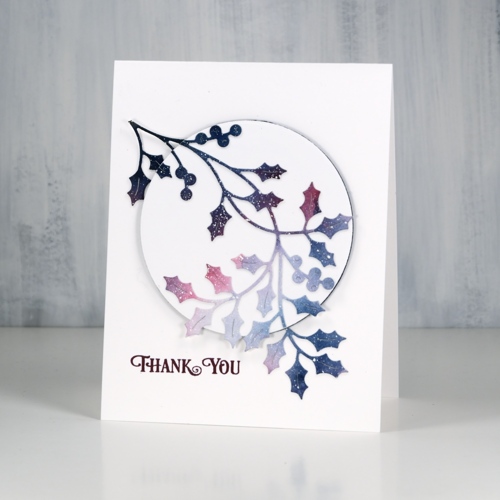
I have a few more simple Christmassy cards to share; these ones are kind of the opposite to the ones in the previous post. I had a large watercolour galaxy panel with white splatter (aka ‘stars’) all over it. I die cut three branches from the panel to pop up on three white card bases.
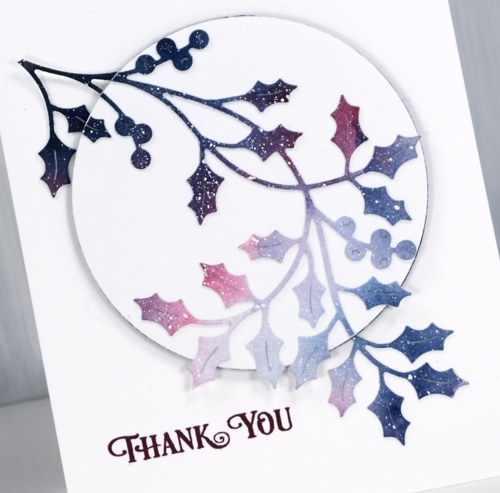
I realise now it would have been a good idea to take a photo of the panel before I cut it up. It was a panel I painted with brusho a while ago, a mix of blues and pinks, light in the centre and dark around the edges with white paint splattered over the whole thing. The holly is a PB die called ‘holly flourish’, the mistletoe is ‘berry flourish’.
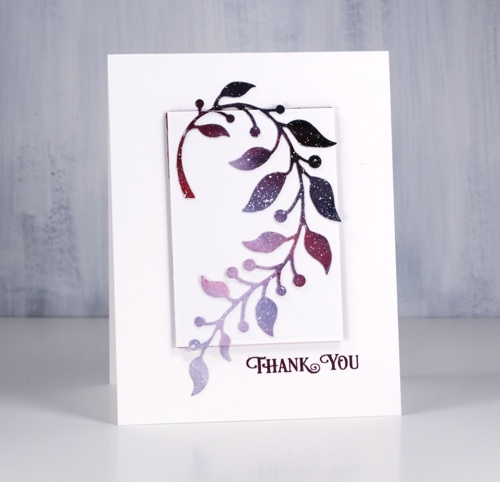
After I had die cut all three branches I chose a shape die a little smaller than each of the branches so some foliage would hang over the edge. I die cut a shape from neenah solar white cardstock and from coloured adhesive backed foam. The foam pieces that pop up the white panels are either burgandy or navy to co-ordinate with the paint colours.
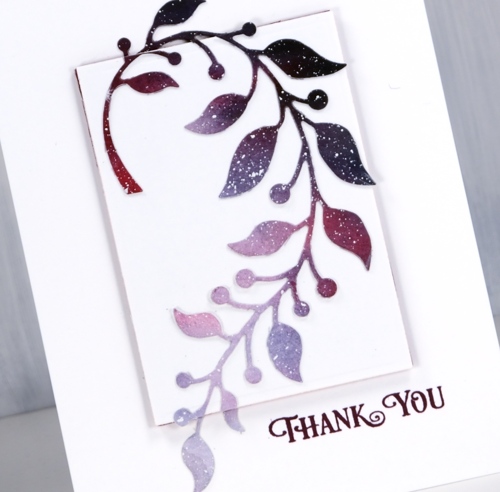
To assemble the cards I first glued the die cut to the white cardstock shape then snipped off and saved any bits hanging over the edge. Next I adhered the white panel to the foam and then all to the white card base. Once the popped up panel was in place I stuck the snipped off bits directly onto the card base lining them up with the rest of the die-cut.
I made all these cards into thank yous. I’m hoping to need many as I am once again participating in Dressember, and will be sending hand made cards to all who donate to the campaign. If you are new to my blog you might not know that I have twice before taken on the challenge of wearing a dress every day in December as part of a worldwide campaign to raise funds for and awareness about the fight to end modern day slavery. If you are interested in donating I have set up a CAMPAIGN PAGE and I am posting photos on pinterest and instagram just so you can check up on me to make sure I’m wearing a dress each day! I have written a little more about Dressember on my other (sadly neglected) blog, Sentient.
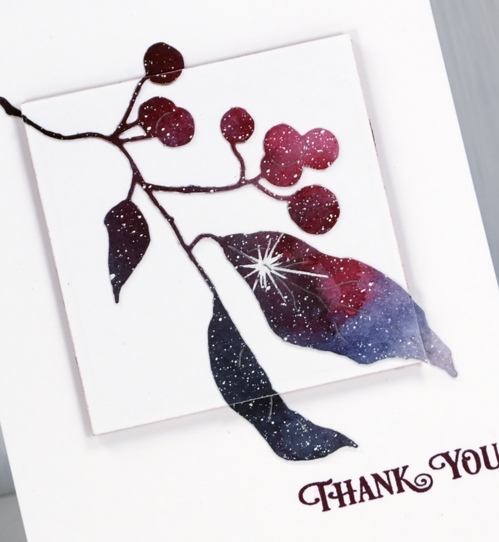
This last branch die is called ‘winter berry branch’ also from Penny Black. The sentiment is from the ‘banner sentiments’ set and is stamped in chianti versafine clair ink.
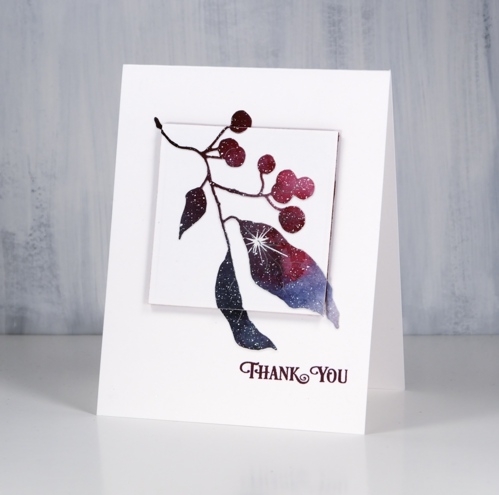
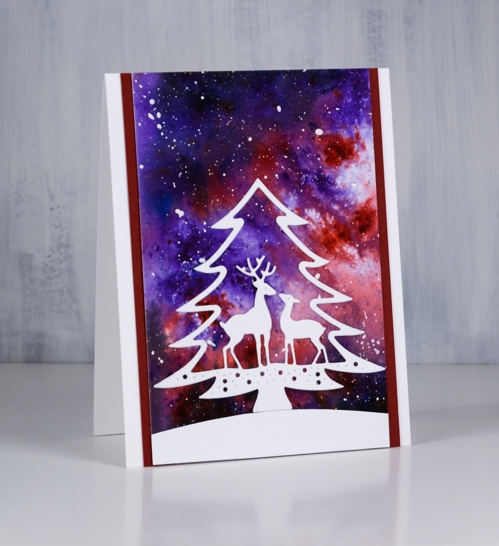
And now a bonus card made with my last watercolour sky piece. I matted it on two sides with burgandy cardstock then cut a snow bank and the ‘deer in tree’ die from neenah solar white cardstock. It is a pretty die but would the deer be standing in a tree? I think not!
Supplies
Stamps: banner sentiments (PB)
Dies: holly flourish, berry flourish, winter berry branch, deer in tree (PB)


Ink: chianti versafine clair ink

Cardstock: hot pressed watercolour paper, neenah solar white, burgandy cardstock

Paint: brusho, white gesso


Also: on point gule

Skies & dies
Posted: December 4, 2018 Filed under: Brusho, holiday hello, neighbourhood border, winter trees | Tags: Brusho, Penny Black creative dies 9 Comments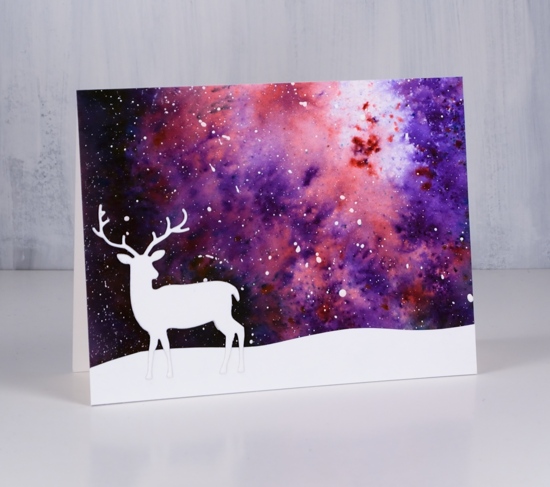
I have three simple cards to show you today, simple that is if you have some watercolour backgrounds sitting around as I often do. Even if you don’t it would not take too long to create a large multicoloured panel with brusho, distress stains or some other watercolour medium then when its dry splatter white paint over it to look like stars or snow.
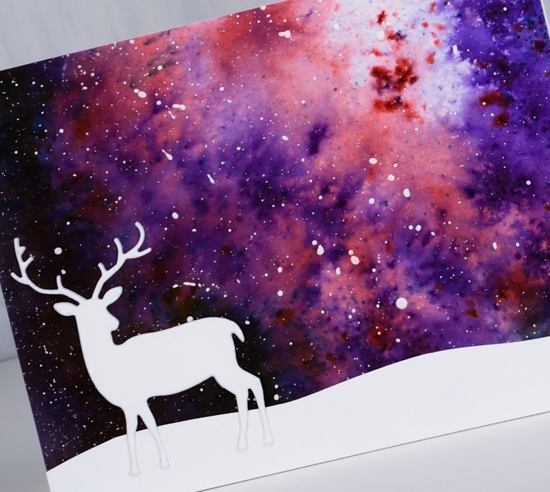
I trimmed my background panels then added a hand cut snow bank to the card above plus the deer from the Penny Black ‘holiday hello’ set. I know it is very minimal but I rather like the way the deer could be looking up into the vast sky.
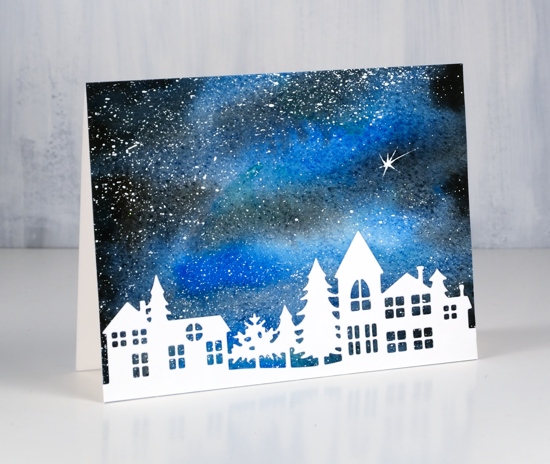
On the second card all I added to the star filled sky was the PB ‘neighborhood border’ die. All the die cuts are neenah solar white cardstock. For some I used liquid glue, others I attached using stick it adhesive.
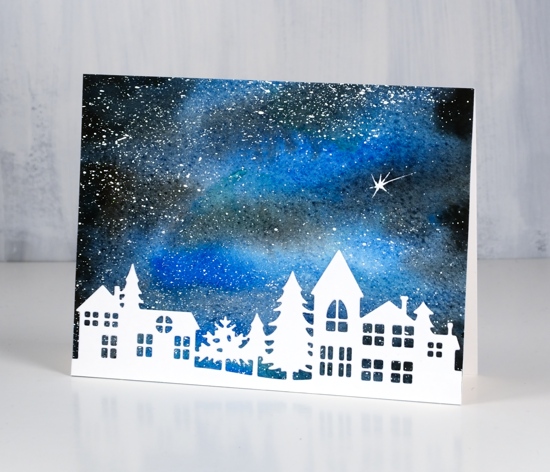
I added the shooting star when I created the watercolour sky with the same white paint.
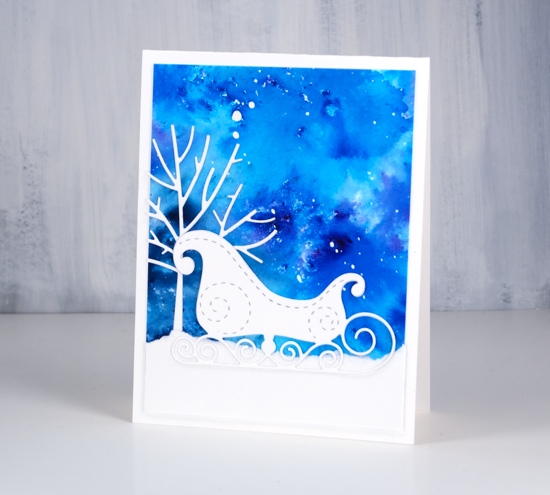
The background sky for this final card is the last scrap of a large panel I painted very randomly with turquoise and blue brusho. I tore a strip of white cardstock to create the snow bank, die cut a tree to tuck behind it and a sleigh to sit on top. The tree is the smaller one from the PB set, ‘winter trees’ and the sleigh is also from Penny Black.
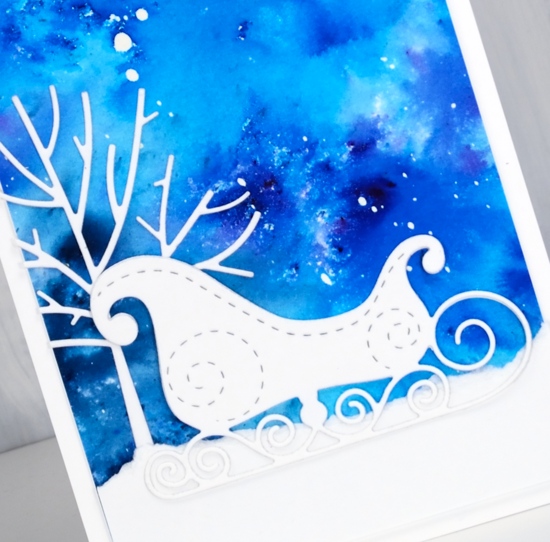
I’m going to leave these without sentiments for now; they might be handy to use as thank you cards after Christmas.
Supplies
Dies: winter trees, sleigh, neighborhood border, holiday hello (PB)


Cardstock: hot pressed watercolour paper, neenah solar white
Paint: brusho, white gesso
Also: stick it adhesive, on point gule
Winter Tree
Posted: November 28, 2018 Filed under: xmas poinsettia cut out | Tags: Penny Black creative dies, Penny Black stamps, Ranger Distress inks, Ranger Distress stains 15 Comments
It is hard to believe I haven’t shared this beautiful tree stamp already. It is a large rubber cling stamp called winter tree and it looks snow laden when stamped. It is a very detailed tree but my treatment has it looking a little more impressionistic. To create the card above I lay the tree stamp on my cold pressed watercolour paper and positioned masking paper around the edges of the stamp. When I lifted the stamp there was a tree shaped space exposed.

I splattered masking fluid over the panel so there were lots of drops in the shape of a tree. When I removed the masking paper I splattered a few more drops of masking fluid around the tree. I placed the panel and stamp in my stamp positioner and dotted distress stain on the stamp. For this tree I used mustard seed, mermaid lagoon, pine needles and blueprint sketch. I stamped a couple of colours at a time until the tree was completely stamped albeit in a loose and watery way. To fill in the background I wanted the same colours but more diluted so I put stain on my glass mat so I could pick it up with a paint brush.

I painted around the tree with water touching the edges of the tree with the paintbrush so the colour would bleed into the sky. To fill the sky I picked up extra colour from my glass mat. When all the paint was dry I removed the masking fluid and added a die cut sentiment and a matching mat.

I followed the same process for the second card but used hot pressed watercolour paper and more colours of distress stain. I also stamped a few trees in the background using a tree from the ‘prancers‘ set and peacock feathers distress ink.
When snow completely covers our Christmas lights the colour does look a bit blurry shining through the snow. That’s what these cards remind me of.
Not that there are any Christmas trees or lights up around here yet. There are members of this family with strong feelings about Christmas decorations!
Supplies
Stamps: winter tree, prancers

Stains: mustard seed, blue print sketch, peacock feathers, pine needles


Die: merry Christmas (PB)


Paper: cold pressed watercolour paper, deep blue cardstock


Tools: MISTI, T ruler, stick-it adhesive, glass mat

Holly & Mistletoe
Posted: November 23, 2018 Filed under: a berry branch | Tags: Penny Black stamps 6 Comments
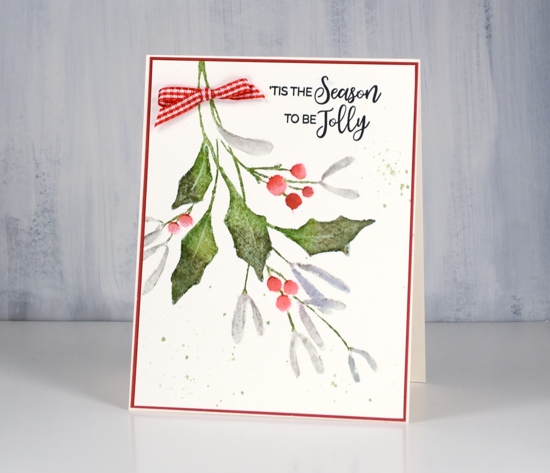
This festive foliage features ‘berry branch’ from Penny Black. I chose a soft muted colour palette and after looking up the colour of mistletoe I kept my mistletoe berries looking white rather than make them red and popping!
First I inked all the mistletoe leaves with distress markers, half iced spruce and half forest moss. I spritzed the stamp lightly and stamped on cold pressed watercolour paper. I blended the leaves with water then inked the holly leaves with a peeled paint distress marker and stamped. To add some blue tones to the holly I pressed the pine needles ink pad on my glass mat, diluted the ink then blended the holly leaves with diluted pine needles ink.

To create my ‘white’ berries I inked them with an old paper distress marker, then diluted the ink with water. While the berry was wet I added a little more old paper ink to make a shadow. I tucked a sentiment into a space that looked like I planned it (unlikely) and added some hemp twine to one side of the panel. I gave the panel two mats, one a simple kraft layer, the other a fancy shmancy textured shimmery green layer. This is quite a big card, 6″x 6″.
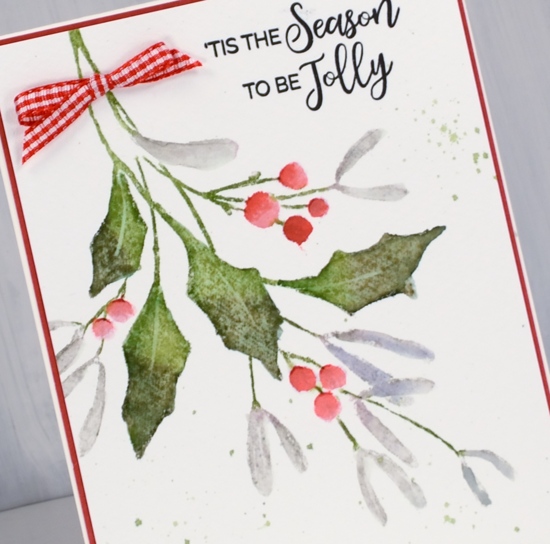
I decided to try one with red berries too, so used ‘candied apple’ distress marker instead of ‘old paper’. I had a wee bit of red gingham ribbon and a red mat to tie it all together. I know the red pops but the white berries are my favourite this time.
Supplies
Stamps: a berry branch, peaceful season, sweetest moments


Inks: iced spruce, peeled paint, forest moss, pine needles, old paper, candied apple distress markers, nocturne & shady lane versafine clair inks


Paper: cold pressed watercolour paper, neenah desert storm, tonic emerald hessian, red cardstock


Also: twine, ribbon

Nativity
Posted: November 21, 2018 Filed under: nativity | Tags: Brusho, Penny Black stamps 6 Comments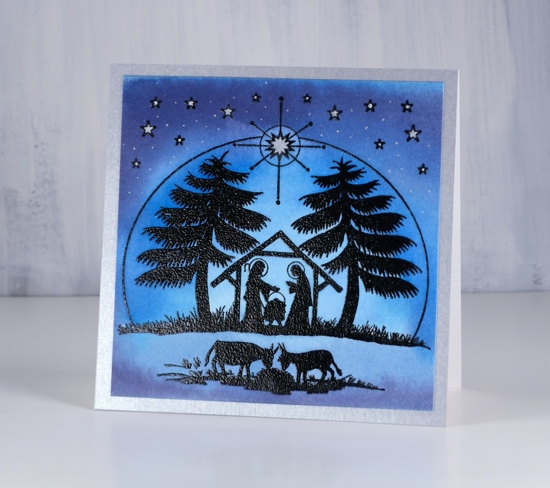
This little scene was very straightforward to complete. I’ll probably do a few more in slightly different colour schemes. I stamped the Penny Black ‘nativity’ stamp in versafine clair nocturne ink then embossed it in clear powder on hot pressed watercolour paper.
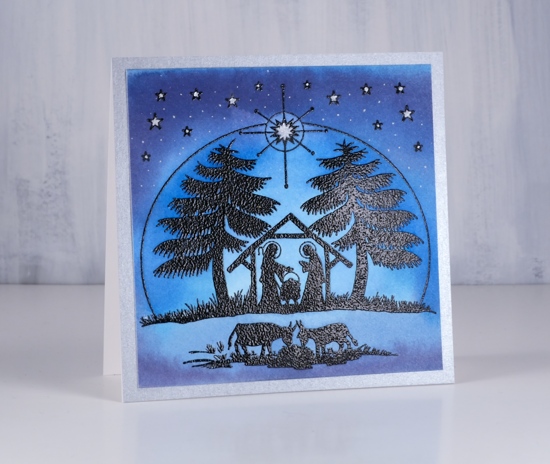
I had leftover brusho paint mixed and in a palette sitting on my table so I used the blue and the purple to paint the scene. I blended from the centre out, blue then purple and did some diluting in the centre with a thirsty brush to keep it pale blue.
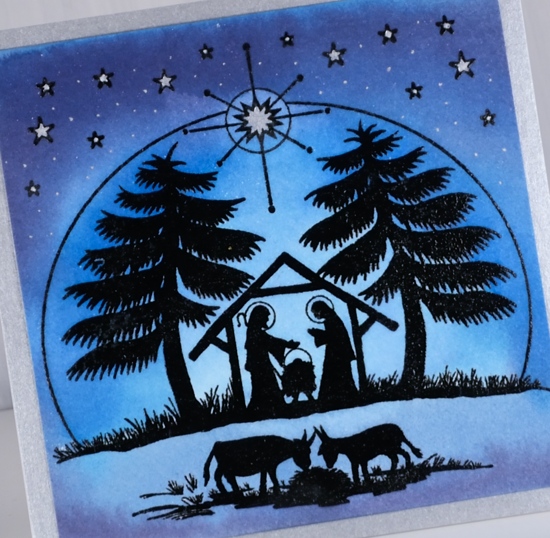
Once the panel was dry I coloured in the stars with a silver gel pen and dotted extra stars in the sky with the same pen. I framed the panel in shimmer silver cardstock to finish it off.
Happy Thanksgiving to all those celebrating this week.
Supplies:
Stamp: nativity

Paper:hot pressed watercolour, shimmer silver, neenah solar white
![]()
Paint: brusho
Ink: nocturne versafine clair
Also: clear embossing powder, silver gel pen
![]()

Snow trails
Posted: November 20, 2018 Filed under: snow trails, Tagged | Tags: Peerless Transparent Watercolors, Penny Black stamps 7 Comments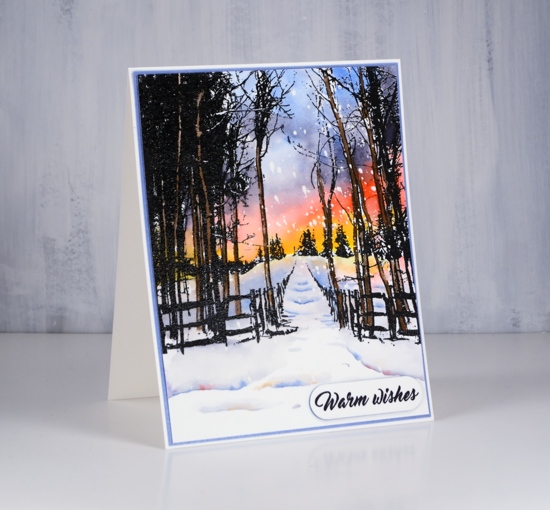
We’ve had some beautiful skies lately, the heavens declaring the glory of the Lord. I decided to add bold colour to this beautiful ‘snow trails’ stamp from Penny Black for a similarly dramatic sky. To begin I embossed the stamp on hot pressed watercolour paper then splattered masking fluid over the panel.
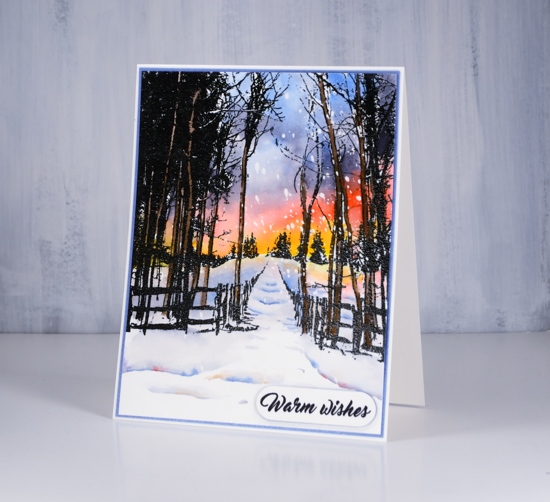
I painted the sky from yellow up adding a colour at a time and blending each into the next. I used my peerless watercolours for all the painting and they blended beautifully. I decided to paint the tree trunks that were not already black in brown, that way I did not have to preserved white ‘birch’ trunks as I painted in the sky. I used the same colours but more diluted to paint colour on the snow and create shadows along the path and in the foreground. Once dry I removed the masking fluid to reveal the falling snow.
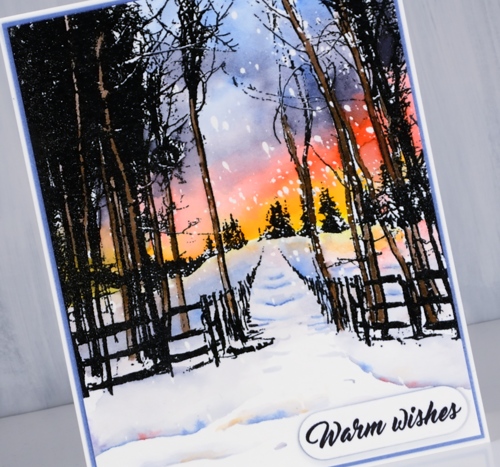
The popped up sentiment in the corner became a necessity when I botched the sentiment directly on the painted panel. I framed the panel in blue and attached it to a natural white card base. Can’t wait to paint another of these panels; it is such a peaceful scene.
Hope you are having a peaceful day.
Supplies
Stamps: snow trails


Die: tagged

Ink: versafine clair nocturne
Paper: hot pressed watercolour paper, blue shimmer paper
Paint: peerless transparent watercolours

Also: clear embossing powder
![]()
Winter Days
Posted: November 19, 2018 Filed under: hometown Christmas, winter days | Tags: Faber-Castell Albrecht Durer Watercolour pencils, Penny Black stamps 4 Comments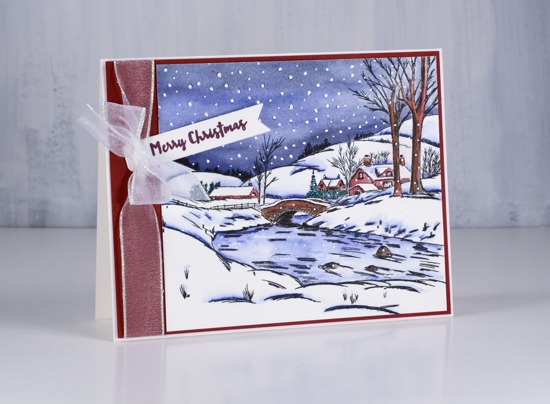
It doesn’t look quite like this yet but we have snow and it is staying on the ground… for now. I stamped this pretty scene from Penny Black’s ‘winter days’ transparent set in black versafine clair ink on hot pressed watercolour paper then coloured with watercolour pencils.
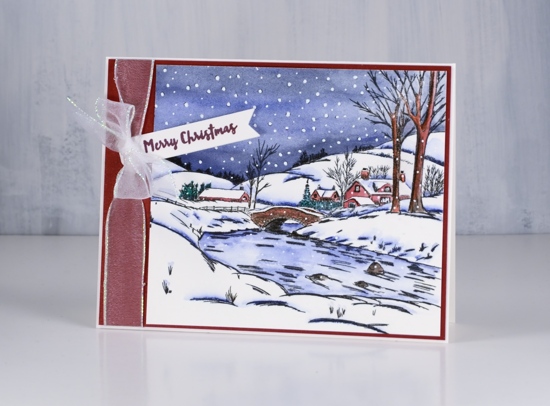
I limited my pencil choices to two dark blues, a black, a green, a red and a brown. There are dots of snow in the stamp so after painting the sky I dotted over the stamped snow with a white gel pen and added some over the rest of the scene also. I used Kathy Racoosin’s shadow trick of adding some black pen here and there where there would be shadows. (eg. the edges of the river, under the eaves on the buildings and the trees on the horizon). I am still enjoying colouring as often as possible for The Daily Marker 30 day colouring challenge.

My panel wasn’t a square nor was it my usual 4¼ “x 5½ ” size but I wanted the usual A2 size I matted it with a wide red mat which left room for some organza ribbon. I stamped a partial sentiment from the ‘hometown Christmas’ set and tucked in under the bow.
If you’d like to see a beautiful and quite different take on this stamp pop on over to Susie Lessard’s blog here.
Supplies
Stamps: winter days, hometown Christmas (PB)

Inks: nocturne, chianti versafine clair
Paper: hot pressed watercolour, deep red cardstock
Pencils: Faber Castell Albrecht Dürer watercolour pencils
Pens: white gel pen, black micron pen


Also: white organza ribbon with shimmery edges


