
More Alcohol Inks on the Gel Plate
Posted: September 25, 2023 Filed under: Alcohol Ink, Dies, Flutters, gel press, Lavinia, Penny Black, pods stencil, Taylored Expressions | Tags: Alcohol Ink, gel press, gel printing, Lavinia, Penny Black creative dies, Taylored Expressions 1 Comment
Using alcohol inks and stencils on the gel plate is a bit of an addiction for me right now so I filmed another one to show you. A friend let me know that if you receive my blog posts by email the video doesn’t show up in the email. To see the video just click on the title of the blog post and it will take you to my blog. If you would like to subscribe to my youtube channel too that would be delightful.
I started this print with the Lavinia pods stencil already covered in ink and then added more ink and isopropyl alcohol when it was on the gel plate. Take a look at the video below to see the process.
I would love to hear if you try this technique. As I mentioned last week I like pulling the prints with paper or cardstock because they are surfaces that I wouldn’t normally use with alcohol inks.

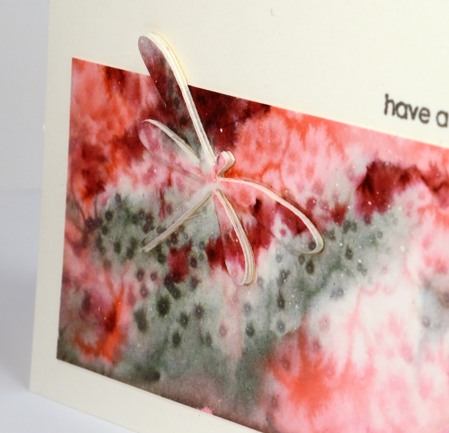
The finished card does include most of the print; it is a larger size than my usual A2 cards. I decided to add the Penny Black dragonflies in the wine colour which matches the alcohol ink I added very sparingly. In retrospect you will probably agree I could have added more. The sentiment is from Taylored Expressions ‘In and Out Birthday’ stamped in Chianti versafine clair ink.

My blog features affiliate links to the following companies. If you buy through these links I receive a small commission at no extra cost to you.
Ecstasy Crafts (Ecstasy Crafts offers a discount code heathertecs10 you can use for a 10% discount at checkout)
Gel Printing with the Strands stencil
Posted: May 18, 2023 Filed under: Classes, Dies, Echidna Studios, Flutters, gel press, online class, Penny Black, rustic birdhouse, strands | Tags: Echidna Studios, gel press, gel printing, Penny Black creative dies, Penny Black stamps 4 Comments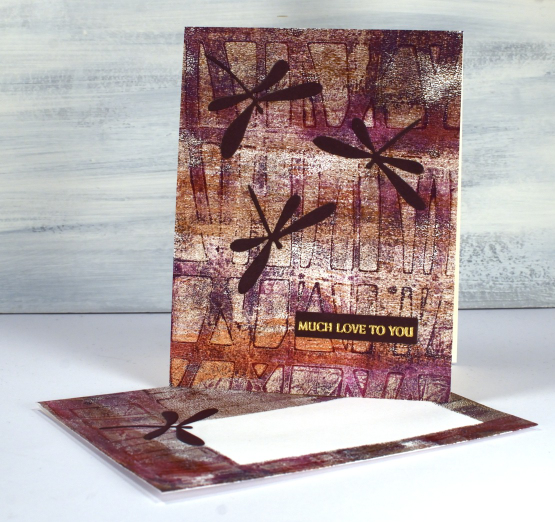
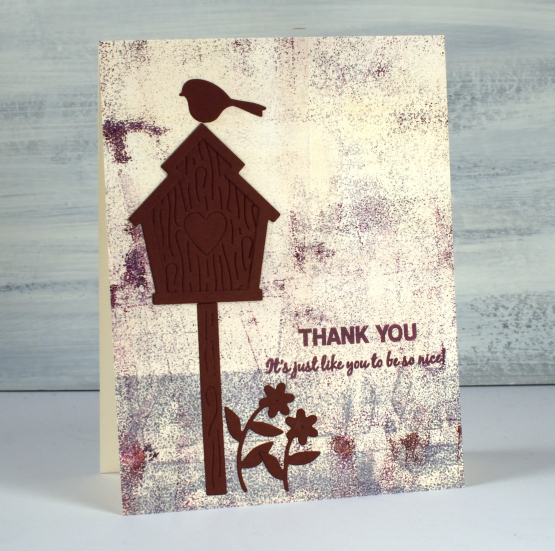
A stencil gel print for you today. I created this distressed print on a large gel plate so I could pick up a card front and an envelope print at the same time. If you don’t have a large plate you could just use the same paint colours and stencil on a second print. Just in case you didn’t catch my news yesterday, my new online course Gel Print Journey is now available! (And there is a discount for blog readers TEAMBLOG10)
The stencil is called ‘strands’ and it is a digital design I created and have made available in the Echidna Studios etsy store. The bold print shown on the card above was made with copper, burgandy and purple paint so I chose a dark burgandy cardstock to cut dragonfly elements and a sentiment strip. Printing directly on the envelope is a easy way to co-ordinate with your card and I placed a sticker on the white envelope before printing to preserve white space for the address. I think I might make a video of this process because it’s quick and effective, a combination I like.

The pattern on the second card is very muted because it is a ghost print, the leftovers on the plate after I pulled the one above. I cover this technique in my new online class using a range of different stencils and colour combinations.
Even though ghost prints are often patchy I like using them for collage or backgrounds as I have here. The line between cream and grey ended up looking like a path or lawn and I just like the unique grungy texture.
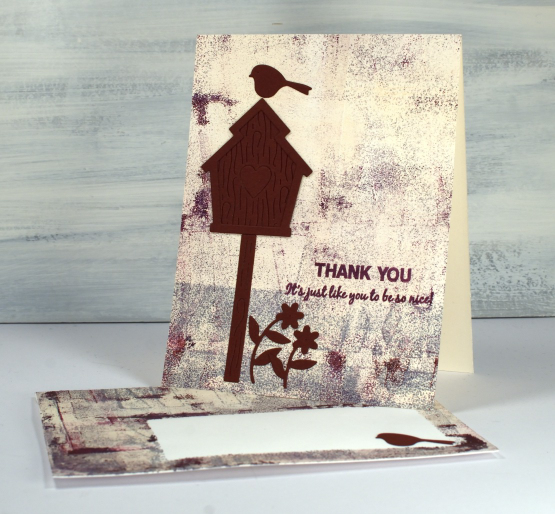
The dies and stamps I used to finish the cards are all Penny Black, those dragonflies on the first card are some of the first dies I ever got and they’re still a favourite.
(Compensated affiliate links from Foiled Fox & ScrapNStamp)
Pods & Wings
Posted: April 14, 2022 Filed under: Dies, Flutters, gel press, Lavinia, Penny Black, pods stencil, soaring | Tags: gel press, gel printing, Lavinia, Mixed Media, Penny Black creative dies, Penny Black stamps 4 Comments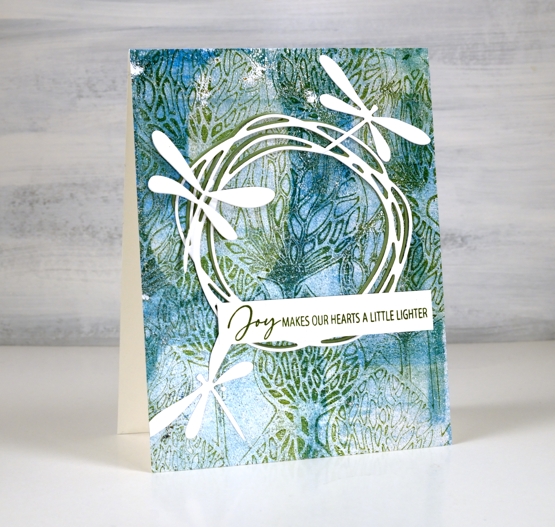
The background of today’s card is another gel print featuring a gorgeous Lavinia stencil called ‘pods’. You can’t see in the photos but in real life there is some shimmer on the print as I used silver paint along with blue, green and white.
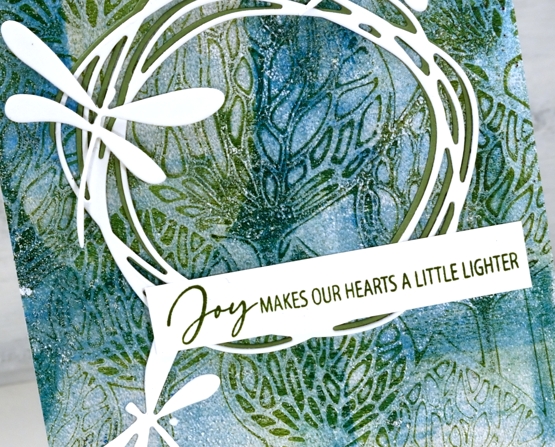
Over the print I added a green and a white wreath die cut from Penny Black. It is part of the new ‘soaring’ set which also includes four butterflies. The background called for dragonflies rather than butterflies so I die cut three from the ‘flutters’ set, an oldy but a goodie.
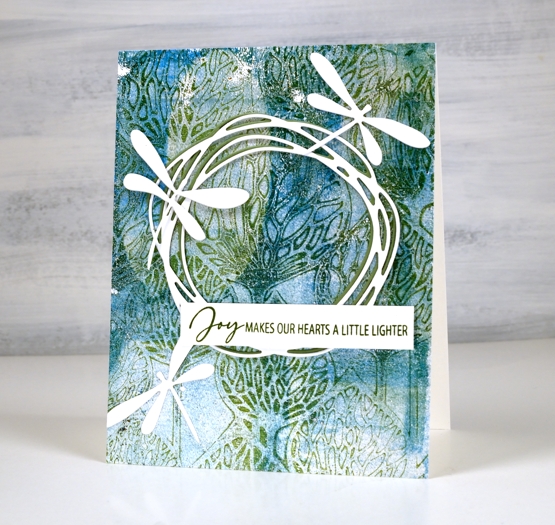
As I spent a chunk of time yesterday listening to Ann Voskamp’s book ‘One Thousand Gifts’, the joy sentiment seemed like a good match for the design.
I was watching a Julie Balzer book club discussion on youtube today as I worked and she mentioned how addictive gel printing is and how if you haven’t tried it you must (48 minute mark)! She called it the one tool that has changed her life! So I will again shamelessly plug my upcoming gel printing workshops and hope you will join me in this addiction!
Supplies
(Compensated affiliate links used when possible)
Silver Dragonflies
Posted: May 26, 2017 Filed under: Flutters, Gilding Flakes | Tags: color burst, Fabriano Watercolour Paper, Gilding, Penny Black creative dies 9 Comments
My second gilded card also features dragonflies, this time little silver ones. In my previous post I shared a card gilded in both gold and silver flakes; this time I just used silver because I think silver and blue look so very pretty together. I used stick it adhesive once again to attach the gilding to the watercolour panel and colorburst powders to create the background panel.
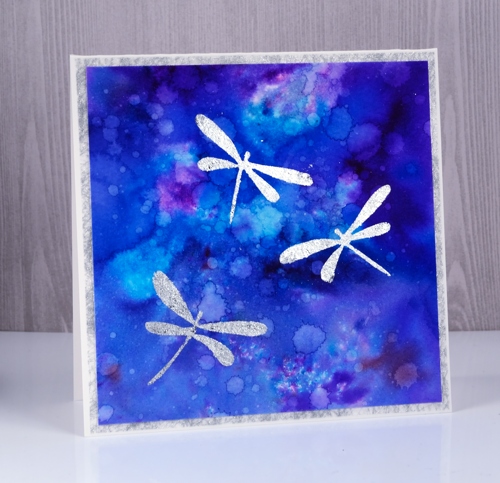
I sprinkled three colours of colorburst powder on watercolour paper then sprinkled with water. Once the colours were blending nicely I used a brush to spread the colour to the edges of the panel. I dried it with a heat tool then added droplets of water a few at a time and dabbed some of them up with a paper towel. I dried the panel in between each batch of water droplets so I could get a mass of water marks. I die-cut three dragonflies from stick it adhesive then applied them to the watercolour panel, removed the backing paper and rubbed silver gilding flakes on top. I burnished with a plastic scrubby pad to remove the excess flakes. It’s finished with a frame of silver spiderweb fabric that comes from France and happens to match the gilding flakes perfectly.
Supplies:
Dies: Flutters
Cardstock: Neenah solar white cardstock, hot pressed watercolour paper
Also: stick it adhesive sheets
Shimmery Stuff: silver spiderweb fabric, Nuvo silver bullion gilding flakes
Revisiting Pink & Grey
Posted: May 4, 2015 Filed under: CAS, Flutters 8 Comments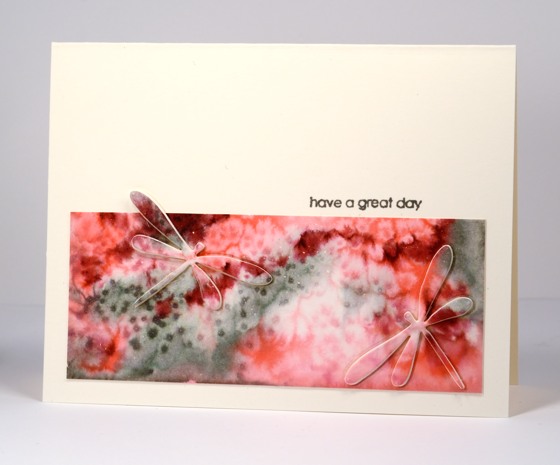
I am the guest muse on Sovushka Slavia blog today. Sovushka Slavia blog is dedicated to CAS cardmaking and Project Life. It has 1325 followers in Russia, Ukraine, Belarus, United States, Germany, Kazakhstan and other countries. The challenge is to CASE my card below from a few years ago.

I didn’t set out to CASE it quite so closely but I ended up keeping the colour scheme, the motif and the layout, I just the changed the technique. I created the watercolour panel first but letting distress stains blend on wet watercolour paper. I added some salt and let it dry. I die-cut two dragonflies then trimmed the panel so that one dragonfly would reach over the border. I stacked several layers below each dragonfly to pop them up above the panel.
I hope you check out the Sovushka Slavia blog, the design team’s cards and maybe add a CASE of your own to the link up.
Supplies:
Stamps: Snippets (PB)
Creative Dies: Flutters (PB)
Inks: Iced Spruce, Spun Sugar, Worn Lipstick, Aged Mahogany Distress Stains (Ranger) Versamark, Versafine smokey grey (Tsukineko)
Cardstock: Canson cold pressed watercolour paper
Also: Winsor & Newton masking fluid, salt
Dies Days 5: Dragonfly silhouettes
Posted: July 12, 2013 Filed under: CAS, Flutters, Glory of Modesty, Maidenhairs 16 Comments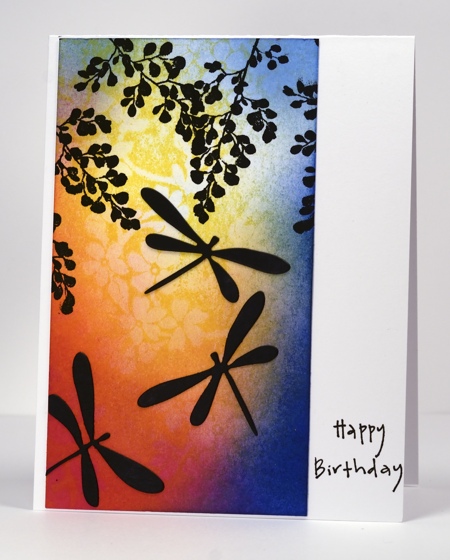
The inspiration for this panel was a vibrant tag made by Glenda Waterworth. I sponged the background in pinks, blues and yellow then stamped the glory of modesty background stamp in yellow over the sponging. The silhouetted leaves are stamped in versafine onyx black and the dragonflies die cut and attached with adhesive. This card is for my daughter who is turning 17 tomorrow and just left to compete in a track meet in Quebec. I wish I had thought enough ahead to pop it in her bag! We are heading up to watch her run tomorrow so we can deliver it in person. I hope you have enjoyed the Creative Die posts this week. If you are looking for more inspiration check out the Penny Black blog and Jill’s Inspired By blog which have been featuring the dies all week also.
Dies Days 1: Daisy Collage
Dies Days 2: Dots and Blossoms
Dies Days 3: Flutters
Dies Days 4: One Die, four ways
Supplies:
Stamps: Maidenhairs, Glory of Modesty, Happy Birthday(PB)
Inks: Memento Rose bud, Dandelion, Summer Sky, Danube Blue & Versafine Onyx Black (Tsukineko)
Dies: Flutters
Dies Days 3: Flutters
Posted: July 10, 2013 Filed under: Background Stamps, CAS, Flutters | Tags: CAS, Faber Castell gelatos, Penny Black stamps 11 Comments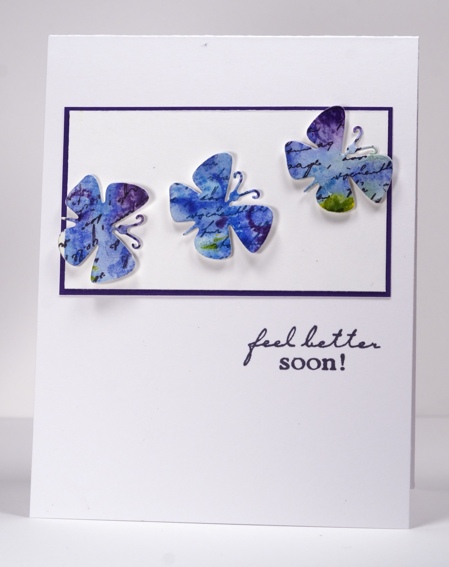
Penny Black released their new Creative Dies recently and are showcasing them everyday this week on the blog. I have been playing around with them so I you will see “Dies Days” here this week too.
To create today’s card I played with two new toys: the Flutters creative die from PB and the Faber Castell gelatos. I coloured and blended the gelatos with water on water colour paper. I wasn’t trying to make a pattern just a pretty blend of blues with a few yellow highlights. After die cutting the butterflies I added the letter background stamp over the top. The most time consuming part of this card was trying to arrange the butterflies; I actually had five that I was fiddling with but I ended up leaving the two big ones out. Maybe they will turn up another day.
Dies Days 1: Daisy Collage
Dies Days 2: Dots and Blossoms
Supplies:
Stamps: Letter background, Feel Better(PB)
Inks: Memento Nautical Blue, Versafine Imperial Purple (Tsukineko)
Gelatos: Blueberry, Lemon, Grape, Boysenberry, Cotton Candy
Dies: Flutters
Cardstock: Mix & Match Purple Mountain


