
Square snowscape
Posted: October 6, 2014 Filed under: Prancers, Stamped Landscapes | Tags: Penny Black stamps, Tsukineko Memento inks 15 Comments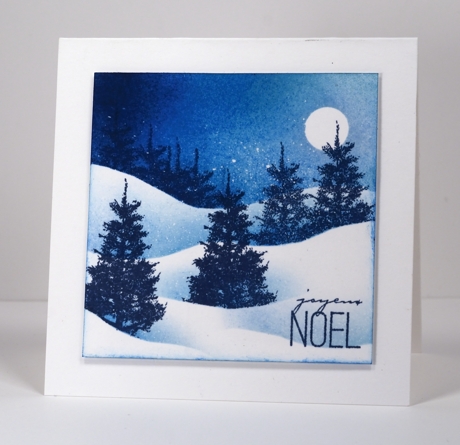
I don’t create many square cards but the symmetry can be very pleasing. I made this little snow scape on a scrap of cardstock which I had previously splattered with masking fluid. The panel was Neenah solar white cardstock not watercolour paper so I refrained from watercolouring and created my night sky and snowy hills and gullies by sponging instead.
I cut a post-it mask for the horizon and punched a little circle mask for the moon then sponged both summer sky and nautical blue memento inks across the sky. Before removing the horizon mask I stamped a row of trees on the left hand side. I cut and positioned a different mask, stamped a couple more trees and then sponged over the edge of the mask. For the last two trees I just used part of a mask to create a few dips in the snow. (I have a tutorial here showing now I create snowscapes with sponging and masking fluid)
To finish I ran the nautical blue sponge around the edge to frame the panel, added some highlights to the edges of a few snow banks and trees with a clear wink of stella pen and stamped my sentiment in nautical blue. When the ink was dry I rubbed the masking fluid off to reveal little white snowflakes.
Thanks for your encouragement to keep on stamping with the Prancers set. You know I will!
Supplies:
Stamps: Prancers, Joy Filled (PB)
Inks: Memento Nautical Blue, Summer Sky (Imagine Craft/Tsukineko)
Cardstock: Neenah Solar White 110lb cardstock
Also: Winsor & Newton masking fluid, Clear wink of stella pen
Walking Home 2
Posted: September 28, 2014 Filed under: On the Town, Stamped Landscapes | Tags: Penny Black stamps, Tsukineko Memento inks 12 Comments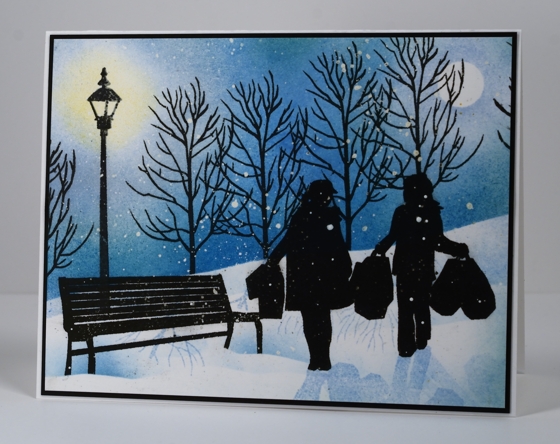
I have had some more fun with the “On the Town” set, this time with Memento inks and sponges instead of the watercolour approach I took in my last attempt. I did start with by flicking masking fluid onto my panel which is Neenah Solar White cardstock. I cut a hill mask and punched a small moon mask out of post-it notes and positioned them before sponging with two blue inks and a little yellow where the lamp would be. When the sponging was complete I stamped the trees along the hill then removed the mask. It is not very obvious but I sponged little bits of blue all over the snowy ground moving one wavy mask around to do so. I added the girls’ silhouettes next, then the seat, but before stamping the seat I positioned two small masks where the legs would be so they all appear to be in little snowdrifts. Next was the lamp and finally some shadows by turning the silhouette stamps upside down and stamping them in memento summer sky ink. When I rubbed the masking fluid off there were very few spots on the girls so I add a few here and there with white gesso and a toothpick.
I still haven’t used every stamp in this set so there may well be another ‘walking home’. On the town is a transparent set which made it easy to lay the scene out first to work out where all the pieces would fit.
Thanks for dropping by today. There will be more autumn tones later in the week.
Supplies:
Stamps: On the Town (PB)
Inks: Memento London Fog, Summer Sky, Bahama Blue, Dandelion ink & Versafine Onyx Black (Imagine Craft/Tsukineko)
Cardstock: Neenah Solar White 110lb cardstock, Black cardstock
Also: Winsor & Newton masking fluid, Gesso
Walking Home
Posted: September 16, 2014 Filed under: On the Town, Watercolour | Tags: Fabriano Watercolour Paper, Penny Black stamps, Ranger Distress stains, Tsukineko Memento inks 38 Comments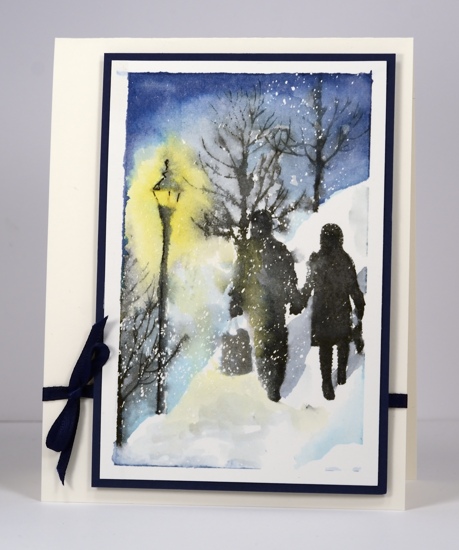
I have been wanting to create a little scene ever since I received the transparent set “On the Town” from Penny Black. I took a break from stamping in autumn colours so I could pull out the masking fluid and create a snowy stroll. After masking a rectangle on my watercolour block, I flicked masking fluid onto my watercolour paper and let it dry completely. I then stamped the lamp post and the three trees in grey and black inks. I spritzed the stamp and the paper with water so the colour bled immediately into the surrounding area. I waited a short while before I added distress stains to the background and sky area. I didn’t want the stamped images completely dry so that the blend between trees and sky would be soft. I used two blue stains and a yellow for the sky/background area. (colours are listed below) I inked the stamp of the people in both grey and black ink so the right side would look more in shadow. I added some shadows to the snowy path with a paintbrush in both blue and grey.
To finish I rubbed off all the masking fluid flecks, matted the panel in navy cardstock and popped it up over a navy satin ribbon.
Thanks for dropping in today.
Supplies:
Stamps: On the Town (PB)
Inks: Chipped Sapphire, Broken China, Mustard Seed distress stains & Black Soot distress ink (Ranger) Memento London Fog ink (Imagine Craft/Tsukineko)
Cardstock: Fabriano 100% cotton hot pressed watercolour paper, Neenah Natural White 110lb cardstock
Also: Winsor & Newton masking fluid, Navy satin ribbon
Leaves and canvas
Posted: September 5, 2014 Filed under: Foliage Fancy, Textures | Tags: Fabriano Watercolour Paper, Penny Black stamps, Ranger Distress stains, Tsukineko Memento inks 7 Comments
I am not anxious for summer to end but I am enjoying playing with autumn stamps and colours. The Foliage Fancy set I used for this card has solid leaf stamps and outline/vein leaf stamps. I started by applying two colours of distress stain directly to the solid leaf, spritzing it and stamping on watercolour paper. I changed the colour mix slightly for each leaf. While the stain was still a bit damp I inked the outline stamp with rich cocoa memento ink and stamped over the solid leaves. I painted tumbled glass distress stain around the leaves and when that was dry splattered a little of each leaf colour over the top.
Before cutting out the watercolour panel I ruled lines down either side of the panel letting the leaves cross the lines for added interest. I stamped the canvas background directly on the cardbase in rich cocoa ink then added a sentiment.
I must admit I am looking forward to autumn a little because I went thrift shopping this week and came home with a 100% cashmere sweater in great condition for $7.99! It will be cosy when the weather turns cold.
Supplies:
Stamps: Foliage Fancy, …smiling, Textures (PB)
Inks: Mustard Seed, Barn Door, Spiced Marmalade, Vintage Photo, Tumbled Glass distress stains (Ranger) Rich Cocoa Memento ink (Imagine Craft/Tsukineko)
Pencils: Faber Castell Albrecht Durer watercolour pencils
Cardstock: Neenah Avon Brilliant White 110lb, Fabriano 100% cotton hot pressed watercolour paper
OLS#9 Hip to be square
Posted: September 4, 2014 Filed under: CAS, One-Layer Simplicity challenge, Tree-mendous | Tags: Penny Black stamps, Tsukineko Memento inks 7 Comments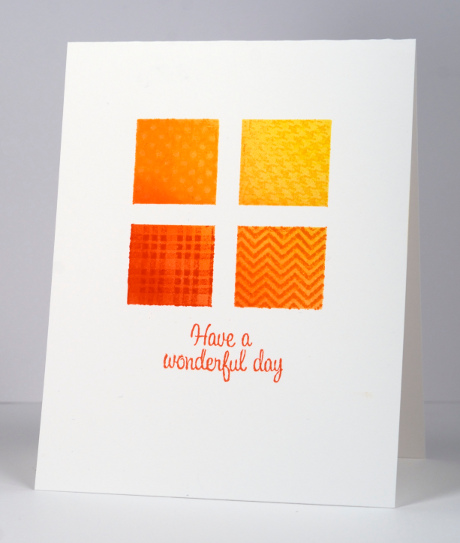
Ardyth has a wonderful challenge happening on the One Layer Simplicity challenge blog this month. We have to use squares on our one layer cards. It can be one square or many squares; there are so many possibilities. I decided to mask and sponge my squares with a bit of a diagonal ombre thing happening. I taped around the edges of the large square with painters tape then cut two narrow strips and criss-crossed them in the middle. My sponging blends from yellow through orange to a burnt orange colour (listed below) and then I added a little pattern to each square by masking the other three squares and stamping. The patterns are from the transparent set, ‘Treemendous’ and they were perfect for this technique. I also used a sentiment from the same set which makes this a one layer, one stamp set and one colour scheme card, but that is not required for the challenge!
The challenge is to have fun with squares on a one layer card. Hope you’re inspired.
Supplies:
Stamps: Treemendous (PB)
Inks: Memento Dandelion, Tangelo, Cantaloupe, Morocco ink (Tsukineko)
Cardstock: Neenah Avon Brilliant White 110lb cardstock
Christmas Traditions
Posted: September 3, 2014 Filed under: Caroling Tree | Tags: Penny Black stamps, Tsukineko Memento inks 9 Comments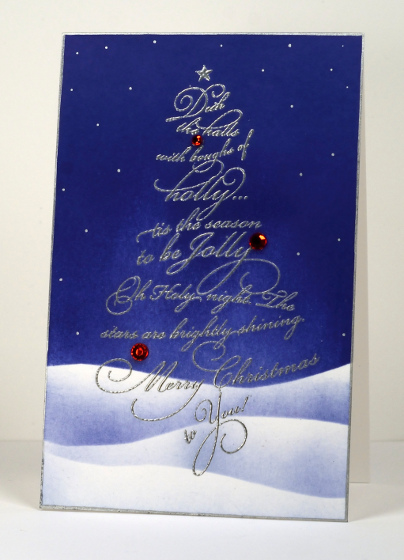
This week on the Penny Black blog the designers are sharing more Christmas inspiration and some of their own holiday traditions. At our house I pick a different colour scheme for decorating the tree each year. The children do give me input and we come to a decision together. Every colour scheme includes gold or silver as we don’t have an endless supply of decorations. Last year it was silver and white with a touch of red.

Another year it was silver and blue like the card above. One year my daughter who loves green and yellow asked for lime green! I was a bit dubious but we teamed it up with gold, found a set of lime green baubles, a garland of lime green berries and it worked. I’m not sure what it will be this year. When the children were younger we made a new set of decorations to add to the collection each year. One year we made peg angels and another year felt mittens. We painted balls with glitter glue a few times and threaded clear beads on florist wire to make icicles; you can see the icicles in the photo above.
To create the blue and silver card above I began by embossing the “Caroling Tree” in silver embossing powder, next I positioned a mask cut from a post-it note to cover the bottom of the panel. I brayered Memento Paris Dusk ink over the exposed part of the panel then evened out the colour with a sponge. I removed the first mask and cut another to place a little lower then sponged above it to create a snow bank and then another below that. To complete the panel I drew a border of silver with a sharpie and added a few silver stars also. The final touch was a few red rhinestones. I trimmed the card base to fit the panel so it is 5.5″ x 3.5″.
Thank you for all the feedback on my “No Card Left Behind” post; it was very interesting and helpful to read how other card makers deal with unexpected mishaps.
Feel free to share some of your Christmas traditions in the comments below; I would love to read about them.
Supplies:Stamps: Caroling Tree (PB)
Inks: Versamark, Memento Paris Dusk ink (Imagine Craft/Tsukineko)
Cardstock: Neenah Solar white 110lb cardstock
Also: Silver Embossing Powder, Silver Sharpie, Red Rhinestones
Double Holly
Posted: August 25, 2014 Filed under: CAS, Happy Holly, Holly Berries | Tags: CAS, Fabriano Watercolour Paper, Penny Black creative dies, Penny Black stamps, Tsukineko Memento inks 9 Comments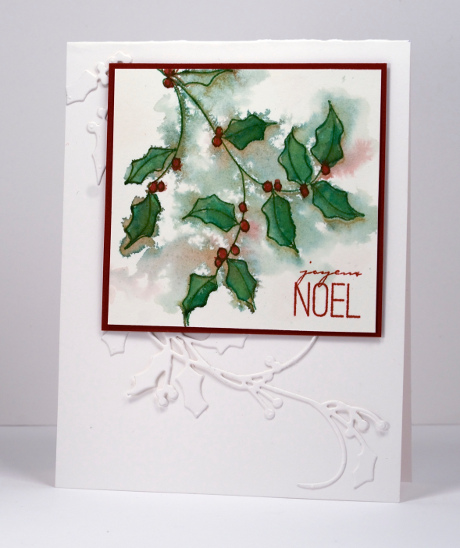
For the next little while at least I will be jumping between Christmas designs, autumn designs and last days of summer designs. I think some of you found the autumn theme of my last card a little much while it is still officially summer. I totally agree; I always hold onto summer as long as I can. I’m happy if I can wear shorts and summer dresses right through September!
Having said that here is another Christmas card. I created a little holly panel by stamping the “Happy Holly” stamp on damp watercolour paper. I inked the stamp with Memento markers then spritzed it and the paper before stamping. The ink bled into the paper straight away and I spread it even further with a water brush. When it was dry I restamped the holly image and painted the leaves and berries with ink from Memento ink pads. To finish I matted the panel in red, added a sentiment and popped it up over some holly die cuts. An adhesive sheet from Scrapbook Adhesives made it much easier to attach the die cut.
Supplies:
Stamps: Happy Holly, Joy Filled (PB)
Creative Dies: Holly Berries
Inks: Memento Rhubarb Stalk, Cottage Ivy inks & markers ( Imagine Craft/Tsukineko)
Also: 4×6 Adhesive Sheets (Scrapbook Adhesives)
Cardstock: Neenah Classic Crest Avon Brilliant White 110lb smooth , Fabriano 100% cotton hot pressed watercolour paper
Most Wonderful
Posted: August 15, 2014 Filed under: Most Wonderful, Prancers, Stamped Landscapes, Watercolour | Tags: Fabriano Watercolour Paper, Penny Black stamps, Ranger Distress stains, Tsukineko Memento inks 14 Comments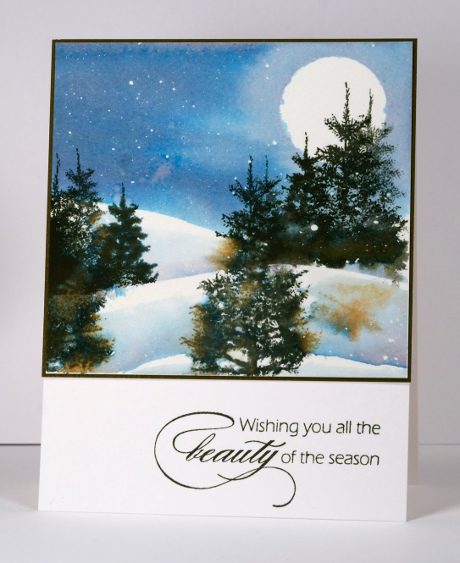
I was very excited to see some new tree stamps in the new “Season’s Greetings” release from Penny Black. I am always happy to have more tree stamps to create stamped scenes with. I will be using the new trees from “Prancers” to create winter scenes but I will probably keep stamping with them all year long. I used them as the main feature of the scene above and a shadowy suggestion of forest in the scene below.
Both scenes were done on watercolour paper but with different approaches and inks. For the scene above I started with a masking fluid flecked panel and positioned a circle mask for the sky. I then painted the sky in Memento Nautical Blue and Paris Dusk ink taking care to dilute the colour around the moon. I used the same two blues to paint the snow banks after I had stamped the trees in Memento Northern Pine.
On the card below I created a three coloured panel with Chipped Sapphire, Evergreen Bough and Tumbled Glass distress stains. I applied the stains to the watercolour paper then spritzed the panel with my homemade Pearl-ex sprays. When it was all dry I embossed the snowflake and sentiment stamps with Memento Luxe Wedding Dress ink and embossed with white powder. I added trees at the bottom with Chipped Sapphire distress ink and then splattered white gesso over the whole panel with a splatter brush. Both panels are framed by very narrow frames and attached to white card bases.
We had quite unseasonably cold weather yesterday, not quite the snowy scenes you see here but definitely chilly enough to sit by the fire in the cottage where I was visiting friends for the day.
Supplies:
Stamps: Most Wonderful, Prancers, Beauty of the Season (PB)
Inks: Chipped Sapphire, Evergreen Bough, Tumbled Glass distress stains (Ranger) Memento Nautical Blue, Paris Dusk, Northern Pink inks & Memento Luxe Wedding Dress ink (Imagine Craft/Tsukineko)
Cardstock: Fabriano 100% cotton hot pressed watercolour paper, Neenah Solar White 110lb cardstock
Also: Winsor & Newton masking fluid, White embossing powder, White Gesso, Three separated Pearl-ex sprays comprised of water mixed with Interference Gold, Interference Blue and Interference Green.
One Layer Foliage
Posted: August 10, 2014 Filed under: CAS | Tags: Faber-Castell Albrecht Durer Watercolour pencils, Tsukineko Memento inks 10 Comments
Yesterday I took time to play along with the new Less is More challenge to make a one layer card based on the theme of foliage. I pulled out my watercolour block and taped a strip of painters tape down the middle of the 9″x12″ page to mask off a portrait oriented card base.
I used a hand-cut stencil a friend gave me to make this card. The cutting is quite intricate around the edge of the leaf; I’m not sure that I would have the patience or steady hand to replicate this design. I sponged three colours onto the panel taking care not to blend them or overdo it with the colour because I wanted the texture of the sponge to show. Usually I sponge until the coverage is uniform but I was after speckle this time. I splattered with three watercolour pencils and a little gold “Wink of Stella” on each leaf also.
Supplies:
Stamps: Flourish Thank You (PB)
Stencil: Hand cut maple leaf
Inks: Memento Rhubarb Stalk, Love Letter, Peanut Brittle (Tsukineko)
Pencils: Albrecht Durer Burnt Ochre 187, Pompeian Red 191, Pale Geranium Lake 121(Faber Castell)
Paper: Fabriano 100% cotton hot pressed watercolour paper
Also: Gold “Wink of Stella” pen
One Layer Simplicity: Shades of Summer
Posted: August 1, 2014 Filed under: CAS, Coloured pencil, One-Layer Simplicity challenge, Poppy Time | Tags: CAS, Faber-Castell Polychromos Colour Pencil, Penny Black stamps, Tsukineko Memento inks 14 Comments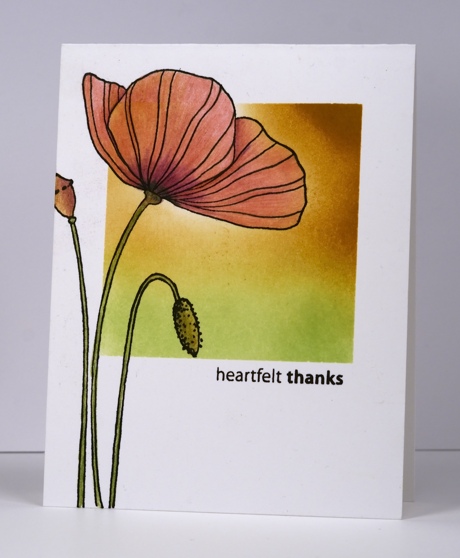
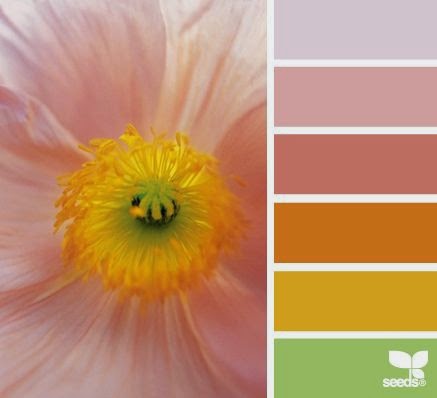
Susan is hosting the new One Layer Simplicity Challenge and she has chosen six gorgeous summer colour palettes to inspire us. I chose the one below which was a challenge as I don’t often combine pinks and yellows.
I just did a big clean up and reorganization of my craft area and in doing so found the card base above with the square already masked and the green sponging started. I sponged more of the square in memento peanut brittle. I then removed the mask and stamped the poppy in versafine onyx black. I decided to use my coloured pencils for the poppy because I had the colours in the photo. I blended one colour pencil over another rather than using a blending fluid or blender pencil.
Also entered in Inkspirational Challenge to use markers or pencils
Supplies:
Stamps: Poppy Time, Amazing (Penny Black)
Inks: Versafine Onyx Black, Memento New Sprout, Peanut Brittle (Tsukineko)
Also: Faber-Castell Artist Polychromos Colour Pencils


