
No card left behind
Posted: August 29, 2014 Filed under: CAS, No Card Left Behind, Oh Christmas Tree | Tags: CAS, Faber-Castell Albrecht Durer Watercolour pencils, Penny Black stamps, Ranger Distress stains 15 Comments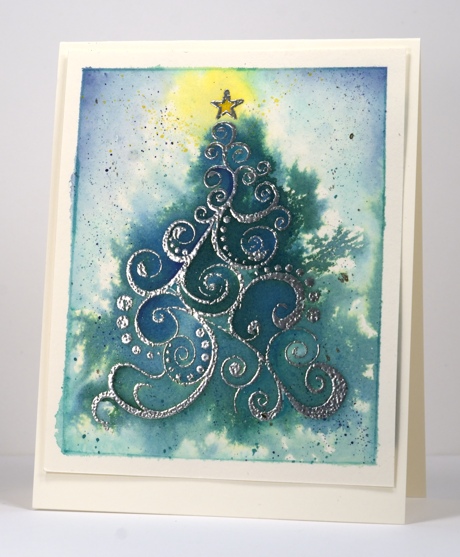
I recently started using the phrase ‘no card left behind’ at my classes. I know sometimes a card needs to left behind; sometimes a fresh start is best. I’m not talking about those instances; I’m talking about the times when the card is basically working. The colours are pretty, the layout is balanced, the stamping is solid but then something goes wrong. It could be a crooked sentiment or maybe a smudge of ink, perhaps an incomplete imprint from the stamp. In these situations I have adopted the policy of “No Card Left Behind” and I like to make sure it happens in my classes. I like the participants to go home happy with the their cards. I know they might try it again and tweak things or they might decide the design is not for them and never try it again. Either way I like them to go home with the promised cards.
To this end I have a few emergency solutions up my sleeve. I’m sure you have them too. Some of my class participants joke about the butterfly fix: “I can always stamp a butterfly over that” It can work in some situations but not really on a snow scene! I have shared some of my fixes before and have decided to continue in the spirit of “No Card Left Behind” and share some more from time to time. I will try and remember to photograph the problem before I come up with the fix but sometimes I just forge ahead and its too late for ‘before and after photo shoots’.
I have two cards to share today; the second one is the NCLB. I started both with the tree image embossed on watercolour paper with silver powder. I added distress stains to the paper and blended them immediately with water and a paintbrush. For the card above I kept the colour contained in the tree area just letting it bleed out a little by spreading the stain and water with a brush. On the other panel I blended the colour all over the panel so the whole rectangular area was covered in shades of green. I then sprinkled salt on the wet paper and let it dry. The result was a pretty textured background but overall the design was lacking something. I set it aside and finished the above panel with some silver, blue, green and yellow splatter. I added a bit of definition around some of the swirls and the border with watercolour pencils.
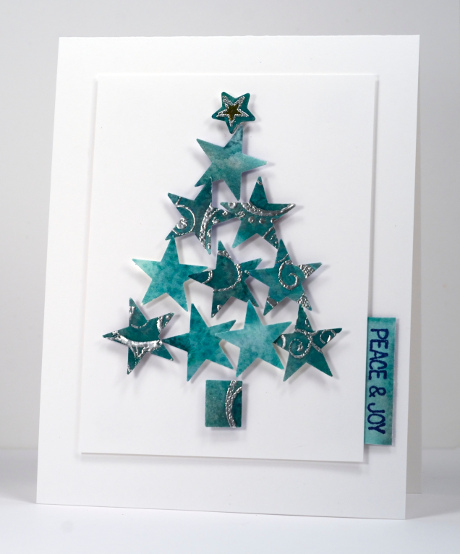
Now how about the NCLB card? You can see I ended up punching out stars and arranging them as a tree but it took a bit of fiddling around before I settled on that design. I first punched squares from the watercoloured panel to see if I could come up with a three or four square CAS layout but that wasn’t coming together so I punched as many stars as possible out of the squares and remaining scraps and arranged them in a tree shape. I had a little star punch that framed the star at the top of the tree and cut a little trunk from a scrap. All the shapes are popped up with 3D foam squares from Scrapbook Adhesives on a white panel which is popped up with the thin 3D foam squares. I had a few narrow scraps left so I stamped a simple sentiment and attached it as a tab to the panel. Punches are a good option for saving a card that will no longer work as a whole panel. I often punch squares from a stamped design but circles or fancier shapes like flowers and stars are great to arrange into a new design.
Thanks for wading through this rather long description; have I inspired you to give the occasional mess up a second chance? Do you have strategies for saving your hard work after an annoying slip or smudge?
Supplies:
Stamps: Oh Christmas Tree , Winter Magic (PB)
Punches: large and small star
Inks: Versamark, Versafine Majestic Blue (Imagine Craft/Tsukineko), Distress stains Pine Needles, Evergreen Bough (Ranger)
Pencils: Albrecht Durer watercolour pencils Indianthrene Blue 247, Viridian 161, Lemon 107 (Faber Castell)
Cardstock: Fabriano 100% cotton hot pressed watercolour paper, Neenah Natural white 110lb cardstock, Neenah Solar white 110lb cardstock
Also: Silver Embossing Powder, Silver Wink of Stella Pen, Salt, 3D foam squares, thin 3D foam squares (Scrapbook Adhesives)


Brilliant post Heather… I so agree with all you say!
The star tree is fabulous!
Chrissie
Both of these are brilliant! I love the star tree – such a fab rescue idea! Thank you. I do save mishaps and try and re-use them. xxx
I call my makeovers “Great Saves” and your star tree is the greatest!
Makes my heart sing!
This was such an extremely interesting post. I always enjoy reading about anyone’s “saves” for 2 reasons: (1)It encourages me to know I’m not the only one who messes up a card (2)I find it useful to get ideas about tips on saving a ?mistake? (opportunity?!). Both of these cards are very beautiful. Thanks for taking time to share your knowledge in this fashion. Happy wkend
I tend to save everything for potential later rehab; I just don’t get to the save portion frequently enough. My favourite is the crooked sentiment that gets a new sentiment layered over top. This save is much more creative than that! Both cards ended up perfect in their own ways.
fabulous!!!
Great save Heather!!!!
What a wonderful way to rework your original card, which had nice, embossed ink work! Love the star tree … very neat. Like that you used another pc of the org card to make your sentiment “tab” as well. THANKS Heather, for sharing this great b4 and after with us! 🙂
I already do something similar to this but it was fab to read your article and how you come at it in a different direction. I will have to remember your idea of using a punch and then displaying the pieces beautifully. Thank you so much Heather – you are a gem sharing how and why you work – not every crafter does that Karen x
I’m like Lindsey, I don’t throw any mishaps away. In the back of my mind, I think, I will use this in a pinch rather than starting a card from scratch. Or I can always make a mixed media type collage out of it. When I took the Insiders Online card class, I had quite a few start overs, but you know, things always look bad in the heat of the moment. When you let them rest and come back later, they don’t look nearly as bad. I will admit to the “butterfly fix”. LOL If I’m working with floral stamps, that is the remedy for an ink smudge or even an imperfection in the card stock. If you see butterflies, bees or birds with my Penny Black critter images, you can bet there was a boo boo underneath those bugs and birds! Fortunately it works, then all of the cards in that batch end up with some because the ones without the bugs look unbalanced. LOL My “name tag” designs often end up with extra stamps on them too, for ink smudges, and somehow it works and remains balanced looking. I have no formal training, so I just have to roll most of the time. I’m often in a hurry, flying by the seat of my pants, which is a potential situation for problems. Ink smudges happen in these hurried instances, where I don’t have time to start over, I turn to the only option available…ink pad direct to card stock technique and I swipe it all over the card. This really works best for Masculine cards, however I have done it live on film while filming my craft supply haul videos and it usually requires some extra stamping to bring it into a collage style look. For cooked sentiments, I do one of two things, I will restamp the sentiment onto the same color card stock and adhere it over the crooked one. Sometimes, I will just stamp another small image on the tail end of the sentiment to lift, lower or hug it, depending on how the sentiment was slanted.
Thanks for all that you do Heather. I love that you are realistic in your crafting and share those journeys. I am constanly in Awe of the Beautiful water colors you achieve with your stamps. These trees are gorgeous!
Hi Paulette,
Thanks for sharing some of your strategies for not leaving a card behind. It is always interesting to read about the techniques other stampers use. I particularly like the direct to cardstock idea; I think I’ve done that one myself a few times.
Very helpful posting Heather! You post such beautiful work that I thought you never made a mistake or botched up a card. I’ll now take a second look at some of my mistakes and try to get creative and save them. Thanks so much for all your postings, I greatly admire your work and save most of your postings for inspiration. So fortunate for me that I’ve found you and Penny Black!
I love your work so so much, your art is inspiring…. I am very happy to have find your blog😊
[…] you for all the feedback on my “No Card Left Behind” post; it was very interesting and helpful to read how other card makers deal with […]