
Flowers under the sea?
Posted: April 18, 2014 Filed under: CAS, Floral Tapestry | Tags: CAS, Penny Black stamps, Ranger Distress stains 12 Comments
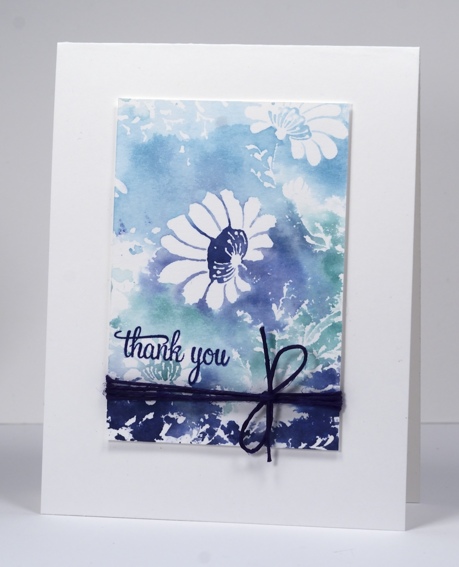
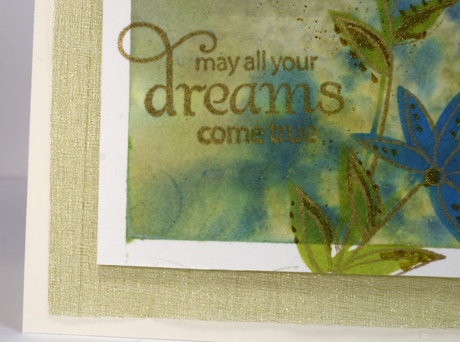
Even though these stamped panels are small they are from a much larger background stamp, Floral Tapestry from the new Bloom release. I used some distress stains on the whole stamp to create a panel (to be seen another day) then, because there was still plenty of stain on the stamp, spritzed it with water and stamped it again. These watery images are the result. When I look at the feathery plant it reminds me of a seaweed and, of course the colours are also nautical, so it could almost be an under sea scene.
I think I might have a new favourite ink colour. Chipped Sapphire distress stain is the dark blue in these panels and it is quite lovely. Expect to see more of it! The colours happen to be three of the colour choices for the current Mod Squad Challenge so I will link it up over there.
Thanks for dropping by.
Supplies:
Stamps: Floral Tapestry, In my Thoughts , Special Wishes (PB)
Inks: Versafine Majestic Blue (Tsukineko) Chipped Sapphire, Evergreen Bough, Broken China Distress Stains (Ranger)
Cardstock: Classic Crest Solar White 110lb smooth ( Neenah)
Also: Purple hemp twine
Jubilant
Posted: April 9, 2014 Filed under: CAS, Jubilant | Tags: Fabriano Watercolour Paper, Penny Black stamps, Ranger Distress stains 14 Comments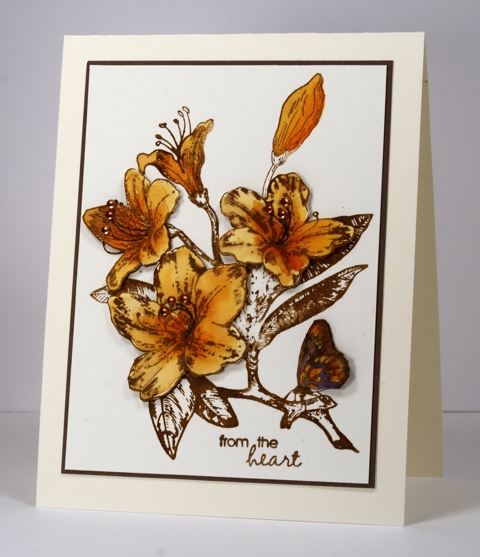
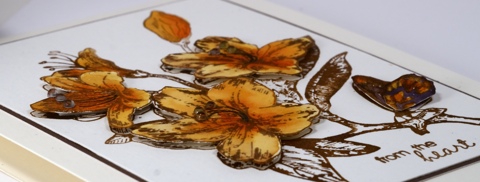
I think this is the first time this gorgeous stamp has appeared on my blog. I inked it up ages ago and had the simple dark brown image sitting around waiting for further inspiration. Because I inked the stamp with distress stain the ink pooled in some areas of the stamp more than others. I really like the effect of darker and lighter tones along with thicker and thinner lines so initially I didn’t want to add colour to the image. I eventually decided to colour a few flowers, cut them out and pop them up. I have said before I am not a fussy cutter, these three relatively simple blooms were enough for me. As if the fussy cutting wasn’t enough of a surprise I also decided to add half pearls which I coloured to match with an alcohol marker!
Supplies:
Stamps: Jubilant, Every Happiness (PB)
Inks: Memento Espresso Truffle Marker (Tsukineko) Vintage Photo, Spiced Marmalade, Dusty Concord Distress Stains (Ranger) Brown Marker TN8 (Spectrum Noir)
Cardstock: Fabriano 25% cotton hot pressed watercolour paper, Sticks & Stones Mix & Match Paper
Also: Keepsakes Memories half pearls
Delightful & Verdant
Posted: April 6, 2014 Filed under: Delightful, Verdant | Tags: Fabriano Watercolour Paper, Penny Black stamps, Penny Black stencils, Ranger Distress stains, Tsukineko Radiant Neon inks 6 Comments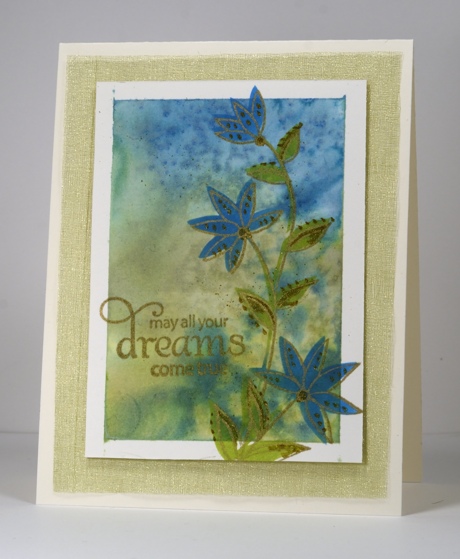
I’ve been having fun playing with background techniques lately. This one was done on wet watercolour paper with distress stains. After taping the panel down to a craft mat I wet the whole panel then painted three colours of distress stain across it in horizontal stripes. Next I spritzed some water and tilted it to let the colours and water blend. (Related tangent: When I first bought distress stains I was a little annoyed that the sponge applicator didn’t come off to allow me to access the stain. I tried to force it but I could just see myself ending up with stain all over my project, desk and clothing so I gave up. Yesterday I learned that you can in fact take the sponge applicator off without disastrous consequences. See video here.) I removed the sponge applicator from the Broken China stain and not only flicked some stain on the panel with a paintbrush, but also used the applicator which was covered in ink to stamp some circles. To finish I sprinkled salt on the panel and let it dry.
When it was dry I brushed the salt off to reveal the speckled effect and positioned the Verdant stencil for sponging with Radiant Neon Electric Blue and Memento Luxe Pear Tart. After I had sponged I stamped the co-ordinating stamp “Delightful” in Encore Gold ink and added some gold wink of stella dots and highlights also. Photos don’t always pick up the sparkle so trust me it does have some. Deciding how to mat it was tricky but I pulled out some wide organza ribbon which was originally around a bunch of flowers and cut some to fit the card base. I was getting ready to photograph the card when I remembered that you can do the ‘ink flicky thing’ with wink of stella pens…
Supplies:
Stamps: Delightful, Sweet Wishes (PB)
Stencils: Verdant (PB)
Inks: Memento Luxe Pear Tart, Radiant Neon Electric Blue & Encore Gold (Tsukineko)
Stains: Broken China, Bundled Sage, Peeled Paint
Paper: Fabriano 100% cotton hot pressed watercolour paper
Also: Organza ribbon, Gold Wink of Stella pen
Dusty Pink Poppies
Posted: April 1, 2014 Filed under: Blooming Garden, Field of Dreams | Tags: Faber-Castell Albrecht Durer Watercolour pencils, Penny Black creative dies, Penny Black stamps, Ranger Distress stains, Tsukineko Memento inks 5 Comments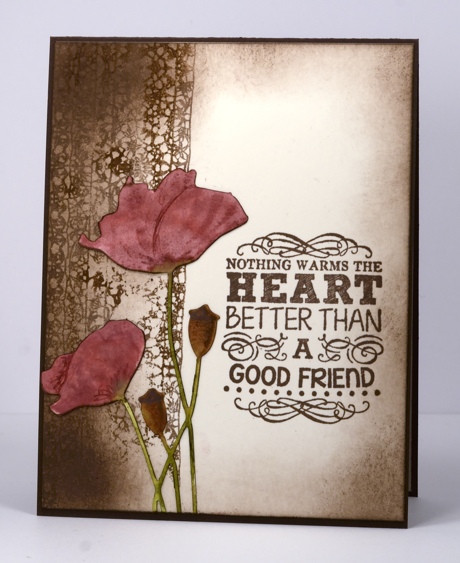
I have poppies for you again today, in pink. The only poppies in my garden are orange; they are quite cheery and bright but the lady down the road has dusty pink poppies which appeal more to me. I cut out the poppies with the Field of Dreams die then coloured them with distress stains. I added some watercolour pencil as they were drying and finished them by stamping parts of the co-ordinating stamp from Blooming Garden to add a little shape and shading. Before sticking them on the card front I ran a rich cocoa marker around all the edges. The left hand border is from the Lace Edgings set and is stamped in a mix of memento rich cocoa and vintage photo distress stain.
Thank you for all your lovely comments about my simple watercolour card. I enjoyed reading them all and was interested in the suggestions for making subtle additions. It was a simple card to make and I did the watercolouring while watching tv so I might remake it and try a little embellishing just for the fun of it.
Supplies:
Stamps: Blooming Garden, Truly Great, Lace Edgings (PB)
Pencils: Albrecht Durer Watercolour pencils Vandyke Brown 176, Medium Flesh 131 (Faber-Castell)
Inks: Memento Rich Cocoa (Tsukineko) Vintage Photo, Peeled Paint & Victorian Velvet distress stains (Ranger)
Creative Dies: Field of Dreams (PB)
Cardstock: Fabriano 100% cotton hot pressed watercolour paper
Watercolour background
Posted: March 24, 2014 Filed under: Delicate Florals, Watercolour | Tags: Fabriano Watercolour Paper, Penny Black stamps, Ranger Distress stains 15 Comments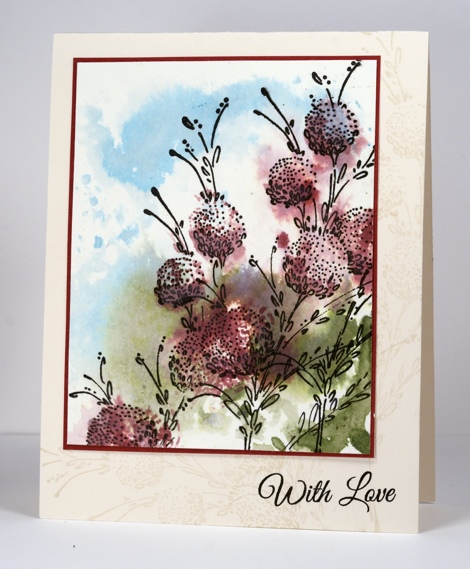
The background was the starting point for this card. I squeezed three colours of distress stain directly onto an acrylic block then pressed the block onto watercolour paper creating a pink, blue and green abstract background. Next I chose the stamp from Delicate Florals and stamped it in a couple of stages. First I inked only the blooms with Victorian Velvet distress stain and stamped them a couple of times. When the paper was dry I inked the whole stamp with versafine onyx black and stamped over the pink blooms. I inked in black again but selectively to stamp parts of a second spray of flowers on the left.
On the card base I stamped the same image a few more times in VersamagicWheat chalk ink.
Drop in on the Penny Black blog this week to enjoy the “How-to Hop” featuring the new large scale stamps and co-ordinating stencils. I will be sharing a card and tutorial mid-week.
Thanks for dropping by.
Supplies:
Stamps: Delicate Florals, Special Wishes (PB)
Inks: Versafine Onyx Black & Versamagic Wheat (Tsukineko) Victorian Velvet, Tumbled Glass, Bundled Sage Distress Stains (Ranger)
Cardstock: Fabriano 100% cotton hot pressed watercolour paper
Gathering Together
Posted: March 20, 2014 Filed under: Gathering Together, Twirls | Tags: Penny Black stamps, Ranger Distress stains, Tsukineko Memento inks 17 Comments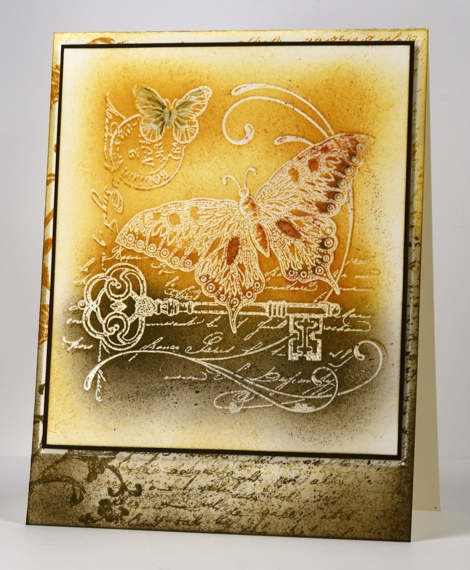
I used the emboss resist technique to add my warm tones to this collage image from Penny Black. After embossing the image in clear e.p. I stamped the same image over the top with Wild Honey distress ink to give a slight shadow. I sponged Wild Honey over the top two-thirds of the image and walnut stain distress ink over the lower third. I then used watercolour pencils to add some details to the butterflies’ wings. To create the background on the card base I inked the Letter Background stamp with the same two distress inks then stamped it several times to one side of the card base. On the other side I stamped the flourish from “Twirls” also in two colours. Before sponging over the background I positioned a mask which was slightly larger than the matted panel to be added later. This way I ended up with a pale border around the popped up matted panel.
Enjoy your day.
Supplies:
Stamps: Gathering Together, Letter Background, Twirls (PB)
Inks: Memento Espresso Truffle & Versamark (Tsukineko) Distress Wild Honey & Walnut Stain (Ranger)
Pencils: Albrecht Durer Sepia & Venetian Red(Faber-Castell)
Also: Clear Embossing Powder
May Arts Creative Collaboration
Posted: March 14, 2014 Filed under: Chat Bubbles, Hollyhocks, Love Expressions, Poppy Pattern, Promise Me, Tagged | Tags: Fabriano Watercolour Paper, May Arts ribbon, Penny Black creative dies, Penny Black stamps, Ranger Distress stains, Tsukineko Memento inks 15 Comments
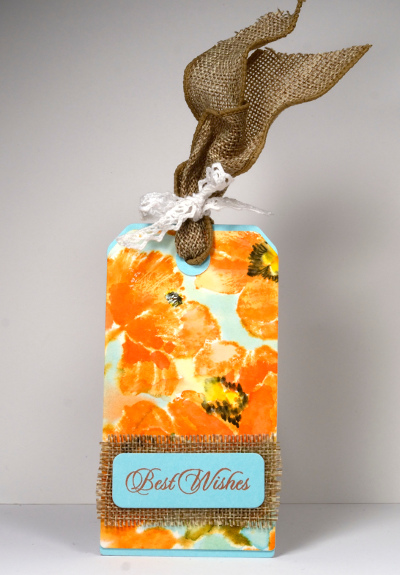
Penny Black and May Arts have been collaborating all week and today is my turn to show how easy it is to pair ribbons with stamping. I decided to make a few tags but if you are looking for more ideas check out both the Penny Black blog and the May Arts blog for all sorts of creative projects. (Instead of listing the supplies at the end of the post I have linked to them in the descriptions)
On both the tulip tag above and the poppy tag below I stamped Memento inks onto wet watercolour paper causing the colours to bleed and blend. When the paper dried a little I added foreground tulips or in the case of the poppies centre details and a blue distress stain background. As watercolour paper is rarely pure white I dyed the white cotton lace ribbon from May Arts in tea to give it a natural off white colour. The tulip tag features luxurious velvet ribbon from May Arts tied with a bow of crochet trim ribbon . The stamps are Promise Me and Special Wishes.
I used a different crochet trim ribbon to tie the versatile Faux Burlap Wired Ribbon on the poppy tag. I left the wire in the edges of the ribbon at the top of the tag so I could shape wavy edges then cut a little mat for my sentiment out of the burlap. The stamps used are Poppy Pattern and Special Wishes.
To create the Hollyhocks tag below I stamped, coloured the tiny tag and dyed the crochet trim with Victorian Velvet distress stain. I used the Hollyhocks stamp as my main image, a little bit of a sentiment from the Eloquence set on the tiny tag and the Hugs diecut from the Love Expressions set. I cut both the tiny tag and the lower rectangle using dies from the Chat Bubbles set. All large tags were cut using the large tag die from the Tagged set

Watercolouring the Lily
Posted: February 20, 2014 Filed under: Every Happiness, First Dance, Twirls, Watercolour | Tags: Fabriano Watercolour Paper, Penny Black stamps, Ranger Distress stains, Tsukineko Memento inks 10 CommentsAll this week on the Penny Black blog you can check out the designers’ favourites from the new Happy Everything collection. It will come as no surprise that I chose a brushstroke stamp that lends itself to the watercolour technique.
To create the pink card below I inked the ‘First Dance’ lily with a combination of distress ink and memento markers then stamped onto dry watercolour paper. I created a mask to cover the centre lily then stamped another lily on either side. With three lilies in a row I spritzed the panel with water and let the dark and light pinks blend a little. I used memento markers to draw over the stamen and stems and to redo the dots on the petals. To finish I picked up with a paintbrush a little diluted pink ink to paint around the top edges of the panel and some green around the bottom.
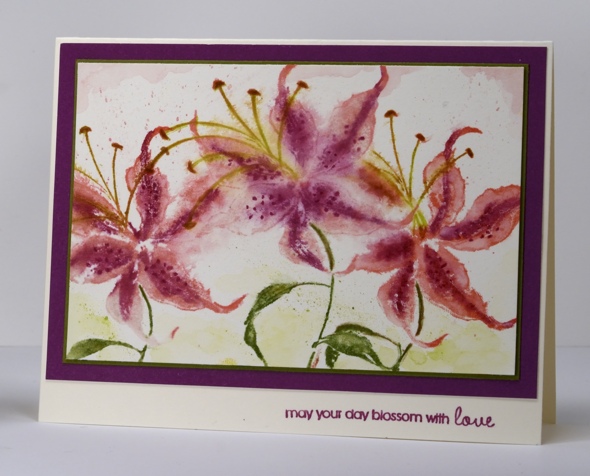
Supplies:
Stamps: First Dance, Every Happiness (PB)
Inks: Memento Bamboo Leaves, Lilac Posies, Angel Pink, Potter’s Clay, Pear Tart (Tsukineko) Worn Lipstcik Distress Ink (Ranger)
Cardstock: Fabriano 100% cotton hot pressed watercolour paper, Penny Black mix & match Fuschia Fantasies paper
The yellow and green lily below was created using the wet into wet technique. It is most apparent where the ink has bled from the stem and leaves. It also bled from the petals (Memento Dandelion) making them quite pale so I used Mustard Seed distress stain to paint over them and intensify their colour. The background panel is stamped with one of the new ‘Twirls’ border stamps.
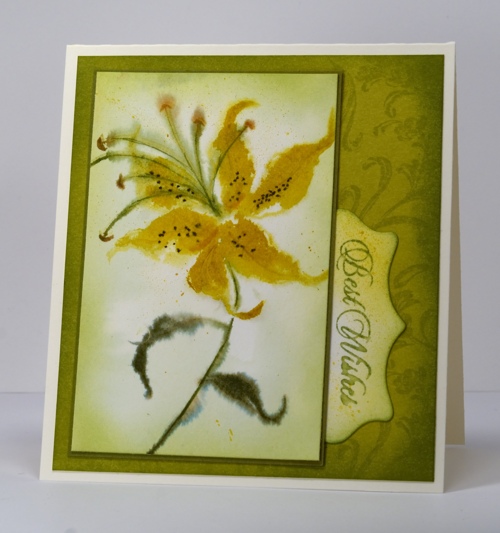
Supplies:
Stamps: First Dance, Special Wishes (PB)
Inks: Memento Dandelion, Potter’s Clay, Espresso Truffle, Pear Tart, Bamboo leaves (Tsukineko)
Distress Stains: Mustard Seed(Ranger)
Creative Dies: Feather & Frames
Cardstock: Fabriano 100% cotton hot pressed watercolour paper, Penny Black mix & match Olive Grove
Ski slopes
Posted: February 17, 2014 Filed under: Christmas Park, Tutorial, Watercolour | Tags: CAS, Penny Black stamps, Ranger Distress stains, Tsukineko Memento inks 19 Comments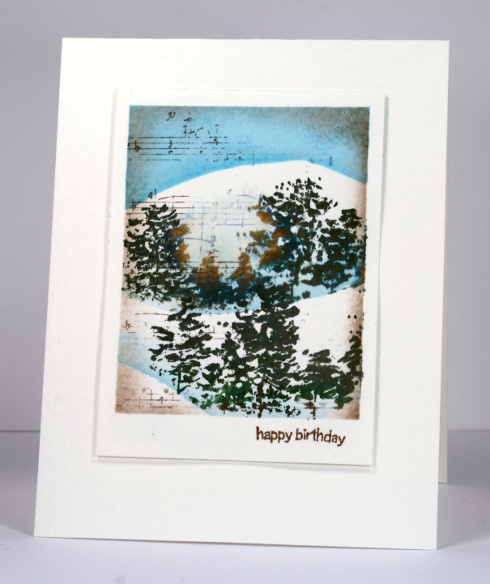
It is my husband, Andrew’s birthday today and this is the card I made for him. Now that he has opened it I can publish it here. I actually made it two days ahead which is a bit of a record for me. I hate to say it but I often make my family’s cards late the night before or even the morning of the birthday. He has been enjoying skiing in Gatineau Park this winter so I attempted a few ski slopes with a little music motif as well because he is also a musician. The plan is to go skiing today after a family breakfast and then tonight our family will attend the Ottawa Symphony concert where our elder daughter is playing.
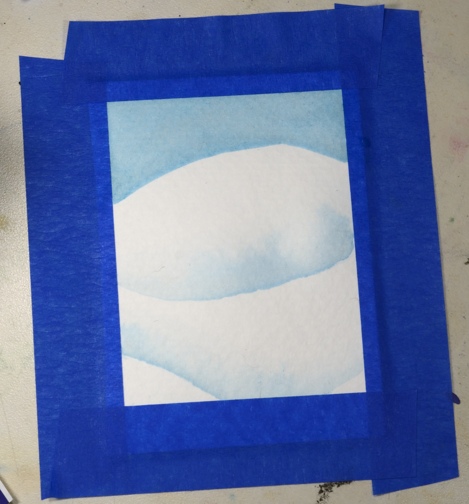
Not only did I make the card ahead of time I remembered to take photos along the way. For a change I used cold pressed watercolour paper. It is more textured so the ink pools in the ‘dents’ a little. I taped a piece to my work table then painted Tumbled Glass distress ink onto the sky area. I painted several layers for a strong colour then painted two snow bank shadows by painting the ink on in a curved line then immediately blending water into the ink to dilute and spread it up the panel.
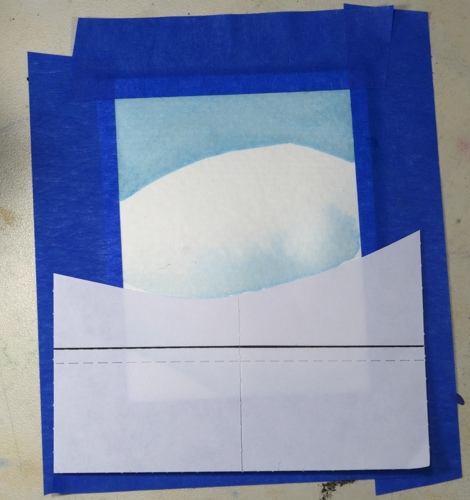
Next I cut a mask to match the top snow bank so I could stamp trees above it.
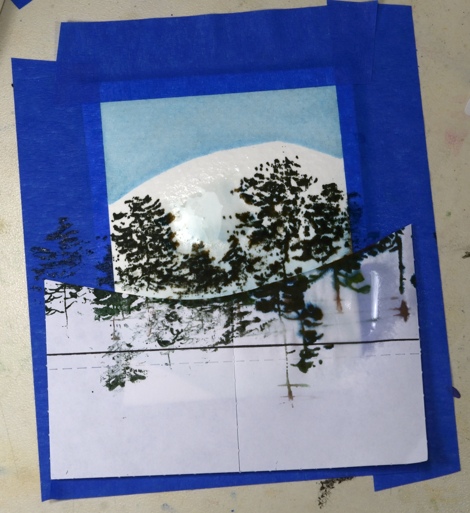
I inked the stamp with two greens, spritzed it with water then stamped it over the mask. I spritzed some water onto the panel to make the colour bleed a little
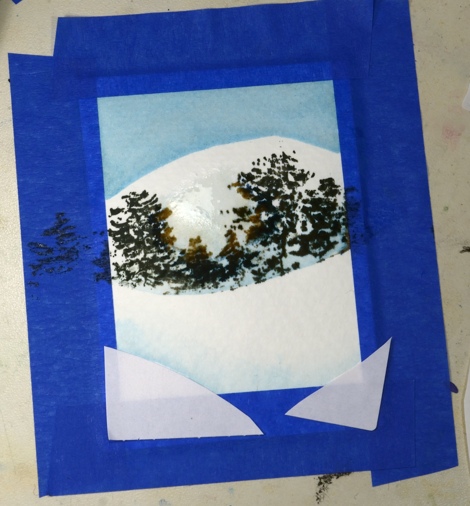
Before stamping trees on the next slope I masked the two lower banks to keep them white.
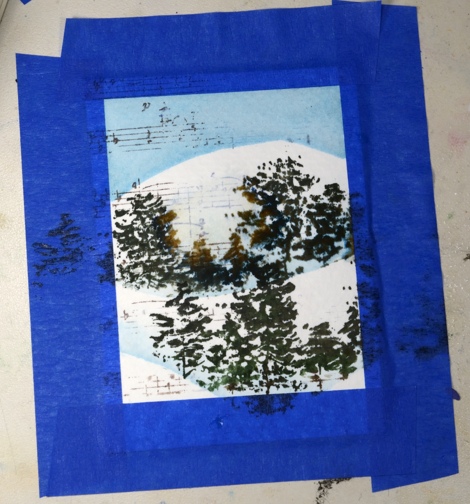
I inked the music background stamp in brown, wiped some of the ink off, stamped on scrap then stamped onto the watercolour panel.
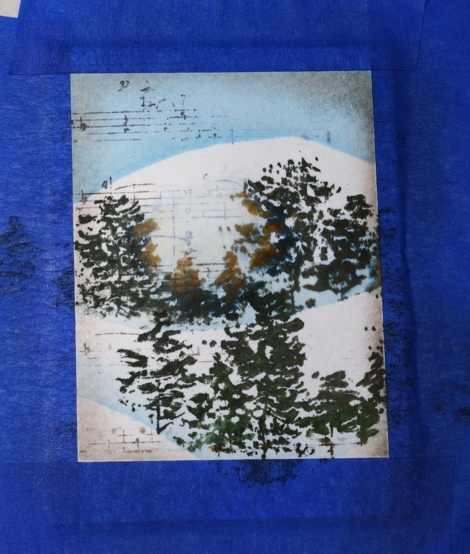
To complete the panel I sponged some brown around the edges. When I removed the painter’s tape I remembered I had left more blank space at the bottom which made it look a little like a polaroid. On the rare occasions I do go skiing I usually wish I had my camera with me to capture the beauty but it is too heavy and my skiing style too unstable to take the risk of carrying it with me.
Supplies:
Stamps: Christmas Park, Summer Fun (PB)
Inks: Memento Cottage Ivy, Northern Pine, Rich Cocoa (Tsukineko)
Distress Stains: Tumbled Glass
Cardstock: Strathmore 140lb cold pressed watercolour paper
Warm toned collage
Posted: February 8, 2014 Filed under: Cupcake Day, Fancy Flourish, Twirls | Tags: Penny Black creative dies, Penny Black stamps, Ranger Distress stains, Tsukineko Memento inks 15 Comments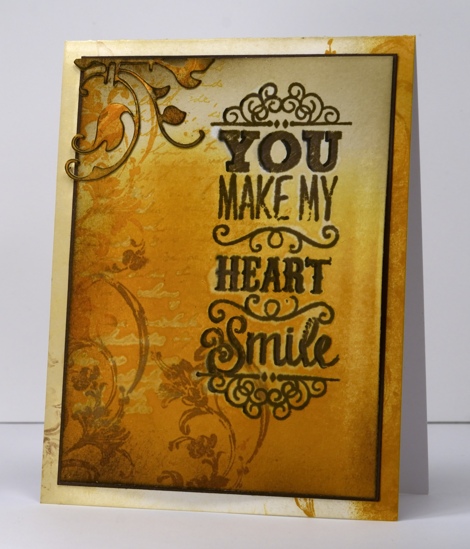
I am not quite sure what style this card would be. Perhaps Vintage floral grunge with a side of chalkboard?? I had fun layering colour, particularly a few yummy sounding distress inks. I don’t have many distress inks but I surprised myself in realising that spiced marmalade is currently my favourite. I rarely reach for orange inks, or orange anything really, but the spiced marmalade is just so rich and bright and happy and yes, yummy. And that wild honey sounds nice too.
I brayered Antique Linen and Wild Honey on the cream panel as a base. Next I added some text inked with Spiced Marmalade and spritzed with water in a couple of places. On the left side and in the corner of the panel I stamped the flourish strip from the Twirls set. I chose one of the new chalkboard style sentiments which I stamped in water first to create some watermarks then brown ink. When dry I used a marker to add black shadowing down the left hand side of some of the letters. To complete the panel I used the same inks to colour and stamp a scrap of card out of which I die cut the fancy flourish. I matted the panel in dark brown then added some stamping and sponging to the card base.
Thanks for all the lovely comments you left on my watercolour florals this week both here and on the PB blog. It is a thrill to get such positive feedback on my designs and the wonderful new stamps.
Supplies:
Stamps: Cupcake Day , Twirls , Letter background(PB)Inks: Memento Espresso Truffle (Tsukineko) & DistressWalnut Stain, Antique Linen, Wild Honey
Distress Stains: Spiced Marmalade, Vintage Photo (Ranger)
Creative Dies: Fancy Flourish


