
Moving Alcohol Inks with Air – Video
Posted: February 3, 2021 Filed under: Alcohol Ink, Brutus Monroe, CAS, Dies, grafix, light as a feather, nesting squares, Penny Black, polar bears, Tutorial, Waffle Flower | Tags: grafix, grafix craft plastic, Penny Black creative dies, Penny Black stamps, pinata alcohol ink, Ranger Alcohol Ink, Tutorial, video 16 Comments
I’ve had the alcohol inks out recently and spent some time trying to get soft wavy patterns on craft plastic. I have seen several artists who do this technique beautifully but I am very much still a beginner with it. I have a few cards to share today along with a video showing my process for two of the panels. I worked on white craft plastic from Grafix which is heavyweight and totally opaque. For most of the panels featured today I used only two alcohol inks plus plenty of 99% rubbing alcohol; each panel was created with a metallic and a non-metallic ink.
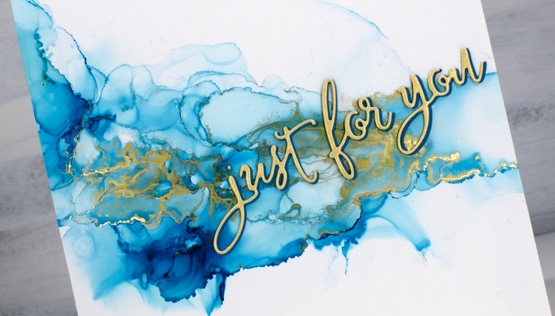
This first panel was made with turquoise AI and gilded alloy AI; I love the range of blues when diluted with rubbing alcohol. The ‘for you’ Penny Black die cut is two layers of turquoise cardstock topped with one layer of pale gold.
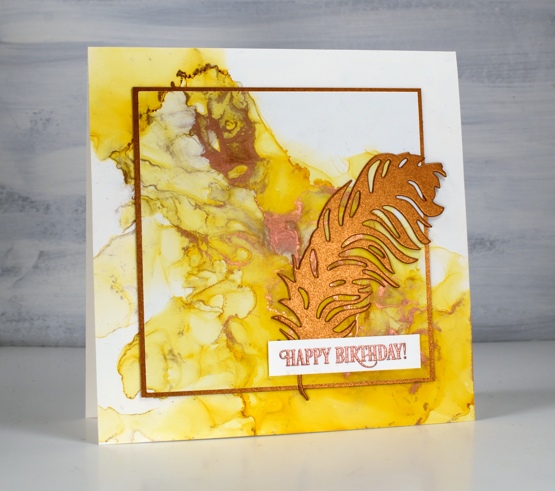
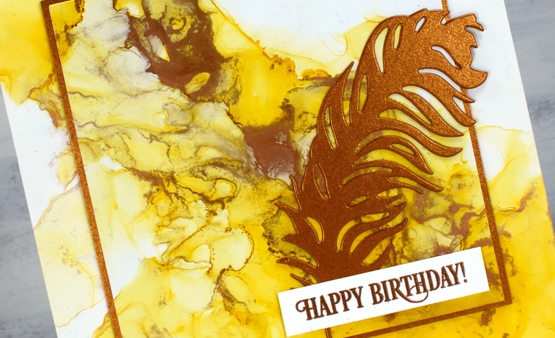
This warm toned card was made with honeycomb AI and mined alloy AI then die cut with a WaffleFlower square nesting die. I used the WaffleFlower additional square dies to cut a larger copper square then added the PB ‘light as a feather’ die cut and a PB birthday sentiment embossed in Brutus Monroe penny embossing powder.
You can see the process for both cards above in the video below.
As I am working on alcohol ink panels I am evaluating my process and working out what I want to try next. I just bought a cheap lazy susan to work on the blown flowers and I’m pretty sure I don’t need to use as much coloured ink when I make the initial drops. You can be sure I will let you know what I discover.
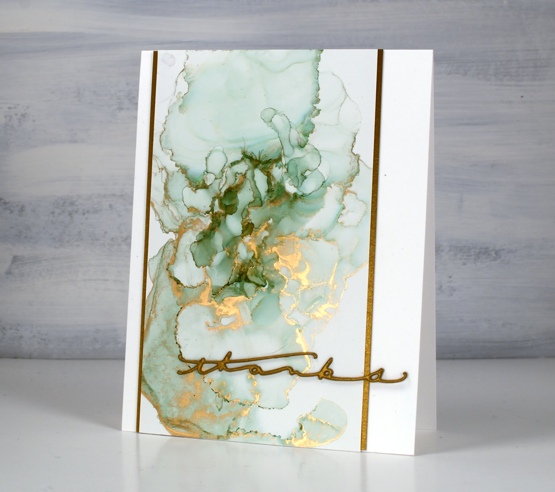
I have a couple more cards made off camera using the same technique shown in the video. The card above features juniper AI and statue alloy AI with the PB ‘many thanks’ die cut from antique gold cardstock and stacked twice.
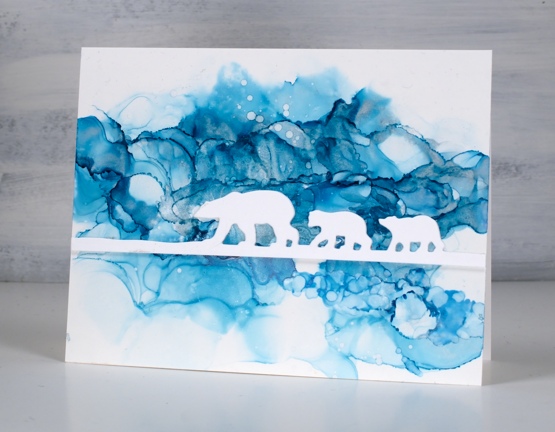
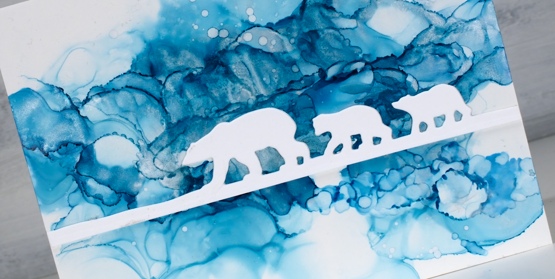
When this panel was finished it reminded me of photos of the artic and far north where the icebergs and glaciers are made up of beautiful shades of blue. It’s kind of a cross section perspective where we can see below and above the ice the bears are walking on. I did use two blue inks plus a silver for this one, ranger turquoise and stream with pinata silver. The bear die is ‘polar bears’ from Penny Black.
We’ve been watching Cecilia Blomdahl’s youtube channel about her life on Svalbard, an island off the north coast of Norway. She lives in the world’s northern most town. Polar bears are definitely around so you don’t wander outside the village without your weapon!
Supplies
(Compensated affiliate links used when possible)


These cards turned out beautiful. I’ve done this before but think I used to many colors. Will try it your way. Love how they turned out. And like the idea of not covering the whole card. Thanks.
Stunning results Heather and love the AI colours. I have tried using a straw to blow the air but I think this type air puffer is much better. The fine tip bottle for the blending solution looks good too, it isn’t on the list but probably won’t be available in UK anyway. Will have to look on line. x
Hi Pat, thanks so much. I have used a straw many times too but I usually end up with a headache! The bottle is from FINELINE and is called a fine tip applicator. I bought it empty and then filled it with rubbing alcohol. I bought mine from a local scrapbooking store.
these are just beautiful!
Heather, what is the alcohol dropper you are using? I cannot seem to find anything on Ranger sites. Thank you.
>
Hi Denise, the bottle is called a fine tip applicator from FINELINE. I bought it empty and filled it with rubbing alcohol. I bought mine from a local scrapbooking store but I can see them on amazon and dickblick as well.
Four beautiful cards, Heather! I love the movement of the inks and the alloys add wonderful shine!
Love your compositions achieved with the AIs…did you notice any difference between the craft plastic and yupo? I recently purchased the new Tim Holtz blower tool after making myself literally sick using a straw when preparing examples for an AI demo! (I kept ‘sucking air in while hovering over the project…duh!) ☺ Love the tip of using the Fineline to apply the alcohol! Thank you for the video tutorial, Heather. ♥
Hi Clelie, the craft plastic and the yupo are quite similar. I haven’t done any side by side comparisons yet but I think the ink moves a bit faster on the yupo and cleans off better on the craft plastic. I too have used a straw to blow the ink around and have ended up with headaches most times!
Fabulous video Heather!! Thank you! Four gorgeous cards using your technique. Each as beautiful as the next. xx
These are all so beautiful! Definitely a fun technique! I have an ink blower but haven’t perfected my technique yet, lol! Maybe one day! Love your videos!
Beautiful results with alcohol inks and great cards
[…] week I posted a video showing my method for abstract alcohol ink backgrounds. This week’s video is less abstract. […]
Great effects, Heather and lots of wonderful helpful hints! I’ll use a fineline bottle for my alcohol as it allows a lovely control! I will get my AI out this weekend to play! It’s been too long!! Thanks! 🙂
I Love all 4 of your beautiful finished cards using your alcohol inks and metallic inks, Heather. I tend to use alcohol inks occasionally and always end up with a stack of backgrounds to use in the future. TFS your beauties and tips. Hugs…Nancy
I learned so much from this video and love your cards. I have been trying to achieve a look like what you’ve done, and always wind up with way too much alcohol ink. I will trying adding the alcohol to the outside of the ink for better control. Thank you for sharing!