
Central Park in snow & masking fluid questions answered
Posted: November 6, 2014 Filed under: City lights, Prancers, Skyline, Stamped Landscapes, Tutorial | Tags: Fabriano Watercolour Paper, Penny Black stamps 16 Comments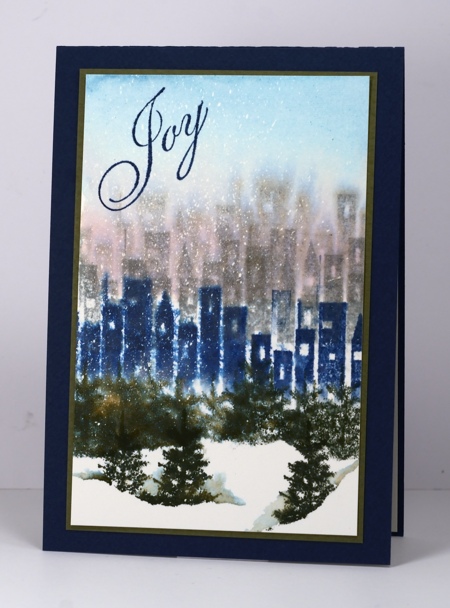
Last week I posted a very snowy card and received several questions about using masking fluid. I decided to make a short video showing my set up for flicking masking fluid. Masking fluid isn’t just for flicking, of course, but you could be excused for thinking that when you see how rarely I do anything else with it!
I included the card above because it shows snow created after flicking a generous amount of masking fluid on a piece of watercolour paper. It is actually the piece I flicked in the video. I painted over the masking fluid with a blue and a pink distress stain (listed below) and then while the paper was still damp stamped the Skyline stamp in grey a few times then blue. I once again used the little tree from the Prancers set in the foreground. I cut the large sentiment from Yuletide Greetings into two pieces and stamped the front and the inside of the card.

Some answers to your questions about masking fluid
What is masking fluid?
A non-staining liquid composed of rubber latex for masking areas of work needing protection when colour is applied over the top
What type do you use?
Winsor & Newton non permanent masking fluid with a slight yellow tint. The yellow tint makes it easier to see where it has been applied. This is probably more useful when carefully painting the masking fluid onto a project rather than flicking it with careless abandon!
Are all brands the same?
I have used the Winsor & Newton brand for years and cannot comment on other brands. I think the key is to make sure you buy non permanent because you want to remove it after all your stamping/sponging/painting is completed.
Where do I find masking fluid?
Masking fluid is an art supply often used by watercolour artsists so you can find it in art supply stores, usually with the watercolour supplies.
How do you remove masking fluid without ripping the paper?
I must admit I haven’t had too many instances of masking fluid ripping my paper. The spots from splattering are small and rub off very easily. Sometimes with larger dots or sections it is harder to remove the masking fluid. If you are painting a larger area do a test on your paper first to make sure you can remove the masking fluid successfully. I always use my fingers to rub it off but you can use a clean soft eraser.
The video I have created shows how I splatter panels for projects such as the one above. Hopefully some of your questions will be answered once you have watched my process.
Supplies:
Stamps: City Lights, Prancers, Season’s Wishes (PB)
Inks: Memento Nautical Blue, London Fog, Northern Pine (Imagine Craft/Tsukineko) Victorian Velvet, Broken China distress stains(Ranger)
Cardstock: Neenah Solar White 110lb cardstock, Fabriano 100% cotton hot-pressed watercolour paper, textured blue cardstock, textured green cardstock, linen textured paper
Also: Winsor & Newton masking fluid, Kemper Spatter brush
By the lake
Posted: October 27, 2014 Filed under: CAS, Stamped Landscapes, Watercolour 17 Comments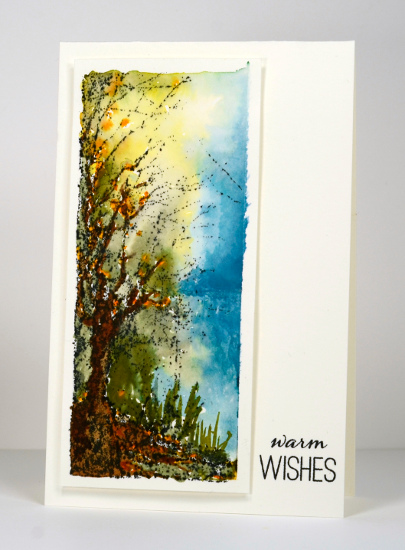
I did a little watercolour painting today with a stamped image as my starting point. The image was stamped on a piece of acetate so I could work out the positioning for another card panel I was creating. I decided to stamp the acetate onto a scrap of watercolour paper I had lying around. Can you guess which stamp I used from the new Penny Black “Winter Wonderland” release? My image is of course a mirror image as it was stamped from the acetate. It is also a patchy imprint because the ink beaded on the plastic and did not transfer a complete image onto the watercolour paper. I ended up using half the stamped image, masking off the side which is now blue.
Looking at the incomplete imprint I could see a tree with spreading roots so I started by painting the trunk, branches and roots. I used distress stains, keeping them intense in some areas and blending in other places with extra water. I decided to keep the card base tall and thin like the panel and was in two minds whether to add a sentiment or not. I ended up choosing a little sentiment which helped complete a visual triangle with the rest of the black stamping.
Supplies:
Stamps:Woodland Wonder, Joy Filled (PB)
Inks: Broken China, Vintage photo, Mustard seed, Spiced Marmalade, Bundled Sage, Peeled Paint distress stains (Ranger) & Memento Tuxedo Black ink (Tsukineko)
Cardstock: Fabriano 25% cotton hot pressed watercolour paper
Moonlit Forest
Posted: October 20, 2014 Filed under: Nature's Friend, No Card Left Behind, Stamped Landscapes | Tags: Fabriano Watercolour Paper, Penny Black stamps, Ranger Distress stains 16 Comments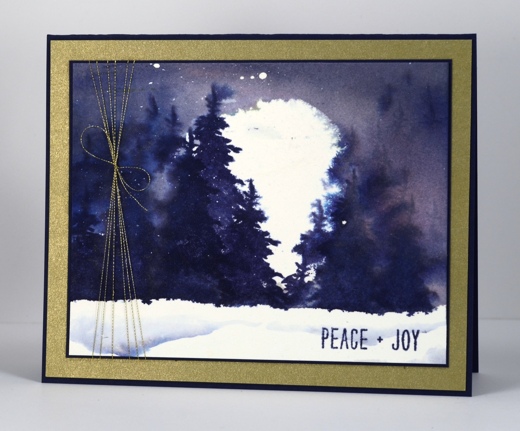
As you can see I am still creating super moons! This time the moon is lighting up a snowy pass through the forest. I have only skied by moonlight once. It was beautiful, cold, but beautiful. This scene reminds me of that moonlit ski because there seems to be a pass between the trees. When I went the moon was nowhere near as big as the one above but it gave us enough light that we could see the trails without headlamps most of the time.
The moon for this panel was masked with frisket film but I have discovered that, for watercolouring, low tack film does not do the trick like extra tack frisket film. I have tried both now and extra tack seals better without damaging the paper. The brand I have tried is Grafix; I am sure there are other brands available but I was able to order both low tack and extra tack from DeSerres. I positioned the large moon mask on watercolour paper that already had some masking fluid flicked over it. I also placed a frisket mask across the bottom of the panel to cover the snowy foreground. I painted Victorian Velvet and Chipped Sapphire distress stains over the whole sky area and spritzed pearl-ex spray (interference gold) over the panel to blend the colours. When I peeled off the moon mask I discovered some of the stain had seeped under the mask (low tack frisket film) so the moon was no longer a circle. I decided to keep going regardless of my wonky moon and stamp the trees to reveal only part of the moon. The tree is from the “Nature’s Friend” set and is a solid silhouette. As you can see the trees are sharper over the moon area, which was dry, and more blended and watery where the paper was damp from the stain and spray. I inked just the top of the tree with a paint brush to stamp the shadowy tops of trees in the distance.
In the foreground I painted a couple of lines of stain then blended with water to make the colour fade out. I wish you could see the shimmery sheen from the pearl-ex spray over the whole sky and tree area. It is really rather pretty and has a gold tint which is why I chose a gold mat and thread to finish the card. The simple sentiment is from the same set as the tree.
Supplies:
Stamps: Nature’s Friend (PB)
Inks: Victorian Velvet, Chipped Sapphire distress stains & Chipped Sapphire distress ink (Ranger)
Cardstock: Navy Cardstock, Gold cardstock, Fabriano 100% cotton hot pressed watercolour paper
Also: Grafix frisket film, Winsor & Newton masking fluid, scanfil metallic gold thread, Interference gold Pearl-ex powder mixed with water to make a spray.
Harvest Moon
Posted: October 16, 2014 Filed under: Etched Branches, Nature's Gifts, No Card Left Behind, Stamped Landscapes, Watercolour | Tags: Fabriano Watercolour Paper, Penny Black stamps, Ranger Distress stains 17 Comments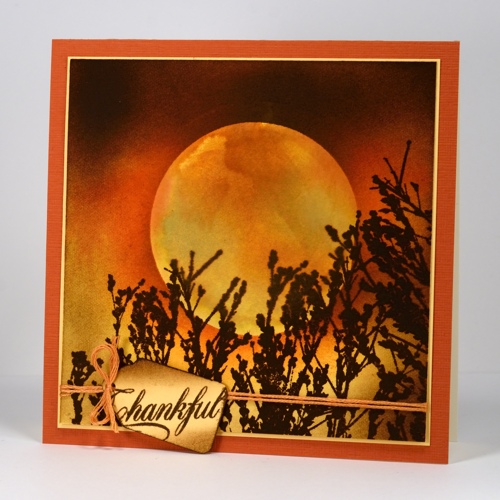
The lovely foliage stamps in the new Penny Black release are perfect for creating stamped landscapes. There are some new transparent sets as well as a couple of slapstick cling stamps that I will use winter, spring, summer and fall. Both these cards are very simple in design using only one foliage stamp to suggest the landscape.
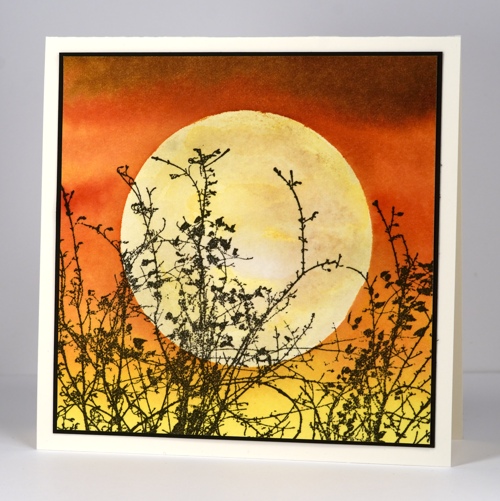
The card above was a “no card left behind” project as it didn’t go quite as planned. I decided to paint a watercolour moon inside a negative mask cut from frisket film. The aperture was wider than the moon you see above. After I had painted the moon in golden orange distress stains I dried it completely (or so I thought). I swapped the negative mask covering the moon for the circle mask which left the rest of the sky to be painted in darker tones. When I started painting the darker distress stains onto the paper the colours seeped in under the mask. They didn’t spread over the whole moon just around the edges. When I removed the mask it did not look like a realistic moon any more. To save my scene I cut a smaller moon mask, stuck that over the watermarked moon then sponged a darker sky around it to cover the seepage. I finished the scene by stamping the branches from “Nature’s Gifts” several times across the bottom and tying on a little tag.
Having learnt from experience I placed the mask on dry unpainted watercolour paper for the panel below. I painted the sky with distress stains and there was no seepage. (I will do more experimenting with the frisket film and let you know what I discover) When I removed the mask the moon was too white and flat so I painted and sponged some pale yellow and brown ink around it until it looked more realistic. I stamped the gorgeous etched branches across the base in black to complete my scene.
Both cards are around 5 inches square so I have been having fun with a friend’s envelope maker making custom envelopes out of pretty designer paper in my stash from long ago.
These cards make me think of one of my favourite songs, Helpless, by Neil Young. It’s the line, Yellow moon on the rise that keeps popping into my head. I have liked that song for many years. Little did I know as a teenager back in Australia I would one day live in Ontario (also mentioned in the song) and see Neil Young in concert twice. Do you ever get inspired by songs or performers? I know Ardyth has a thing for David Bowie but I’m definitely more of a Neil Young girl!
Supplies
Stamps: Natures Gifts, Etched Branches, Special Wishes (PB)
Inks: Ripe Persimmon, Spiced Marmalade, Mustard seed, Vintage Photo, Antique Linen distress stains & Wild Honey, Spiced Marmalade, Vintage Photo, Black Soot distress inks(Ranger)
Cardstock: Neenah Natural White 110lb, Fabriano 100% cotton hot pressed watercolour paper, rust cardstock
Square snowscape
Posted: October 6, 2014 Filed under: Prancers, Stamped Landscapes | Tags: Penny Black stamps, Tsukineko Memento inks 15 Comments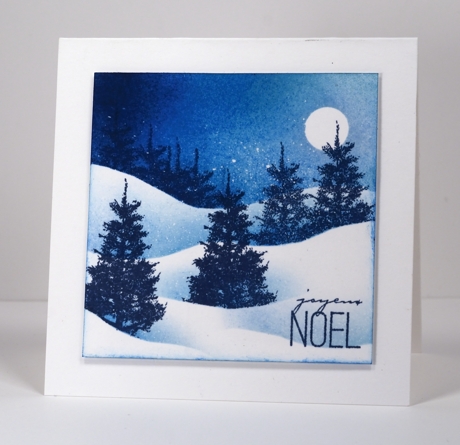
I don’t create many square cards but the symmetry can be very pleasing. I made this little snow scape on a scrap of cardstock which I had previously splattered with masking fluid. The panel was Neenah solar white cardstock not watercolour paper so I refrained from watercolouring and created my night sky and snowy hills and gullies by sponging instead.
I cut a post-it mask for the horizon and punched a little circle mask for the moon then sponged both summer sky and nautical blue memento inks across the sky. Before removing the horizon mask I stamped a row of trees on the left hand side. I cut and positioned a different mask, stamped a couple more trees and then sponged over the edge of the mask. For the last two trees I just used part of a mask to create a few dips in the snow. (I have a tutorial here showing now I create snowscapes with sponging and masking fluid)
To finish I ran the nautical blue sponge around the edge to frame the panel, added some highlights to the edges of a few snow banks and trees with a clear wink of stella pen and stamped my sentiment in nautical blue. When the ink was dry I rubbed the masking fluid off to reveal little white snowflakes.
Thanks for your encouragement to keep on stamping with the Prancers set. You know I will!
Supplies:
Stamps: Prancers, Joy Filled (PB)
Inks: Memento Nautical Blue, Summer Sky (Imagine Craft/Tsukineko)
Cardstock: Neenah Solar White 110lb cardstock
Also: Winsor & Newton masking fluid, Clear wink of stella pen
Walking Home 2
Posted: September 28, 2014 Filed under: On the Town, Stamped Landscapes | Tags: Penny Black stamps, Tsukineko Memento inks 12 Comments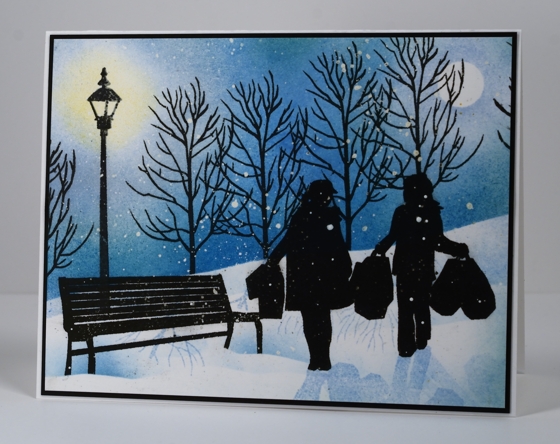
I have had some more fun with the “On the Town” set, this time with Memento inks and sponges instead of the watercolour approach I took in my last attempt. I did start with by flicking masking fluid onto my panel which is Neenah Solar White cardstock. I cut a hill mask and punched a small moon mask out of post-it notes and positioned them before sponging with two blue inks and a little yellow where the lamp would be. When the sponging was complete I stamped the trees along the hill then removed the mask. It is not very obvious but I sponged little bits of blue all over the snowy ground moving one wavy mask around to do so. I added the girls’ silhouettes next, then the seat, but before stamping the seat I positioned two small masks where the legs would be so they all appear to be in little snowdrifts. Next was the lamp and finally some shadows by turning the silhouette stamps upside down and stamping them in memento summer sky ink. When I rubbed the masking fluid off there were very few spots on the girls so I add a few here and there with white gesso and a toothpick.
I still haven’t used every stamp in this set so there may well be another ‘walking home’. On the town is a transparent set which made it easy to lay the scene out first to work out where all the pieces would fit.
Thanks for dropping by today. There will be more autumn tones later in the week.
Supplies:
Stamps: On the Town (PB)
Inks: Memento London Fog, Summer Sky, Bahama Blue, Dandelion ink & Versafine Onyx Black (Imagine Craft/Tsukineko)
Cardstock: Neenah Solar White 110lb cardstock, Black cardstock
Also: Winsor & Newton masking fluid, Gesso
Most Wonderful
Posted: August 15, 2014 Filed under: Most Wonderful, Prancers, Stamped Landscapes, Watercolour | Tags: Fabriano Watercolour Paper, Penny Black stamps, Ranger Distress stains, Tsukineko Memento inks 14 Comments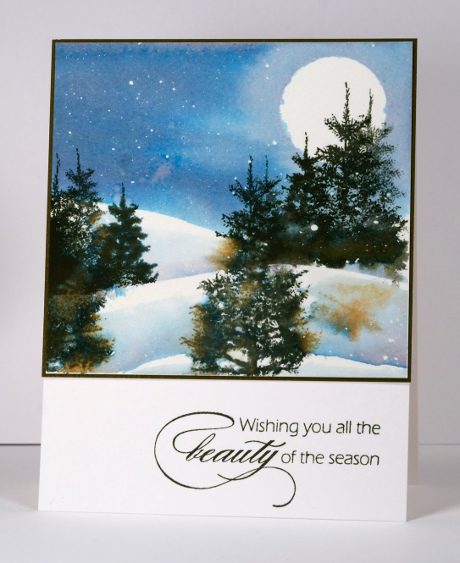
I was very excited to see some new tree stamps in the new “Season’s Greetings” release from Penny Black. I am always happy to have more tree stamps to create stamped scenes with. I will be using the new trees from “Prancers” to create winter scenes but I will probably keep stamping with them all year long. I used them as the main feature of the scene above and a shadowy suggestion of forest in the scene below.
Both scenes were done on watercolour paper but with different approaches and inks. For the scene above I started with a masking fluid flecked panel and positioned a circle mask for the sky. I then painted the sky in Memento Nautical Blue and Paris Dusk ink taking care to dilute the colour around the moon. I used the same two blues to paint the snow banks after I had stamped the trees in Memento Northern Pine.
On the card below I created a three coloured panel with Chipped Sapphire, Evergreen Bough and Tumbled Glass distress stains. I applied the stains to the watercolour paper then spritzed the panel with my homemade Pearl-ex sprays. When it was all dry I embossed the snowflake and sentiment stamps with Memento Luxe Wedding Dress ink and embossed with white powder. I added trees at the bottom with Chipped Sapphire distress ink and then splattered white gesso over the whole panel with a splatter brush. Both panels are framed by very narrow frames and attached to white card bases.
We had quite unseasonably cold weather yesterday, not quite the snowy scenes you see here but definitely chilly enough to sit by the fire in the cottage where I was visiting friends for the day.
Supplies:
Stamps: Most Wonderful, Prancers, Beauty of the Season (PB)
Inks: Chipped Sapphire, Evergreen Bough, Tumbled Glass distress stains (Ranger) Memento Nautical Blue, Paris Dusk, Northern Pink inks & Memento Luxe Wedding Dress ink (Imagine Craft/Tsukineko)
Cardstock: Fabriano 100% cotton hot pressed watercolour paper, Neenah Solar White 110lb cardstock
Also: Winsor & Newton masking fluid, White embossing powder, White Gesso, Three separated Pearl-ex sprays comprised of water mixed with Interference Gold, Interference Blue and Interference Green.
Winter forest watercolour
Posted: January 31, 2014 Filed under: CAS, Christmas Park, Stamped Landscapes | Tags: CAS, Penny Black stamps, Tsukineko Memento inks 15 Comments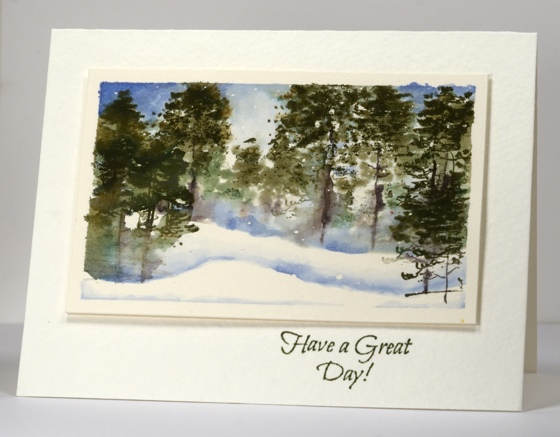
When I posted the watercolour butterfly tutorial I mentioned that I had divided my watercolour block into four panels, two of which worked out. One was the butterfly and the other was this little scene. I started with some masking fluid flecks then wet the top two thirds of the panel with water. I used the Christmas Park stamp from Penny Black and the techniques for creating snowbanks described in this tutorial. Because I was layering the images I did use a post-it note a couple of times to mask the white snow areas from the bottom of the tree stamp. It really was trial and error for this one but I am happy to say it worked in the end.
It will be winter here for quite some time yet so expect some wintry scenes interspersed with the floral cards now and then!
Supplies:
Stamps: Christmas Park, A Day in Paris (PB)
Inks: Memento Olive Grove, Danube Blue, Espresso Truffle (Tsukineko)
Cardstock: CartieraMagnani 100% cotton hot pressed watercolour paper
Also: Winsor & Newton Masking Fluid
Winter Watercolour Tutorial
Posted: January 4, 2014 Filed under: Before the Snow, Stamped Landscapes, Tutorial, Watercolour | Tags: Fabriano Watercolour Paper, Penny Black stamps, Tsukineko Memento inks, Tutorial 37 Comments
Here is the first of my watercolour tutorials. I have used only one image stamp and one basic technique. There are several different techniques I use when creating watercolour scenes and cards because different stamps lend themselves to different approaches. I plan to cover more techniques in future tutorials.
I stress in the video that watercolouring is never the same twice and you cannot predict how the colours will blend and bleed in each scene. It is worth playing around with for a while to work out the amount of water to add to the paper, how long to let it dry between stamping images and how much colour to add and blend when creating backgrounds.
Here is a list of other cards made using the technique shown in this tutorial. Noel, Watercolour Night Sky, Watercolour Snowstorm, Poppies in a Field, Watercolour Sympathy.
Thanks for dropping in.
Supplies:
Stamps: Before the Snow, Flourish Thank you (PB)
Inks: Memento Cottage Ivy, Danube Blue & Versafine Majestic Blue (Tsukineko)
Cardstock: Fabriano 100% cotton hot pressed watercolour paper
Also: Winsor & Newton Masking Fluid
Noel
Posted: December 24, 2013 Filed under: Stamped Landscapes, Tannenbaum, Watercolour | Tags: Fabriano Watercolour Paper, Penny Black stamps, Tsukineko Memento inks 22 Comments
I would like to wish you a wonderful Christmas. Thank you for visiting here and encouraging me with your comments. I appreciate all the kind words, I am happy to answer questions when I can and yes, I am hoping to make some tutorials in the new year! I have met many lovely people through blogging, most only in the virtual world but some I have been privileged to meet in person. I hope to get to know more of you in the year to come.
I pray that you will know the peace that Jesus can give this Christmas and that you will experience God’s blessing in your life in the new year.
Then let us all with one accord
Sing praises to our heavenly Lord,
That hath made heaven and earth of nought,
And with his blood mankind has bought.
Noel, Noel, Noel, Noel,
Born is the King of Israel.
Supplies:
Stamps: Tannenbaum, Noel (PB)
Inks: Memento Cottage Ivy, Summer Sky, Danube Blue, Love Letter & Versafine Majestic Blue (Tsukineko)
Cardstock: Fabriano 100% cotton hot pressed watercolour paper
Also: Winsor & Newton Masking Fluid
Instructions for a similar scene


