
Dusty Pink Poppies
Posted: April 1, 2014 Filed under: Blooming Garden, Field of Dreams | Tags: Faber-Castell Albrecht Durer Watercolour pencils, Penny Black creative dies, Penny Black stamps, Ranger Distress stains, Tsukineko Memento inks 5 Comments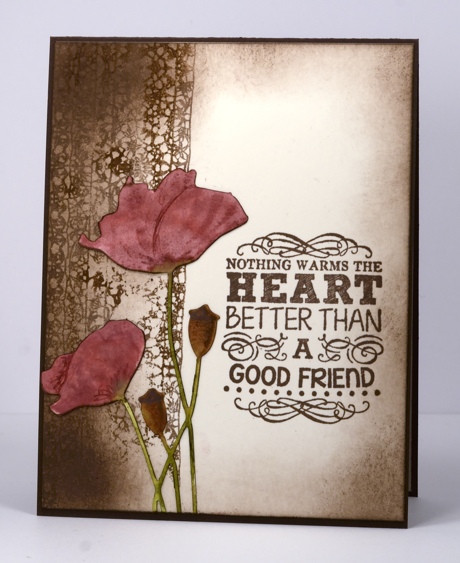
I have poppies for you again today, in pink. The only poppies in my garden are orange; they are quite cheery and bright but the lady down the road has dusty pink poppies which appeal more to me. I cut out the poppies with the Field of Dreams die then coloured them with distress stains. I added some watercolour pencil as they were drying and finished them by stamping parts of the co-ordinating stamp from Blooming Garden to add a little shape and shading. Before sticking them on the card front I ran a rich cocoa marker around all the edges. The left hand border is from the Lace Edgings set and is stamped in a mix of memento rich cocoa and vintage photo distress stain.
Thank you for all your lovely comments about my simple watercolour card. I enjoyed reading them all and was interested in the suggestions for making subtle additions. It was a simple card to make and I did the watercolouring while watching tv so I might remake it and try a little embellishing just for the fun of it.
Supplies:
Stamps: Blooming Garden, Truly Great, Lace Edgings (PB)
Pencils: Albrecht Durer Watercolour pencils Vandyke Brown 176, Medium Flesh 131 (Faber-Castell)
Inks: Memento Rich Cocoa (Tsukineko) Vintage Photo, Peeled Paint & Victorian Velvet distress stains (Ranger)
Creative Dies: Field of Dreams (PB)
Cardstock: Fabriano 100% cotton hot pressed watercolour paper
Softly, softly
Posted: March 29, 2014 Filed under: CAS, Softly, Watercolour | Tags: CAS, Faber-Castell Albrecht Durer Watercolour pencils, Fabriano Watercolour Paper, Penny Black stamps, Tsukineko Memento inks 59 Comments
After a week of lovely features on the Penny Black blog I decided to continue playing around with the new large scale stamps. I created a panel with the Softly stamp on watercolour paper without a definite plan of how to use it. Once it was complete I turned it this way and that and used scraps of blank card to frame it so I could decide where to crop it to fit on a 4.25″x 5.5″ cardbase. It was at this point that I chose to have the image in landscape orientation rather than portrait. I like the flowers hanging down.
My watercolouring process began by inking the stamp with Memento Angel Pink and New Sprout markers. These colours are quite pale and when stamped made perfect outlines for me fill with colour. I used two pink watercolour pencils and two green, colouring first then blending with a waterbrush. I masked the leaves in the top left hand corner and stamped a couple more flowers.
I was tempted to add a pale watery border but I resisted. I was even more tempted to flick some pink and green droplets over the panel as that is currently my favourite thing to do . I was tempted to add a pretty organza ribbon but my inner Susan Raihala said, “Leave well alone.” She might have suggested bling, which of course she would have pulled off perfectly, but the bling-thing doesn’t come as naturally to me as it does to her so I just stopped. I didn’t want to risk spoiling what I had done.
Would you have added a little something more?
Supplies:
Stamps: Softly, Special Wishes (PB)
Inks: Memento Markers Angel Pink, New Sprout & Memento Luxe Pear Tart(Tsukineko)
Pencils: Albrecht Durer Apple Green 170, Moss Green 168, Middle Purple Pink 125, Pink Madder Lake 129 (Faber-Castell)
Paper: Fabriano 100% & 25% cotton hot pressed watercolour paper
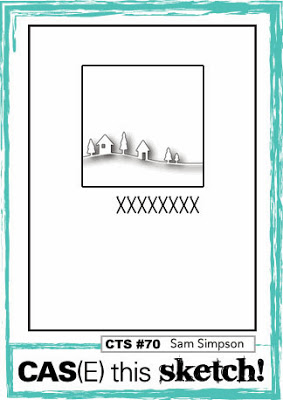
CAS(E) this sketch #70
Posted: March 27, 2014 Filed under: Queen Anne's Lace | Tags: Faber-Castell Albrecht Durer Watercolour pencils, Fabriano Watercolour Paper, Penny Black stamps 11 Comments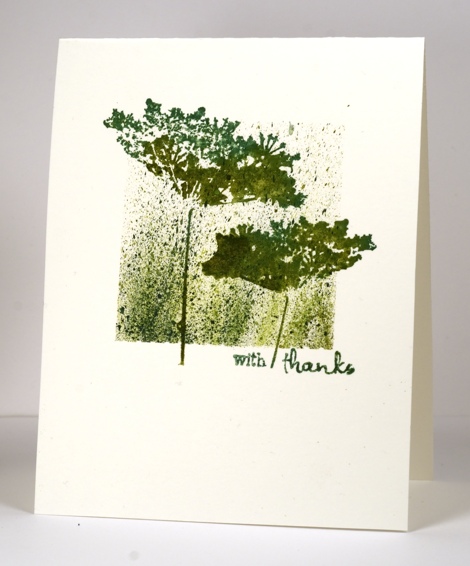
Playing along with CAS(E) this sketch is getting to be a habit but I am not just playing along this week; I am privileged to be the guest designer for sketch #70
Seems like this sketch was made just for me. You won’t have to look far through my blog before you spy one or two layouts along the same lines. I pulled out an old favourite from my stamp collection and paired it with my new favourite technique, flicking watercolour paint! I stamped the Queen Anne’s Lace first in a mix of Memento Cottage Ivy ink and Peeled Paint Distress stain. Next I positioned post-it notes as masks to create the central square and flicked colour from three different watercolour pencils with a water brush. Finally I removed the masks and added the sentiment.
Make sure you visit the CAS(E) this sketch challenge blog to see all the wonderful creations from the design team.
Supplies:
Stamps: Queen Anne’s Lace, Wishes (PB)
Inks: Memento Cottage Ivy (Tsukineko) & Peeled Paint Distress Stain (Ranger)
Pencils: Albrecht Durer watercolour pencils (Faber-Castell)
Cardstock: Fabriano Hot pressed 25%cotton watercolour paper
How-to with Large Scale Stamps
Posted: March 26, 2014 Filed under: Delightful | Tags: Penny Black stamps, Penny Black stencils, Tsukineko Memento inks, Tsukineko Radiant Neon inks 10 Comments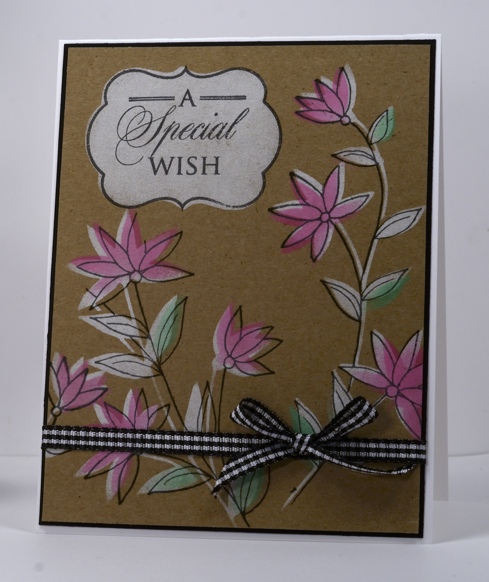
All through this week Penny Black is showcasing their new large scale stamps and co-ordinating stencils.The week kicked off with an inspiring video blog hop featuring seven guest designers and their impressive array of projects. During the rest of the week the PB design team are sharing their projects all with a “how-to” tutorial.
My project is a pictured above and the process is outlined in a photo tutorial on the PB blog . It is unusual to see a kraft card from me but I have to say it makes the perfect background for the new Memento Luxe ink and the Radiant Neon inks.
Supplies:
Stamps: Delightful, Special Wishes (PB)
Stencils: Verdant (PB)
Inks: Memento Luxe Wedding Dress, Radiant Neon Electric Pink, Electric Green & Versafine Onyx Black (Tsukineko)
Paper: Kraft, Black, White
Also: Gingham ribbon
Watercolour background
Posted: March 24, 2014 Filed under: Delicate Florals, Watercolour | Tags: Fabriano Watercolour Paper, Penny Black stamps, Ranger Distress stains 15 Comments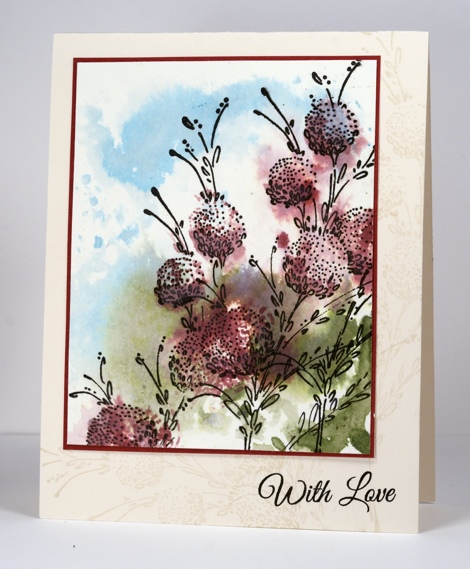
The background was the starting point for this card. I squeezed three colours of distress stain directly onto an acrylic block then pressed the block onto watercolour paper creating a pink, blue and green abstract background. Next I chose the stamp from Delicate Florals and stamped it in a couple of stages. First I inked only the blooms with Victorian Velvet distress stain and stamped them a couple of times. When the paper was dry I inked the whole stamp with versafine onyx black and stamped over the pink blooms. I inked in black again but selectively to stamp parts of a second spray of flowers on the left.
On the card base I stamped the same image a few more times in VersamagicWheat chalk ink.
Drop in on the Penny Black blog this week to enjoy the “How-to Hop” featuring the new large scale stamps and co-ordinating stencils. I will be sharing a card and tutorial mid-week.
Thanks for dropping by.
Supplies:
Stamps: Delicate Florals, Special Wishes (PB)
Inks: Versafine Onyx Black & Versamagic Wheat (Tsukineko) Victorian Velvet, Tumbled Glass, Bundled Sage Distress Stains (Ranger)
Cardstock: Fabriano 100% cotton hot pressed watercolour paper
Gathering Together
Posted: March 20, 2014 Filed under: Gathering Together, Twirls | Tags: Penny Black stamps, Ranger Distress stains, Tsukineko Memento inks 17 Comments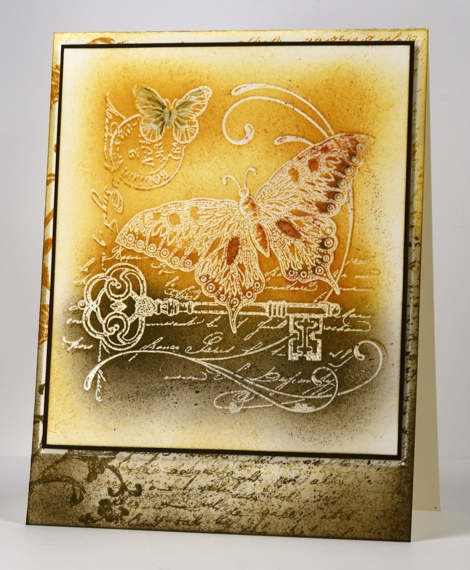
I used the emboss resist technique to add my warm tones to this collage image from Penny Black. After embossing the image in clear e.p. I stamped the same image over the top with Wild Honey distress ink to give a slight shadow. I sponged Wild Honey over the top two-thirds of the image and walnut stain distress ink over the lower third. I then used watercolour pencils to add some details to the butterflies’ wings. To create the background on the card base I inked the Letter Background stamp with the same two distress inks then stamped it several times to one side of the card base. On the other side I stamped the flourish from “Twirls” also in two colours. Before sponging over the background I positioned a mask which was slightly larger than the matted panel to be added later. This way I ended up with a pale border around the popped up matted panel.
Enjoy your day.
Supplies:
Stamps: Gathering Together, Letter Background, Twirls (PB)
Inks: Memento Espresso Truffle & Versamark (Tsukineko) Distress Wild Honey & Walnut Stain (Ranger)
Pencils: Albrecht Durer Sepia & Venetian Red(Faber-Castell)
Also: Clear Embossing Powder
Just Add Water
Posted: March 17, 2014 Filed under: Noble, Watercolour | Tags: Fabriano Watercolour Paper, Penny Black stamps, Tsukineko Memento inks 16 Comments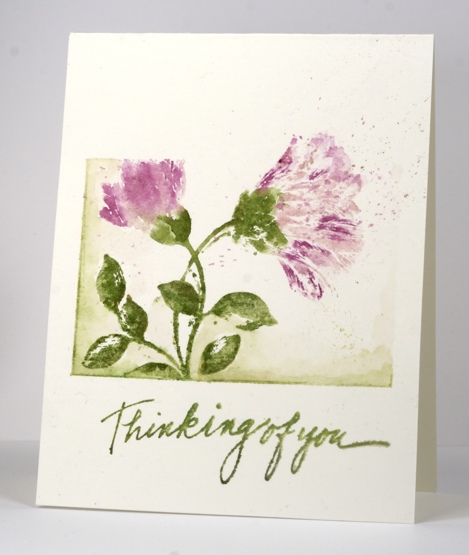
I can’t believe how long it has taken me to play along with Karen’s ‘Just Add Water challenge’ at One Layer Simplicity. Considering how often I use watercolour these days I should have several cards linked by now! Seems they have all been more than one layer lately.
Using watercolour paper as my card base I taped off a panel in the centre of the card front. I pulled out a stamp I hadn’t tried before, ‘Noble’ from the PB Happy Everything release, inked it with Memento markers and spritzed it with water. I added a few highlights to the leaves, a three sided border with a watercolour pencil and flicked a little extra colour around also. I decided the sentiment could be all watery too so inked it with two greens, spritzed it and stamped.
If you haven’t already played along head over to One Layer Simplicity now; you still have a week to get involved.
Supplies:
Stamps: Noble, Thinking of You (PB)
Inks: Memento Bamboo Leaves, Olive Grove, Angel Pink, Lilac Posies (Tsukineko)
Pencils: Albrecht Durer Olive green (Faber-Castell)
Paper: Fabriano 25% cotton hot pressed watercolour paper
Stenciled Leaves
Posted: March 16, 2014 Filed under: Promenade, Verdant | Tags: May Arts ribbon, Penny Black stamps, Penny Black stencils, Tsukineko Memento inks 6 Comments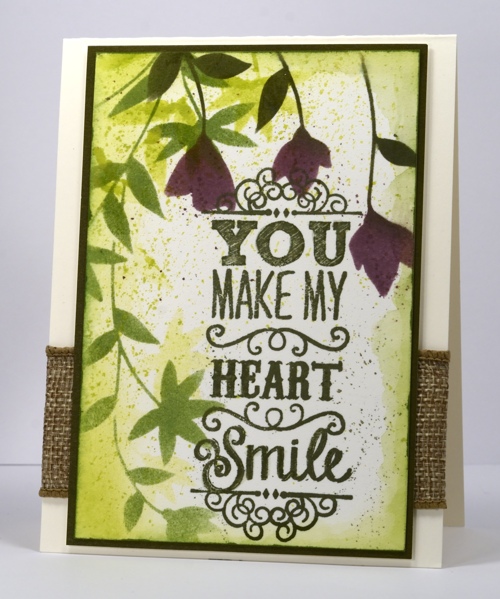
Today’s ‘hint of a rainforest’ card was made primarily with a couple of stencils from the new Happy Everything release. I used watercolour paper in case I wanted to blend some colours but I could have stuck with smooth cardstock just as easily. I started by sponging Pear Tart ink through the Verdant stencil with a sponge, moved the stencil and sponged with Bamboo Leaves ink. I then switched to the Promenade stencil and sponged Sweet Plum ink on the hanging blooms and Olive Grove on their stems and leaves. I picked up Pear Tart, Olive Grove and Sweet Plum ink on a paint brush and flicked it happily across the panel before adding the sentiment in Olive Green ink. For a dark edge I ran the Bamboo leaves ink pad along the edges of the panel then matted with Olive Grove paper.
Supplies:
Stamps: Cupcake Day (PB)
Stencils: Promenade, Verdant (PB)
Inks: Memento Pear Tart, Bamboo Leaves, Olive Grove, Sweet Plum (Tsukineko)
Paper: Olive Grove Mix & Match paper (PB), Fabriano 100% cotton hot pressed watercolour paper
Also: Faux Burlap Wired Ribbon
May Arts Creative Collaboration
Posted: March 14, 2014 Filed under: Chat Bubbles, Hollyhocks, Love Expressions, Poppy Pattern, Promise Me, Tagged | Tags: Fabriano Watercolour Paper, May Arts ribbon, Penny Black creative dies, Penny Black stamps, Ranger Distress stains, Tsukineko Memento inks 15 Comments
Penny Black and May Arts have been collaborating all week and today is my turn to show how easy it is to pair ribbons with stamping. I decided to make a few tags but if you are looking for more ideas check out both the Penny Black blog and the May Arts blog for all sorts of creative projects. (Instead of listing the supplies at the end of the post I have linked to them in the descriptions)
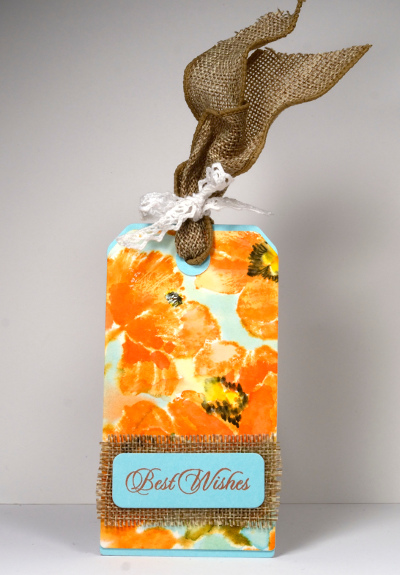
On both the tulip tag above and the poppy tag below I stamped Memento inks onto wet watercolour paper causing the colours to bleed and blend. When the paper dried a little I added foreground tulips or in the case of the poppies centre details and a blue distress stain background. As watercolour paper is rarely pure white I dyed the white cotton lace ribbon from May Arts in tea to give it a natural off white colour. The tulip tag features luxurious velvet ribbon from May Arts tied with a bow of crochet trim ribbon . The stamps are Promise Me and Special Wishes.
I used a different crochet trim ribbon to tie the versatile Faux Burlap Wired Ribbon on the poppy tag. I left the wire in the edges of the ribbon at the top of the tag so I could shape wavy edges then cut a little mat for my sentiment out of the burlap. The stamps used are Poppy Pattern and Special Wishes.
To create the Hollyhocks tag below I stamped, coloured the tiny tag and dyed the crochet trim with Victorian Velvet distress stain. I used the Hollyhocks stamp as my main image, a little bit of a sentiment from the Eloquence set on the tiny tag and the Hugs diecut from the Love Expressions set. I cut both the tiny tag and the lower rectangle using dies from the Chat Bubbles set. All large tags were cut using the large tag die from the Tagged set

CAS(E) this sketch #67
Posted: March 7, 2014 Filed under: Blooming tags, Watercolour | Tags: Faber-Castell Albrecht Durer Watercolour pencils, Penny Black stamps, Tsukineko Memento inks 16 Comments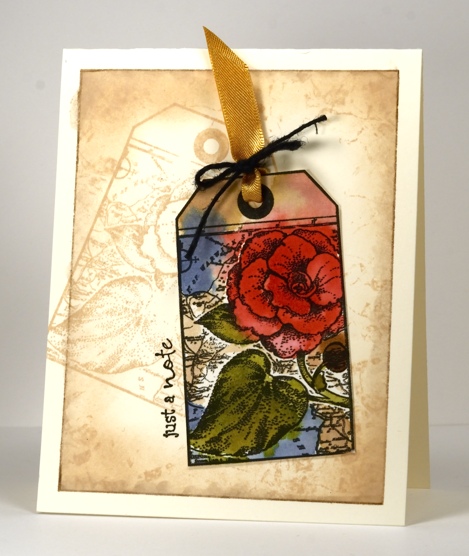
I rarely participate in sketch challenges but here I am playing along with CAS(E) this sketch for the second week in a row. I had several watercoloured tags lying around that had been completed a while ago so I chose the rose and map one for this card. I stamped the same tag on the card base in Memento Desert Sand then masked the edge. I had my camera handy so photographed the next step. (It was only after I had taken two photos that I realized I had no photos of the tag painting process which is probably what you are more interested in!)

I sponged around the edges of the masked area then crumpled up a piece and used it to stamp more Desert Sand ink around the edges.

Before removing the masks I drew around the edge with a Faber-Castell watercolour pencil and blended it with a waterbrush.
Now for the hard part. I don’t exactly remember how I did the tag way back when. I think I must have stamped the tag with Versafine Onyx Black because the image hasn’t bled at all. Then I probably wet the watercolour paper and started adding colour. Not sure what the inks were… Sorry about the lack of information; I am now trying to remember to take notes as I create in case it is a while before I finish a project or write a post.
Supplies:
Stamps: Blooming Tags, Wishes (PB)
Inks: Memento Desert Sand & Versafine Onyx Black (Tsukineko)
Pencils: Albrecht Durer Van Dyke brown 176 (Faber-Castell)
Also: Gold ribbon, black twine


