
Stencil negative
Posted: January 24, 2017 Filed under: Brusho, Promenade, Uncategorized | Tags: Brusho, Penny Black stamps, Penny Black stencils 14 Comments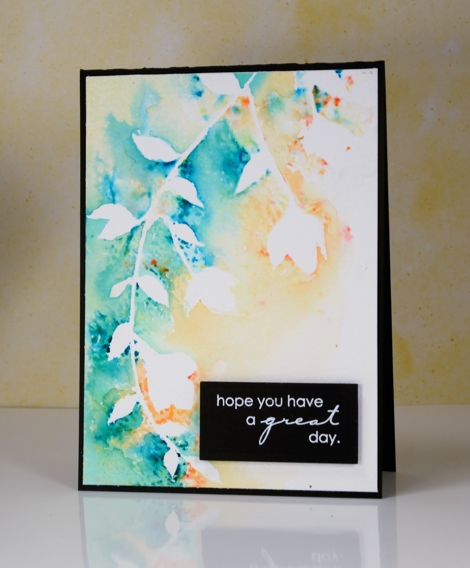
The technique I have to share today is one of those ‘don’t waste all that pretty paint’ techniques. Sometimes I will be creating something and paint or ink ends up all over a mat, stamp or in this case, a stencil after the initial project is completed. Rather than simply rinse the ink or paint off it is usually worth taking a print or swiping a piece of paper through the excess paint to pick up all the pretty.
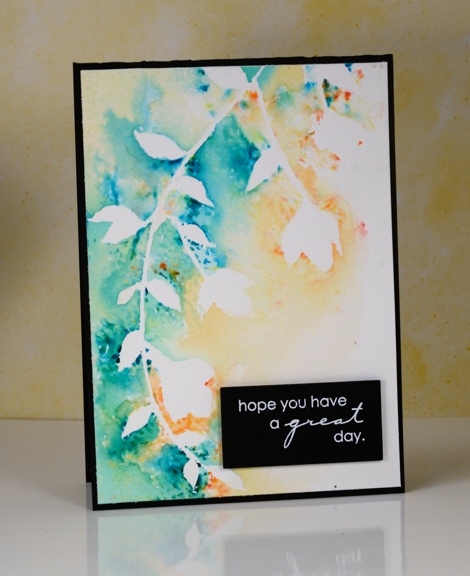
I was creating panels using the Penny Black stencil, promenade, along with molding paste and brusho paint. Once I had finished sprinkling brusho over the stencil and paste, I spritzed with water before removing the stencil. The stencil was covered in diluted brusho so I pressed it onto a piece of cold pressed watercolour paper and this patterned piece was the result. Incidentally I also made two cards with the stencilled shape on them but they did not photograph well at all. They look fine in real life!
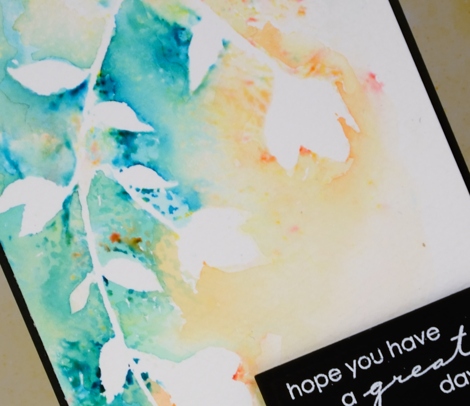
I like the ‘negative’ print from the stencil enough that I might just create a negative print as a technique on its own. But then would I end up with a pretty ‘positive print’ as a by product of my creating!?!
This post was brought to you from my ‘pile of possibilities‘.
Supplies:
Stamps: Amazing (PB)
Stencils: Promenade (PB)
Inks: Versamark(Tsukineko)
Paint: Brusho (Colourcraft)
Paper: Canson 100% cotton cold pressed watercolour paper, Neenah epic black
Also: white embossing powder
Orange blooms
Posted: August 4, 2015 Filed under: CAS, Promenade, Softly | Tags: Penny Black stamps, Penny Black stencils, Ranger Distress stains 20 Comments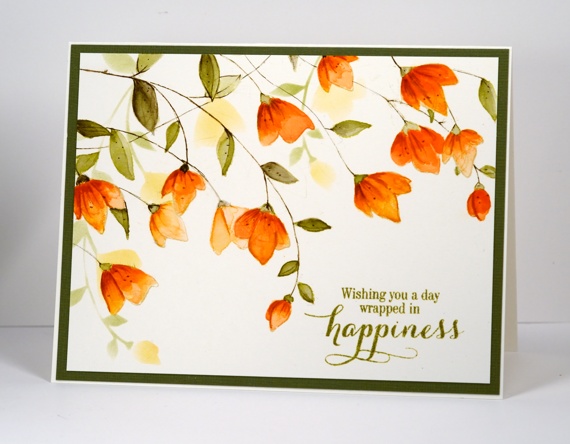
When I set out to create this card I knew I had stamped a similar layout with this stamp before but it wasn’t until the card was completed and I looked at the earlier card that I realised just how how similar! This one has a wee bit more going on and was painted with distress stains not watercolour pencils. I began by stamping the large ‘Softly’ stamp a couple of times. Each time I inked it I wiped off some of the antique linen ink so the two imprints would not interfere with each other too much. The antique linen ink is pale so I was able to paint inside the lines and have them disappear into the darker oranges and greens.
I had to repeat my mantra (walk away, just walk away) periodically through the making of this card because I was trying to follow the steps shown on this photo tutorial. I painted all the petals with a diluted wash of ‘dried marigold’ distress stain first. After it dried I added another layer keeping the colour undiluted. Once that dried I painted some darker areas with ‘spiced marmalade’, let it dry then finally added some ‘rusty hinge’. ( I have just discovered what a warm brown rusty hinge is; it works well with orange tones). After waiting once again for it to dry I added some details with the spiced marmalade and rusty hinge markers. I stuck with just ‘forest moss’ stain for the leaves but began by diluting for the first wash then increasing the intensity as I added shading.
When all the painting was finished I used the co-ordinating stencil ‘Promenade’ to sponge some background flowers before adding a sentiment and a green mat. This card is a little bigger than A2 (6.25″x4.75″) so I will need to hunt through my envelope supply to find a match.
Thank you so much for dropping by and for your kind comments. I have been interested to read about your opinions and experiences with the different watercolour powders I have been featuring.
Supplies:
Stamps: Softly, Sprinkles & Smiles (PB)
Stencils: Promenade (PB)
Inks: Spanish Moss Versafine (Tsukineko) Spiced Marmalade, Dried Marigold, Forest Moss, Rusty Hinge, Antique Linen distress products (Ranger)
Paper: Canson 100% cotton hot pressed watercolour paper, Green textured cardstock
Stenciled Leaves
Posted: March 16, 2014 Filed under: Promenade, Verdant | Tags: May Arts ribbon, Penny Black stamps, Penny Black stencils, Tsukineko Memento inks 6 Comments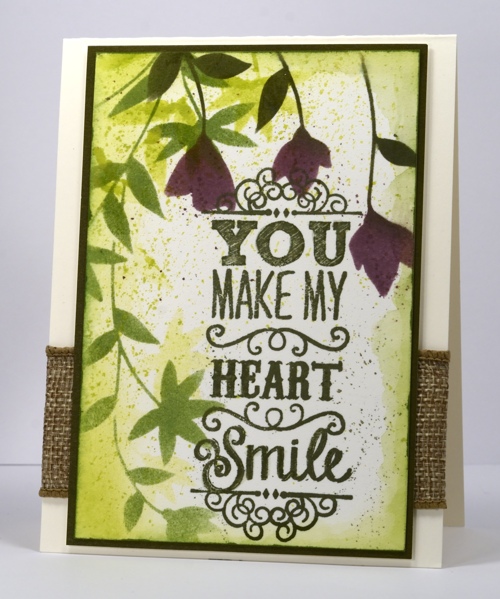
Today’s ‘hint of a rainforest’ card was made primarily with a couple of stencils from the new Happy Everything release. I used watercolour paper in case I wanted to blend some colours but I could have stuck with smooth cardstock just as easily. I started by sponging Pear Tart ink through the Verdant stencil with a sponge, moved the stencil and sponged with Bamboo Leaves ink. I then switched to the Promenade stencil and sponged Sweet Plum ink on the hanging blooms and Olive Grove on their stems and leaves. I picked up Pear Tart, Olive Grove and Sweet Plum ink on a paint brush and flicked it happily across the panel before adding the sentiment in Olive Green ink. For a dark edge I ran the Bamboo leaves ink pad along the edges of the panel then matted with Olive Grove paper.
Supplies:
Stamps: Cupcake Day (PB)
Stencils: Promenade, Verdant (PB)
Inks: Memento Pear Tart, Bamboo Leaves, Olive Grove, Sweet Plum (Tsukineko)
Paper: Olive Grove Mix & Match paper (PB), Fabriano 100% cotton hot pressed watercolour paper
Also: Faux Burlap Wired Ribbon
Neon Blooms
Posted: March 2, 2014 Filed under: CAS, Flower Dance, Promenade, Stencils | Tags: CAS, Penny Black stamps, Penny Black stencils, Tsukineko Radiant Neon inks 20 Comments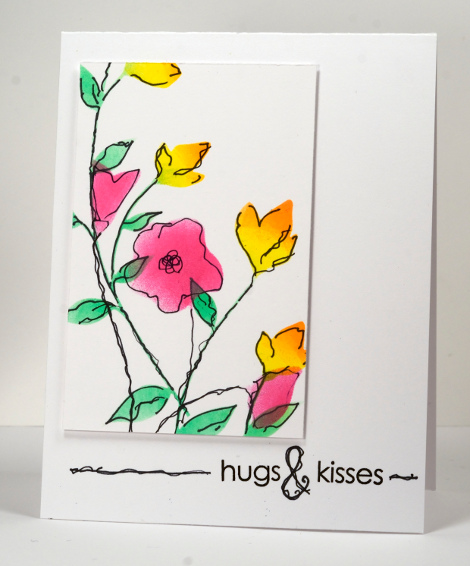
I played with a couple of new products when creating this card for the current challenge from CAS(E) this Sketch. Imagine Crafts Tsukineko recently brought out a new line of inks called Radiant Neons. I used the Electric Yellow, Orange, Pink and Green for the flowers and stems. The ink pads are incredibly juicy so I barely needed to touch the pad with the ink blusher to pick up enough ink to sponge through the stencil.
The other new products featured on this card are stencils from Penny Black. I used the promenade and the flower dance stencils from the new Happy Everything release. I can see so many possible ways to use these stencils so expect to see more of them in the next little while. I could have added the black outlines with the co-ordinating large stamps but I have been wanting to do the ‘scribbly black line technique‘ on a card so I kept the stencils in place to draw in some black outlines with a Pitt artist pen. After I removed the stencil I added a few more scribbly lines here and there. I used a post-it to mask between the words of the sentiment so I could scribble in my own ampersand and then added a couple of scribbles either side.
Can I just add that it takes a little longer to post a card while watching the Oscars!
Supplies:
Stamps: From the Heart (PB)
Creative Dies: Flower Dance, Promenade (PB)
Inks: Radiant Neon Electric Yellow, Electric Orange, Electric Pink, Electric Green & Versafine Onyx Black (Tsukineko)
Pen: Black Pitt Artist Pen (Faber-Castell)


