
One Layer Poppy
Posted: May 3, 2014 Filed under: One-Layer Simplicity challenge, Poppy Time, Sun Catcher | Tags: CAS, Fabriano Watercolour Paper, Penny Black stamps, Penny Black stencils, Ranger Distress stains, Tsukineko Memento inks 20 Comments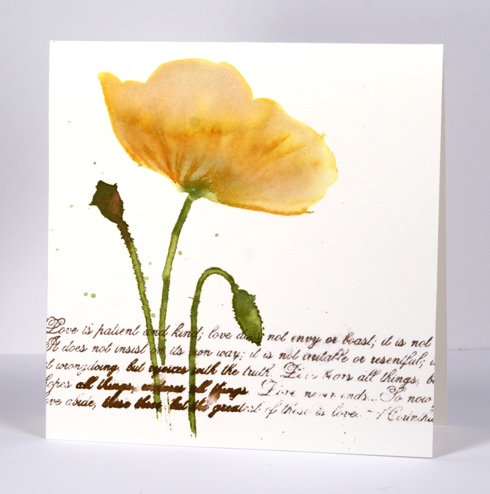
The new One Layer Simplicity Challenge is to make a card with flowers on it. There is already a gorgeous array of floral inspiration on the blog and you have until May 24th to add yours. The current Mod Squad challenge is to make a one-layer card so my poppy card meets the criteria there also.
To create this watery poppy I positioned the ‘Sun Catcher Stencil’ then painted the flower head in water. While it was very wet I added both Mustard Seed and Victorian Velvet Distress stains to the water and blended them with a paintbrush. I used the co-ordinating ‘Poppy Time’ stamp to stamp the stems, bud and seed head then used a paintbrush to immediately fill them with distress stains. By this stage the poppy head had dried a bit so I inked some of the stamp with ink to add a few veins to define the petals. I added the verses from 1 Corinthians in a mix of Memento ink and distress stain allowing some to blur and some to bleed. The piece of watercolour paper already had two ink drops on it so I carefully added a few more rather than going overboard with the flicking technique I have been using lately.
Thanks for dropping by. I hope you enjoy the rest of your weekend.
Edited to add: If you are interested in an “Introduction to Stamping” class there are a few spaces left in the class I am teaching at “Crop-A-While” in Orleans on Thursday May 8th. Please click on the store link for more details and contact the store to register.
Supplies:
Stamps: Poppy Time, Love Chapter (PB)
Stencil: Sun Catcher
Inks: Memento Rich Cocoa (Tsukineko) Vintage Photo, Mustard Seed, Victorian Velvet, Peeled Paint Distress Stains & Wild Honey, Peeled Paint Distress inks (Ranger)
Cardstock: Fabriano 100% cotton hot pressed watercolour paper
Charming in blue
Posted: April 30, 2014 Filed under: Charming | Tags: Faber-Castell Albrecht Durer Watercolour pencils, Fabriano Watercolour Paper, Penny Black stamps, Tsukineko Memento inks 7 Comments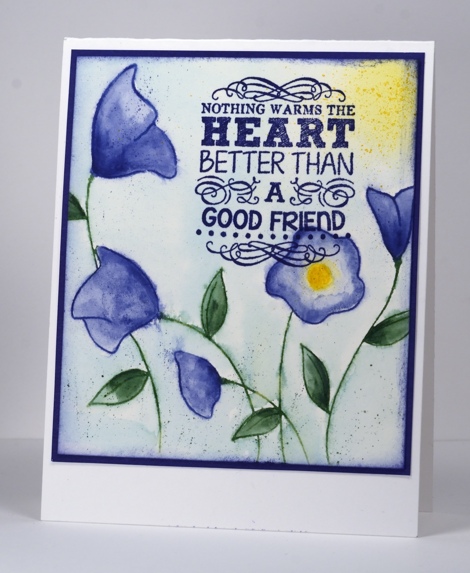
I made this card quite a while ago so I am not able to tell you which watercolour pencils I used but I can outline my process for you. I inked the “Charming” stamp using memento markers which make it easy to ink the flowers, leaves and stems in different colours. I used a blue, a green and a yellow watercolour pencil to colour in the leaves and flowers blending afterward with a waterbrush . I ran the blue pencil around the perimeter of the panel and blended the colour in to create a spft edge. I also picked up colour from a pale blue pencil to fill in the background. Some of the pale blue blended with the the stamped ink which created little water colour bleeds that I quite like. I sponged a bit of yellow ink in the top corner to suggest sunlight and added the sentiment and mat.
Thank you for all your encouraging comments; I enjoy reading them all and try to respond to the questions as soon as I can. I have also been taking note of requests for tutorials, so hopefully there will be a new one soon!
Take care.
Supplies:
Stamps: Charming, Truly Great (PB)
Inks: Memento Paris Dusk, Cottage Ivy, Dandelion (Tsukineko)
Pencils: Albrecht Durer Watercolour pencils (Faber Castell)
Paper: Fabriano 100% cotton hot pressed watercolour paper, Neenah Classic Crest Solar White 110lb smooth, PB Mix & Match Periwinkle Paper
Friendship Flowers
Posted: April 23, 2014 Filed under: Friendship Flowers, Twirls, Watercolour | Tags: Faber-Castell Albrecht Durer Watercolour pencils, Fabriano Watercolour Paper, Penny Black stamps, Penny Black stencils, Tsukineko Memento inks 11 Comments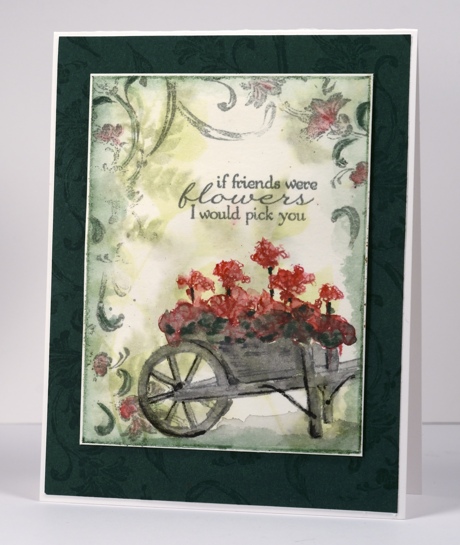
This little scene was built in layers, some of which you will need to take my word for as they are no longer obvious. I taped the watercolour panel down with painters tape to begin and you can see that I kept a very narrow border around the picture panel when I cropped it later.
The first step was sponging memento new sprout ink through the promenade stencil ( you can just see it ). Next I wet the whole panel and stamped the verdant wood mounted stamp in memento olive grove several times. The ink bled and faded. At this point I had to decide on a feature image; I picked the little wheel barrow of flowers from the new Friendship Flowers transparent set. I inked only the wheel barrow in memento London fog, spritzed it and stamped on the panel. I then used watercolour pencils to add colour and shading to the barrow. I inked up the rest of the stamp (flowers) in memento rhubarb stalk and love letter, spritzed it and stamped onto the panel. I used red and green watercolour pencils to fill in the flowers, stems and leaves. I framed the scene using the flourish stamp from the Twirls set stamped in London Fog and coloured with the same red and green pencils. I drew a border around the edge with the green pencil and blended from the edge inwards with water. Finally I added the sentiment and matted the picture on green stamped with the Twirls flourish stamp.
Supplies:
Stamps: Verdant, Friendship Flowers, Twirls (PB)
Inks: Memento London Fog, New Sprout, Olive Grove, Rhubarb Stalk, Love Letter (Tsukineko)
Pencils: Albrecht Durer Watercolour pencils Pale Geranium Lake 121, Light Grey 195, Medium Grey 197, Black 199, Pine Green 267 (Faber Castell)
Cardstock: Fabriano 100% cotton hot pressed watercolour paper, Neenah Classic Crest Solar White 110lb smooth, PB Mix & Match Spring Meadow Paper
One Layer Blooms
Posted: April 21, 2014 Filed under: CAS, Friendship Flowers, Petal Power, Watercolour | Tags: CAS, Fabriano Watercolour Paper, Penny Black stamps, Tsukineko Memento inks 8 Comments
I have a one layer card for you today made using watercolour techniques. I often set out to make one layer cards by starting my stamping on a masked and scored card base. But if something goes wrong I end up cropping out the image and putting it on a second layer. For this card I masked around all the edges of the card front with masking tape. This not only framed my image it also kept the watercolour paper from warping too much when it got wet. The paper does warp but I keep it taped until it dries completely by which time it has flattened out again. I inked the roses with two pinks, spritzed with water and stamped. While the image was still wet I added a little more of the darker pink in a few places and blended the image a little more in a few places. I used the same technique with the green inks on the leaves and stems. I finished with plenty of ink flicking on this one and a sentiment in the darker green ink.
The Penny Black blog will be featuring one layer cards all week so pop over there each day to see what the other designers created. The One Layer Simplicity challenge for April continues for a few more days so there is still time to add a “road trip” themed card. I finally got one made and will have it up as soon as I get it photographed.
Supplies:
Stamps: Petal Power, Friendship Flowers, Special Wishes (PB)
Inks: Memento Angel Pink, Pear Tart & Memento markers Rose Bud, Bamboo Leaves(Tsukineko)
Paper: Fabriano 100% cotton hot pressed watercolour paper
Sunny Hello – Painting with stamps
Posted: April 14, 2014 Filed under: Sunny Hello, Watercolour | Tags: Faber-Castell Albrecht Durer Watercolour pencils, Fabriano Watercolour Paper, Penny Black stamps, Tsukineko Memento inks 13 Comments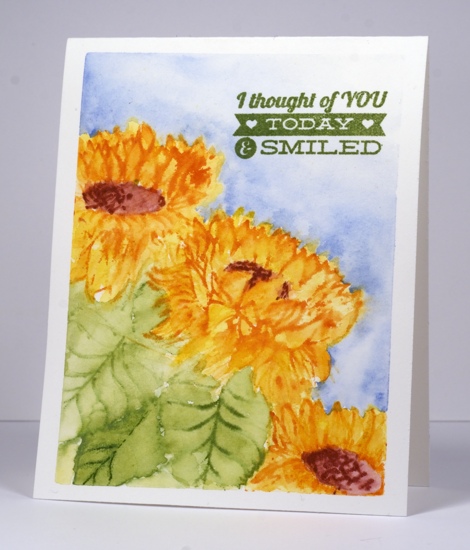
I have a mini tutorial today showing you how I “paint with stamps”. Sometimes I want to change something on the stamp I am using, perhaps add a stem or leaf, or leave something out. It is possible to do this with masking or, if I am watercolouring and the initial stamped image will be pale and watery it is possible to wipe some of the ink off the stamp before I stamp it onto my panel.
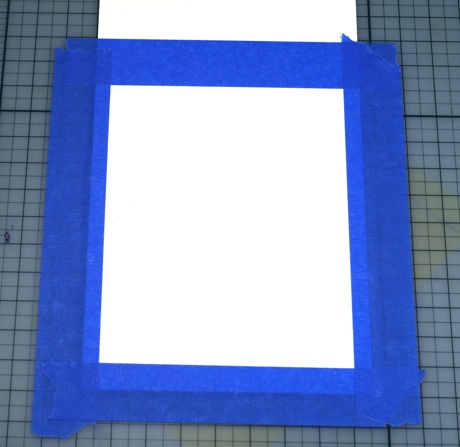
The photo above shows how I tape my watercolour card base down to prevent too much warping when it gets wet. I cut the card base to the finished size to begin with; the tapes create a border for the finished picture. After taping I painted water onto the panel.
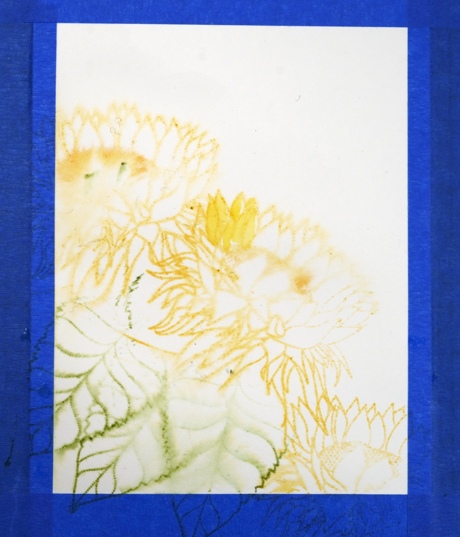
I inked the sunflower heads with memento cantaloupe ink and stamped them three times. I used a pale colour because I was creating an outline image to paint. Before stamping the top and bottom flowers I wiped a bit of ink off the centre of the flower to allow me to change the flower a little when adding colour later. The leaves are inked with memento bamboo leaves ink. Rather than cut masks for the leaves I inked the stamp then wiped off the ink where it was likely to overlap with another leaf. I began adding colour to the petals with a brush, picking up ink from a watercolour pencil. I painted all the petals in yellow with fairly loose brush strokes not worrying if the colour stayed inside the lines.
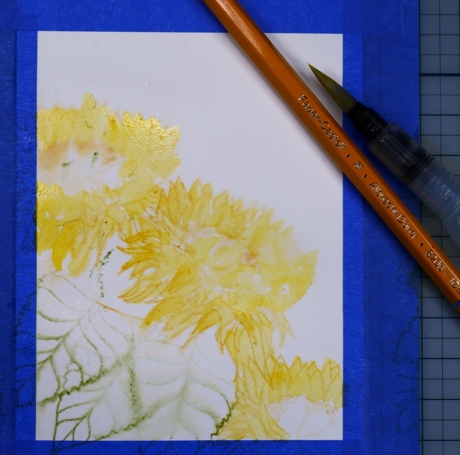
When adding the colour to the petals you can see I left an oval space on the top flower where I wanted to change the shape of the dark centre. I kept the waterbrush nice and wet as I painted to create a watery blended effect on the petals. When I was happy with the yellow petals I reinked the petals on the stamp with memento tangelo ink, stamped over the colouring I had done and blended a bit more with colour from an orange pencil.
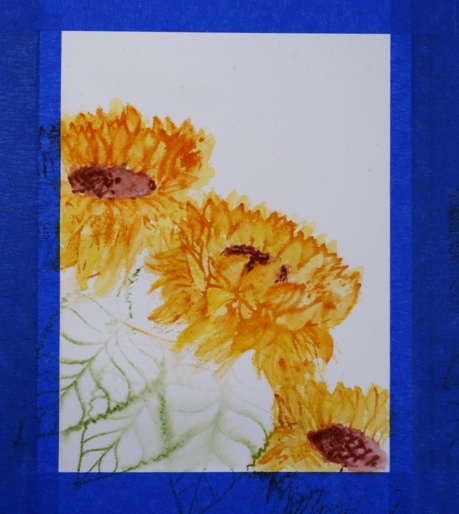
The stamp features petals which cover most of the flower’s centre as you can see in the middle flower. I did not want the flowers to be identical so I drew an oval centre on two of the flowers with watercolour pencil. I blended the darker colour and added definition by dipping the pencil tip into water before drawing with it.
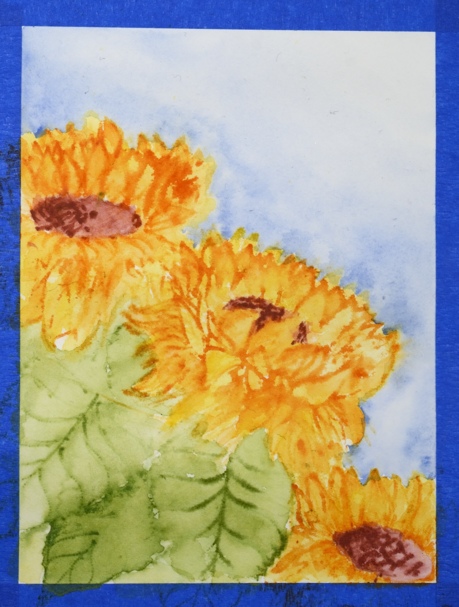
I painted the leaves the same way picking up colour from a watercolour pencil with a wet paintbrush. I added more colour to the lowest leaf which is shadowed by the other too. When the flowers were almost dry I painted water around the edge of the petals then added blue to the background area blending with water to fade it out on the right hand side.
I am not very happy with the arrangement of my flowers. The poor things need stems! Its as though they have heads and shoulders but no necks! I wouldn’t follow my example in the layout of the images if I were you, but I hope you have fun with the technique.
Supplies:
Stamps: Sunny Hello (Penny Black)
Inks: Memento Cantaloupe, Tangelo, Bamboo Leaves (Tsukineko)
Pencils: Albrecht Durer Light Orange 113, Orange yellow 109, Indian Red 192, True Blue, 148, Moss Green 168 (Faber-Castell)
Cardstock: Fabriano 100% cotton hot pressed watercolour paper
Butterfly on a Wall
Posted: April 11, 2014 Filed under: Brick Wall, Soft Wings, Twirls, Watercolour | Tags: Faber-Castell Albrecht Durer Watercolour pencils, Fabriano Watercolour Paper, Penny Black stamps, Tsukineko Memento inks 16 Comments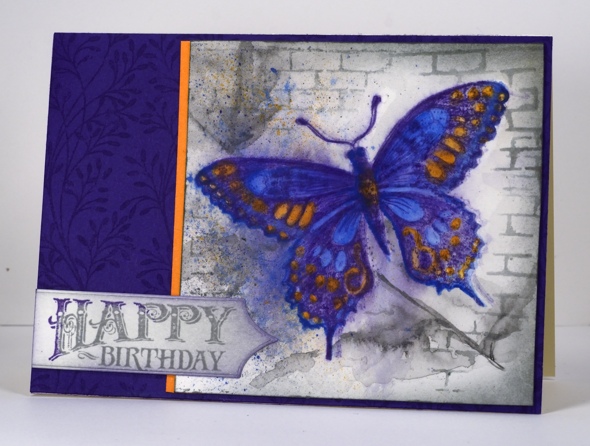
I sat and coloured with watercolour pencils the other night while watching Skyfall. I started with the butterfly stamped in Memento Angel Pink to give me a pale outline for colouring. Once the colouring and blending was finished I restamped the butterfly over the top, this time in Memento Grape Jelly. I wasn’t sure what to add as background so I painted a grey wash first then sketched a shadowy stem with leaves. It still wasn’t quite what I wanted so I added some bricks by masking the butterfly and stamping the brick wall stamp. Of course I splattered a bit of blue, orange and grey around too. I realize now that either the butterfly is huge or the bricks are way in the background.
The panel I had created was basically square so I decided to make a larger than usual card for me. I added just one strip of orange then framed it with a purple cardbase. Ardyth just reminded me the current Card Concept challenge is a butterfly one so I will link up there. I am not sure that this card fits neatly into a particular style but the closest is probably shabby chic & vintage.
Supplies:
Stamps: Soft Wings, Sentimental, Brick Wall
Inks: Memento Grape Jelly, London Fog, Angel pink (Tsukineko)
Pencils: Albrecht Durer Blue Violet 137, True Blue 148, Medium Grey 197, Prussian Blue 151 Light Orange 113 (Faber-Castell)
Cardstock: Fabriano 100% cotton hot pressed watercolour paper, Purple Mountain mix & match paper, Summer Sun mix & match paper (Penny Black)
Dusty Pink Poppies
Posted: April 1, 2014 Filed under: Blooming Garden, Field of Dreams | Tags: Faber-Castell Albrecht Durer Watercolour pencils, Penny Black creative dies, Penny Black stamps, Ranger Distress stains, Tsukineko Memento inks 5 Comments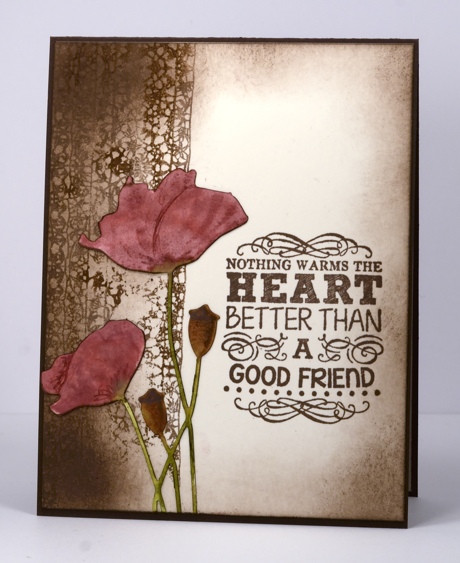
I have poppies for you again today, in pink. The only poppies in my garden are orange; they are quite cheery and bright but the lady down the road has dusty pink poppies which appeal more to me. I cut out the poppies with the Field of Dreams die then coloured them with distress stains. I added some watercolour pencil as they were drying and finished them by stamping parts of the co-ordinating stamp from Blooming Garden to add a little shape and shading. Before sticking them on the card front I ran a rich cocoa marker around all the edges. The left hand border is from the Lace Edgings set and is stamped in a mix of memento rich cocoa and vintage photo distress stain.
Thank you for all your lovely comments about my simple watercolour card. I enjoyed reading them all and was interested in the suggestions for making subtle additions. It was a simple card to make and I did the watercolouring while watching tv so I might remake it and try a little embellishing just for the fun of it.
Supplies:
Stamps: Blooming Garden, Truly Great, Lace Edgings (PB)
Pencils: Albrecht Durer Watercolour pencils Vandyke Brown 176, Medium Flesh 131 (Faber-Castell)
Inks: Memento Rich Cocoa (Tsukineko) Vintage Photo, Peeled Paint & Victorian Velvet distress stains (Ranger)
Creative Dies: Field of Dreams (PB)
Cardstock: Fabriano 100% cotton hot pressed watercolour paper
Softly, softly
Posted: March 29, 2014 Filed under: CAS, Softly, Watercolour | Tags: CAS, Faber-Castell Albrecht Durer Watercolour pencils, Fabriano Watercolour Paper, Penny Black stamps, Tsukineko Memento inks 59 Comments
After a week of lovely features on the Penny Black blog I decided to continue playing around with the new large scale stamps. I created a panel with the Softly stamp on watercolour paper without a definite plan of how to use it. Once it was complete I turned it this way and that and used scraps of blank card to frame it so I could decide where to crop it to fit on a 4.25″x 5.5″ cardbase. It was at this point that I chose to have the image in landscape orientation rather than portrait. I like the flowers hanging down.
My watercolouring process began by inking the stamp with Memento Angel Pink and New Sprout markers. These colours are quite pale and when stamped made perfect outlines for me fill with colour. I used two pink watercolour pencils and two green, colouring first then blending with a waterbrush. I masked the leaves in the top left hand corner and stamped a couple more flowers.
I was tempted to add a pale watery border but I resisted. I was even more tempted to flick some pink and green droplets over the panel as that is currently my favourite thing to do . I was tempted to add a pretty organza ribbon but my inner Susan Raihala said, “Leave well alone.” She might have suggested bling, which of course she would have pulled off perfectly, but the bling-thing doesn’t come as naturally to me as it does to her so I just stopped. I didn’t want to risk spoiling what I had done.
Would you have added a little something more?
Supplies:
Stamps: Softly, Special Wishes (PB)
Inks: Memento Markers Angel Pink, New Sprout & Memento Luxe Pear Tart(Tsukineko)
Pencils: Albrecht Durer Apple Green 170, Moss Green 168, Middle Purple Pink 125, Pink Madder Lake 129 (Faber-Castell)
Paper: Fabriano 100% & 25% cotton hot pressed watercolour paper
How-to with Large Scale Stamps
Posted: March 26, 2014 Filed under: Delightful | Tags: Penny Black stamps, Penny Black stencils, Tsukineko Memento inks, Tsukineko Radiant Neon inks 10 Comments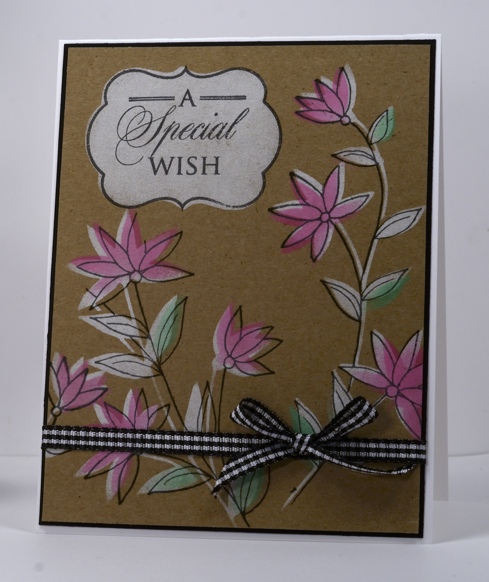
All through this week Penny Black is showcasing their new large scale stamps and co-ordinating stencils.The week kicked off with an inspiring video blog hop featuring seven guest designers and their impressive array of projects. During the rest of the week the PB design team are sharing their projects all with a “how-to” tutorial.
My project is a pictured above and the process is outlined in a photo tutorial on the PB blog . It is unusual to see a kraft card from me but I have to say it makes the perfect background for the new Memento Luxe ink and the Radiant Neon inks.
Supplies:
Stamps: Delightful, Special Wishes (PB)
Stencils: Verdant (PB)
Inks: Memento Luxe Wedding Dress, Radiant Neon Electric Pink, Electric Green & Versafine Onyx Black (Tsukineko)
Paper: Kraft, Black, White
Also: Gingham ribbon
Gathering Together
Posted: March 20, 2014 Filed under: Gathering Together, Twirls | Tags: Penny Black stamps, Ranger Distress stains, Tsukineko Memento inks 17 Comments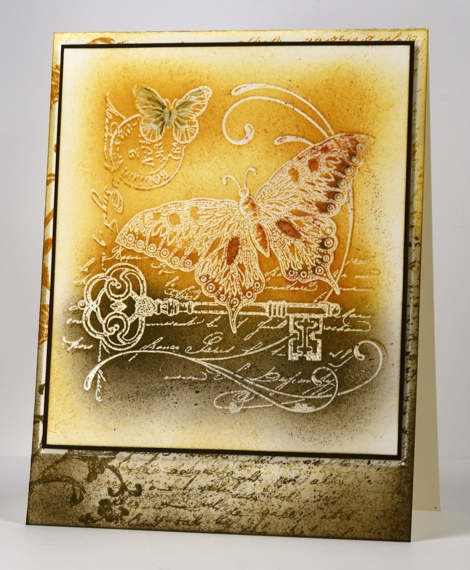
I used the emboss resist technique to add my warm tones to this collage image from Penny Black. After embossing the image in clear e.p. I stamped the same image over the top with Wild Honey distress ink to give a slight shadow. I sponged Wild Honey over the top two-thirds of the image and walnut stain distress ink over the lower third. I then used watercolour pencils to add some details to the butterflies’ wings. To create the background on the card base I inked the Letter Background stamp with the same two distress inks then stamped it several times to one side of the card base. On the other side I stamped the flourish from “Twirls” also in two colours. Before sponging over the background I positioned a mask which was slightly larger than the matted panel to be added later. This way I ended up with a pale border around the popped up matted panel.
Enjoy your day.
Supplies:
Stamps: Gathering Together, Letter Background, Twirls (PB)
Inks: Memento Espresso Truffle & Versamark (Tsukineko) Distress Wild Honey & Walnut Stain (Ranger)
Pencils: Albrecht Durer Sepia & Venetian Red(Faber-Castell)
Also: Clear Embossing Powder


