
Winter Tree
Posted: November 28, 2018 Filed under: xmas poinsettia cut out | Tags: Penny Black creative dies, Penny Black stamps, Ranger Distress inks, Ranger Distress stains 15 Comments
It is hard to believe I haven’t shared this beautiful tree stamp already. It is a large rubber cling stamp called winter tree and it looks snow laden when stamped. It is a very detailed tree but my treatment has it looking a little more impressionistic. To create the card above I lay the tree stamp on my cold pressed watercolour paper and positioned masking paper around the edges of the stamp. When I lifted the stamp there was a tree shaped space exposed.

I splattered masking fluid over the panel so there were lots of drops in the shape of a tree. When I removed the masking paper I splattered a few more drops of masking fluid around the tree. I placed the panel and stamp in my stamp positioner and dotted distress stain on the stamp. For this tree I used mustard seed, mermaid lagoon, pine needles and blueprint sketch. I stamped a couple of colours at a time until the tree was completely stamped albeit in a loose and watery way. To fill in the background I wanted the same colours but more diluted so I put stain on my glass mat so I could pick it up with a paint brush.

I painted around the tree with water touching the edges of the tree with the paintbrush so the colour would bleed into the sky. To fill the sky I picked up extra colour from my glass mat. When all the paint was dry I removed the masking fluid and added a die cut sentiment and a matching mat.

I followed the same process for the second card but used hot pressed watercolour paper and more colours of distress stain. I also stamped a few trees in the background using a tree from the ‘prancers‘ set and peacock feathers distress ink.

When snow completely covers our Christmas lights the colour does look a bit blurry shining through the snow. That’s what these cards remind me of.

Not that there are any Christmas trees or lights up around here yet. There are members of this family with strong feelings about Christmas decorations!
Supplies
Stamps: winter tree, prancers

Stains: mustard seed, blue print sketch, peacock feathers, pine needles


Die: merry Christmas (PB)


Paper: cold pressed watercolour paper, deep blue cardstock


Tools: MISTI, T ruler, stick-it adhesive, glass mat


Lantern
Posted: November 9, 2018 Filed under: winter branches, Xmas sprigs | Tags: Penny Black stamps, Ranger Distress inks, Ranger Distress stains 8 Comments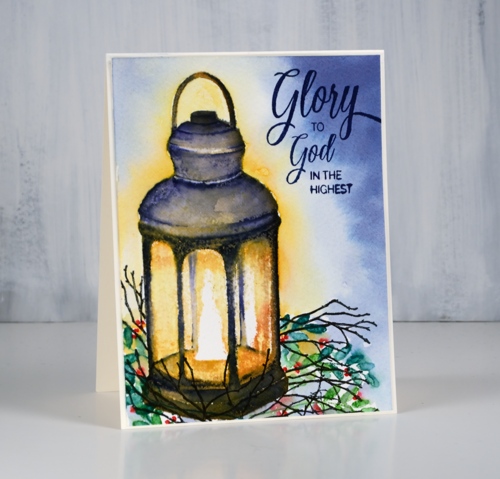
This little light of mine is the ‘lantern’ stamp from Penny Black paired with the ‘Xmas sprigs’ and ‘winter branches’ for added interest. I worked on this panel over several days leaving it in the MISTI the whole time so I could add a bit anytime I was waiting for something else to dry. I definitely made use of the MISTI to build up colour without loosing much detail from the stamp.

The panel is cold pressed watercolour paper; you can see a bit of texture in the yellow areas. I began by stamping the whole lantern in scattered straw distress ink. Next I stamped all but the very centre around the flame with wild honey ink, after than spiced marmalade ink and finally rusty hinge ink, each time leaving more of the centre of the stamp un-inked so the brightest ink was central and the darkest around the edges. At this point I hadn’t done any blending, it was all just stamped. I switched to a chipped sapphire marker and began stamping the details of the lantern and blending them with a wet paintbrush. Dark blue over all the orange tones looked almost black. I stuck with the chipped sapphire marker and kept adding detail, blending, then letting it dry before doing any more. I added detail and shadow to the lantern by painting with chipped sapphire ink then dried the panel before blending the warm tones inside the lantern.

I stamped some foliage around the lantern after positioning a mask over it. I stamped a leaf stamp from the Xmas sprigs set in mowed lawn and pine needles distress inks then dotted some small berries with a candied apple distress marker. I added some winter branches stamped in versafine black then coloured with a fine black micron pen.
I wasn’t sure whether to try adding background colour at this point; It can be a bit risky. I painted scattered straw stain around the lantern and chipped sapphire stain around the edge of the panel then blended some water in between the colours because I didn’t want the yellow and blue mixing to create a strange green light! And it worked better than expected. The final detail was a sentiment in dark blue from the ‘holy night’ set.
Thanks for dropping in today. Enjoy your weekend.
Supplies
Stamps: lantern, Xmas sprigs, winter branches, holy night (PB)


Inks: scattered straw, wild honey, spiced marmalade, rusty hinge, mowed lawn, pine needles, chipped sapphire distress inks & nocturne versafine clair, majestic blue versafine


Markers: chipped sapphire, candied apple distress markers, micron pen


Paper: cold pressed watercolour paper, neenah cream cardstock

Stains: chipped sapphire, scattered straw


Also: MISTI, masking paper

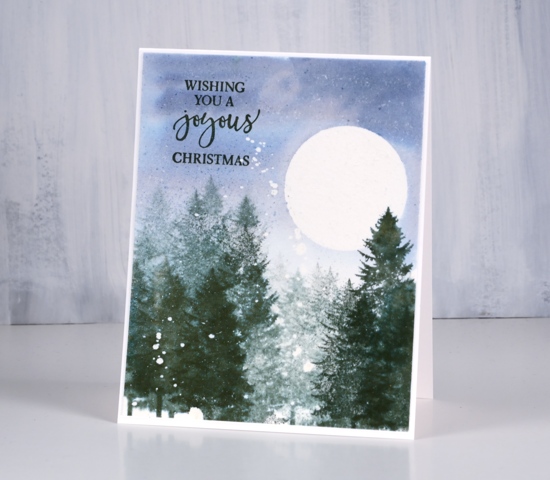
Majestic Mountains
Posted: October 29, 2018 Filed under: majestic mountains, Stamped Landscapes, yuletide greetings | Tags: Darkroom Door stamps, Ranger Distress inks, Ranger Distress stains, Tsukineko Versafine inks 7 Comments
I have a few wintry landscapes to share today featuring stamps from the beautiful new ‘majestic mountains‘ set by Darkroom Door. This set includes three mountains, six sentiments (not featured on these cards) and – happy sigh – four trees! You can find step by step instructions on the Darkroom Door blog. I usually list all the ingredients at the end of the post but today I have included links throughout my descriptions.

On the card above I first splattered masking fluid over cold pressed watercolour paper and let it dry. I placed a torn post-it note mask across the panel then stamped the mountain several times in weathered wood distress ink so the base of the stamp overlapped the post-it. I painted the sky in dusty concord and tumbled glass distress stains then added a small amount of mustard seed stain close to mountain edges. I dried the panel then placed another torn post it note across below the base of the mountains.This was so I could stamp the trees in chipped sapphire distress ink but not have all the trunks showing. Because I was working on cold pressed watercolour paper the tree images were not solid so I used water to blend the ink. I dried the trees then painted a line of weathered wood distress stain along base of trees to create a snow bank and some shadows in the foreground. I removed the masking fluid and added a sentiment from the new Yuletide Greetings Stamp Set in chipped sapphire ink.
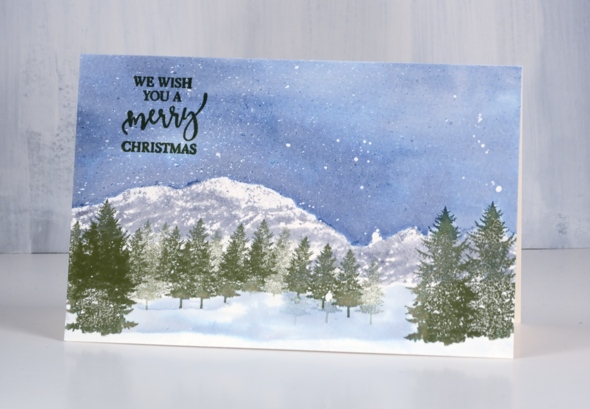
For this second card I once again splattered masking fluid but over hot pressed watercolour paper. Instead of using a post it note I partially inked the mountain stamp in weathered wood distress stain so the bases of the mountains were uneven, then stamped across the lower half of the wide panel. I picked a small tree and stamped repeatedly in front of the mountains in memento olive grove ink including second generation stamping to fill the space. Then I switched to large trees in olive grove ink overlapping some of the small trees.
I painted the sky in stormy sky distress stain taking care to paint to the edge of mountains and tree tops then dried it completely. I removed the masking fluid and chose another sentiment from the Yuletide Greetings to stamp in versafine olympia green ink.

On my last card I wanted a big winter moon so I cut a circle mask from frisket film and attach to a hot pressed watercolour panel then splattered masking fluid over the panel. I painted water over whole panel then added some stormy sky distress stain keeping the colour darkest in the top half. While panel was still damp I stamped a large tree in memento northern pine ink repeatedly using first and second generation stamping for dark and lighter images. I removed the moon mask and stamped one more tree to overlap the moon. I dried the panel completely then removed the masking fluid. I used another sentiment from the Yuletide Greetings Stamp Set in versafine olympia green ink.
This is going to be another of those lovely year round sets but I think it will be all wintry scenes from me for a while. I love having new trees to play with and those mountain stamps make it easy to fill in a simple background. Even though it is still October it has been snowing for the last 24 hours! It’s not going to stay though, definitely not!

Stamps: majestic mountains, yuletide greetings (Darkroom Door)


The rest of the supplies are linked throughout the post. I use affiliate links to the Foiled Fox online store. For no additional cost to you I receive a small commission when you use my links to shop at the Foiled Fox
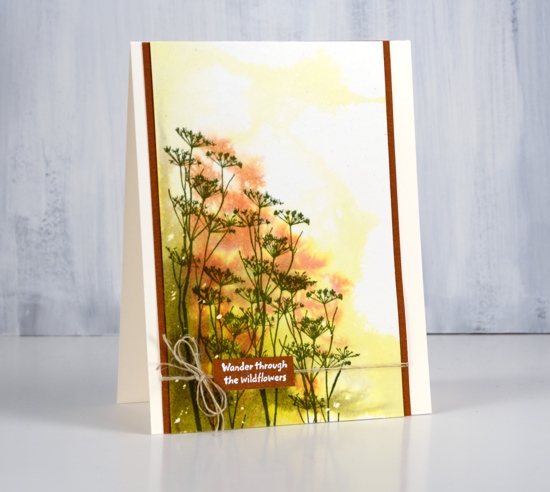
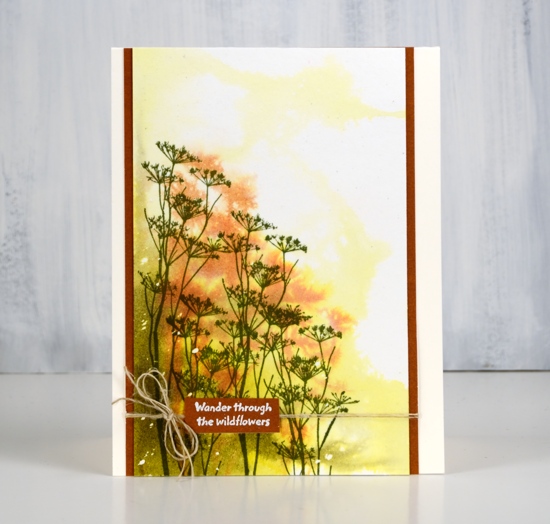
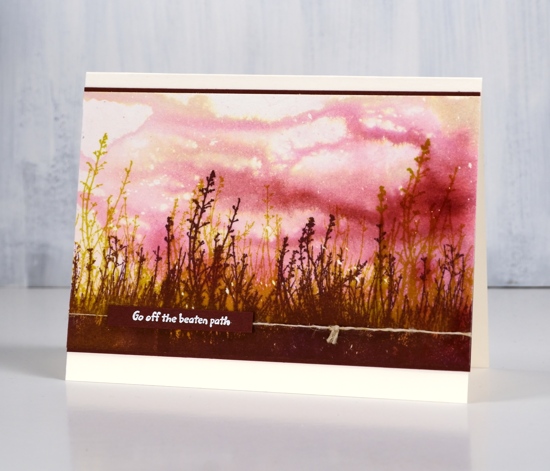
Nature Walk
Posted: October 22, 2018 Filed under: Nature Walk | Tags: Darkroom Door stamps, Ranger Distress stains, Tsukineko Versafine inks 11 Comments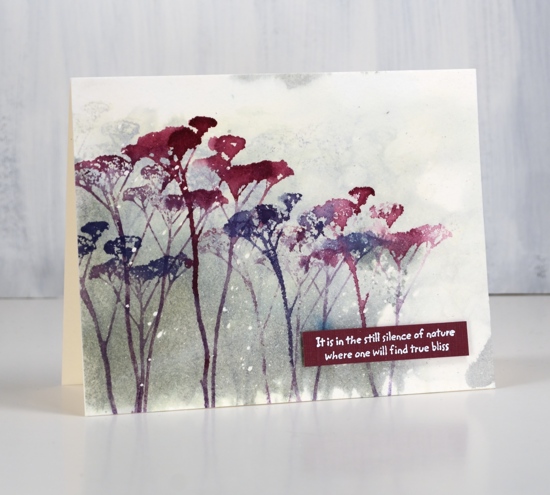
I am over on the Darkroom Door blog today sharing cards made with the gorgeous new ‘Nature Walk‘ set. The flowers and foliage in this set have incredible detail; the first time I stamped them I was blown away by how delicate the images were. For their debut on my blog I wanted to make them as artsy as possible but I will be back showing them off in all their delicate simplicity another day. This first one is my favourite of the three in this post; it reminds me a little of trees in some of Sydney Long’s paintings.
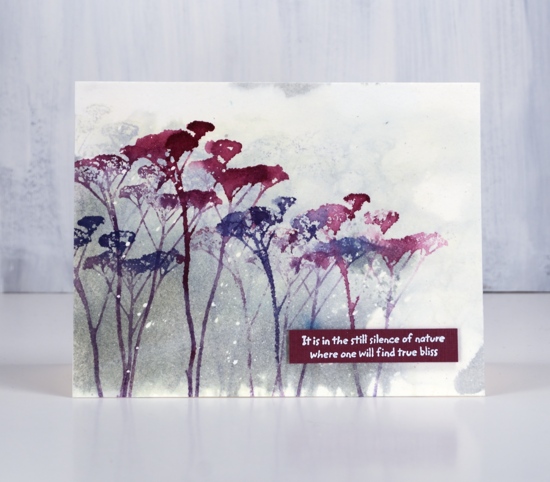
To begin I splattered some masking fluid over hot pressed watercolour paper and let that dry. Next I wet most of the panel with water and repeatedly stamped the round topped wildflowers in bundled sage and iced spruce distress stain. Distress stain is a liquid so it doesn’t stamp a sharp detailed image; stamping it onto partially wet paper resulted in soft background colour with a few shadowy flower heads appearing. I let the panel dry then inked the stamp with chipped sapphire, seedless preserves and dusty concord stains then stamped it several times across the panel. When the panel dried I rubbed off the masking fluid, added a sentiment embossed in white on co-ordinating cardstock and attached the panel to a white card base.
Supplies
Stamps: nature walk (DD)

Stains: bundled sage, iced spruce, chipped sapphire, dusty concord, seedless preserves (card 1)


crushed olive, rusty hinge, forest moss (card 2)


antique linen, aged mahogany, victorian velvet (card 3)


Inks: versamark & shady lane, chianti, golden meadows versafine clair,


Paper: hot pressed watercolour paper, neenah natural cardstock, burgandy cardstock, rust cardstock

Also: Cutterpillar glass mat, white embossing fluid, masking fluid, twine,


Pine Forest
Posted: October 4, 2018 Filed under: pine forest | Tags: Penny Black stamps, Ranger Distress inks, Ranger Distress stains, Tsukineko Versafine inks 5 Comments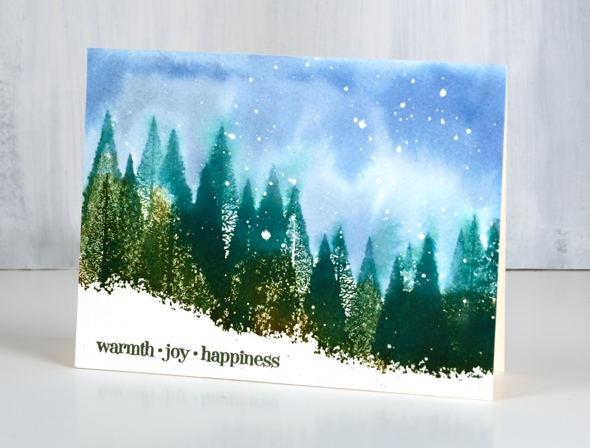
As I’ve said before, you can never have too many tree stamps! This one is a beauty from Penny Black. I used three green inks plus a spritz of water on the stamp; you can’t see all the detail in the trees but the mix of solid and delicate lines makes for a lot of texture. I used forest moss, pine needles, evergreen bough distress inks stamped onto cold pressed watercolour paper which I had splattered masking fluid on earlier.
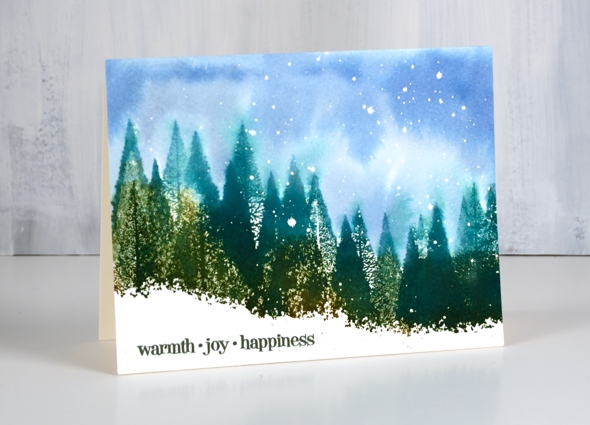
After stamping the trees I painted the sky in chipped sapphire and stormy sky stains. I painted in amongst the trees so there is some green bleeding into the blue sky. I don’t let that bother me; it adds to the loose artsy feel.

Once the panel was dry I removed the masking fluid to reveal dots of snow and added a sentiment in versafine ink.
I am thankful you stopped by today.
Supplies
Stamps: pine forest 40-638(PB), Christmas sentiments 30-504(PB)


Inks: forest moss, pine needles, evergreen bough distress inks & chipped sapphire, stormy sky distress stains & Olympia green versafine ink


Paper: cold pressed watercolour paper
Also: masking fluid
Turnabout leaves again
Posted: October 3, 2018 Filed under: thankful leaves turnabout | Tags: Concord & 9th, Ranger Distress inks, Ranger Distress stains, WOW embossing powders 16 Comments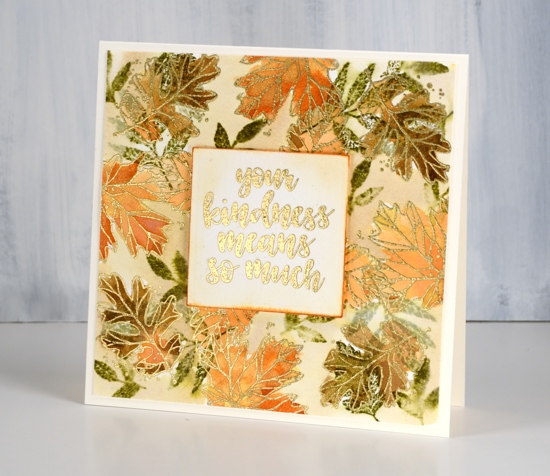
In creating this card I didn’t quite follow the directions properly for a turnabout stamp. I didn’t attach my piece of watercolour paper to a 6’x6″ square of cardstock but my piece was close to 6″ so it wasn’t a waste of paper. (It is worthwhile to watch one of the Concord & 9th videos explaining how the turnabout stamps work. You know, if all else fails read the instructions, ha!) I also chose not to ink all the leaves on the turnabout stamp so as to feature the line images more than the solid ones. I inked the line images in versamark, stamped, rotated the watercolour panel and repeated. Once I had oriented the panel in all four directions I embossed all the line leaves in gold powder. I also inked some of the small leaves in forest moss distress ink. I used distress inks pressed onto my glass mat as paint to fill in all the embossed leaves.
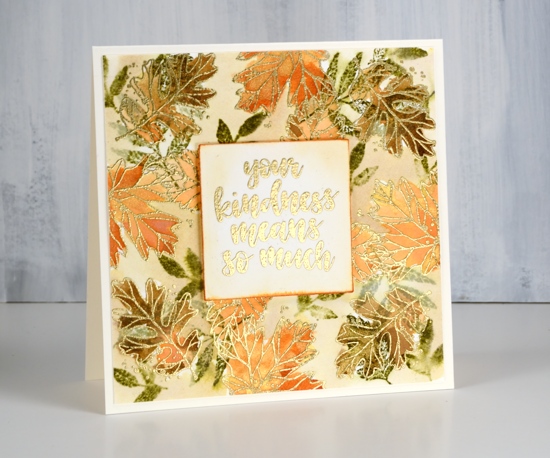
As I hadn’t stamped all the images on the turnabout stamp I had a bit of space between leaves so I loosely painted antique linen distress stain around the leaves. I stamped one of the sentiments included in the set on a square of hot pressed watercolour paper, painted some antique linen around it and dragged the edges across a rusty hinge distress ink pad to frame the panel.
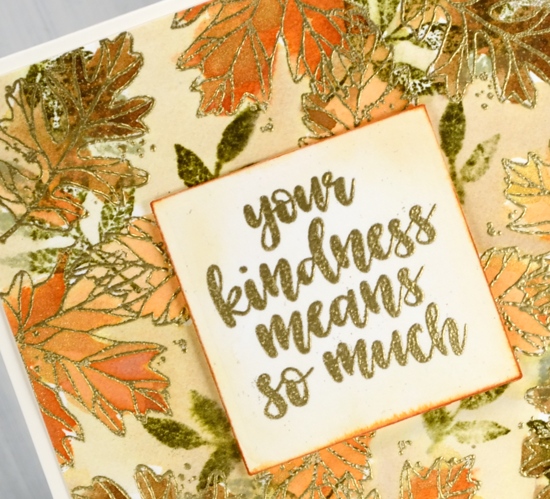
Rusty hinge is my current fave distress ink colour. I have been through a few favourites which remain in my top ten. Chipped sapphire is a long time favourite; it is deep blue after all. Spiced marmalade changed my mind about orange; I used to pick it last. Stormy sky is such a beautiful grey blue and gets along with all the colours. Forest moss tends to be the colour of all my leaves; I have to remind myself that leaves come in light green and bright green too. Seedless preserves is the prettiest deep pink around, dark or diluted it’s a winner. What are your favourite ink colours? Let me know; I might have to add to my collection.
I’m so thankful you dropped in today; take care.
Supplies
Stamps: thankful leaves turnabout stamps

Inks: forest moss, dried marigold, rusty hinge distress inks, versamark


Stain: antique linen distress stain
Paper: hot pressed watercolour, neenah natural white
Tools: cutterpillar glass mat, misti stamping positioner
Also: gold embossing powder, Ken Oliver gold liquid metal

Grateful for all you’ve done
Posted: October 1, 2018 Filed under: grateful for everything | Tags: Brusho, Concord & 9th, Ranger Distress stains 8 Comments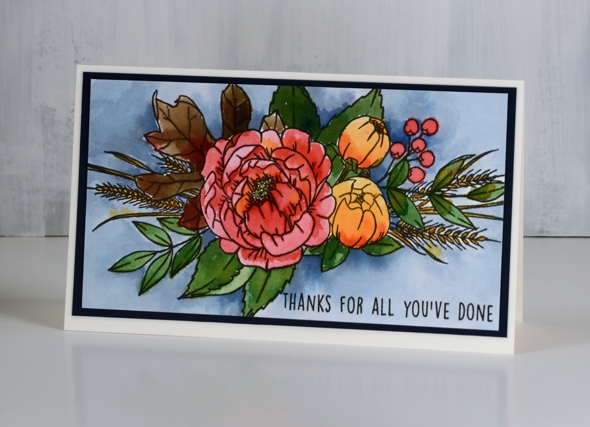
Thank you to all who joined in last week and shared what they are thankful for. It was a privilege to read your comments and to know so many of you are grateful for family, friends, our faithful God, health, safety and the joy of this hobby we share. The Foiled Fox and I are leaving the comments open on our posts from last week so you can still share what you are thankful for and be entered in the giveaway.
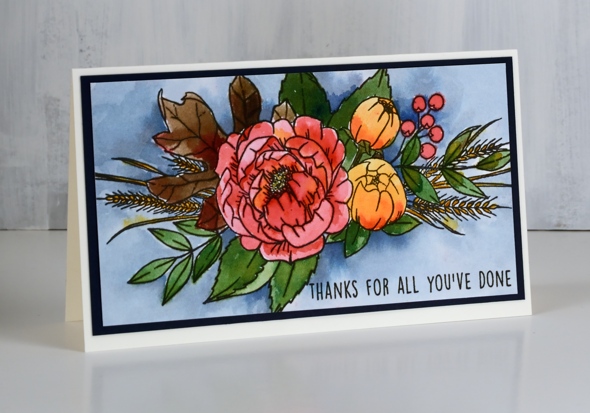
I posted a card made with this stamp a week or so back but have quite a different look on today’s card. The stamp is flipped around and stamped in versafine clair nocturne on hot pressed watercolour paper. I painted with brusho paints and used only three colours: rose red, gamboge and olive green. The brown leaf is a mix of olive green and rose red. The blue background is painted with stormy sky distress stain.

I matted the panel in navy and attached it to a white card base.
Supplies
Stamps: grateful for everything, kindhearted (C&9th)


Inks: versafine clair nocturne & stormy sky distress stain

Paint: brusho rose red, gamboge, olive green

Paper: hot pressed watercolour paper, navy cardstock, neenah natural white
Peaceful
Posted: September 12, 2018 Filed under: peaceful | Tags: Penny Black stamps, Ranger Distress stains, Tsukineko Versafine inks 8 Comments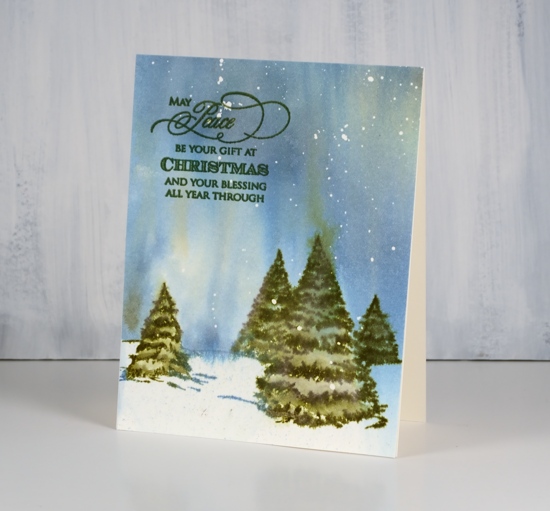
This simple card utilises only two stamps and three inks but I think it manages to convey an impression of a big winter sky. I splattered masking fluid on hot pressed watercolour paper then, after it had dried I sprayed water, stormy sky and forest moss stains over the panel. I did it fairly randomly but tilted the paper to keep one corner pale while the rest of the panel filled with colour.
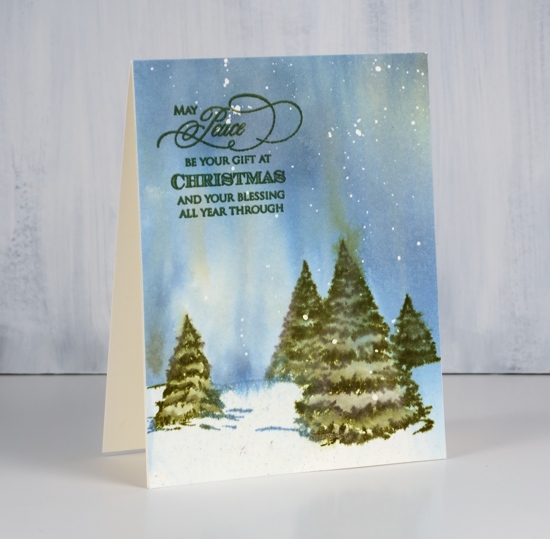
When the sky was partially dry I stamped the trees with forest moss distress ink. With the trees in place I added more drops of stormy sky stain and scattered straw stain while tilting the panel upside down to make the colours bleed up into the sky like the northern lights. I blended forest moss stain into the stamped trees then let the panel dry before removing the masking fluid.

I trimmed the panel to cover the whole card front and added a sentiment from the PB ‘Christmas and love’ set. I had forgotten how much I like the look of masking fluid splatter. I use it more as snow in wintry scenes than anything else but it adds a little something to other designs also. Now I want to go and splatter masking fluid on all my watercolour paper…
Supplies
Stamps: peaceful 30-511(PB), Christmas and love 30-508(PB)


Inks: forest moss distress stain, stormy sky distress stain, scattered straw distress stain olympia green versafine
Paper: hot pressed watercolour
Also: masking fluid
Grevillea aflame
Posted: September 7, 2018 Filed under: grevilleas | Tags: Brusho, Darkroom Door stamps, Ranger Distress stains 8 Comments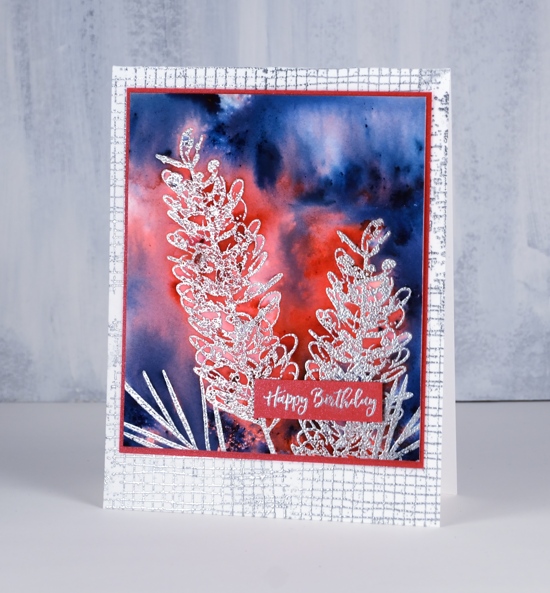
Thank you for the lovely comments you left on my previous post, also featuring the grevillea stamps. I love hearing from you and was very touched by your sweet words about me and my dad.
I’m sharing cards over on the Darkroom Door blog today. If you haven’t visited there you should; there is a collection of amazing artists who share their creations there. I have a couple of grevillea cards to share with you today. One of them not too realistic in colour but still bright and bold like the real thing. I stamped the grevillea in versamark twice and the foliage twice then embossed in silver embossing powder on hot pressed watercolour paper. I sprinkled brilliant red brusho around the flower heads and prussian blue brusho round the perimeter of the panel, spritzed with water and let the brusho activate before adding any more. I then played around with adding more water and tilting to make paint move. I also used a brush to pick up wet paint from panel to move it to an empty area then let it dry. 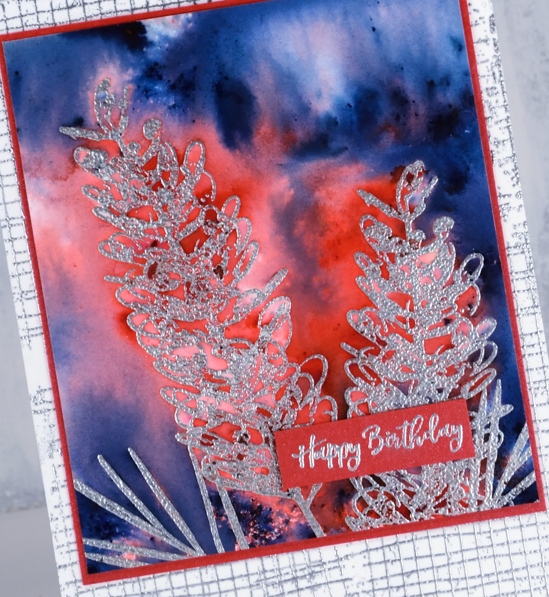
For a background I stamped mesh textures stamp four times on white card base with versamark ink (you could use mesh background stamp if you have it to fill card base) and embossed in silver. I stamped a sentiment from happy birthday sentiment strip in versamark on red cardstock and embossed it with silver powder. To complete the card I matted the grevillea panel with red cardstock and attached it to the card base.
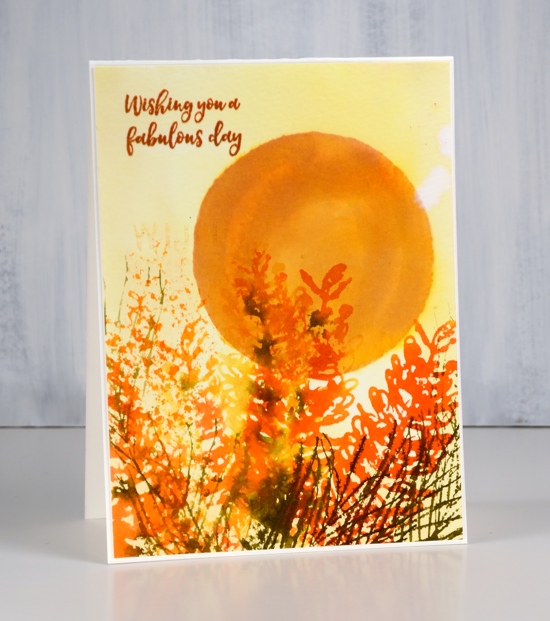
For this more realistic colour scheme I painted a circle in wild honey distress stain on cold pressed watercolour paper and let it dry. Then I painted scattered straw distress stain over whole panel and let that dry. I inked the large grevillea flower in wild honey, ripe persimmon, spiced marmalade and forest moss distress stains, spritzed stamp then stamped on the watercolour panel. I repeated by spritzing the stamp to get a paler impression then followed the same procedure to fill the base of the panel with flowers. I inked the foliage stamp with forest moss distress ink, stamped and restamped for bold and paler images.
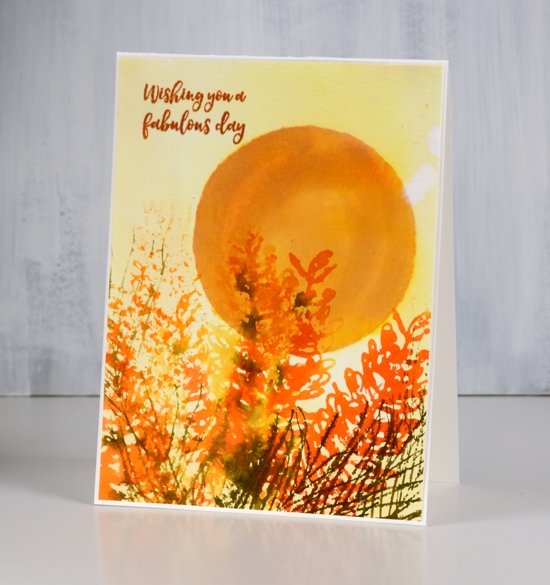
To finish I stamped a sentiment from ‘happy birthday’ set in rusty hinge distress ink then trimmed and attached the panel to natural white card base.

Supplies
Stamps: grevilleas, happy birthday, mesh textures (DD)


Card 1 Inks: versamark
Card 2 Inks: wild honey, scattered straw, ripe persimmon, spiced marmalade, forest moss distress stains, rusty hinge distress ink


Paint: brilliant red, prussian blue brusho
Paper: hot pressed watercolour paper, neenah natural white cardstock, neenah solar white, red cardstock
Also: stamping platform, silver embossing powder


Mesh stencil butterflies
Posted: September 3, 2018 Filed under: Butterflies, mesh | Tags: Darkroom Door stamps, Nuvo embellishment mousse, Ranger Distress inks, Ranger Distress stains 6 Comments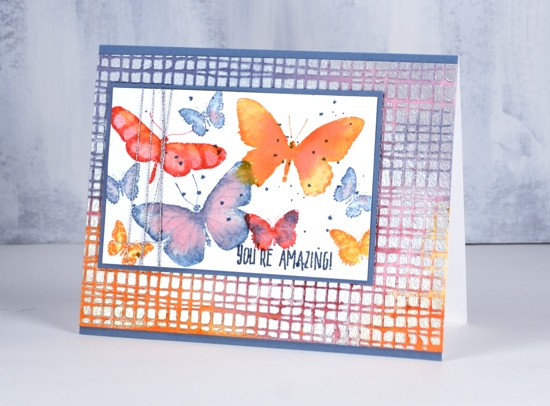
There is plenty of texture on today’s card, more than most of my projects. The pretty shimmer which is only just apparent in the photos is from Nuvo pure platinum embellishment mousse. I pressed it through the Darkroom Door mesh stencil onto watercolour paper. Once the mousse had dried I added distress stains over the mousse. It soaked into the paper but was easily polished off the mousse.
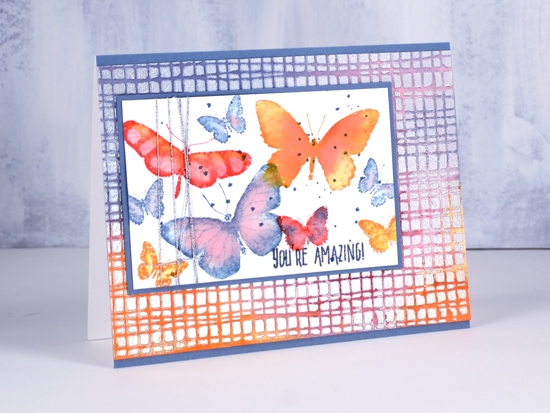
To create the butterfly panel I stamped with the same colour inks as previously used stains. After stamping the butterflies in one colour I blended with water and added drops of another colour to make them all all two tone. You can also see some dots of blue because I love a little splatter here and there.

I completed the card with a sentiment, some silver cord and co-ordinating blue mats.
Supplies
Stamps: Butterflies, Thank you

Stencil: Small stencil mesh (DD)

Inks: spiced marmalade, festive berries, stormy sky distress inks


Stains: spiced marmalade, festive berries, stormy sky distress stains


Also: nuvo embellishment mousse, silver cord


