
A blessed gift
Posted: January 2, 2018 Filed under: Berry speckled | Tags: Penny Black stamps, Ranger Distress inks, Ranger Distress stains, WOW embossing powders 3 Comments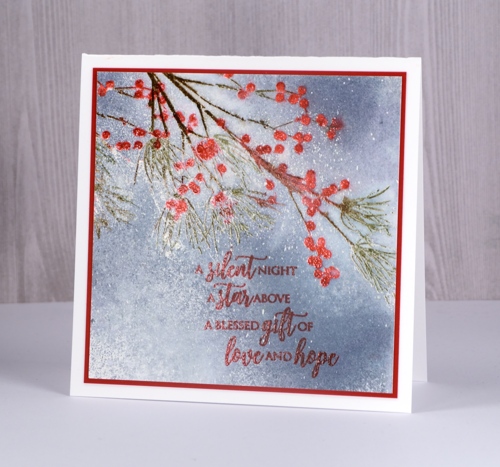
On the ninth day of Christmas I am returning to the blog. I’ve been enjoying some time with family and friends, relaxing, reading but I have not been creating cards! This panel started out as a practice for another project but I ended up turning it into a card anyway. I began with a panel of hot pressed watercolour paper with masking fluid splattered over it. I used a stamp positioner to stamp the different coloured elements of the berry branch in distress inks then embossed over the image with embossing powder. Unfortunately when you put embossing powder over masking fluid it sticks so the panel became very textured and very speckled with ‘snow’. I painted weathered wood distress stain over the background added a sentiment but was not able to remove much of the masking fluid as I had ‘glued’ it there with heat embossing!
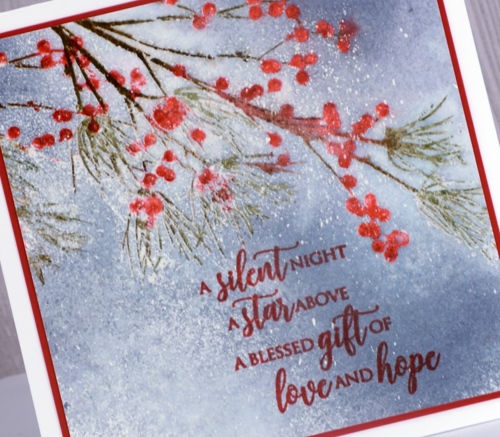
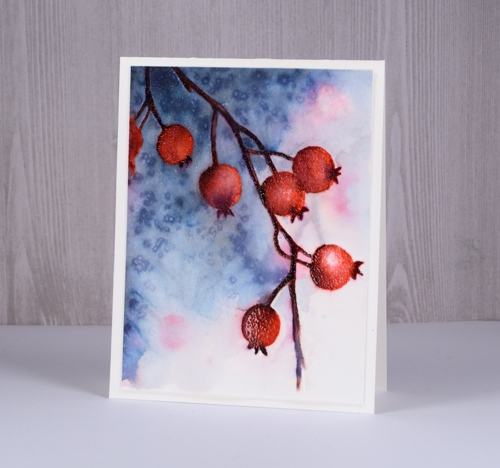
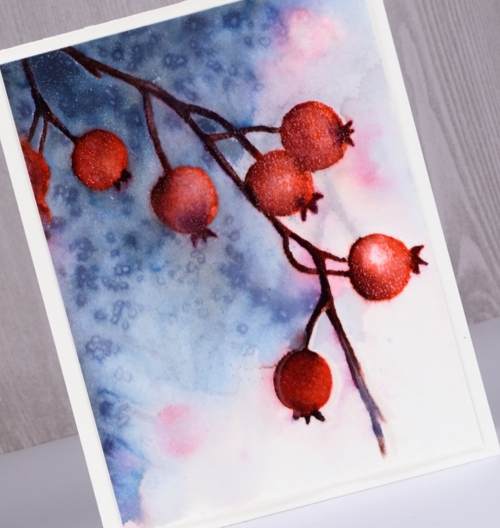
As this was a practice panel I changed my order of operations when I made the next card, stamping and embossing first then splattering masking fluid second. I hope your 2018 is off to a great start. I have been busy keeping up with Dressember details which I will post more about later but I’ll just add a quick thank you here to all who have donated to this worthy cause; you have really encouraged me.
Supplies
Stamps: berry speckled, peace & love


Inks: versamark, crimson red versamark, weathered wood distress stain


Distress Markers: festive berries, gathered twig, barn door, forest moss


Paper: Neenah solar white cardstock, hot pressed watercolour paper, neenah red pepper cardstock


Also: stamping platform, masking fluid, WOW clear gloss superfine embossing powder


Winter wardrobe
Posted: December 22, 2017 Filed under: Skis 'n' sled, winter wardrobe | Tags: Kuretake Gansai Tambi watercolour paints, Penny Black creative dies, Penny Black stamps, Tsukineko Versafine inks 1 Comment
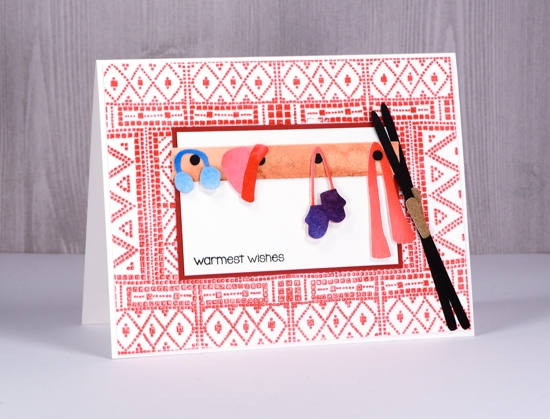
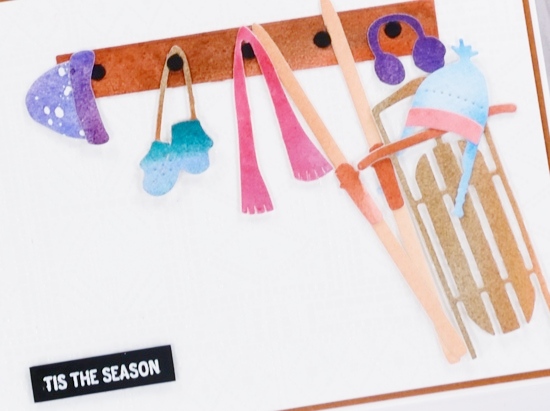
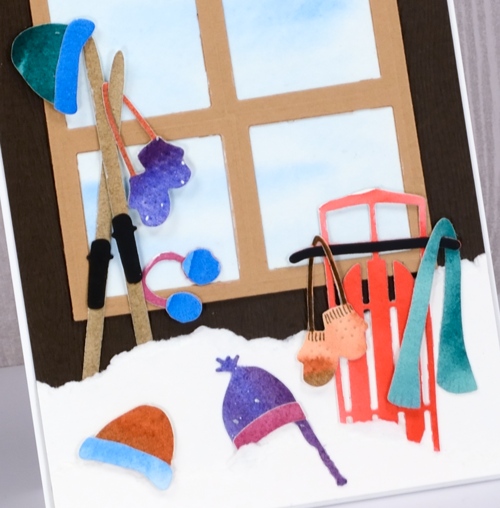
I had some fun and a certain amount of frustration putting today’s cards together. The fiddliness factor was high, well for me anyway. All three cards feature the winter wardrobe and sled ‘n’ skies die sets from Penny Black. I’ve backed them with the mosaic pattern stamp on the first two cards and created an outside window backdrop for the final card.
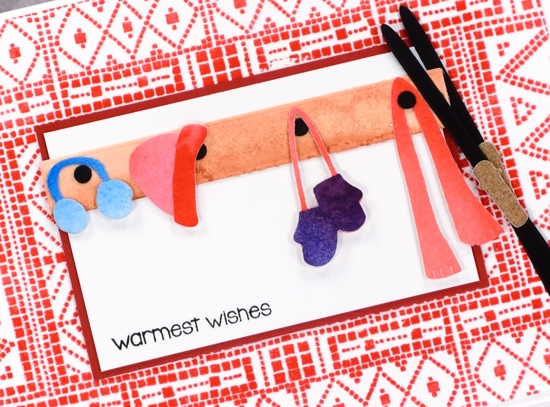
On the cards above and below I stamped the mosaic background stamp then embossed in clear powder. Above I used versafine crimson red ink; below I used versamark. To create all the clothing, skis and sleds I painted scraps of watercolour paper with gansai tambi paints. I had a bunch of coloured scraps that I lay the various dies on to cut as many elements as I could. I also cut a few from black card stock. When I had all my little bits and pieces cut out I arranged them on a white sheet of paper and started making combinations and vignettes. For a few crazy moments I thought about videoing the process of putting these cute little collections together then realized that it would make me want to poke tweezers in my eyes and possibly have the same effect on you, my faithful readers.
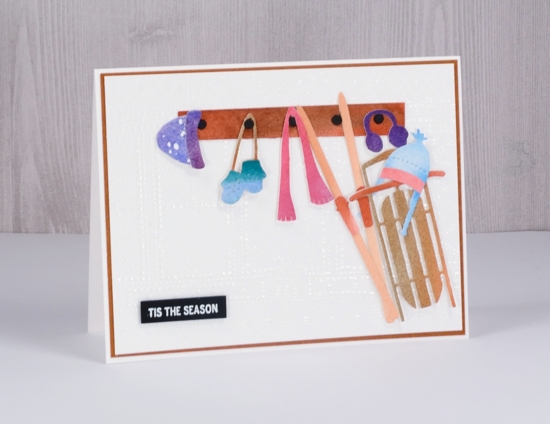
Despite the fiddliness factor it was fun to combine my different coloured hats, mitts, scarves, muffs and trims to co-ordinate and contrast with the sleds and skis.
To create my outdoor scene I used a piece of brown wood textured cardstock then tore some white card to create two layers of snow where I tucked in the sled, skis and hats (or beanies and toques depending where you come from!) I painted pale blue on a white piece of watercolour paper for the window panel and die cut a light brown square with four more squares cut from it for the window frame.
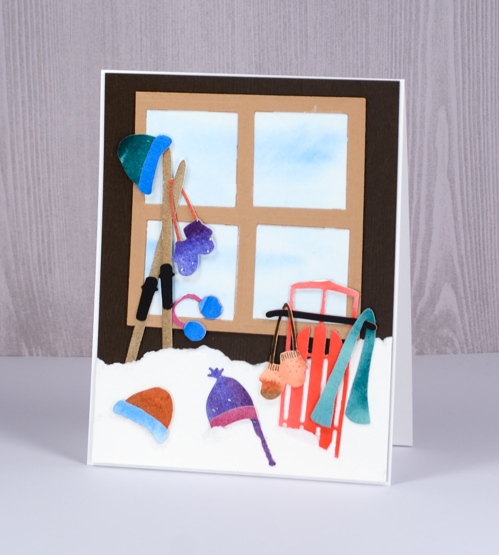
All three panels are on white card bases and two feature sentiments from the PB holiday snippets stamp set.
I hope you are having a warm and wonderful day.
Supplies
Stamps: holiday snippets

Dies: winter wardrobe, sled n skis, square dies


Ink: versafine crimson red, versamark


Paper: neenah solar white, neenah epic black, hot pressed watercolour

Paint

Adhesives: multi matte medium, kool tak foam


Dressember update
Posted: December 21, 2017 Filed under: Hello Gorgeous | Tags: Brusho, Faber-Castell Polychromos Colour Pencil, Penny Black stamps, Tsukineko Stazon inks 5 Comments
As we are over half way through December I thought I’d give you an update on Dressember. If you didn’t see my post earlier in the month I am participating in a campaign raising funds to end human trafficking. The campaign is called Dressember and participants all round the world commit to wear a dress every day of December while raising funds and awareness about the fight against modern day slavery.
We are now three weeks into Dressember and I have worn a dress every day. It doesn’t have to be a different dress, some advocates challenge themselves to wear the same dress all 31 days. The first week of December was relatively mild for Ottawa but it has since got cold, cold, cold. I am wearing my dresses but often with sweaters and woolly tights.
I have been very encouraged by the support I have received from the cardmaking community. Blog readers and instragram followers have donated to the cause, as have friends I know through my classes. Thank you so much! I am approaching my goal of $1000 but I’m not there yet. If you would like to donate to this worthy cause please click this link to go to my campaign page.

I have been sending one of my cards to each donor (if they share their address with me privately) and it has been exciting to send them locally to Ottawa and Toronto, to several locations in the States, to North Wales and to Melbourne, Australia.

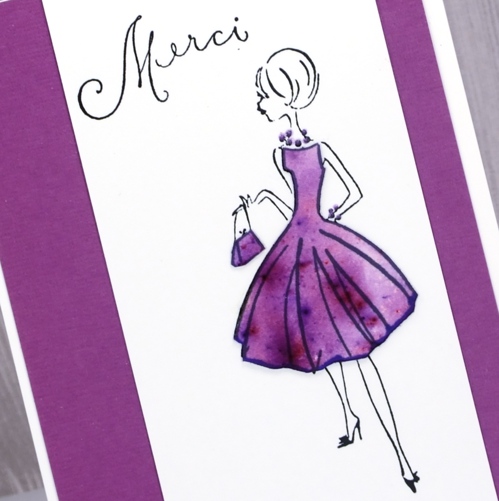
I don’t often include people in my cards, the skin colour gives me trouble. I decided to sidestep that problem on these cards by keeping the girls black and white so it’s all about the dresses! The top dress was painted with purple brusho; I painted on a separate piece of watercolour paper then cut it out and attached it over the black stamped image. I also gave dimension to her necklace and bracelet with nuvo drops. The second dress is coloured with Faber-Castell polychromos pencils then given some shimmer with a clear wink of stella pen. It isn’t obvious in the photo but the fur trim is embossed with diamond white embossing powder to make it sparkly.
They’re simple cards I know, but I’d be happy to own either of those dresses.
Supplies
Stamps: hello gorgeous, relax & enjoy


Paper: neenah solar white, hot pressed watercolour, purple cardstock
Ink: stazon jet black, versafine imperial purple, versamarker

Paint: brusho purple

Pencils: Faber Castell polychromos
Also: WOW diamond white embossing powder, clear wink of stella pen

![]()
Winter Thank you
Posted: December 20, 2017 Filed under: Nature's Friend, snowy village, Stamped Landscapes, Woodland Beauty | Tags: Penny Black stamps, Ranger Distress inks, Ranger Distress stains 5 Comments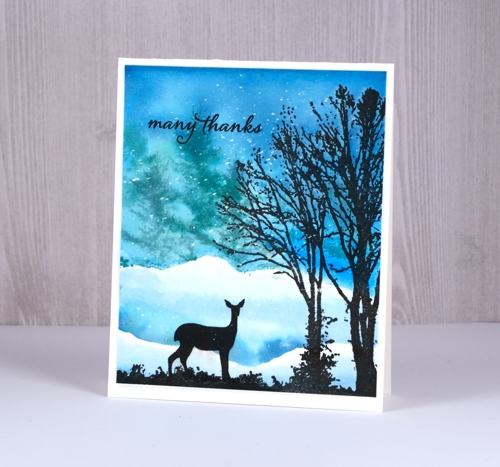
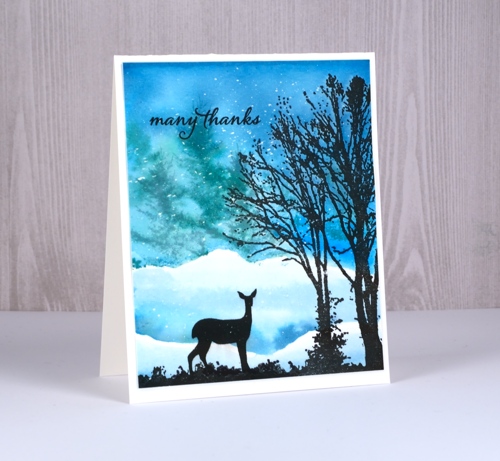
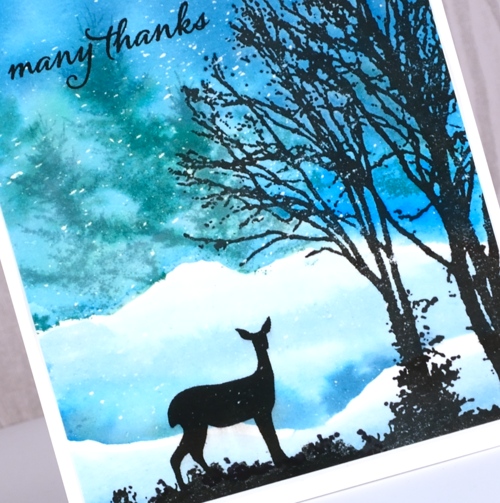
I’m a guest over at the Foiled Fox blog today; you know that is one of my favourite places to share my cards. With less than a week until Christmas I have switched to making thank you cards. This one combines several Penny Black stamps, one from this year and others from Christmasses past. All the snow falling is the effect created when painting over splattered masking fluid. After the painting has dried I rub off the masking to reveal little white dots – snow! The black stamping is done with pigment inks to preserve the sharp defined edges of the trees and deer. The soft tree shapes in the background are stamped in distress inks to enable blending and bleeding into the watercolour sky.
The whole process is described in detail on the Foiled Fox blog and supplies are listed below.
Supplies
Stamps: snowy village, nature’s friends, woodland beauty, happy snippets


Inks: versafine onyx black, evergreen bough distress ink


Distress Stains: salty ocean, faded jeans, evergreen bough


Hot pressed watercolor paper
Also: masking fluid, stamping platform


Circle sky
Posted: December 19, 2017 Filed under: snow covered | Tags: Penny Black stamps, Ranger Distress inks 6 Comments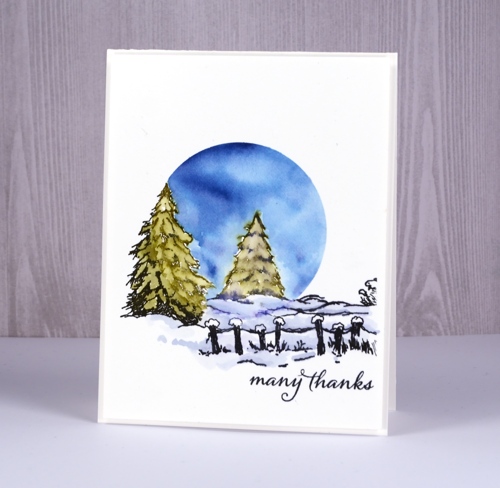
Today’s card is a bit of an experimental piece. I don’t think I would do it quite the same next time but it turned out ok. I used a stamp positioning tool so I could stamp inside my circle mask and outside my circle mask with different colour schemes. I die cut a circle from frisket film (a removable adhesive backed plastic film) and used both the positive and negative pieces for this card. I positioned the negative piece first on hot pressed watercolour paper then stamped the tree stamp from the PB ‘snow covered’ set in forest moss and chipped sapphire ink. I blended the forest moss ink to fill the tree shapes and the chipped sapphire to colour the snow banks then painted the sky with diluted chipped sapphire ink. I dried the painted area then placed the circle mask over the stamping and removed the negative mask. With the painted section covered I inked the stamp in versafine onyx black ink and stamped the rest of the scene. Basically what was inside the circle was in colour, outside the circle was black, white and grey.

I added a sentiment then popped up the panel with some foam.
Supplies
Stamps: snow covered, happy snippets


Ink: versafine onyx black, forest moss distress, chipped sapphire distress


Hot pressed watercolour paper

Also: foam, frisket film
Polar bears
Posted: December 18, 2017 Filed under: mosaic pattern, polar bears | Tags: Kuretake Gansai Tambi watercolour paints, Penny Black creative dies, Penny Black stamps 12 Comments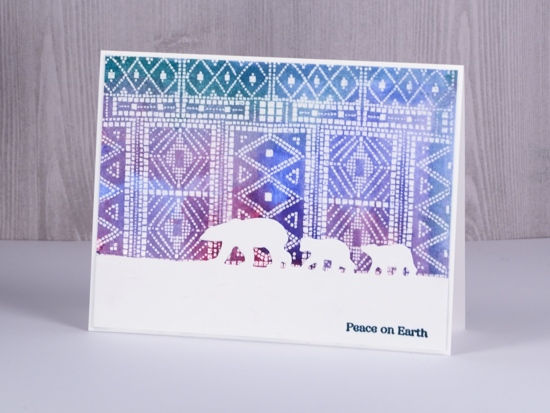
I stamped and embossed four panels of this Penny Black mosaic background recently for a project you’ll see in a few days but then I got another idea and painted over one. When I started painting it I totally forgot that I had not stamped it on watercolour paper but neenah solar white cardstock. I dabbed it dry fairly quickly and although it curled the surface of the paper, it did not end up looking pilled or damaged.
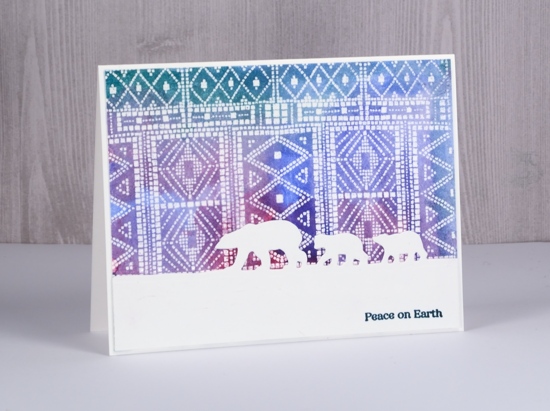
Even though the ‘sky’ is very patterned I still think it gives the impression of northern lights for this little family of bears to wander under. The polar bears die from Penny Black cuts only at the top so the bears appear to be walking across the snow.
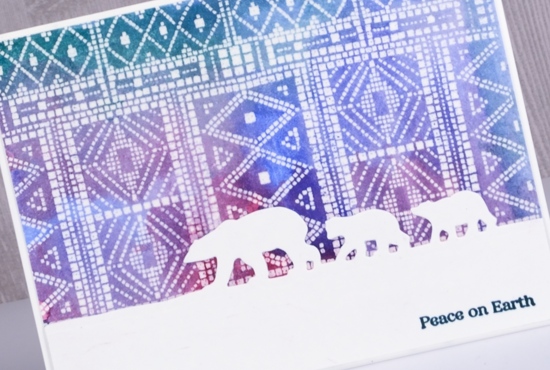
Even though I initially did not plan to do watercolour with this panel I did and it meets the challenge at CAS watercolor this month. As always there is tons of beauty to be found if you check out the team samples and challenge entries.

Supplies
Stamp: mosaic pattern


Die: polar bears

Versamark ink & clear embossing powder
Paint

Berry bramble
Posted: December 15, 2017 Filed under: Berry bramble | Tags: Penny Black stamps, Ranger Distress inks, Ranger Distress stains, WOW embossing powders 12 Comments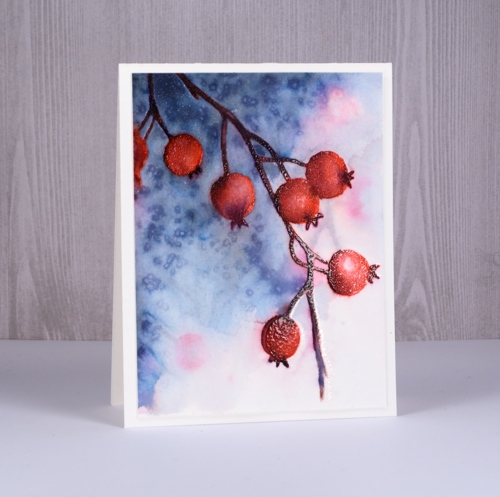
Sometimes it is fun to rediscover and incorporate some techniques you haven’t used for a while. I love to splatter masking fluid over watercolour paper to create the look of falling snow but sometimes I don’t think about it in advance or just don’t want to wait long enough for the masking fluid to dry. Salt to the rescue! While salt does not create bright white dots it does make lighter areas and pretty patterns that look a little like snow or fairy lights.
You can see some pale pink and brown pattern in the background of the scene; to create this I wet the whole panel, inked the stamp with festive berries and ground espresso distress markers and stamped it onto the damp paper. I dabbed at the inky impression immediately with a paper towel so I would have soft shapes that would not overpower the foreground image.After drying the panel completely I put it in my stamping platform for all the berry work. First I inked and stamped the whole stamp with festive berries distress ink.
Next I switched to markers and added shading to the berries and darker colours to the twigs and calyx. (yes, of course I had to look that up!) I used barn door and aged mahogany to add depth and shadow to the berries. I used chipped sapphire and ground espresso to darken the stems and calyx. After I had added colour I used a small paint brush and water to blend the stamped colour. Once the panel dried I embossed the berries with versamark and clear powder which gave them a frosty, shiny look. The embossing made them waterproof so I was able to add weathered wood stain to the panel without diluting the berries. I kept the stain dark on the left and diluted it with water on the right then sprinkled salt to created the speckled effect. I decided not to add a sentiment yet as I think this one might be a winter birthday card not a Christmas card. I popped up the whole panel on some foam and added it to a natural white card base.
Supplies
Stamps: berry bramble

Inks: festive berries distress ink, versamark

Distress markers: barn door, chipped sapphire, aged mahogany, ground espresso


Distress stain: stormy sky

Hot pressed watercolour paper
Also: Tonic stamping platform, WOW clear gloss superfine embossing powder, salt
Journey home
Posted: December 12, 2017 Filed under: Joy to All, Nature's Friend, Spread Cheer | Tags: Brusho, Penny Black stamps 10 Comments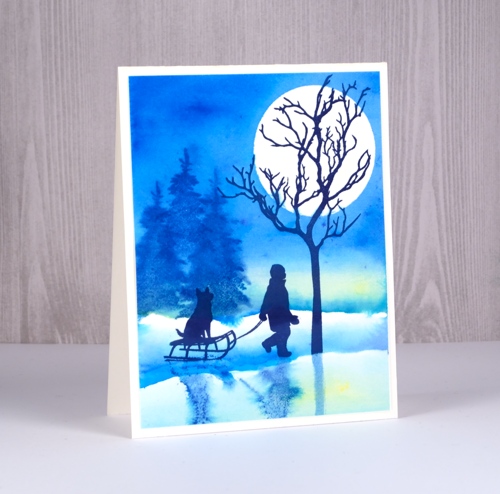
I pulled out of few old favourites for this card, both stamps and techniques. I began by tearing a post-it note mask and positioning it across the bottom of the watercolour paper panel. I then stamped the large tree in onyx black versafine overlapping the mask at the bottom and the boy and sled also in onyx black just above the mask (the stamps and supplies are all listed below). I cut a circle from frisket film and placed it firmly over the tree branches then painted water across the panel from left to right where the sky would be.
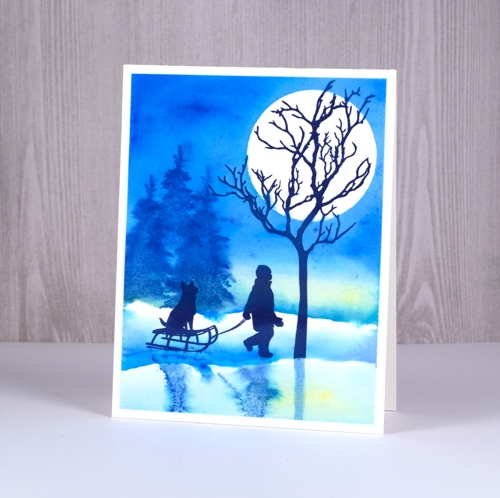
I sprinkled yellow brusho sparingly into the water and blended it to create a ‘glow’ in the sky. Above and below the yellow I painted blue brusho then, while it was still wet, stamped trees in memento Danube blue ink. As the background was damp the impressions have soft blended edges. I mixed a little blue brusho with water on a palette then painted a line of blue below the stamped boy to create a shadowy area where he was walking. I used water to dilute the colour as I extended the colour up towards the horizon. I added more blue below the boy and the tree and diluted that with water.
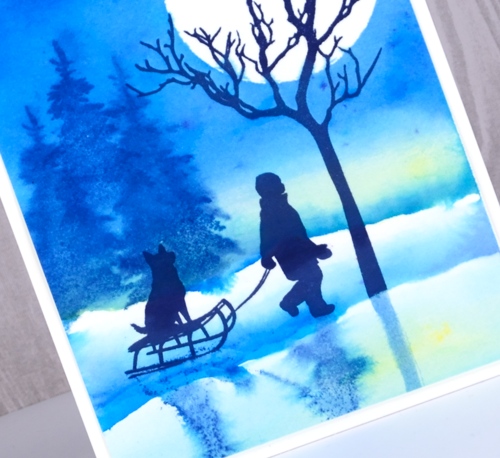
To create the shadow of the boy and his sled I inked the stamp with memento Danube blue and stamped it onto an acrylic block. I stamped the block into the damp watercolour paper where it created a blurred mirror image. I painted straight shadow for the tree also in Danube blue ink. When the ink and paint were dry I removed the moon mask and attached the panel to a natural white card base.
Supplies
Stamps: spread cheer, nature’s friends, joy to all


Inks: versafine majestic blue, memento Danube blue ink


Brusho paints: lemon, cobalt blue


Hot pressed watercolor paper
Also: stamping platform, frisket film, post-it note
Frozen field
Posted: December 7, 2017 Filed under: restful | Tags: Brusho, Penny Black stamps 14 Comments
I have another frosty winter scene to share today, and of the three I’ve shared this week, this one might be my favourite. The reason is that the scenery round here sometimes looks like this in winter. I will admit the moon is rarely that big but when freezing rain creates a layer of ice on top of snow the fields look very shiny and reflective.
As with the previous two projects I used hot pressed watercolour paper. I placed the panel in my stamp positioner 1mm from the top edge then stamped the ‘restful’ stamp in versamark ink. Next I moved the panel up so it was flush against the top edge of the stamp positioner and stamped the tree in versafine onyx black and the rest of the stamp in versafine smokey grey. I then embossed the panel in clear powder. By moving the panel just 1mm up between the two impressions I was able to create the look of snow on top of the branches and fences and uneven ground.
I decided to go for a super moon so I die cut a large circle from frisket film then sliced off a section to create a straight edge. I pressed it down firmly above the horizon. This time I used brusho to add colour to my scene but filled the sky area first with water then sprinkled prussian blue, dark brown and just a touch of yellow onto the damp paper. I tilted the paper or used a paintbrush to guide the colours to where I wanted them then let it dry completely.

I used same method and colours below the horizon but kept them more diluted especially in the area below the moon. Once that was dry I removed the mask and added diluted blue paint to the moon. I almost didn’t add a sentiment but I ended up using two little stamps from ‘festive snippets’embossed in white powder. To finish I added stars with white gel pen then attached the panel to a white card base. If you are a local you might see why this reminds me of the farmer’s fields along Fallowfield…
Supplies
Stamps: restful, festive snippets


versafine onyx black, versafine smokey grey


Uniball signo white gel pen

Hot pressed watercolour paper, neenah solar white cardstock


Brusho paint: prussian blue, dark brown, yellow


Also: clear embossing powder, white embossing powder, frisket film

Snowy Village
Posted: December 6, 2017 Filed under: snow covered, snowy village | Tags: Peerless Transparent Watercolors, Penny Black creative dies, Penny Black stamps 2 Comments
The second of my winter landscapes this week combines two outline stamps, the little village in the background is from the ‘snowy village set’ and the trees and fence stamp is from the ‘snow covered’ set. I stamped both stamps in versafine onyx black ink onto hot pressed watercolour paper. To make sure the two stamps created a cohesive scene I extended some of the snow bank lines with a black embossing pen both to the right of the village and to the left behind the trees then added some mountains in the background. I embossed all the stamping and pen work with clear embossing powder.
To add colour to scene I used the ‘wet into wet’ technique, painting water first into sky area filling all the space above the mountain tops. I worked with peerless watercolours to next add blue paint, then purple and grey to the wet area gradually filling the sky with colour. One by one I painted water into each hill shape then added blue and purple paint from the bottom blending to pale at the top of each hill. I did the same on all the snow banks.
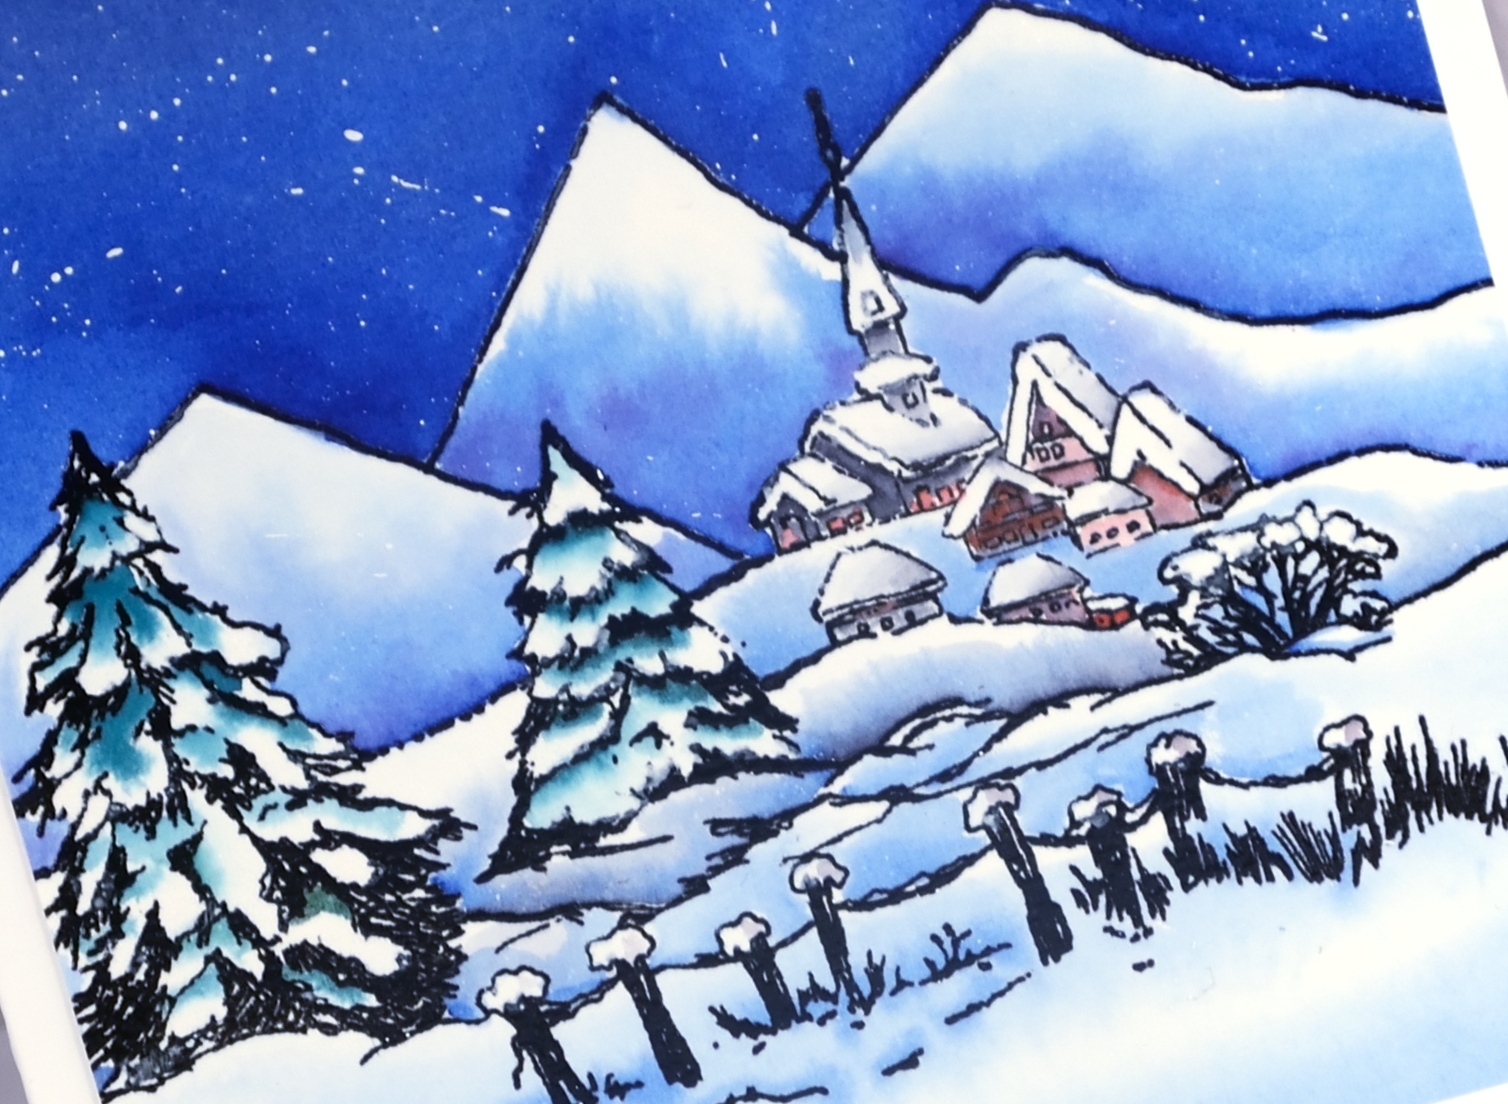
To colour the trees I also painted water over them and added small amounts of green paint while preserving some areas as white. I used grey and red paint to fill the buildings taking care to keeping the snowy roofs white or with minimal grey shading. I splattered white gesso over the sky using a small brush and a toothpick then attached the panel to a white card base.
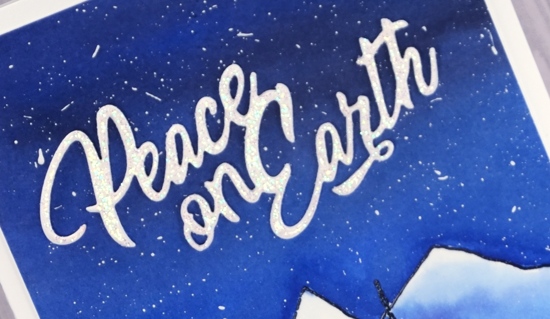
As the sky filled almost half the panel I decided to create a large sparkly sentiment. I cut the ‘peace’ die from white cardstock three times and embossed one with clear sparkle embossing powder. I added glue to the back of each die cut and stacked them on top of each other. I have found the easiest way to get them to line up is to squeeze the layers together from above with a pair of tweezers. It is a quite large card so I did a side fold rather than my usual top fold.
Supplies
Stamps: snowy village, snow covered


Die: peace

Inks: versafine onyx black, black embossing marker
Paint: Peerless transparent watercolors, white gesso


Paper: neenah solar white cardstock, arches hot pressed watercolour paper

Also: WOW clear sparkle embossing powder, clear gloss embossing powder
![]()


