
Stencils & Oxides
Posted: August 16, 2018 Filed under: geometric stars, MFT stencils, Moroccan mosaic | Tags: distress oxide inks, My Favorite Things 5 Comments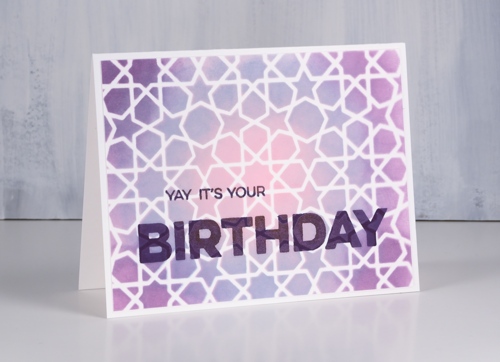
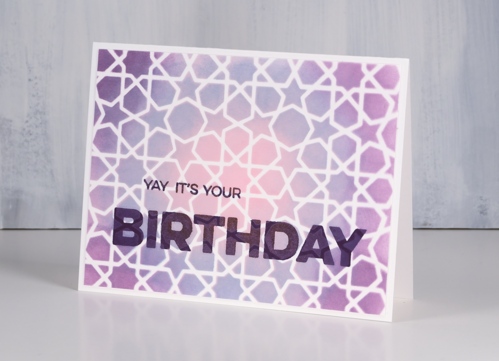
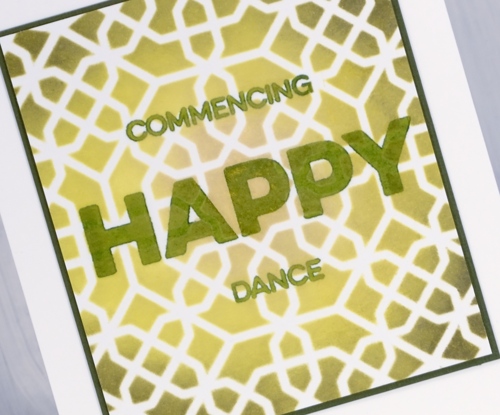
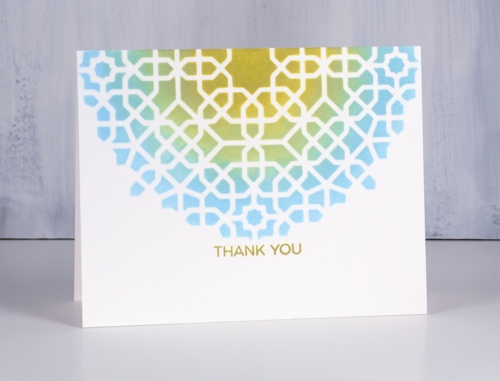
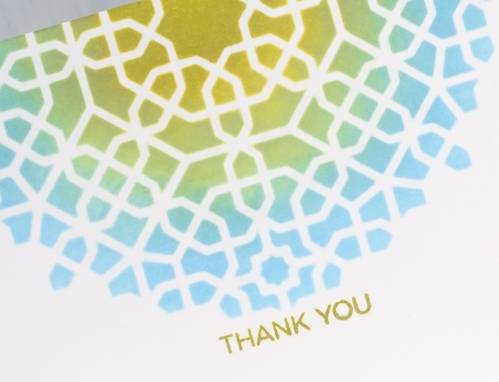
I have new MFT stencils and oxide inks in the house, a good combination for sure as the oxide inks blend so very nicely. The stencils are the focus on today’s cards but I’m sure I’ll have them providing subtle backgrounds on cards in the future. I’m over on the Foiled Fox blog today talking about these cards and my choices for each one. The first card features MFT ‘geometric stars’ stencil. The next two cards are made with the MFT ‘Moroccan mosaic’ stencil.
I used mini ink blending tools and Neenah solar white cardstock to create all the cards.
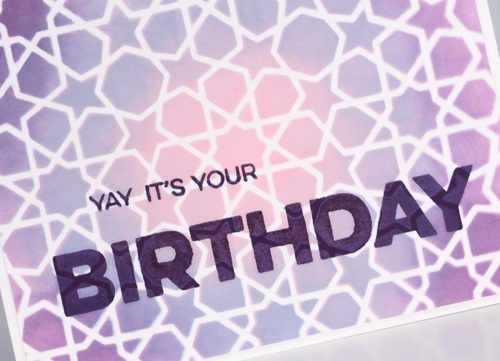
I have some of the new oxide colours so I was keen to try them out. Above are all new stormy sky, spun sugar and dusty concord. (Ahh stormy sky, you are so perfect)
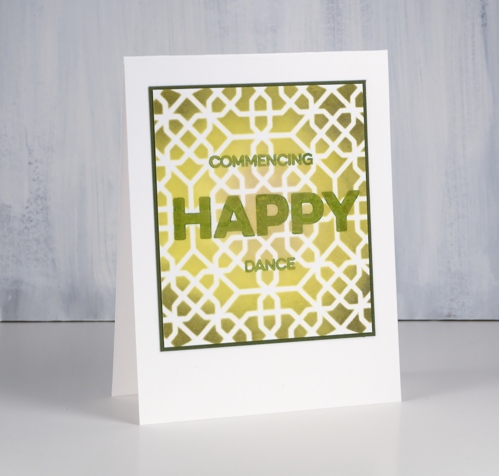
I paired the new crushed olive with the older forest moss. (There is also some antique linen in the middle there but it’s covered up by the HAPPY!) I had fun mixing and matching with some MFT sentiment sets to create all my messages and I love the way the stencilling underneath affects the stamping over the top.
For my final card it was again new oxides, tumbled glass and crushed olive. If you have never blended with oxide inks, you probably should; it’s very satisfying.
I was happy with these colour combos; I’d love to hear which oxides you like to put together.
Supplies
Stamps: Happy Birthday to you, Yay for you (MFT)


Stencils: geometric stars, Moroccan mosaic (MFT


Inks: spun sugar, stormy sky, dusty concord, crushed olive, forest moss, antique linen, tumbled glass oxide inks


Paper: neenah solar white cardstock

Also: cutterpillar glow premium, mini ink blending tool, mini ink blending foams


Painted Prints
Posted: August 14, 2018 Filed under: painted prints | Tags: My Favorite Things, Ranger Distress inks 7 Comments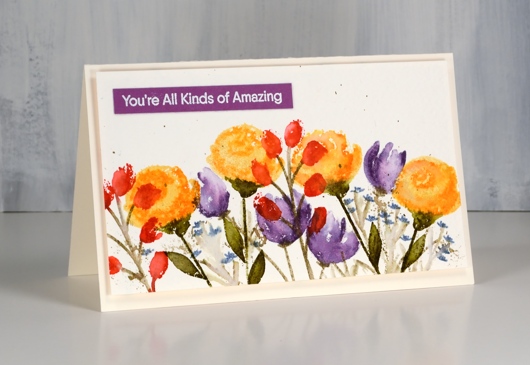
To create this card I worked with a bold red, orange and purple palette on rough watercolour paper with distress ink pads, a little different to the blues, pinks and hot pressed choices I often make. The stamps are from the Painted Prints layering set from My Favorite Things. I started by stamping the roses in scattered straw with the second layer in spiced marmalade. After stamping I blended with a wet paint brush. Next I popped in the purple flowers stamping off with dusty concord for the first layer then using the same ink at full strength for the second layer. The red flowers I used only the second layer stamp with festive berries ink.
The stems or leaves are either forest moss or frayed burlap, stamped then blended with some water. I used a tiny stamp, which I think is for sepals or maybe flower centres, to stamp little flowers in stormy sky ink. I also splattered a little frayed burlap ink over the panel; you know I like a little splatter here and there.
The floral panel is popped up on a piece of orange adhesive backed foam and attached to a cream base. To finish off the card I embossed a sentiment from Anything but basic Friendship set on a strip of purple cardstock in opaque white powder.
Supplies
Stamps: painted prints,


Inks: scattered straw, spiced marmalade, dusty concord, festive berries, frayed burlap, forest moss, stormy sky distress inks, versamark


Cardstock: rough watercolour paper, neenah natural white, purple


Also: opaque white embossing powder, orange fun foam

Summer in the city
Posted: July 30, 2018 Filed under: City stacks, City Stacks dies, Concord & 9th | Tags: Canson watercolour paper, Concord & 9th, Inktense 7 Comments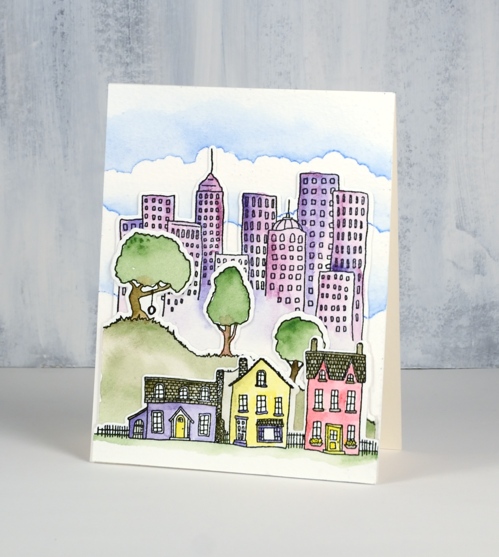
You might not have guessed I would go for this set but I have had so much fun playing with all the possibilities. I am sharing this card and my process over on the Foiled Fox blog today so pop on over there to read about how I made it.
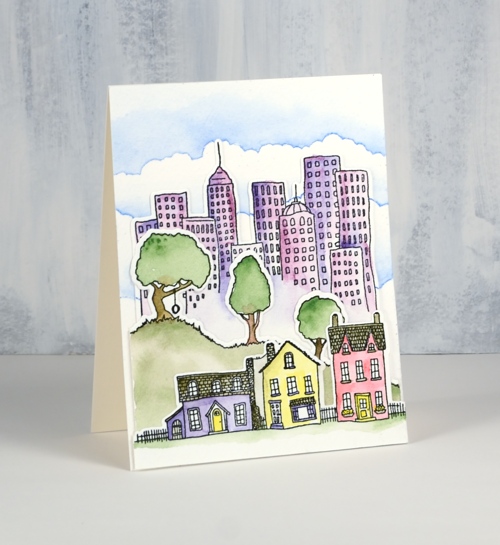
The set is called ‘city stacks’ and there is a matching set of dies to cut out the row of houses, the hill of trees, the collection of skyscrapers and the bank of clouds. This card is definitely a stack of layers, five to be exact including the card base, but I have made a some one and two layer cards with this set also.
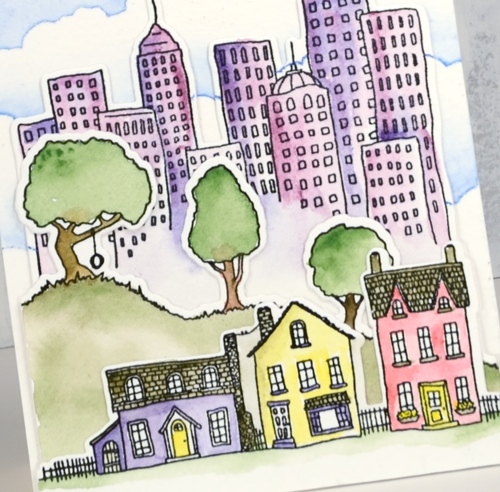
When I saw all the fun that could be had with this set I decided to design a class around it so you can check that out on my upcoming classes page. To see what Laurel Beard dreamed up with this set check out her card on the Foiled Fox blog last week. Now tell me, even if this isn’t your style, can you see why I love this set so much?
Supplies
Stamps: City Stacks (Concord & 9th)

Dies: City Stacks die set (Concord & 9th)

Paper: Canson XL cold pressed watercolour paper, Neenah natural white

Ink

Pencils

Adhesive

Rose bowl
Posted: July 26, 2018 Filed under: rose bowl | Tags: Catherine Pooler inks, Penny Black stamps 7 Comments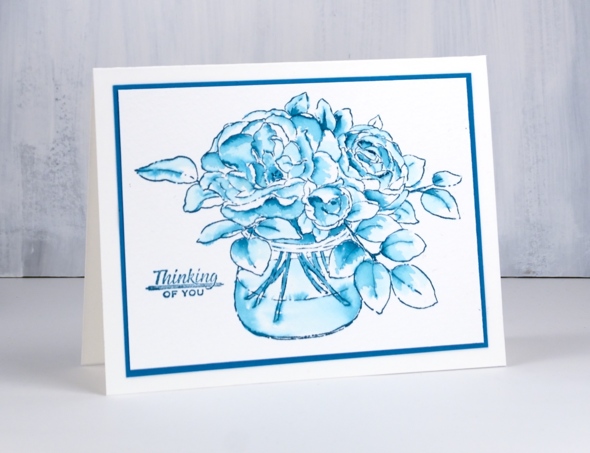
I mentioned recently that I’ve been trying the Catherine Pooler inks for some of my favourite techniques. A watercolour method I often use involves stamping an outline stamp in a nice juicy ink such as distress ink or stain then using a damp brush to pull the ink into the outlined areas (often petals or leaves). I stamped the Penny Black rose bowl stamp in CP daydream ink on cold pressed watercolour paper then used a watercolour brush and some water to blend the stamped ink to create shading and shadow.
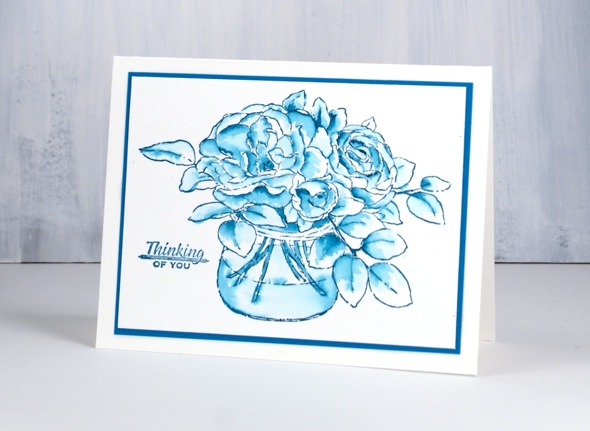
The CP ink is great for this technique; because it is so juicy, there is plenty to blend. At times I blended ink from the outline into the petal then had to dab away some colour because it was too strong. I used either a paper towel or a thirsty brush to pull colour off.
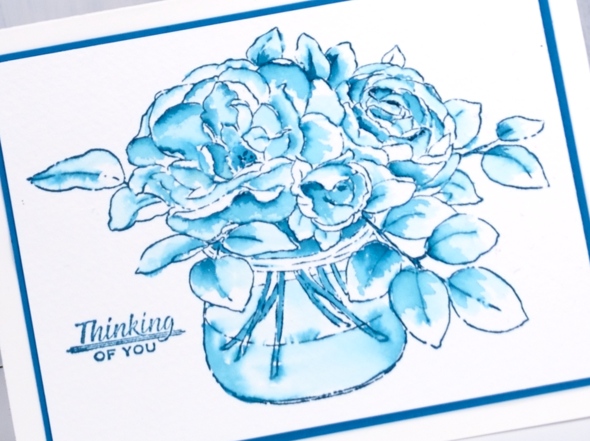
Not sure why I chose to stamp roses in blue to start off with but there they are. I added a sentiment from a set of tiny sentiments, matted in a matching cardstock and ended up with a simple watercolour design. You’ve probably gathered I’ll be using this technique with CP inks again.
Supplies
Stamps: rose bowl (PB), Just a little greeting (Hot off the Press)

Ink: daydream (CP)

Paper: cold pressed watercolour, blue

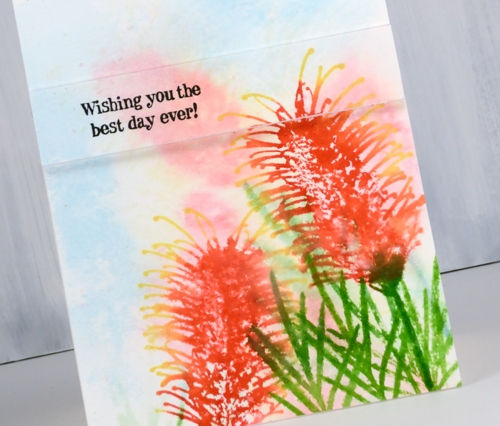
Popped up grevillea
Posted: July 23, 2018 Filed under: grevilleas | Tags: Darkroom Door stamps, Ranger Distress stains 4 Comments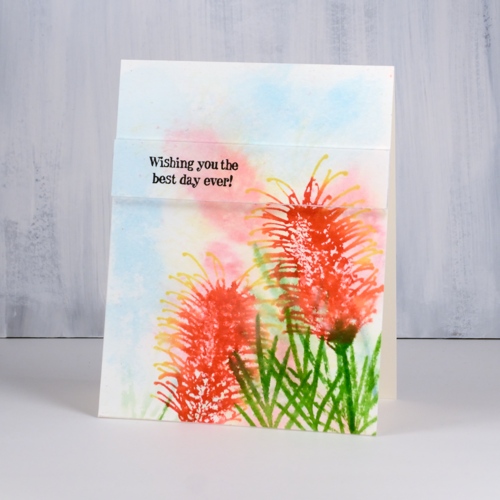
I have a second grevillea card today featuring another of the flowers from the Darkroom Door ‘grevilleas’ set. (you can see my first one here) There are many different shapes, sizes and colours of grevilleas; this one I coloured to look like the ‘coastal sunset grevillea’. To get my background grevilleas I stamped ‘wet into wet’. I painted water over a piece of cold pressed watercolour paper, inked my stamps with distress stains and stamped onto the wet panel. The ink immediately bled into the surrounding area giving me a loose watery image. I blotted the panel with paper towel to stop the ink from moving too much and to soften the depth of colour. I painted a little blue stain around the edges.
I wanted the foreground images to be sharper so I dried the panel with a heat tool. In order to keep the tips of the grevillea yellow and the rest of the styles red, I stamped first in yellow then in red but I wiped red stain off the ends. I used one of the foliage stamps and inked it with two greens for a more realistic look. I spritzed ever so slightly to make the inks blend a little but not so much as to loose the definition in the detailed stamp.
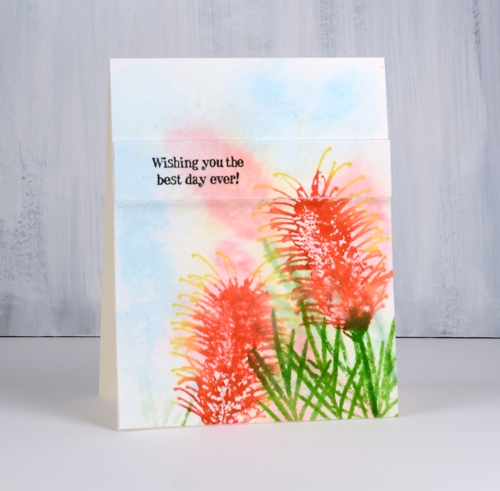
Once my panel was complete, stamped with one sentiment from the new ‘happy birthday’ strip, I cut across the panel to separate the piece containing the sentiment so I could pop it up on a piece of foam.
Supplies
Stamps: grevilleas, happy birthday (DD)


Inks: mowed lawn, peeled paint, scattered straw, festive berries, tumbled glass distress stains, nocturne versafine clair


Paper: hot pressed watercolour paper, neenah natural white cardstock

Also: adhesive backed foam

.
Popped up blooms
Posted: July 18, 2018 Filed under: little lowercase letters, radiating half tone background, stitched blooms, YAY for you | Tags: Catherine Pooler inks, My Favorite Things, WOW embossing powders 2 Comments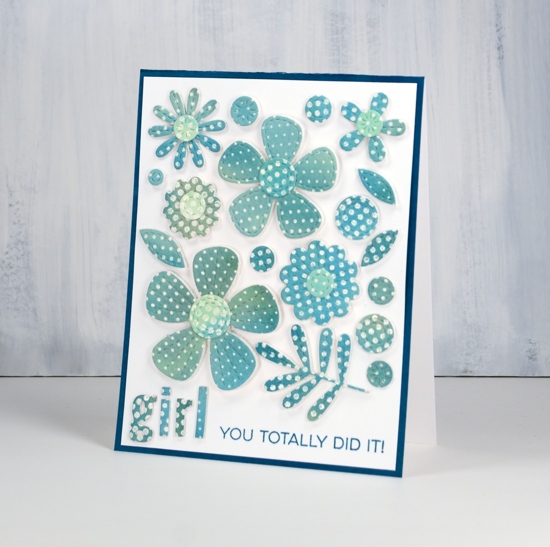
This is the last of my cards made featuring the stitched blooms dies paired with my homemade dotty watercolour panels. I embossed the radiating half tone stamp from MFT on watercolour paper three times then painted over the embossing with Catherine Pooler inks. I used pinks and yellows on one panel then blue and yellow on the others which ended up giving me blue and green variations. You can see the other cards made with the dotty panels here and the card stenciled through a leftover die cut negative here.
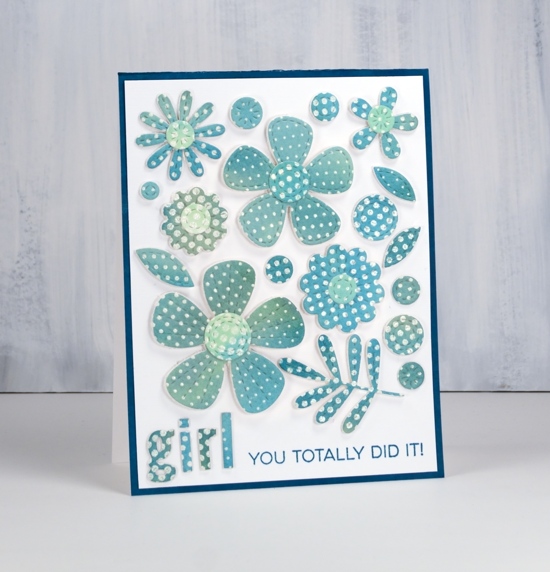
To create this card I attached a watercoloured dotty panel to adhesive backed foam and cut as many dots, leaves and flowers as I could. The watercolour paper attached to foam did make a thick panel for the die cutter to manage so a few passes were necessary. I arranged all my little elements on a white panel along with some letters die cut using the ‘little lowercase letters’ dies from MFT and a sentiment from ‘Yay for you’ stamp set.
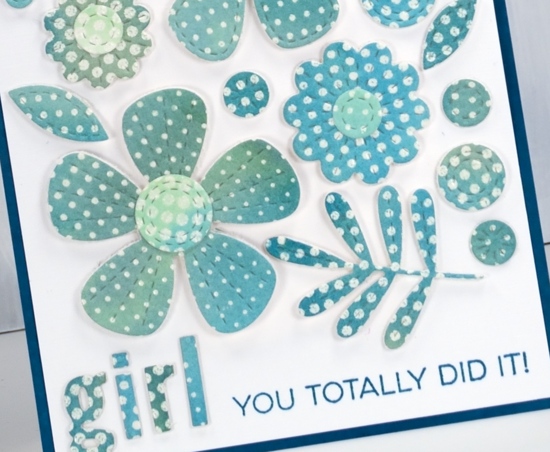
I love the dimension of the foam backed elements on this card and the teal/blue colour scheme; it pleases my matchy-matchy heart.
Supplies
Stamps: MFT Radiating halftone background stamp, Anything but basic friendship set (MFT)


Dies: MFT stitched blooms, MFT little lowercase letters


Inks: Catherine Pooler’s shea butter, spruce, daydream


Paper: hot pressed watercolour paper, neenah solar white, teal
Also: white embossing powder, mono aqua liquid glue, 3D dots foam dot adhesive, adhesive backed foam, T-ruler


Stencilled blooms
Posted: July 16, 2018 Filed under: Anything but basic friendship, friend duo die, stitched blooms | Tags: Catherine Pooler inks, My Favorite Things 3 Comments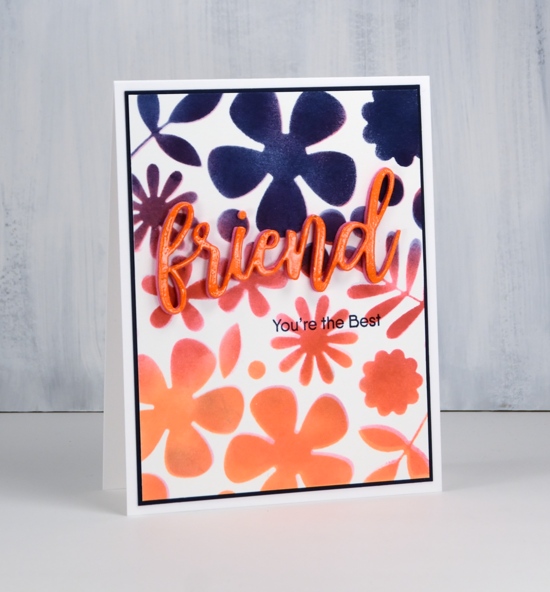
Last week I used a new stamp and new dies from MFT to create some dotted stitched blooms cards. As I had die cut the leaves and flowers from my painted panel without separating the dies I was left with a negative panel. It was quite pretty painted in party dress, bellini and shea butter inks but I decided to use it as a stencil not as a feature. I taped it over a piece of neenah solar white paper and sponged three CP inks through the leaf, flower and dot spaces. I used party dress, bellini and juniper mist inks and overlapped them in places. Unfortunately the stencil moved half way through so I started getting some shadow effects – not a problem – I gave several shapes shadow effects. You can see the depth of colour the Catherine Pooler inks give. I have now watercoloured with them and sponged with them, two techniques you’ll see me apply often. I like the results I am getting so I’ll keep putting them through their paces (and add a few more to my current collection of five).
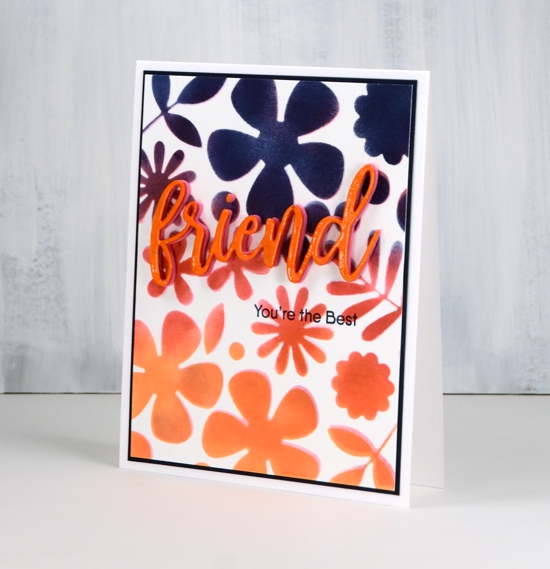
With such bold colours and shapes in the background I needed to make my sentiment stand out. I cut the word friend from orange cardstock, embossed it in clear and added it to two stacked pink foam die-cuts. I added part of a sentiment below in juniper mist ink. To tie that in I matted the whole panel in dark blue and added it to a white card base.

I have one more card made with the last of my three dotted panels; you’ll see that later in the week. Thanks for dropping by.
Supplies
Stamps: Anything but basic friendship set (MFT)
Dies: MFT stitched blooms, MFT friend duo

Inks: Catherine Pooler’s bellini, party dress, juniper mist, versamark


Paper: neenah solar white, dark blue
Also: glue, clear embossing powder

Stitched and dotted blooms
Posted: July 10, 2018 Filed under: Anything but basic friendship, little lowercase letters, radiating half tone background, stitched blooms | Tags: Catherine Pooler inks, My Favorite Things, WOW embossing powders 3 Comments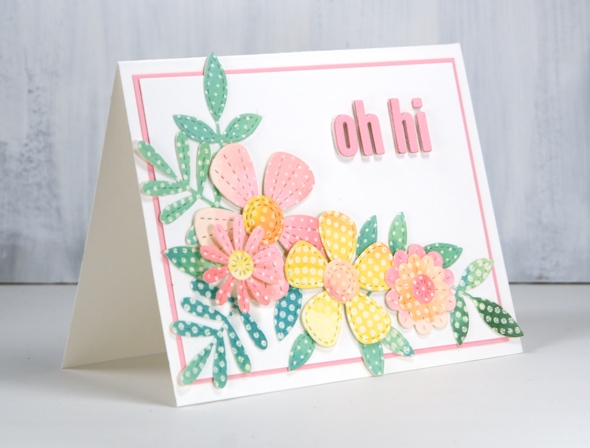
Oh, Hi!
I am excited to have new cards to share and a WINNER to announce. I teamed up with the Foiled Fox to host a giveaway just two short weeks ago and I’m very happy to announce that Lagene is the randomly chosen winner of the $25 gift voucher to spend at the delightful Foiled Fox online store.

Congratulations LAGENE, you will be hearing from the Foiled Fox any minute now!
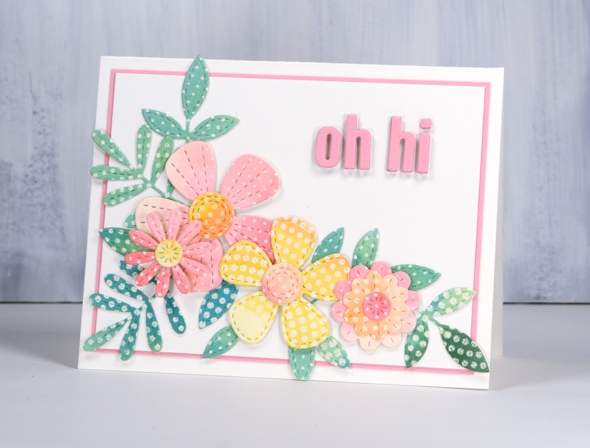
I’m on the Foiled Fox blog today featuring this new funky background stamp, delightful stitched flower dies, sweet letter dies and the oh-so-juicy Catherine Pooler inks. I’ve been planning to make a card layered with floral die-cuts for a while so when the MFT stitched blooms arrived I decided to cut out a whole bunch so I could do some ‘flower arranging’.If you look closely you can see the dots on the flowers and leaves are different sizes, that’s because I used the MFT Radiating halftone background stamp to create some patterned paper. I stamped three panels of hot pressed watercolour paper and embossed with white powder. I then used some Catherine Pooler ink to paint one panel in pink, yellow and orange (inks listed below) and the other two in greens and blue. Once the panels were dry I positioned the whole sheet of dies over the panel without separating any of them. I cut a whole set from both colour schemes then separated the dies so I could cut a few more individual flowers and leaves.

I arranged the pink, yellow and orange flowers with the green and blue leaves on a piece of white paper then, when I was happy with the layout I snapped a pic with my phone so I could recreate it and glue it all down in layers. I used liquid glue for the elements going directly on the white panel and two different thicknesses of dimensional adhesives to raise some of the flowers up higher. To create my little sentiment I adhered some white foam to pink cardstock then cut out the letters using the MFT ‘little lowercase letters’ dies. I used the same pink cardstock to mat the panel and my first flower arranngement was completed.
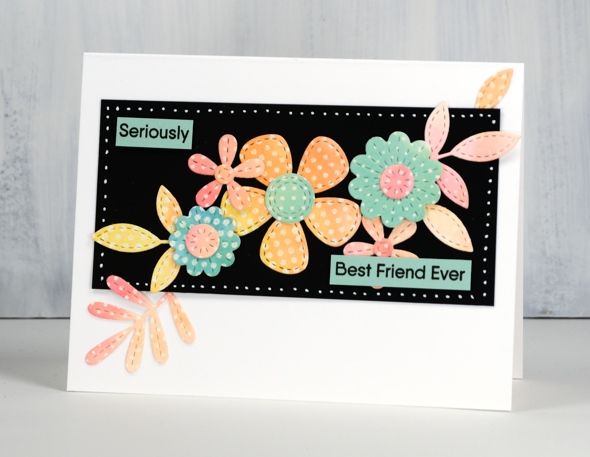
Because I had cut all the dies out of both colour schemes I had pink and yellow leaves left over along with green flowers. I decided to make a smaller arrangement on a narrow black panel and add a stamped sentiment from the MFT ‘Anything but basic Friendship’ stamp set. I stamped the whole sentiment in black on green cardstock then sliced it up to exclude those little words I didn’t need!
I used a white gel pen and a T-ruler to add dots to my panel. When I had finished these two cards I still had an uncut dotted panel in blue/green tones and the negative sheets I had cut the flowers and leaves from. I’ll share what I did with them later in the week.
Supplies
Stamps: MFT Radiating halftone background stamp, Anything but basic friendship set (MFT)
Dies: MFT stitched blooms, MFT little lowercase letters
Inks: Catherine Pooler’s bellini, shea butter, party dress, spruce, daydream, versafine clair nocturne
Paper: hot pressed watercolour paper, neenah black, neenah solar white, pink, green

Also: white embossing powder, mono aqua liquid glue, 3D dots foam dot adhesive, Kool tac clear foam roll, white gel pen, adhesive backed foam, T-ruler


‘Simply Sarah’ grevillea
Posted: July 5, 2018 Filed under: grevilleas | Tags: Darkroom Door stamps, Ranger Distress stains 11 Comments
My father is visiting from Australia at present; he has attended all three graduations with us. Before he left home I asked him to pick up some new stamps from Darkroom Door. It’s been pretty busy here but I finally found some time earlier this week to try them out. Grevillea is a plant native to Australia and some other southern hemisphere islands. There is a wide range of grevilleas with different shapes and colours. The new grevillea stamp set includes four different shaped flower heads and a couple of foliage stamps.
I searched for grevillea images on line and chose a couple of different colour schemes including this purple/burgandy one know as ‘Simply Sarah‘. I used both dusty concord and seedless preserves distress stains to ink the stamp, spritzed, then stamped on hot pressed watercolour paper. I spritzed again without reinking, stamped again and repeated a couple of times to get lighter images. I inked one of the foliage stamps with forest moss distress stain and stamped it a few times in and around the flowers. Finally I splattered some dots of scattered straw stain over the panel and added a sentiment from another new DD set, ‘thank you’. All the thank you sentiments are on one long strip so I masked with some post it notes to leave a space for just one sentiment.
When my dad first arrived he took a close look at the stamps he’d brought and came up with a challenge for me, but that will be a post for another day.
Supplies
Stamps: grevilleas, thank you DDSE002 (DD)
Inks: scattered straw, seedless preserves, dusty concord, forest moss distress stains, monarch versafine clair


Paper: hot pressed watercolour paper, neenah natural white cardstock
Flowers & Scrolls
Posted: June 28, 2018 Filed under: floral edger, scrolls half edger | Tags: Cutterpillar glass mat, distress oxide inks, Penny Black creative dies 8 Comments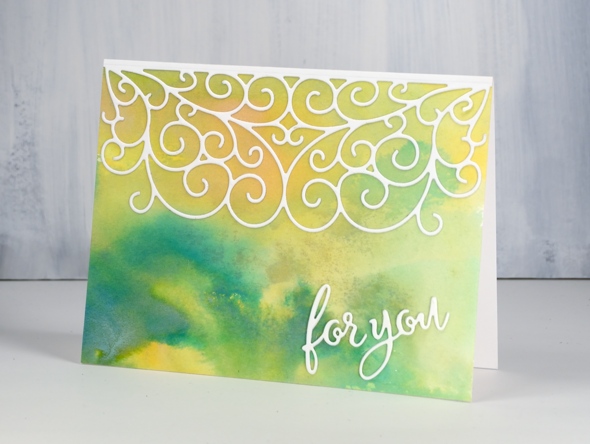
I have a new glass mat on my work table and it’s been fun trying some of my favourite techniques on the glass surface. To create the backgrounds for these two cards I swiped distress oxide inks on the glass, spritzed some water over the ink then swiped hot pressed watercolour paper through it.
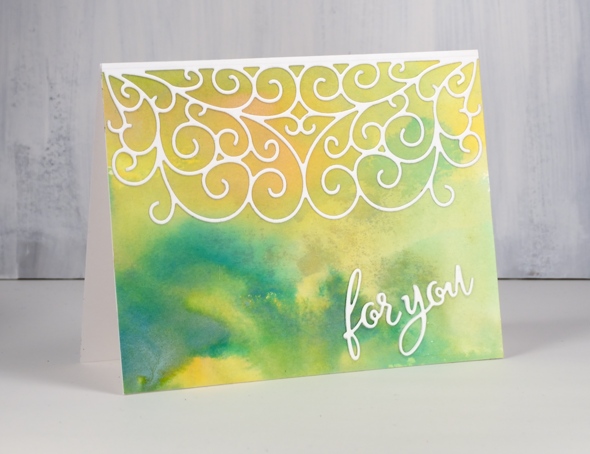
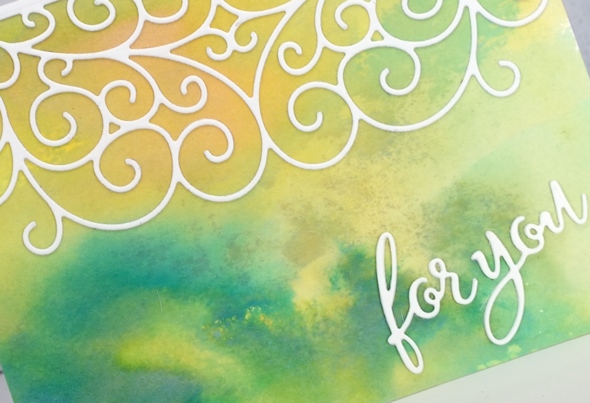
For this card the oxide inks were wild honey and lucky clover. I topped the panel with the scrolls half edger die cut and a stacked sentiment. I backed the white cardstock with adhesive sheet first before cutting to make it easier to attach.
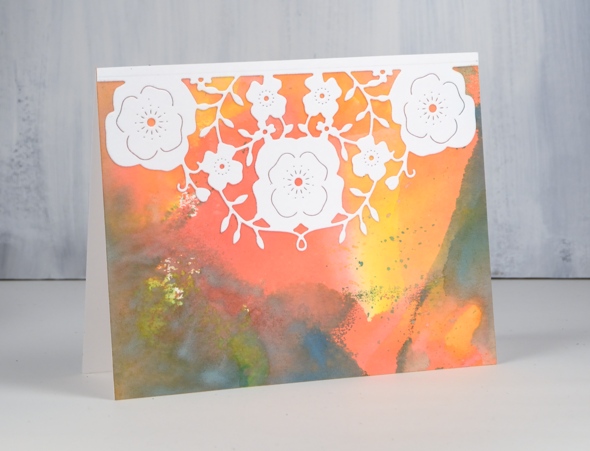
The second background was made by swiping watercolour paper through wild honey, lucky clover and abandoned coral oxide inks then splattering some more ink and water over the top.
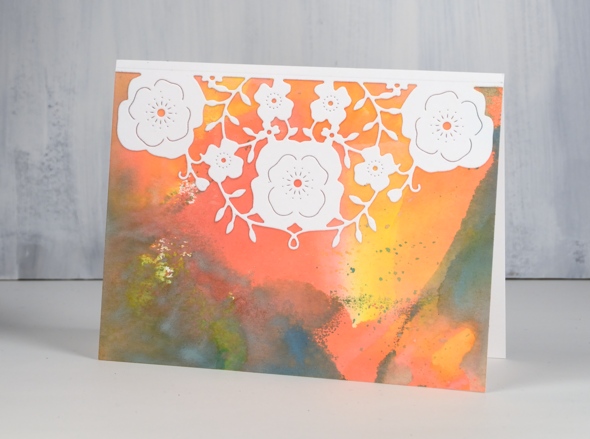
This one I decorated with the ‘floral half’ die cut edger. Both decorative dies cut all the intricate detail on one side and leave the opposite edge uncut
The cutterpillar glass mat worked beautifully for smooshing ink onto. I managed to spill half a bottle of glue on it while putting these cards together and ended up leaving it to dry for a day or two then peeled it off with ease. I have linked to the glass mat below so you can take a look (in the photo it is shown on top of the Cutterpillar Glow light pad). I really like the size as I can complete inky-painty projects on it but it doesn’t take over my whole work table. I will share more about it as I put it through its paces with other techniques.
Supplies
Dies: scrolls half edger, floral half, party for you


Inks


Papers: hot pressed watercolour, neenah solar white
Tools: stick-it adhesive, Cutterpillar Glow Tempered Glass mat


