
Inch by Inch 5: Christmas Village
Posted: November 21, 2014 Filed under: Frame, Gleeful | Tags: Faber-Castell Albrecht Durer Watercolour pencils, Penny Black creative dies, Penny Black stamps 6 Comments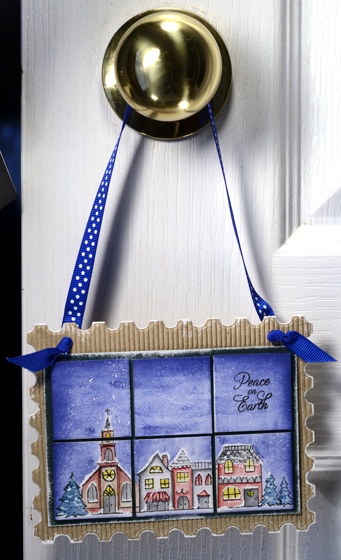
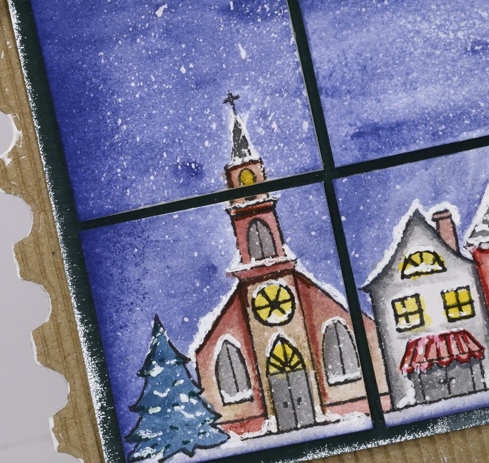
I hope you have enjoyed the Inchie Arts projects this week. My final one (for now) is a door handle decoration, a little panel with a winter scene on six 1.5″ squares.
To create this panel I began by splattering masking fluid on six squares then, when the fluid had dried I placed them edge to edge in a 2×3 array on masking paper to hold them together while I stamped and coloured. I stamped the village from the transparent set, “Gleeful” on an array of tiles in versafine onyx black. Using a waterbrush I picked up blue from a watercolour pencil to paint the sky. With a selection of watercolour pencils I coloured and blended the buildings and trees in the stamped image. Once the watercolouring had dried I rubbed off all the masking fluid to reveal the ‘falling snow’. I used ultrafine sharpie markers to highlight some features on the fillage and a clear wink of stella pen to make the windows glisten. With a white gel pen I drew snow on roofs, window trim and around doorways to finish off the picture.
To assemble the decoration I cut a corrogated cardboard base using the ‘Frame’ die and a green mat for the squares then painted the frame edges with white gesso and the green card with wedding dress luxe ink. I mounted the art squares on the green with a small margin between each square then finished it off with a blue and white polka dot ribbon.
Make sure you visit the Penny Black and the Inchie Arts blogs for more Inchie inspiration and for a chance to win some stamps and art squares.
Supplies:
Stamps: Gleeful (PB)
Creative Dies: Frame and Pattern (PB)
Inks: Versafine Onyx Black (Imagine Crafts/Tsukineko)
Pencils: Albrecht Durer watercolour pencils (Faber Castell)
Cardstock: Green cardstock, Natural corrogated cardstock, Inchie Arts 1.5″ white square
Also: Winsor & Newton masking fluid, polka dot ribbon, white gesso, white gel pen, clear wink of stella pen, ultrafine sharpies
Inch by Inch 4: Vintage Skyline
Posted: November 20, 2014 Filed under: Skyline, Stamped Landscapes | Tags: Faber-Castell Albrecht Durer Watercolour pencils, Inchie Arts, Penny Black stamps 16 Comments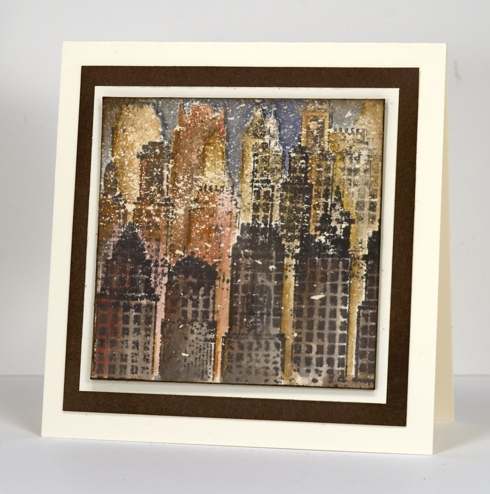
From a snowscape to a vintage cityscape my Inchie experiments continue. I never would have guessed when I first saw this skyline stamp that it would become such a favourite. Working on a 3″square splattered with masking fluid, I stamped ‘Skyline’ several times, never a full impression just the top of the buildings and without reinking so that the foreground images were darker than the background. I added colour with several earth tone watercolour pencils layering and blending colour until I was happy with the values and shadows. I mixed a blue and green to make a dark colour for the sky then added brown over the top to make it more muted. Finally I removed the masking fluid to reveal the cream flecks which I think make it look like an old damaged photo.
Deciding what to turn it into was difficult. I would have liked to create a notebook but time was not on my side so I made a card. I tried a patterned background, a portrait oriented and a landscape oriented rectangular card and two different sentiments before deciding less was once again more. Don’t forget more inchie arts inspiration on the Penny Black and the Inchie Arts blogs.
Supplies:
Stamps: Skyline (PB)
Inks: Memento Rich Cocoa (Imagine Crafts/Tsukineko)
Pencils: Albrecht Durer watercolour pencils (Faber Castell)
Cardstock: Neenah Natural White 110lb cardstock, Inchie Arts 3″ cream square, Penny Black mix & match Sticks and Stones paper
Also: Winsor & Newton masking fluid
Inch by Inch 3: Mini Snowscape
Posted: November 19, 2014 Filed under: CAS, Prancers, Stamped Landscapes | Tags: Inchie Arts, Penny Black stamps 6 Comments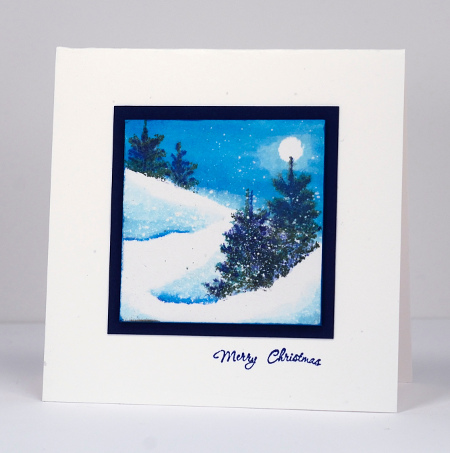
A mini snowscape was a must with the Inchie Arts squares so for day 3 I watercoloured a tiny scene using distress inks and memento inks. I used the same techniques I’ve used on previous snowscapes, a punched mask for the moon, a cut mask for the hill side and snowbanks and of course a splatter of masking fluid to create the appearance of falling snow. I have a tutorial showing the process on a larger scale here. When I was creating my masking fluid tutorial recently I splattered quite a few inchies at the same time so I would have a few ready when inspiration struck. The trees on this little scene were stamped in Memento Northern Pine ink which is my first choice for stamping pine trees. I added some Paris Dusk ink to the trees with a marker as they were looking a little flat. The teeny sentiment is a result of stamp surgery performed on a circular stamp from the Hello Winter set. The finished card is 3.5″ square.
If you are wondering where to buy art squares there is a list of retailers on the Inchie Arts blog. Don’t forget to visit both the Penny Black and the Inchie Arts blogs for more inspiration and giveaways.
Supplies:
Stamps: Prancers, Hello Winter (PB)
Inks: Memento Northern Pine, Paris Dusk ink (Imagine Crafts/Tsukineko) Chipped Sapphire, Salty Ocean distress ink(Ranger)
Cardstock: Neenah Solar White 110lb cardstock, Navy cardstock, Inchie Arts 2″ white square
Also: Winsor & Newton masking fluid
Inch by Inch 2: Twirl Tree
Posted: November 18, 2014 Filed under: CAS, Tree of Joy, Twirl Tree | Tags: Inchie Arts, Penny Black creative dies, Penny Black stamps, Ranger Distress inks, Tsukineko Memento inks 7 Comments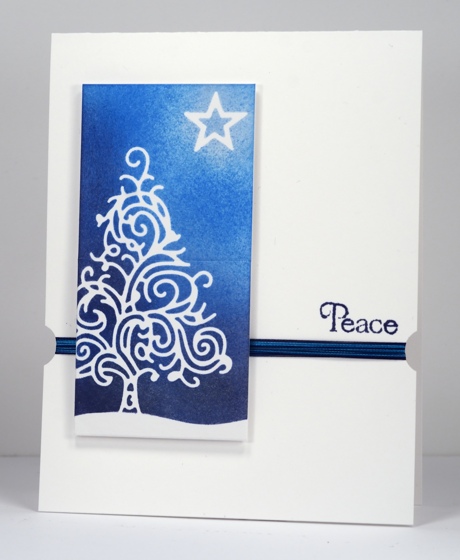
Day 2 of my Inchie Arts week features the white 2″ squares. All week you can see Inchie projects on the Penny Black blog and the Inchie Arts blog. There are giveaways too so make sure you visit.
To create today’s project I worked on two squares taped together at the back. While completing my design I was undecided about whether I would mount them on the card with a gap between them or not. In the end I decided to keep them together. I used the new intricate die, ‘Twirl Tree’ to cut a mask from masking paper. I also cut the star using the ‘Tree of Joy’ die. I pressed the sticky masks firmly onto the squares then added a handcut snow bank mask over the bottom of the square which overlapped the tree trunk. I sponged over the masks with memento Summer Sky ink, Salty Ocean distress ink, Chipped Sapphire distress ink and to finish, a very light application of Encore Silver metallic ink.
Before attaching the squares to the card base I punched a little bite out of both sides of the card base with a ½” circle punch and wound dark blue and turquoise machine embroidery thread round and round. I taped it down firmly then popped up the squares over the thread and added a simple sentiment. We had a few centimetres of snow today so all the trees look prettier. I won’t talk about it too much though because I know some of you would rather not think about winter and others of you have a whole lot more than a few centimetres!
Supplies:
Stamps: Yuletide Greetings (PB)
Creative Dies: Twirl Tree, Tree of Joy (PB)
Inks: Memento Summer Sky ink, Encore Silver Ultimate Metallic ink (Imagine Crafts/Tsukineko) Chipped Sapphire, Salty Ocean distress ink(Ranger)
Cardstock: Neenah Solar White 110lb cardstock, Inchie Arts 2″ white square
Also: machine embroidery thread
Inch by Inch 1: Gold Snowflakes
Posted: November 17, 2014 Filed under: All is Bright, Winter Pine | Tags: Inchie Arts, Penny Black stamps, Ranger Distress stains, Sharpies 20 Comments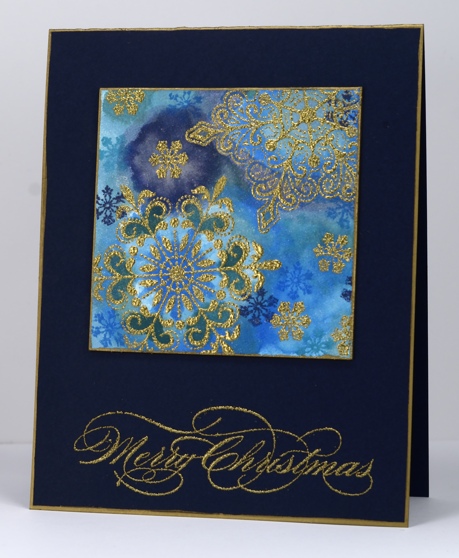
The Penny Black design team are collaborating with Inchie Arts this week and I will be sharing an Inchie Arts project here each day too. I have really enjoyed creating on a smaller scale, trying to make a visual impact in a couple of inches square. I have several projects on a single square and a couple where I lined up more than one. I did not end up working with ‘true inchies’ (1″x 1″); I had 1.5 inch, 2 inch and 3 inch matboard tiles to experiment with.
Today’s card features a 3 inch cream square. I started by embossing the snowflakes in gold powder then used distress stains to add colour. Distress stains react a little differently on matboard than on watercolour paper as the matboard absorbs liquids more quickly. I not only blended the colours on the matboard but layered them creating different colours and tones. The matboard is sturdy and does not warp with the addition of water and stains. I can’t remember exactly which distress stains I used (sorry) but I have taken a guess in the list below. I also stamped a few little snowflakes in light and dark blue ink. I added a border to both the square and the navy card base with a gold sharpie. I was impressed that the sharpie matched the embossing so well and showed up on the dark cardstock. Running the sharpie along the edge is a very quick way to ‘gild’ the edge of panels.
Thanks so much for visiting today.
Supplies:
Stamps: All is Bright, Most Wonderful, Winter Pine (PB)
Inks: Versamark ink (Imagine Crafts/Tsukineko) Chipped Sapphire, Salty Ocean, Pine Needles, Tumbled Glass distress stains & Chipped Sapphire, Salty Ocean distress ink(Ranger)
Cardstock: Neenah Navy 100lb cardstock, Inchie Arts 3″ cream square
Also: gold embossing powder, gold sharpie
Snow Wishes
Posted: November 15, 2014 Filed under: Skyline, Snow Wishes | Tags: Penny Black creative dies, Penny Black stamps, Tsukineko Memento inks 9 Comments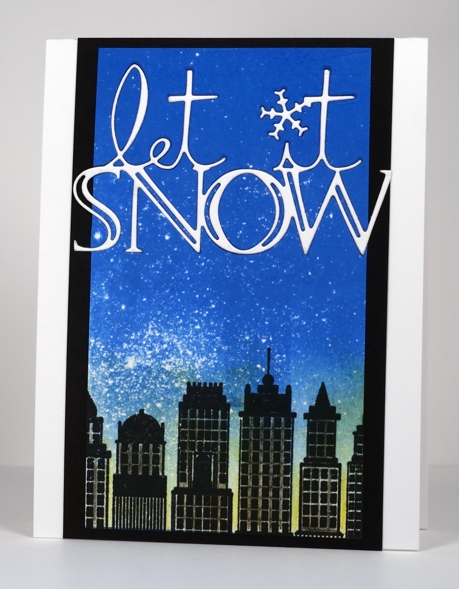
The theme on the Penny Black blog has been intricate dies this week and the designers have created beautiful projects. My card today features one of the new intricate sentiments fitted into a snowy city sky. To create the scene I splattered masking fluid on white cardstock then brayered Memento Bahama Blue ink from one end which resulted in the colour fading out toward the other end. I stamped part of the slapstick cling stamp, ‘Skyline’ at the base of the panel and sponged yellow around the buildings and used a grey marker on the facades. I die cut the ‘Snow Wishes’ sentiment out of the top of the panel and out of a piece of white cardstock then fitted the white diecut into the stamped panel, attached it all to the black mat and finally to the white cardbase.
Stamps: Skyline (PB)Creative Dies: Snow Wishes (PB)
Inks: Memento Bahama blue, Dandelion, London fog inks, Versafine Onyx black (Imagine Crafts/Tsukineko)
Cardstock: Solar white cardstock, Epic Black cardstock (Neenah)
Reflections
Posted: November 13, 2014 Filed under: Prancers, Stamped Landscapes | Tags: Penny Black stamps, Tsukineko Memento inks 20 Comments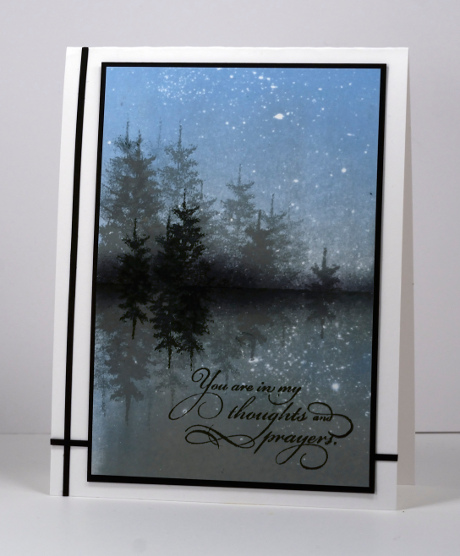
What started out as a brayering experiment turned into a simple peaceful scene, perfect for the sympathy card I needed this week. On top of some splattered masking fluid I brayered memento summer sky ink and memento London fog ink with overlap of the two colours in the middle. I positioned a frisket film mask across the panel and stamped trees in both grey and black ink. Next I positioned the mask over the stamping so I could stamp in the reflecting water. Because the frisket film is transparent I was able to line up the trees when I stamped them as reflections. I also added a bit of sponging at the edge of the water.
When I came to finish the card I tried adding some cord and ribbon but nothing was quite right. I settled on some very thin strips of the same black cardstock I used to mat the panel.
Supplies:
Stamps: Prancers, Eloquence (PB)
Inks: Memento Summer Sky, London Fog, Tuxedo Black(Imagine Craft/Tsukineko)
Cardstock: Neenah Solar White 110lb cardstock, black cardstock
Also: Winsor & Newton masking fluid, Grafix frisket film
Sunrise Branches
Posted: November 10, 2014 Filed under: Etched Branches | Tags: Penny Black stamps, Ranger Distress stains, Tsukineko Radiant Neon inks 9 Comments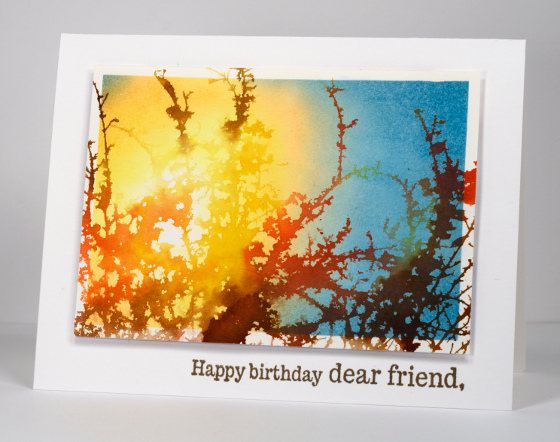
Does this scene look familiar? I posted an autumn branches card last week which involved inking the ‘Etched Branches’ stamp multiple times with distress stains. When I had finished making that panel there was still stain on the stamp so I stamped it on a piece of watercolour paper to see what it looked like. When I apply distress stains directly onto a stamp I often stamp it several times resulting in less intense colour each time. I was happy with the amount and variety of colour on the panel above so made it into another card. After stamping I stuck painter’s tape around the border of the panel then sponged the sky. I decided on a sunrise made up of radiant neon inks (listed below). I chose area where the branches were palest for the lightest sponging, leaving a small area unsponged then a circle of yellow, surrounded by orange then the rest of the panel in blue.
I popped it up on dimensional squares then added a sentiment below. I think the next ‘Etched Branches’ card will be winter one. Fall is fast slipping away.
Stamps: Etched Branches, Edge to Edge (PB)
Inks: Barn door, Vintage Photo, Mustard Seed, Crushed Olive, Spiced Marmalade distress stains, Vintage Photo distress ink (Ranger) Radiant Neon Electric Blue, Electric Yellow, Electric Orange inks (Imagine Crafts/Tsukineko)
Cardstock: Fabriano 100% cotton hot pressed watercolour paper, Neenah Natural white cardstock
Also: Dimensional squares (Scrapbook Adhesives)
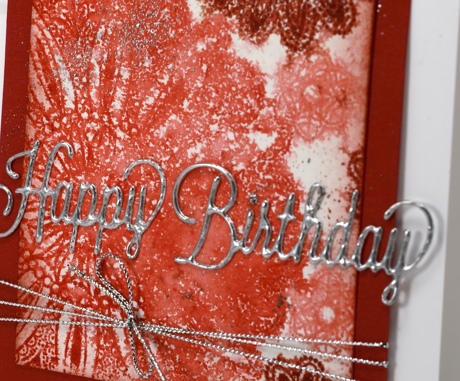
Dazzler Birthday
Posted: November 8, 2014 Filed under: Celebrations, Dazzlers | Tags: Penny Black creative dies, Penny Black stamps, Ranger Distress inks 5 Comments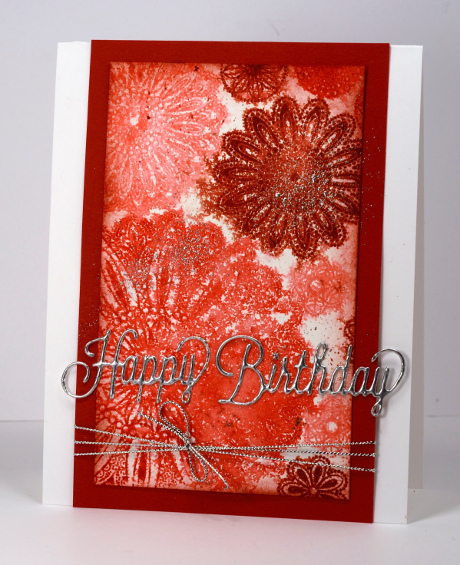
Look! It’s not all autumn leaves and snow scenes around here. I pulled out a set of flower/circle pattern transparent stamps and gave them the watery treatment. I stamped them on watercolour paper in three different distress inks then spritzed the panel lightly and let them bleed into each other a bit. After trimming my panel I added both some ink splatter and some dark sponging around the edge with barn door ink. After heat embossing the diecut sentiment in silver I wanted a little silver on the patterned panel too so I flicked my silver wink of stella pen. It wasn’t quite silvery enough so I sprinkled some embossing powder over the same area and it stuck to the wink of stella ink making it possible for me to heat it and achieve a fine sprinkle of silver. You can just see it in the top left of detail photo below.
Stamps: Dazzlers (PB)
Creative Dies: Celebrations (PB)
Inks: Fired Brick, Festive Berries, Worn Lipstick distress inks (Ranger) Versamark (Imagine Crafts/Tsukineko)
Cardstock: Fabriano 100% cotton hot pressed watercolour paper, Neenah Natural white cardstock, red cardstock
Also: Silver embossing powder, Silver cord, Wink of Stella silver marker
Central Park in snow & masking fluid questions answered
Posted: November 6, 2014 Filed under: City lights, Prancers, Skyline, Stamped Landscapes, Tutorial | Tags: Fabriano Watercolour Paper, Penny Black stamps 16 Comments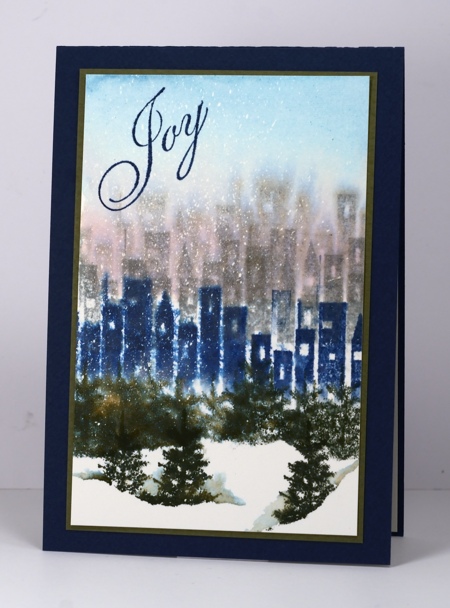
Last week I posted a very snowy card and received several questions about using masking fluid. I decided to make a short video showing my set up for flicking masking fluid. Masking fluid isn’t just for flicking, of course, but you could be excused for thinking that when you see how rarely I do anything else with it!
I included the card above because it shows snow created after flicking a generous amount of masking fluid on a piece of watercolour paper. It is actually the piece I flicked in the video. I painted over the masking fluid with a blue and a pink distress stain (listed below) and then while the paper was still damp stamped the Skyline stamp in grey a few times then blue. I once again used the little tree from the Prancers set in the foreground. I cut the large sentiment from Yuletide Greetings into two pieces and stamped the front and the inside of the card.
Some answers to your questions about masking fluid
What is masking fluid?
A non-staining liquid composed of rubber latex for masking areas of work needing protection when colour is applied over the top
What type do you use?
Winsor & Newton non permanent masking fluid with a slight yellow tint. The yellow tint makes it easier to see where it has been applied. This is probably more useful when carefully painting the masking fluid onto a project rather than flicking it with careless abandon!
Are all brands the same?
I have used the Winsor & Newton brand for years and cannot comment on other brands. I think the key is to make sure you buy non permanent because you want to remove it after all your stamping/sponging/painting is completed.
Where do I find masking fluid?
Masking fluid is an art supply often used by watercolour artsists so you can find it in art supply stores, usually with the watercolour supplies.
How do you remove masking fluid without ripping the paper?
I must admit I haven’t had too many instances of masking fluid ripping my paper. The spots from splattering are small and rub off very easily. Sometimes with larger dots or sections it is harder to remove the masking fluid. If you are painting a larger area do a test on your paper first to make sure you can remove the masking fluid successfully. I always use my fingers to rub it off but you can use a clean soft eraser.
The video I have created shows how I splatter panels for projects such as the one above. Hopefully some of your questions will be answered once you have watched my process.
Supplies:
Stamps: City Lights, Prancers, Season’s Wishes (PB)
Inks: Memento Nautical Blue, London Fog, Northern Pine (Imagine Craft/Tsukineko) Victorian Velvet, Broken China distress stains(Ranger)
Cardstock: Neenah Solar White 110lb cardstock, Fabriano 100% cotton hot-pressed watercolour paper, textured blue cardstock, textured green cardstock, linen textured paper
Also: Winsor & Newton masking fluid, Kemper Spatter brush


