
Wedding flowers
Posted: April 20, 2015 Filed under: Centerpiece, Frame | Tags: Penny Black creative dies, Penny Black stamps, Ranger Distress stains 4 Comments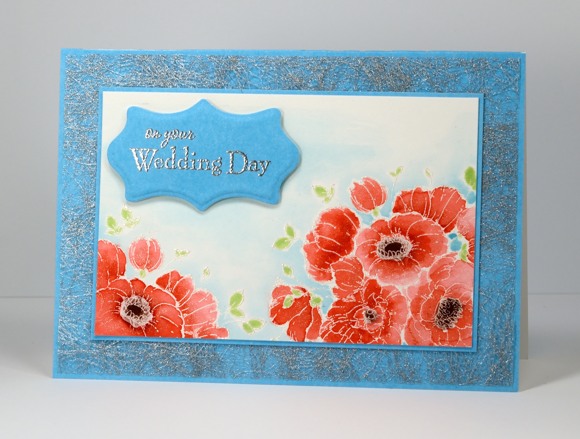
This week on the Penny Black blog the design team are sharing projects which display the versatility of the latest PB release, Time to Celebrate. Over the past few weeks we have shared Mother’s Day, Father’s Day and graduation cards but the stamps and dies can be used for so much more. I picked out the pretty flower stamp, Centerpiece to create a wedding card.
I stamped the floral part of the stamp twice, leaving the vase out altogether. I embossed the design in silver pearl powder which has a subtle sheen to it then watercoloured with festive berries distress stain on the petals and aged mahogany distress stain on the flower centers. The tiny leaves I coloured with a memento new sprout marker. Around the edge of the embossed flowers I painted tumbled glass distress stain, feathering it out to nothing with extra water. I chose to pick up the same blue in the card base and sentiment panel by using PB Clear Skies mix and match paper. It is not obvious in the photo but I coloured over all the flowers with a clear wink of stella marker which gave them all a soft sparkly shimmer. The delicate silver mat is actually fabric interfacing from France. A fellow card making friend brought it back and it was the perfect addition for a little silver accent on the wedding card.
I have just returned from a great weekend teaching at Bizzy B Stamp & Scrap in Toronto and will share some photos from the classes soon.
Supplies
Stamps: Centerpiece, You and Me (PB)
Creative Dies: Frames (PB)
Inks: Versafine, Memento New Sprout marker (Tsukineko) Festive Berries, Aged Mahogany, Tumbled Glass distress stains (Ranger)
Cardstock: Fabriano 100% cotton hot pressed watercolour paper, Clear skies mix & match paper(PB)
Also: Silver & Silver pearl embossing powder
Inch by Inch 5: Christmas Village
Posted: November 21, 2014 Filed under: Frame, Gleeful | Tags: Faber-Castell Albrecht Durer Watercolour pencils, Penny Black creative dies, Penny Black stamps 6 Comments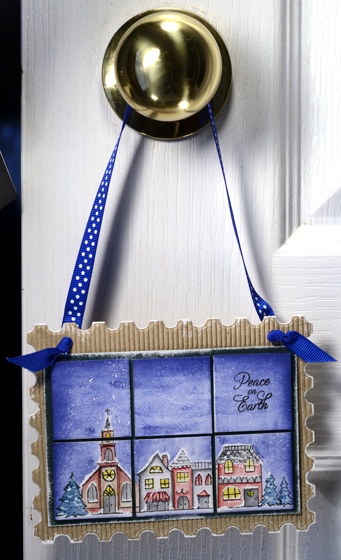
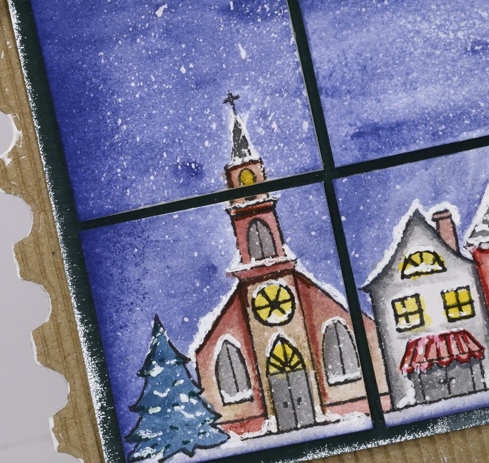
I hope you have enjoyed the Inchie Arts projects this week. My final one (for now) is a door handle decoration, a little panel with a winter scene on six 1.5″ squares.
To create this panel I began by splattering masking fluid on six squares then, when the fluid had dried I placed them edge to edge in a 2×3 array on masking paper to hold them together while I stamped and coloured. I stamped the village from the transparent set, “Gleeful” on an array of tiles in versafine onyx black. Using a waterbrush I picked up blue from a watercolour pencil to paint the sky. With a selection of watercolour pencils I coloured and blended the buildings and trees in the stamped image. Once the watercolouring had dried I rubbed off all the masking fluid to reveal the ‘falling snow’. I used ultrafine sharpie markers to highlight some features on the fillage and a clear wink of stella pen to make the windows glisten. With a white gel pen I drew snow on roofs, window trim and around doorways to finish off the picture.
To assemble the decoration I cut a corrogated cardboard base using the ‘Frame’ die and a green mat for the squares then painted the frame edges with white gesso and the green card with wedding dress luxe ink. I mounted the art squares on the green with a small margin between each square then finished it off with a blue and white polka dot ribbon.
Make sure you visit the Penny Black and the Inchie Arts blogs for more Inchie inspiration and for a chance to win some stamps and art squares.
Supplies:
Stamps: Gleeful (PB)
Creative Dies: Frame and Pattern (PB)
Inks: Versafine Onyx Black (Imagine Crafts/Tsukineko)
Pencils: Albrecht Durer watercolour pencils (Faber Castell)
Cardstock: Green cardstock, Natural corrogated cardstock, Inchie Arts 1.5″ white square
Also: Winsor & Newton masking fluid, polka dot ribbon, white gesso, white gel pen, clear wink of stella pen, ultrafine sharpies


