
Floral border
Posted: February 9, 2017 Filed under: Centerpiece, Stitched Edges | Tags: Fabriano Watercolour Paper, Penny Black creative dies, Penny Black stamps, Sakura Koi watercolour paints 18 Comments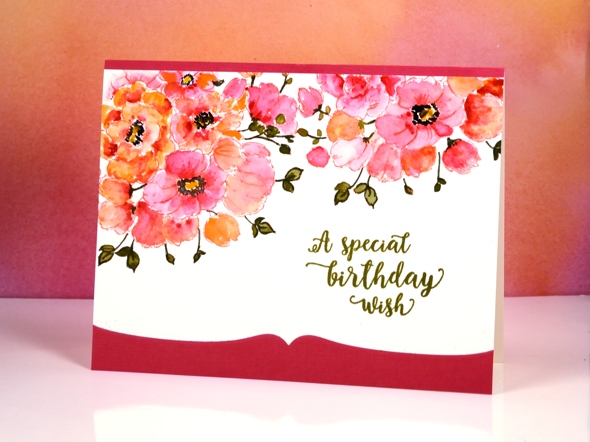
Between Christmas and New Year I did some major re-organising in my work room and changed the way I store my stamps. I am still working out a few details and wondering the best way to store my wood block stamps but other than that the new system seems to be working well. One benefit of doing some serious sorting was re-acquainting myself with my supplies. I pulled out a stamp from a few years ago and my Koi watercolour travel set to make this card.

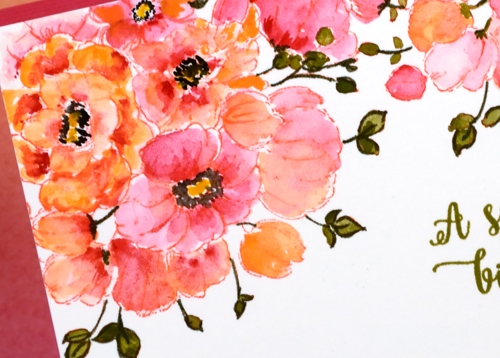
The stamp is a bouquet of flowers in a vase but as you can see I left the vase out of the picture and just worked with the flowers to create a border. With masking I could have positioned the flowers even more closely but I was hoping to finish this card fairly quickly so I just stamped the flower part of the stamp with the MISTI then moved my watercolour panel and stamped again. I used distress ink to stamp so I could blend it while painting. To keep it simple I used two colours of paint on the petals switching back and forth between a pink and a pale orange. I painted olive green into the leaves but then went around the edges and over the stems with a marker. To complete the flowers I painted black dots and yellow centres.
It really was a fairly quick panel to paint, the time consuming part ended up being the way I mounted it between a strip of pink and a die-cut edge of pink. I should have just attached it over the top of a pink panel but I made it less bulky but more fiddly by cutting both the watercolour panel and the pink cardstock with the edge die then aligning them on the card base. The Happy Little Stampers challenge this month is watercolour with an optional twist of die-cutting, so I’m popping over to add this one in.
As I write this I am sitting beside an amaryllis which looks like it might just burst out in bloom today. It is a gift from one of my artsy accomplices and it has been growing very steadily since the new year. It’s nice to have a real flower inside when all outside is snow and ice!
Supplies
Stamps: Centerpiece, words of kindness (PB)
Creative Dies: stitched edges (PB)
Inks: abandoned coral distress ink (Ranger) Olive grove memento marker, versafine Spanish moss (Tsukineko)
Cardstock: Fabriano 100% cotton hot pressed watercolour paper, Neenah Natural White 110lb cardstock, pink cardstock
Also: Koi watercolor field sketch travel kit (Sakura)
Wedding flowers
Posted: April 20, 2015 Filed under: Centerpiece, Frame | Tags: Penny Black creative dies, Penny Black stamps, Ranger Distress stains 4 Comments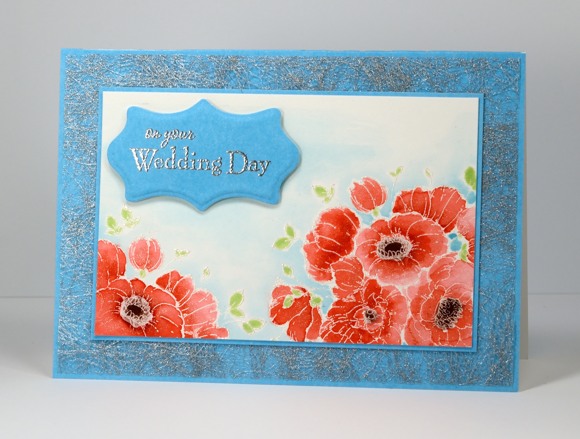
This week on the Penny Black blog the design team are sharing projects which display the versatility of the latest PB release, Time to Celebrate. Over the past few weeks we have shared Mother’s Day, Father’s Day and graduation cards but the stamps and dies can be used for so much more. I picked out the pretty flower stamp, Centerpiece to create a wedding card.
I stamped the floral part of the stamp twice, leaving the vase out altogether. I embossed the design in silver pearl powder which has a subtle sheen to it then watercoloured with festive berries distress stain on the petals and aged mahogany distress stain on the flower centers. The tiny leaves I coloured with a memento new sprout marker. Around the edge of the embossed flowers I painted tumbled glass distress stain, feathering it out to nothing with extra water. I chose to pick up the same blue in the card base and sentiment panel by using PB Clear Skies mix and match paper. It is not obvious in the photo but I coloured over all the flowers with a clear wink of stella marker which gave them all a soft sparkly shimmer. The delicate silver mat is actually fabric interfacing from France. A fellow card making friend brought it back and it was the perfect addition for a little silver accent on the wedding card.
I have just returned from a great weekend teaching at Bizzy B Stamp & Scrap in Toronto and will share some photos from the classes soon.
Supplies
Stamps: Centerpiece, You and Me (PB)
Creative Dies: Frames (PB)
Inks: Versafine, Memento New Sprout marker (Tsukineko) Festive Berries, Aged Mahogany, Tumbled Glass distress stains (Ranger)
Cardstock: Fabriano 100% cotton hot pressed watercolour paper, Clear skies mix & match paper(PB)
Also: Silver & Silver pearl embossing powder
Centrepiece
Posted: March 27, 2015 Filed under: CAS, Centerpiece | Tags: Fabriano Watercolour Paper, Kuretake Gansai Tambi watercolour paints, Penny Black creative dies, Penny Black stamps 18 Comments
Have you visited the Penny Black blog this week? Jill Foster has been sharing gorgeous projects all week to showcase the new ‘Time to Celebrate’ release. There is a giveaway too, so make sure you drop in. This lovely vase of flowers is one of the new stamps and I pulled out my new watercolours to paint it. I started by inking the stamp with memento angel pink on the flowers and desert sand on the vase which gave me a pale outline for my painting. I used a small round watercolour brush and worked one petal or flower section at a time. I started by painting water onto a petal, added pale color to the watery area and spread it, then added darker colour on the section closest to the centre of the flower or to any areas that would be in shadow behind another petal. As I painted I dabbed excess paint and water away with a paper towel or dry paintbrush. I worked on sections that were not adjacent to each other so the paint could dry before I painted the petals next door. I used both paint and markers for the stems, leaves and flower centres.
When the flowers were dry I painted the vase and finally a pale shadow below it. I picked out some co-ordinating pink and green cardstock to mat the panel and die cut a green sentiment from the new 2 die set ‘Many Thanks’. Thanks for dropping in.
Supplies
Stamps: Centerpiece (PB)
Creative Dies: Many Thanks (PB)
Inks: Memento Angel Pink, Desert Sand, Bamboo Leaves, Grape Jelly, Tuxedo Black (PB)
Cardstock: Fabriano 100% cotton hot pressed watercolour paper, Neenah Natural White 110lb cardstock, pink and green cardstock
Also: Kuretake Gansai Tambi watercolour paints


