
Floral border
Posted: February 9, 2017 Filed under: Centerpiece, Stitched Edges | Tags: Fabriano Watercolour Paper, Penny Black creative dies, Penny Black stamps, Sakura Koi watercolour paints 18 Comments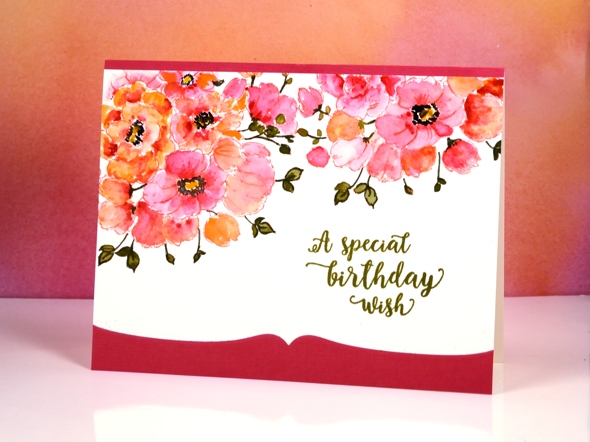
Between Christmas and New Year I did some major re-organising in my work room and changed the way I store my stamps. I am still working out a few details and wondering the best way to store my wood block stamps but other than that the new system seems to be working well. One benefit of doing some serious sorting was re-acquainting myself with my supplies. I pulled out a stamp from a few years ago and my Koi watercolour travel set to make this card.

The stamp is a bouquet of flowers in a vase but as you can see I left the vase out of the picture and just worked with the flowers to create a border. With masking I could have positioned the flowers even more closely but I was hoping to finish this card fairly quickly so I just stamped the flower part of the stamp with the MISTI then moved my watercolour panel and stamped again. I used distress ink to stamp so I could blend it while painting. To keep it simple I used two colours of paint on the petals switching back and forth between a pink and a pale orange. I painted olive green into the leaves but then went around the edges and over the stems with a marker. To complete the flowers I painted black dots and yellow centres.
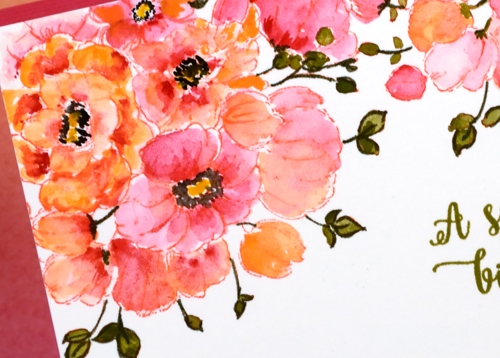
It really was a fairly quick panel to paint, the time consuming part ended up being the way I mounted it between a strip of pink and a die-cut edge of pink. I should have just attached it over the top of a pink panel but I made it less bulky but more fiddly by cutting both the watercolour panel and the pink cardstock with the edge die then aligning them on the card base. The Happy Little Stampers challenge this month is watercolour with an optional twist of die-cutting, so I’m popping over to add this one in.
As I write this I am sitting beside an amaryllis which looks like it might just burst out in bloom today. It is a gift from one of my artsy accomplices and it has been growing very steadily since the new year. It’s nice to have a real flower inside when all outside is snow and ice!
Supplies
Stamps: Centerpiece, words of kindness (PB)
Creative Dies: stitched edges (PB)
Inks: abandoned coral distress ink (Ranger) Olive grove memento marker, versafine Spanish moss (Tsukineko)
Cardstock: Fabriano 100% cotton hot pressed watercolour paper, Neenah Natural White 110lb cardstock, pink cardstock
Also: Koi watercolor field sketch travel kit (Sakura)
Trumpet Song
Posted: May 29, 2015 Filed under: Stitched Edges, Trumpet Song | Tags: Penny Black creative dies, Penny Black stamps, Tsukineko Memento inks 11 Comments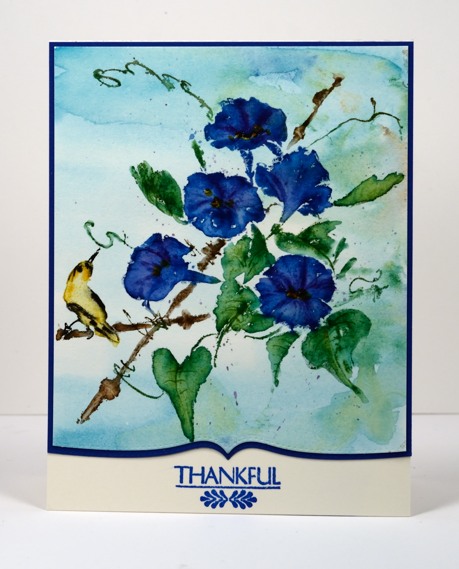
Thanks for joining me this week as I showcased stamps and dies from the new Sunshine and Smiles collection. Today I have this lovely floral slapstick cling stamp to share. I began by painting a pale blue wash over watercolour paper with Broken China distress stain. Once that was dry I inked the Trumpet Song stamp with Danube Blue and Grape Jelly memento markers on the flowers, Bamboo Leaves and Cottage Ivy on the leaves, Dandelion, Cantaloupe and Tuxedo Black on the bird and Rich Cocoa and Black on the twigs. I spritzed the stamp lightly before stamping on the watercolour panel. I used a paint brush to pick up memento ink from an acrylic block which I added to the stamped image. To finish I splattered some grape jelly and cottage ivy ink over the panel.
To complete the card I cut both the painted panel and a blue mat with one of the stitched edge dies, attached it all to a natural white card base then added a sentiment.
Karen has used this stamp on a couple of gorgeous cards recently here and here.
Supplies:
Stamps: Trumpet Song, Pretty Petals (PB)
Creative Dies: Stitched Edges
Inks: Broken China distress stain, Evergreen Bough distress inks (Ranger) Versafine Deep Lagoon, Danube Blue, Grape Jelly, Bamboo Leaves, Cottage Ivy, Dandelion, Cantaloupe, Tuxedo Black, Rich Cocoa memento markers(Imagine Craft/Tsukineko)
Cardstock: Fabriano 100% cotton hot pressed watercolour paper, Neenah Natural White cardstock
Roses and wishes
Posted: May 12, 2015 Filed under: Efflorescence, Stitched Edges, Wishes | Tags: Fabriano Watercolour Paper, Penny Black creative dies, Penny Black stamps, Ranger Distress stains 5 Comments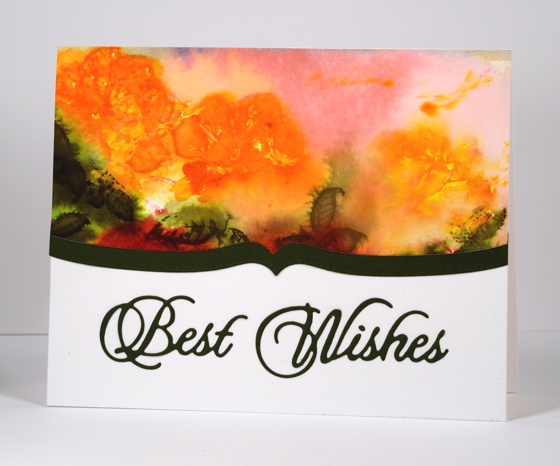
Today’s card is the one which produced the pretty coloured baby wipe that made the previous card possible. The watery rose panel above was initially much larger and there were red roses down below the orange ones. I used the wipe which ended up covered with orange, pink and green stain to clean off the rose stamp after each impression. I can’t really give you a play-by-play for this panel because I just kept on stamping, spritzing, painting and blotting until I ended up what you see above. There is a fine line between a soft blurred floral design and and a mess of washed out colour which some of you might think I have definitely stepped over (hehe) but I like the way the roses bleed into the background and the leaves bleed into the roses.
I cropped the red roses out because they were not so pretty then added a shaped border cut with one of the ‘stitched edge’ dies. I put ‘stick it’ adhesive on the back of the green cardstock before I cut the ‘best wishes’ sentiment which makes it very easy to attach to the card base.
Supplies:
Stamps: Efflorescence (PB)
Creative Dies: Stitched Edges, Wishes (PB)
Inks: Ripe Persimmon, Worn Lipstick, Forest Moss, Festive Berries, Spiced Marmalade distress stains (Ranger)
Cardstock: Fabriano 100% cotton hot pressed watercolour paper, Green paper, Neenah Avon Brilliant White 110lb cardstock
Curtain Call Inspiration Challenge – Bouquet
Posted: April 15, 2015 Filed under: Efflorescence, Stitched Edges | Tags: Faber-Castell Polychromos Colour Pencil, Penny Black creative dies, Penny Black stamps, Ranger Distress stains 4 Comments
Penny Black is playing along with the Curtain Call Inspiration Challenge today and the inspiration picture is a big bright bouquet of flowers.

I chose to highlight one of the flowers, a dahlia I think, and repeated it three times across my panel. I inked the flower from the transparent set ‘Efflorescence’ in barn door and ripe persimmon distress stain, spritzed it so the stains would blend then stamped it once on the panel. I did one at a time so I could do all the painting for each one while the stain was still wet. I used a waterbrush to pull colour from the outline in to fill the petals. If the stain dried before I could pull colour in I squeezed some out of the bottle and picked it up with the brush. After letting the first flower dry I did another and then a third. When all three were dry I added a fine splatter of barn door stain.
The background is coloured with Faber Castell polychromos pencils in two blues, I also added some extra definition here and there on the petals with red and orange pencils. The bottom edge of the panel, as well as the red, the blue mat and the card base, is die-cut by one of the stitched edges dies. For the sentiment I stamped only part of a stamp from the Sprinke & Smiles set so I could finish the phrase with words die cut in the same red as the mat.
Make sure you check out the challenge and some more interpretations from the PB design team
Supplies:
Stamps: Efflorescence, Sprinkles and Smiles (PB)
Creative Dies: Stitched Edges, Splendid Wishes (PB)
Inks: Ripe Persimmon, Barn Door distress stains (Ranger), Versafine Onyx Black (Imagine Craft/Tsukineko)
Cardstock: Fabriano 100% cotton hot pressed watercolour paper, Red and Blue cardstock, Neenah Avon Brilliant White 110lb cardstock
Delicate Blossoms
Posted: January 30, 2015 Filed under: CAS, Delicate Blossoms, Stitched Edges | Tags: Penny Black creative dies, Penny Black stamps, Tsukineko Memento inks 13 Comments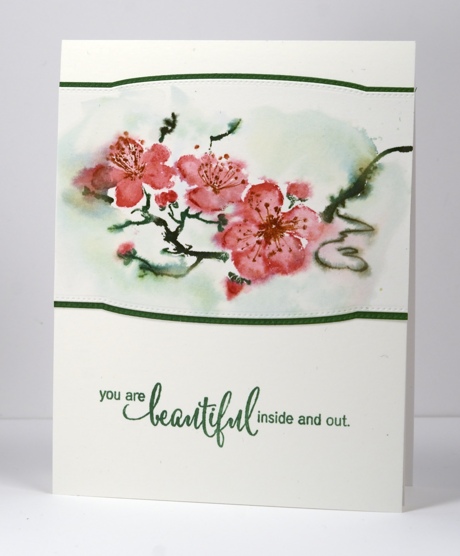
Today I have a simple design featuring a sweet new stamp called ‘delicate blossoms’. The new release, “Bring on the Happy” is available in the online store today and it is full of gorgeous new stamps, dies and stencils. To create the little panel above I used Memento inks and markers on watercolour paper. I inked the stamp one colour at a time and used a stamp positioning tool to make sure the stamp landed in the same place each time. I stamped the blossoms with love letter and angel pink and added some water to blend the colours. I let the inks bleed a little but kept flowers fairly well defined. The branch was inked with two greens and then I added water and summer sky ink around the image to spread some background colour but avoided the flowers. Finally I drew the flower centres with a marker. I cropped the panel using one of the new ‘stitched edge’ dies and added a green mat and sentiment.
Enjoy your weekend.
Supplies:
Stamps: Delicate Blossoms, Heartfelt(PB)
Creative Dies: Stitched Edges (PB)
Inks: Olive Grove, Cottage Ivy, Potter’s Clay, Summer Sky, Love Letter, Angel Pink memento (Imagine Craft/Tsukineko)
Cardstock: Fabriano hotpressed 100% cotton watercolour paper, Neenah Avon Brilliant White 110lb, Green cardstock
Demure but sparkly
Posted: January 26, 2015 Filed under: Demure, Stitched Edges | Tags: Fabriano Watercolour Paper, Penny Black creative dies, Penny Black stamps, Ranger Distress stains 21 Comments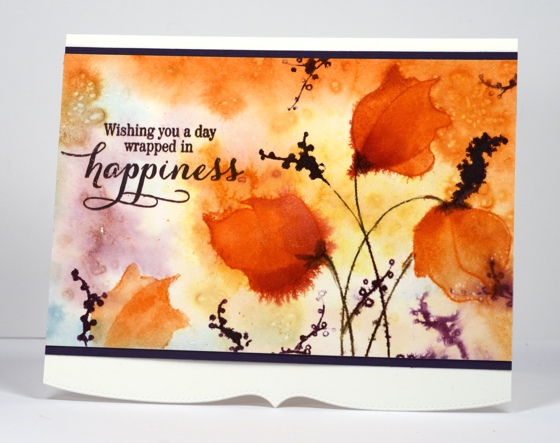
Are you ready for some brand new Penny Black prettiness? The new release is being revealed today on the Penny Black blog, facebook and website and there will be projects on the design team members blogs featuring new products for the new few weeks.
I first played with the new stamps around Christmas, finishing up several cards before the new year so they could travel off to CHA and join in the fun there. I am happy to be sharing some of those cards over the next week, especially as I have been too sick and too behind to do any new stamping lately. I can’t believe January is drawing to a close and I have only posted two new cards on my blog this year!
Before I got sick I did manage to create a few new cards but you will need to pop over to Splitcoaststampers.com to view them. The reason they are there and not here is quite exciting; I was invited to join the Dirty Dozen and began my six month term on January 15. I feel very honoured to involved with such a talented and committed group of artists and look forward to doing all sorts of fun things with Splitcoast in the months to come. Many projects will be featured here on my blog but each month the Dirty Dozen fills a themed gallery with projects available to fan club members only so there will be six new cards from me there each month. January’s theme is “All Cooped Up” and believe it or not I came up with six cards for the theme despite not owning a single chicken stamp!
But back to the card at hand. This one was my favourite from the eight I created for CHA. It is hard to see in the photo but it is covered in shimmery sparkliness. I began by wetting the watercolour panel and dropping Victorian Velvet, Ripe Persimmon and Tumbled glass distress stains into the water. I also sprinkled Camargue salt onto the wet areas to create patterns as it dried. All the little dots in the background were created by the salt absorbing moisture and colour. You can try it with any salt you have on hand but different salts will give you different results. When the background was dry I stamped the flowers in Spiced Marmalade distress ink, the stems in Peeled Paint and the little seeds in Dusty Concord. I used both Spiced Marmalade and Ripe Persimmon stains to paint the flower heads, spritzing with pearl-ex spray here and there to make the colour bleed and shimmer. The sentiment and mat strips do look black in the photo but they are both purple to co-ordinate with the seed heads. See that cute little shaped edge? There are two new edge dies in the “Bring on the Happy” release and I hope they will be the first of many. That edge does add that certain something don’t you think?
Oh, Happy Australia Day!
Supplies:
Stamps: Demure, Sprinkles and Smiles (PB)
Inks: Dusty Concord, Victorian Velvet, Ripe Persimmon, Spiced Marmalade, Tumbled Glass distress stains (Ranger)
Creative Dies: Stitched Edges (PB)
Cardstock: Fabriano 100% cotton hot pressed watercolour paper, purple cardstock


