
Watercoloured leaves the distressing way
Posted: September 30, 2015 Filed under: Filigree Foliage, Wishes | Tags: Penny Black creative dies, Penny Black stamps, Ranger Distress inks, Ranger Distress stains 18 Comments
Watercolour and autumn were made for each other were they not? I went for a run this morning and there were deep red maple leaves lying on the path looking like mini masterpieces. I kept wanting to pick them up and bring them home to inspire some painting. I did not want to carry them however and there will be thousands (I am not kidding) in my yard over the next 6-8 weeks (again, not kidding).
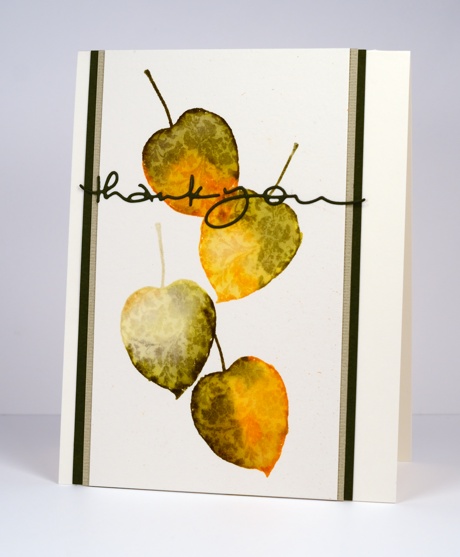
I did a periscope comparing painting leaves with distress stains, ink pads and markers this morning. These cards use the same techniques I demonstrated on the video. The first one is my favourite distress technique, stamping with stains then moving the stain with a paintbrush to fill the stamped image. I added fine splatter to the leaves on this one but kept the next one fairly clean.
I used the same ‘stamp then paint and blend’ technique for the second card but inked the stamp with ink pads. The main difference is less liquid on the stamp and an image that soaks into the watercolour paper more quickly. The result once blended with water is similar but more of the stamped outline remains. Using markers gives a similar result to inkpads but transfers even less liquid on the stamp. With markers however you can apply colour to small areas of the stamp and have a more detailed and intricate colour result.
To finish I matched cardstock to the stamping for mats and die cut sentiments.
Supplies


Roses and wishes
Posted: May 12, 2015 Filed under: Efflorescence, Stitched Edges, Wishes | Tags: Fabriano Watercolour Paper, Penny Black creative dies, Penny Black stamps, Ranger Distress stains 5 Comments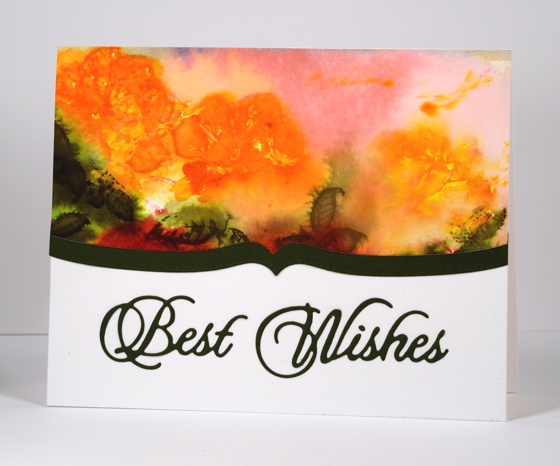
Today’s card is the one which produced the pretty coloured baby wipe that made the previous card possible. The watery rose panel above was initially much larger and there were red roses down below the orange ones. I used the wipe which ended up covered with orange, pink and green stain to clean off the rose stamp after each impression. I can’t really give you a play-by-play for this panel because I just kept on stamping, spritzing, painting and blotting until I ended up what you see above. There is a fine line between a soft blurred floral design and and a mess of washed out colour which some of you might think I have definitely stepped over (hehe) but I like the way the roses bleed into the background and the leaves bleed into the roses.
I cropped the red roses out because they were not so pretty then added a shaped border cut with one of the ‘stitched edge’ dies. I put ‘stick it’ adhesive on the back of the green cardstock before I cut the ‘best wishes’ sentiment which makes it very easy to attach to the card base.
Supplies:
Stamps: Efflorescence (PB)
Creative Dies: Stitched Edges, Wishes (PB)
Inks: Ripe Persimmon, Worn Lipstick, Forest Moss, Festive Berries, Spiced Marmalade distress stains (Ranger)
Cardstock: Fabriano 100% cotton hot pressed watercolour paper, Green paper, Neenah Avon Brilliant White 110lb cardstock
Time Out Challenge
Posted: October 9, 2014 Filed under: Wishes, Wondrous | Tags: Penny Black creative dies, Penny Black stamps, Ranger Distress stains 28 Comments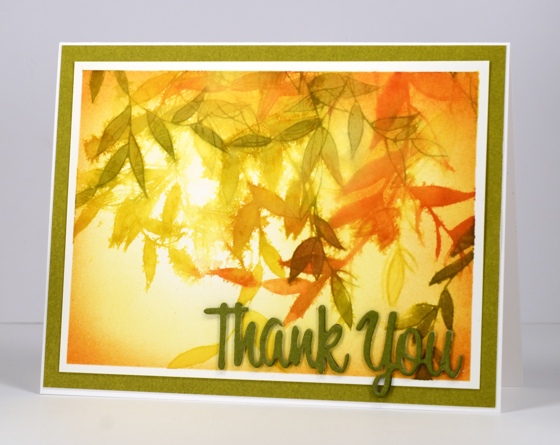
I am honoured to be a guest at Time Out Challenges today. The card above is the inspiration for their current challenge. When I designed this card over a month ago I was not seeing such lovely colours in the local leaves, but now they are looking beautiful. To created the blended mass of leaves above I stamped with distress stains and distress inks on watercolour paper. I used yellow, orange and green and each time I stamped repeatedly without reinking the stamp. Once I had a tangle of leaves stamped I then spritzed the paper and watched the clean edges of the image blur and blend. I used a waterbrush to fill in some of the leaves with the stain they were stamped in. When all was dry I sponged orange and yellow around the edges leaving a white area to look like the light shining through. My sentiment is three die cuts glued together, a process I find fiddly but I like the 3D result.
I hope you do take time out to visit the Time Out Challenge Blog to see what their design team came up with and to get inspired to participate yourself. I am looking forward to visiting through out the next two weeks while the challenge lasts.
Stamps: Wondrous (PB)
Creative Dies: Wishes (PB)
Inks: Mustard Seed, Spiced Marmalade, Peeled Paint distress stains & Spiced Marmalade distress ink (Ranger) Memento Dandelion ink (Tsukineko)
Cardstock: Neenah Avon Brilliant White 110lb, Fabriano 100% cotton hot pressed watercolour paper
Patterned Poppies
Posted: August 4, 2014 Filed under: Bashful, CAS, Field of Dreams, Indian Wheel, Wishes | Tags: Penny Black creative dies, Penny Black stamps, Ranger Distress stains 17 Comments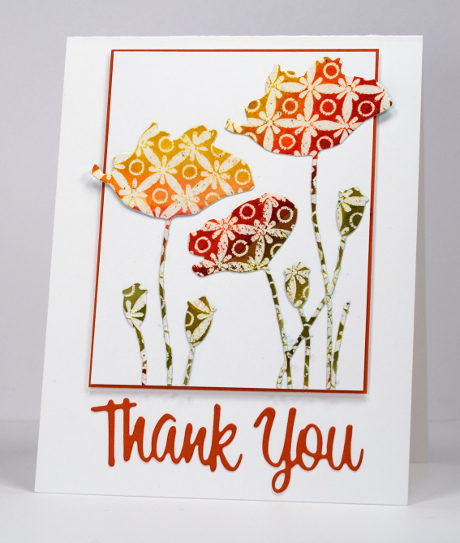
It seems to be nothing but poppies on the blog at present. I can assure you that changes tomorrow as something quite unseasonal will appear!
Today I have a card inspired by one of the techniques in the Stretch Your Stamps 2 online card class. I have created watercolour patterned paper for die cutting before but I don’t think I have die-cut any embossed designs. I embossed the background stamp, Indian Wheel, watercoloured with distress stains then cut out several poppies with the “Field of Dreams” die. I also cut the sentiment from the patterned panel but it was a bit much so I decided to a cut a plain orange sentiment.
When I was photographing the top card and getting ready to post it I saw the pretty patterned sentiment and another die cut flower and decided a second card was possible. I had cut the daisy first from the patterned panel using the “Bashful” die but decided there was not enough patterned showing so switched to the poppies. It’s great when one design turns into two. The layout below is an adaption of the current Case Study Challenge #202 layout, one big flower and a sentiment strip stretching right across the card.

Supplies:
Stamps: Indian Wheel (Penny Black)
Inks: Vintage Photo, Peeled Paint, Mustard Seed, Spiced Marmalade, Barn Door, Crushed Olive, Bundled Sage distress stains (Ranger)
Creative Dies: Field of Dreams, Wishes, Bashful (PB)
Cardstock: Fabriano 100% cotton hot pressed watercolour paper, Fall Festival mix & match paper (Penny Black), Neenah Solar White 110lb card stock.
Butterfly Chapter
Posted: February 4, 2014 Filed under: Butterfly Chapter, Watercolour, Wishes | Tags: Faber-Castell Albrecht Durer Watercolour pencils, Fabriano Watercolour Paper, Penny Black creative dies, Penny Black stamps, Tsukineko Memento inks 9 Comments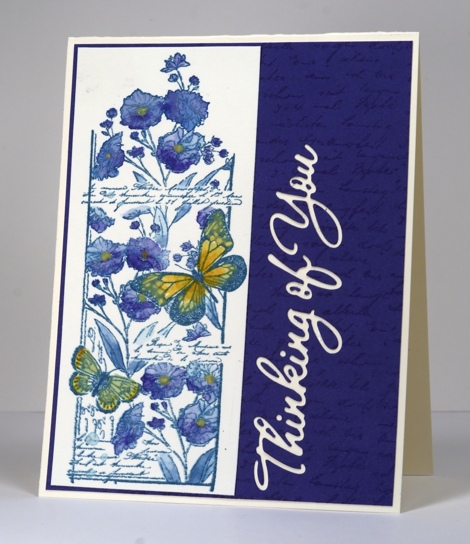
Penny Black is revealing designs and projects from the new ‘Happy Everything’ catalog all week and I have another card featuring a new stamp and die cut today. Check out the PB blog today to see Elizabeth’s wonderful creations and find out about the new contest also.
![]()
To create the picture panel for today’s card I stamped on watercolour paper with Memento Teal Zeal ink. I then added all my colour with watercolour pencils. As the Memento ink is a water-based dye ink it blended with the watercolour pencils as I coloured. I used a waterbrush to pick up colour from the lead of the pencil then painted it onto the panel blending with more water when a paler colour was desired. The mat is Purple Mountain Mix & Match paper stamped with the letter background stamp. The word die is new from the ‘Wishes’ set. Gluing those little cut outs from inside the letter loops was downright finicky. Any suggestions will be gratefully received!

I expect you will see more of this stamp from me; it is so delicate and pretty.
Supplies:
Stamps: Butterfly Chapter (PB)
Pencils: Albrecht Durer Watercolour pencils Night Green 155, Blue Violet 137, Ochre 184, Light Orange 113 (Faber-Castell)
Inks: Memento Teal Zeal (Tsukineko)
Creative Dies: Wishes (PB)
Cardstock: Fabriano 100% cotton hot pressed watercolour paper, PB Mix & match Purple Mountain


