
Floral border
Posted: February 9, 2017 Filed under: Centerpiece, Stitched Edges | Tags: Fabriano Watercolour Paper, Penny Black creative dies, Penny Black stamps, Sakura Koi watercolour paints 18 Comments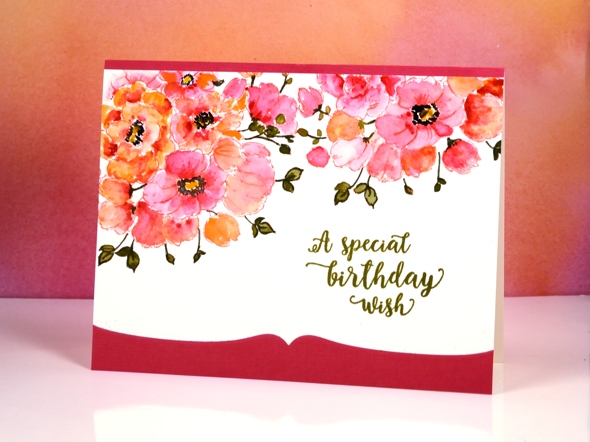
Between Christmas and New Year I did some major re-organising in my work room and changed the way I store my stamps. I am still working out a few details and wondering the best way to store my wood block stamps but other than that the new system seems to be working well. One benefit of doing some serious sorting was re-acquainting myself with my supplies. I pulled out a stamp from a few years ago and my Koi watercolour travel set to make this card.

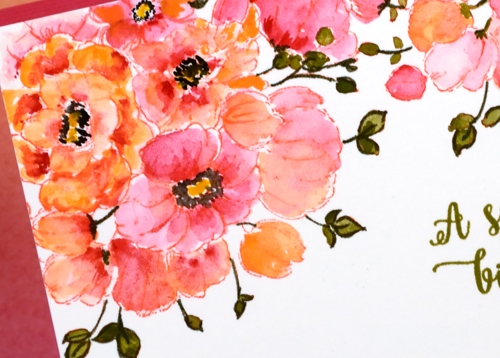
The stamp is a bouquet of flowers in a vase but as you can see I left the vase out of the picture and just worked with the flowers to create a border. With masking I could have positioned the flowers even more closely but I was hoping to finish this card fairly quickly so I just stamped the flower part of the stamp with the MISTI then moved my watercolour panel and stamped again. I used distress ink to stamp so I could blend it while painting. To keep it simple I used two colours of paint on the petals switching back and forth between a pink and a pale orange. I painted olive green into the leaves but then went around the edges and over the stems with a marker. To complete the flowers I painted black dots and yellow centres.
It really was a fairly quick panel to paint, the time consuming part ended up being the way I mounted it between a strip of pink and a die-cut edge of pink. I should have just attached it over the top of a pink panel but I made it less bulky but more fiddly by cutting both the watercolour panel and the pink cardstock with the edge die then aligning them on the card base. The Happy Little Stampers challenge this month is watercolour with an optional twist of die-cutting, so I’m popping over to add this one in.
As I write this I am sitting beside an amaryllis which looks like it might just burst out in bloom today. It is a gift from one of my artsy accomplices and it has been growing very steadily since the new year. It’s nice to have a real flower inside when all outside is snow and ice!
Supplies
Stamps: Centerpiece, words of kindness (PB)
Creative Dies: stitched edges (PB)
Inks: abandoned coral distress ink (Ranger) Olive grove memento marker, versafine Spanish moss (Tsukineko)
Cardstock: Fabriano 100% cotton hot pressed watercolour paper, Neenah Natural White 110lb cardstock, pink cardstock
Also: Koi watercolor field sketch travel kit (Sakura)
True Love
Posted: May 8, 2016 Filed under: CAS, Hand painted, Watercolour | Tags: Penny Black stamps, Sakura Koi watercolour paints 18 Comments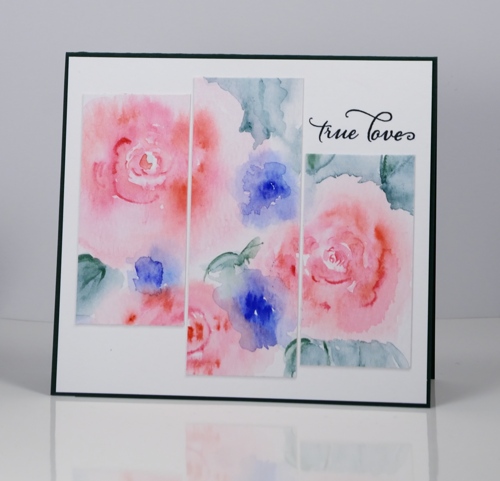
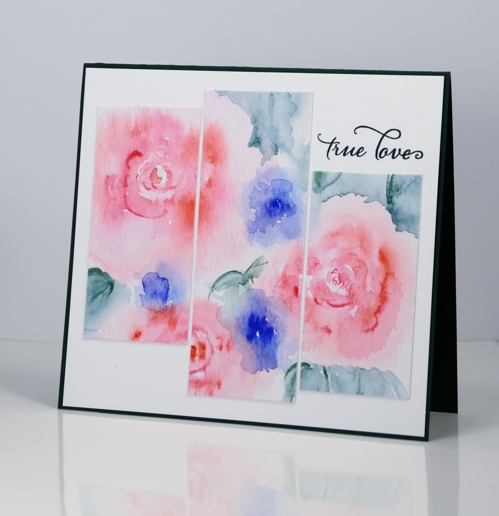
In keeping with my resolve to mix up my card layouts a wee bit I have a triptych inspired card to share. I painted the roses on a piece of watercolour paper, added leaves and blue flowers (not sure what they might be) then decided to find some inspiration on my ‘sketchy’ pinterest board. I sliced my panel into three strips of the same width then trimmed the ends so each would be a different length. The sentiment fitted quite nicely in one of the white spaces. I stamped the sentiment once in green then over the top in blue which gave me the bluey-green I was after to match my paint. I think the colours are soft enough to join in with the ‘pastels’ challenge on Less is More this week.
I hope you are having a lovely day.
Supplies:
Stamps: Happy Snippets, (PB)
Ink: Majestic Blue, Olympia Green Versafine inks (Tsukineko)
Paint: Sakura Koi watercolours
Paper: Heavy weight water media paper (Ken Oliver), Neenah SolarWhite 110lb cardstock, green cardstock
Hand painted wreath and swag
Posted: December 7, 2015 Filed under: Hand drawn | Tags: Sakura Koi watercolour paints 14 Comments
I am back with another wreath and swag today but hand painted this time. The stamped ones were a good warm up for getting the fullness and balance right. I began the wreath by tracing a circle onto the watercolour paper which had masking fluid splattered on it. The pencil line was a guide for me which ended up being painted over by the time I had finished. I painted a soft circle of blue paint first and while it was still damp I painted some green needles and brown pine cones shapes which ended up as soft muted shapes because it was wet into wet painting. I let the panel dry before adding more needles, some holly, berries and definition on the pine cones. I kept painting elements until the wreath shape looked full and even, added some fine green paint splatter then removed the masking fluid to reveal some tiny white spots.
The technique for the swag was similar but instead of painting pine cones in a two tones of brown I did roses in two tones of pink. You can see the soft shadow shapes under the wreath that were painted while the blue background paint was still wet. I decided to keep these two cards flat with mats but no bows. Thanks for your kind comments yesterday on the stamped wreath and swag; I’d love to hear if you gave the technique a try by pulling out some pine needle and pinecone stamps from your own stash or if you tried painting one.
Supplies:
Cardstock: Fabriano 100% cotton cold pressed watercolour paper, dark green card stock, gold card stock
Also:Water colour with Sakura Koi watercolours, Winsor & Newton masking fluid
Stamped wreath & swag
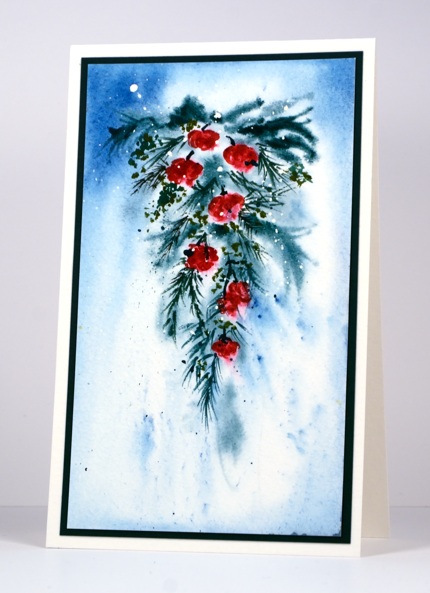
Posted: December 6, 2015 Filed under: Nature's Gifts, Winter moments | Tags: Fabriano Watercolour Paper, Penny Black stamps, Sakura Koi watercolour paints 15 Comments 
Last Sunday afternoon while sitting at the walk-in clinic waiting for my son to be seen I sketched a wreath and practised some lettering in a sketchbook. (He is fine, the doctor got him sorted and he was well enough to play basketball on Monday which of course was the real concern!) Once I returned home I was inspired to stamp a wreath and a swag using stamps from a couple of sets. I do own wreath stamps but wanted to see what I could come up with myself. For the wreath all the stamps came from the Nature’s Gifts set. To stamp the swag below I substituted smaller pinecones from the Winter Moments set.
I began by splattering masking fluid on one large panel still in my cold pressed watercolour block. Next I painted the background blue for both designs (plus 2 more) using the Sakura Koi watercolor travel set. I just wanted soft edges on the blue so I added plenty of water and also removed some colour with a brush or paper towel. While the background was still wet I stamped some pine needles and let them bleed into the damp paper to create a very soft look. Then I walked away while it dried. Once it was almost dry I stamped the rest of the elements adding a little water here and there with a paintbrush to blend colours and soften the images. I added little red dots on the swag as berries then let it all dry before rubbing off the masking fluid. I decided against any sentiment but added red ribbon and mats to bring out the colour of the berries.

After finishing these two stamped panels I created another swag and wreath which I will share tomorrow. My method was similar but I painted them instead of stamping.
Thank you so much for your kind and enthusiastic response to my ‘Stamping the Stories’ collection. I really enjoyed creating each card and was thrilled to see you enjoyed them too.
Supplies:
Stamps: Nature’s Gifts, Winter Moments (PB)
Inks: Memento Espresso Truffle, Love letter, Rhubarb Stalk, Lady Bug, Northern Pine, Potter’s Clay, Northern Pine, Tuxedo Black ink pads and markers (Tsukineko)
Cardstock: Fabriano 100% cotton cold pressed watercolour paper,
Also: Sakura Koi watercolours, Winsor & Newton masking fluid, red ribbon


