
Inch by Inch 4: Vintage Skyline
Posted: November 20, 2014 Filed under: Skyline, Stamped Landscapes | Tags: Faber-Castell Albrecht Durer Watercolour pencils, Inchie Arts, Penny Black stamps 16 Comments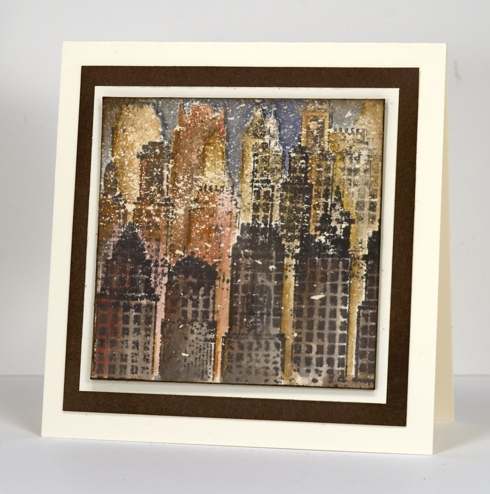
From a snowscape to a vintage cityscape my Inchie experiments continue. I never would have guessed when I first saw this skyline stamp that it would become such a favourite. Working on a 3″square splattered with masking fluid, I stamped ‘Skyline’ several times, never a full impression just the top of the buildings and without reinking so that the foreground images were darker than the background. I added colour with several earth tone watercolour pencils layering and blending colour until I was happy with the values and shadows. I mixed a blue and green to make a dark colour for the sky then added brown over the top to make it more muted. Finally I removed the masking fluid to reveal the cream flecks which I think make it look like an old damaged photo.
Deciding what to turn it into was difficult. I would have liked to create a notebook but time was not on my side so I made a card. I tried a patterned background, a portrait oriented and a landscape oriented rectangular card and two different sentiments before deciding less was once again more. Don’t forget more inchie arts inspiration on the Penny Black and the Inchie Arts blogs.
Supplies:
Stamps: Skyline (PB)
Inks: Memento Rich Cocoa (Imagine Crafts/Tsukineko)
Pencils: Albrecht Durer watercolour pencils (Faber Castell)
Cardstock: Neenah Natural White 110lb cardstock, Inchie Arts 3″ cream square, Penny Black mix & match Sticks and Stones paper
Also: Winsor & Newton masking fluid
Inch by Inch 3: Mini Snowscape
Posted: November 19, 2014 Filed under: CAS, Prancers, Stamped Landscapes | Tags: Inchie Arts, Penny Black stamps 6 Comments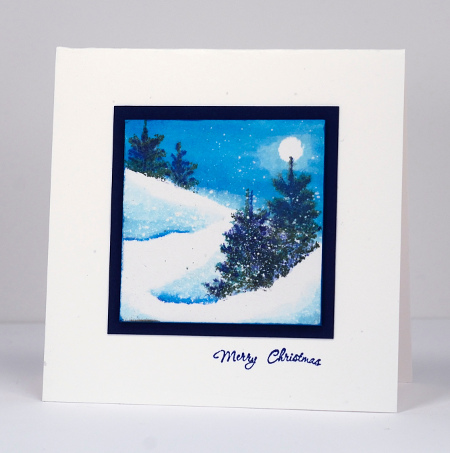
A mini snowscape was a must with the Inchie Arts squares so for day 3 I watercoloured a tiny scene using distress inks and memento inks. I used the same techniques I’ve used on previous snowscapes, a punched mask for the moon, a cut mask for the hill side and snowbanks and of course a splatter of masking fluid to create the appearance of falling snow. I have a tutorial showing the process on a larger scale here. When I was creating my masking fluid tutorial recently I splattered quite a few inchies at the same time so I would have a few ready when inspiration struck. The trees on this little scene were stamped in Memento Northern Pine ink which is my first choice for stamping pine trees. I added some Paris Dusk ink to the trees with a marker as they were looking a little flat. The teeny sentiment is a result of stamp surgery performed on a circular stamp from the Hello Winter set. The finished card is 3.5″ square.
If you are wondering where to buy art squares there is a list of retailers on the Inchie Arts blog. Don’t forget to visit both the Penny Black and the Inchie Arts blogs for more inspiration and giveaways.
Supplies:
Stamps: Prancers, Hello Winter (PB)
Inks: Memento Northern Pine, Paris Dusk ink (Imagine Crafts/Tsukineko) Chipped Sapphire, Salty Ocean distress ink(Ranger)
Cardstock: Neenah Solar White 110lb cardstock, Navy cardstock, Inchie Arts 2″ white square
Also: Winsor & Newton masking fluid
Inch by Inch 2: Twirl Tree
Posted: November 18, 2014 Filed under: CAS, Tree of Joy, Twirl Tree | Tags: Inchie Arts, Penny Black creative dies, Penny Black stamps, Ranger Distress inks, Tsukineko Memento inks 7 Comments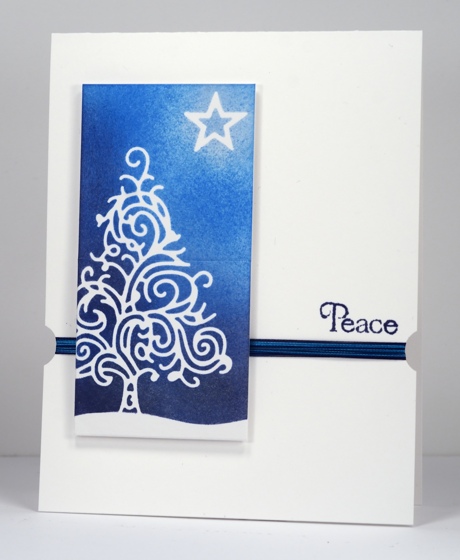
Day 2 of my Inchie Arts week features the white 2″ squares. All week you can see Inchie projects on the Penny Black blog and the Inchie Arts blog. There are giveaways too so make sure you visit.
To create today’s project I worked on two squares taped together at the back. While completing my design I was undecided about whether I would mount them on the card with a gap between them or not. In the end I decided to keep them together. I used the new intricate die, ‘Twirl Tree’ to cut a mask from masking paper. I also cut the star using the ‘Tree of Joy’ die. I pressed the sticky masks firmly onto the squares then added a handcut snow bank mask over the bottom of the square which overlapped the tree trunk. I sponged over the masks with memento Summer Sky ink, Salty Ocean distress ink, Chipped Sapphire distress ink and to finish, a very light application of Encore Silver metallic ink.
Before attaching the squares to the card base I punched a little bite out of both sides of the card base with a ½” circle punch and wound dark blue and turquoise machine embroidery thread round and round. I taped it down firmly then popped up the squares over the thread and added a simple sentiment. We had a few centimetres of snow today so all the trees look prettier. I won’t talk about it too much though because I know some of you would rather not think about winter and others of you have a whole lot more than a few centimetres!
Supplies:
Stamps: Yuletide Greetings (PB)
Creative Dies: Twirl Tree, Tree of Joy (PB)
Inks: Memento Summer Sky ink, Encore Silver Ultimate Metallic ink (Imagine Crafts/Tsukineko) Chipped Sapphire, Salty Ocean distress ink(Ranger)
Cardstock: Neenah Solar White 110lb cardstock, Inchie Arts 2″ white square
Also: machine embroidery thread
Inch by Inch 1: Gold Snowflakes
Posted: November 17, 2014 Filed under: All is Bright, Winter Pine | Tags: Inchie Arts, Penny Black stamps, Ranger Distress stains, Sharpies 20 Comments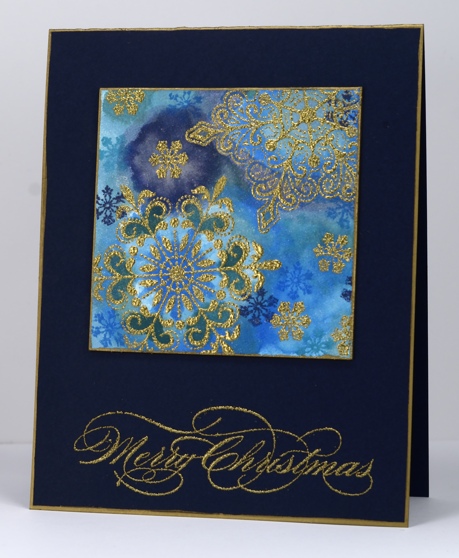
The Penny Black design team are collaborating with Inchie Arts this week and I will be sharing an Inchie Arts project here each day too. I have really enjoyed creating on a smaller scale, trying to make a visual impact in a couple of inches square. I have several projects on a single square and a couple where I lined up more than one. I did not end up working with ‘true inchies’ (1″x 1″); I had 1.5 inch, 2 inch and 3 inch matboard tiles to experiment with.
Today’s card features a 3 inch cream square. I started by embossing the snowflakes in gold powder then used distress stains to add colour. Distress stains react a little differently on matboard than on watercolour paper as the matboard absorbs liquids more quickly. I not only blended the colours on the matboard but layered them creating different colours and tones. The matboard is sturdy and does not warp with the addition of water and stains. I can’t remember exactly which distress stains I used (sorry) but I have taken a guess in the list below. I also stamped a few little snowflakes in light and dark blue ink. I added a border to both the square and the navy card base with a gold sharpie. I was impressed that the sharpie matched the embossing so well and showed up on the dark cardstock. Running the sharpie along the edge is a very quick way to ‘gild’ the edge of panels.
Thanks so much for visiting today.
Supplies:
Stamps: All is Bright, Most Wonderful, Winter Pine (PB)
Inks: Versamark ink (Imagine Crafts/Tsukineko) Chipped Sapphire, Salty Ocean, Pine Needles, Tumbled Glass distress stains & Chipped Sapphire, Salty Ocean distress ink(Ranger)
Cardstock: Neenah Navy 100lb cardstock, Inchie Arts 3″ cream square
Also: gold embossing powder, gold sharpie


