
A little bird
Posted: December 9, 2014 Filed under: CAS, No Card Left Behind, Winter Song | Tags: Fabriano Watercolour Paper, Penny Black stamps, Ranger Distress stains, Tsukineko Memento inks 11 Comments
Do you recognise this little scene? It is a portion of the large “Winter Song” scenic stamp. I was experimenting with ways to the colour the stamp back when I made this card. I wasn’t happy with the whole panel but cropping it gave me a smaller scene I could work with. Coming up with a layout that worked I’m sure took me as long as the original painting. I tried portrait but really wanted landscape orientation. A partial red mat didn’t overwhelm the panel and the words provide balance and carry the red highlights across the card. It wasn’t until I was searching for a sentiment that I realized that these three word stamps positioned in the right order have built in framing. It only took me about ten practices off the card base to get the positioning right!. I embossed them in clear powder so they have a pretty shine.
I guess I should mention how I coloured the panel. It was weeks ago so I am guessing a bit. I stamped the whole scene in memento summer sky first; you can see it at the base of the panel looking a bit like a shadow. The summer sky ink served as a guide so I could paint the scene with distress stains. I selectively inked the stamp to restamp after the painting, adding brown to the lower branches and black for the birch trees.
Thanks for dropping by.
Supplies:
Stamps: Winter Song , Joy Filled (PB)
Inks: Memento Summer Sky, London Fog, Rich Cocoa, Versafine & Satin Red (Tsukineko) Barn Door, Broken China, Peeled Paint
Cardstock: Fabriano 100% cotton hot pressed watercolour paper, Neenah Avon Brilliant White 110lb, Neenah Chili Red 100lb
Pine needles & cones
Posted: November 27, 2014 Filed under: CAS, Nature's Gifts | Tags: Penny Black stamps, Ranger Distress inks, Ranger Distress stains, Tsukineko Memento inks 12 Comments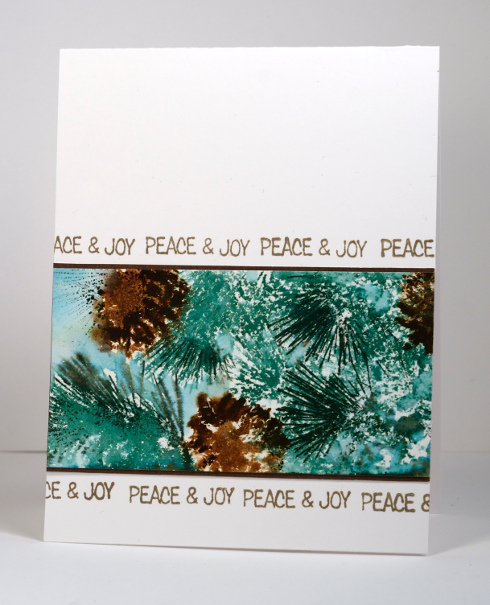
This panel of pine cones and needles is one of the bits & pieces that was waiting to be turned into something. I made the panel quite a while ago so here is my best guess at how I did it. I splattered some masking fluid on watercolour paper then inked the pine cones with vintage photo distress ink spritzed them with water then stamped them on the panel. I did the same with the pine needles in, surprise, surprise, pine needle distress ink. At this point I may have painted a little tumbled glass stain around the needles and cones as a background. When the panel had partially dried I restamped sections of the pine cone for added definition. I switched to Memento Northern Pine ink to add some darker needles. When all was dry I rubbed off the masking fluid.
I trimmed it a little and matted it with brown and then tried to think of a background that would add interest but not compete with the panel itself. I tried embossing the needles and cones from the “Nature’s Gifts” set on the card base in a pearl powder. The powder is very pretty and I will try it again on another project but it didn’t work for this one. I ended up with no more pattern on the card base that the stripes of repeated sentiments. Keeping it clean and simple qualifies it for the Less is More challenge this week to be ‘Christmassy’.
Supplies:
Stamps: Nature’s Gifts, Winter Magic (PB)
Inks: Tumbled Glass distress stains & Pine Needle, Vintage Photo distress ink(Ranger), Memento Northern Pine, Versafine Vintage Sepia (Imagine Craft/Tsukineko)
Cardstock: Neenah Avon Brilliant 110lb cardstock, Fabriano 100% cotton hot pressed watercolour paper, Sticks & Stones mix & match paper (Penny Black)
Also: Winsor & Newton masking fluid
Falling Snow Video Tutorial
Posted: November 26, 2014 Filed under: Prancers, Stamped Landscapes, Tutorial | Tags: Fabriano Watercolour Paper, Penny Black stamps, Tsukineko Memento inks, Tutorial 16 Comments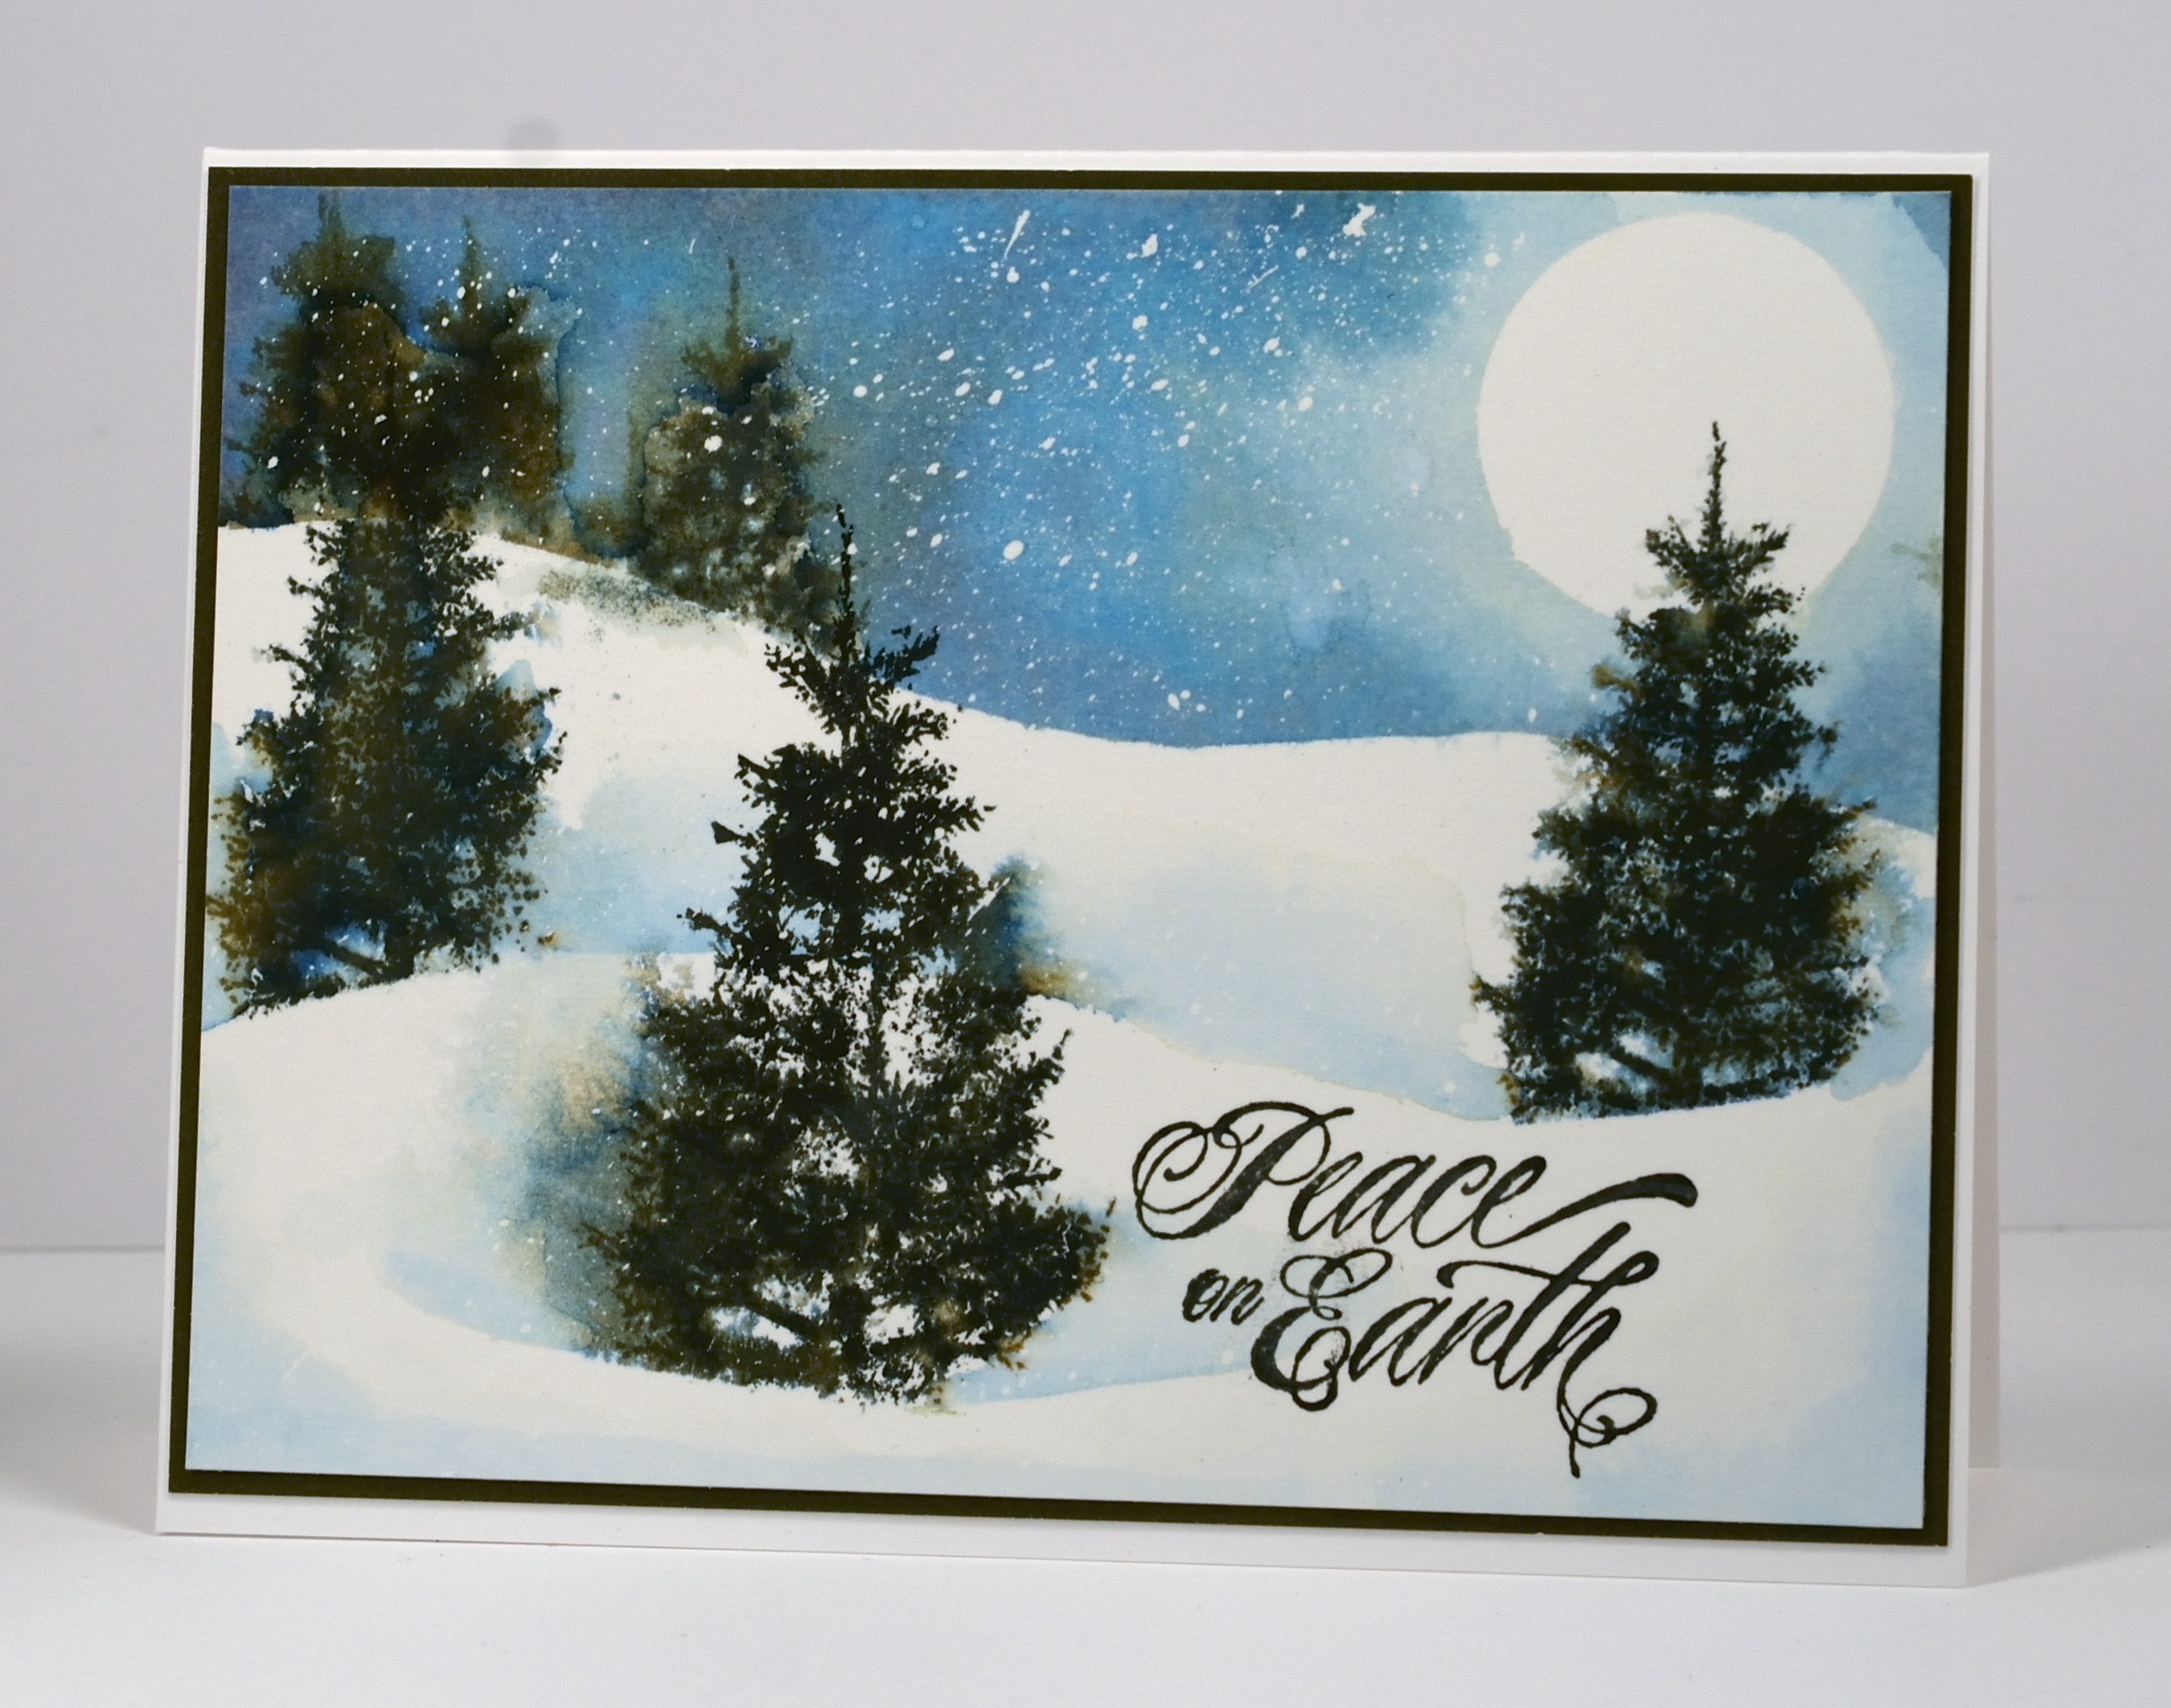
Today’s tutorial is one I created for Splitcoast Stampers. Splitcoast posts a new technique tutorial every Wednesday and in today’s I show how to create the look of falling snow on a watercolour card. I created both a photo and video tutorial for Splitcoast.
The video took me a few attempts so I have four slightly different versions of the card which supports my claim that watercolour techniques never give you the same result twice. The picture above is the first one I created and the one featured in the photo tutorial. It has quite a bit of masking fluid snow in the sky; the one in the video ended up with a lot less. I mention in the video that I have stopped using post-it notes to mask when I do watercolour scenes. I now use frisket film, a reusable, repositionable plastic film which doesn’t disintegrate when it gets wet. It is called Grafix Extra Tack Prepared Frisket Film.
I have another video showing in detail how to apply and remove the masking fluid here.
Supplies:
Stamps: Prancers, Hello Winter(PB)
Inks: Memento Nautical Blue, Bahama Blue, Northern Pine inks (Imagine Craft/Tsukineko)
Cardstock: Fabriano 100% cotton hot pressed watercolour paper, Neenah Solar White 110lb cardstock, Olive Green cardstock
Also: Winsor & Newton masking fluid, Kemper Spatter brush
Inch by Inch 2: Twirl Tree
Posted: November 18, 2014 Filed under: CAS, Tree of Joy, Twirl Tree | Tags: Inchie Arts, Penny Black creative dies, Penny Black stamps, Ranger Distress inks, Tsukineko Memento inks 7 Comments
Day 2 of my Inchie Arts week features the white 2″ squares. All week you can see Inchie projects on the Penny Black blog and the Inchie Arts blog. There are giveaways too so make sure you visit.
To create today’s project I worked on two squares taped together at the back. While completing my design I was undecided about whether I would mount them on the card with a gap between them or not. In the end I decided to keep them together. I used the new intricate die, ‘Twirl Tree’ to cut a mask from masking paper. I also cut the star using the ‘Tree of Joy’ die. I pressed the sticky masks firmly onto the squares then added a handcut snow bank mask over the bottom of the square which overlapped the tree trunk. I sponged over the masks with memento Summer Sky ink, Salty Ocean distress ink, Chipped Sapphire distress ink and to finish, a very light application of Encore Silver metallic ink.
Before attaching the squares to the card base I punched a little bite out of both sides of the card base with a ½” circle punch and wound dark blue and turquoise machine embroidery thread round and round. I taped it down firmly then popped up the squares over the thread and added a simple sentiment. We had a few centimetres of snow today so all the trees look prettier. I won’t talk about it too much though because I know some of you would rather not think about winter and others of you have a whole lot more than a few centimetres!
Supplies:
Stamps: Yuletide Greetings (PB)
Creative Dies: Twirl Tree, Tree of Joy (PB)
Inks: Memento Summer Sky ink, Encore Silver Ultimate Metallic ink (Imagine Crafts/Tsukineko) Chipped Sapphire, Salty Ocean distress ink(Ranger)
Cardstock: Neenah Solar White 110lb cardstock, Inchie Arts 2″ white square
Also: machine embroidery thread
Snow Wishes
Posted: November 15, 2014 Filed under: Skyline, Snow Wishes | Tags: Penny Black creative dies, Penny Black stamps, Tsukineko Memento inks 9 Comments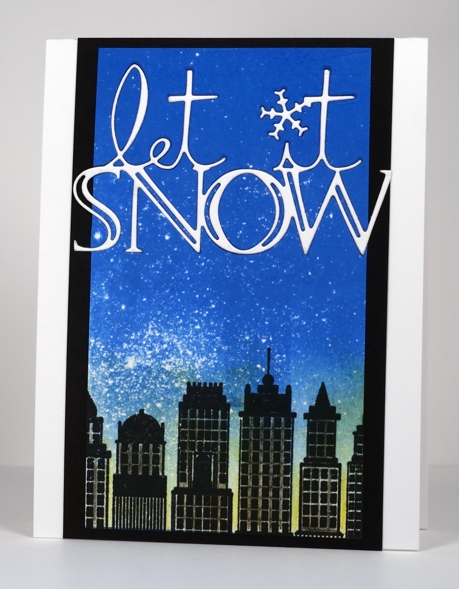
The theme on the Penny Black blog has been intricate dies this week and the designers have created beautiful projects. My card today features one of the new intricate sentiments fitted into a snowy city sky. To create the scene I splattered masking fluid on white cardstock then brayered Memento Bahama Blue ink from one end which resulted in the colour fading out toward the other end. I stamped part of the slapstick cling stamp, ‘Skyline’ at the base of the panel and sponged yellow around the buildings and used a grey marker on the facades. I die cut the ‘Snow Wishes’ sentiment out of the top of the panel and out of a piece of white cardstock then fitted the white diecut into the stamped panel, attached it all to the black mat and finally to the white cardbase.
Stamps: Skyline (PB)Creative Dies: Snow Wishes (PB)
Inks: Memento Bahama blue, Dandelion, London fog inks, Versafine Onyx black (Imagine Crafts/Tsukineko)
Cardstock: Solar white cardstock, Epic Black cardstock (Neenah)
Reflections
Posted: November 13, 2014 Filed under: Prancers, Stamped Landscapes | Tags: Penny Black stamps, Tsukineko Memento inks 20 Comments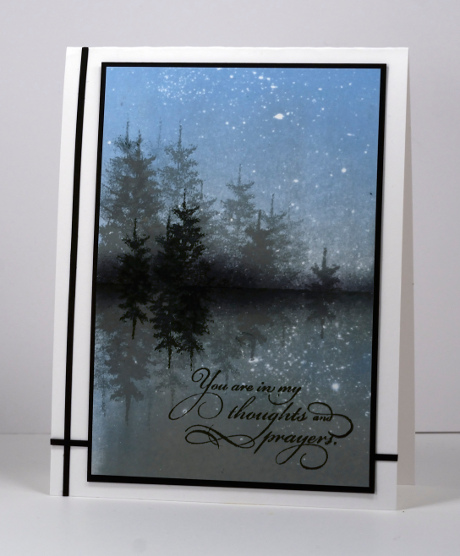
What started out as a brayering experiment turned into a simple peaceful scene, perfect for the sympathy card I needed this week. On top of some splattered masking fluid I brayered memento summer sky ink and memento London fog ink with overlap of the two colours in the middle. I positioned a frisket film mask across the panel and stamped trees in both grey and black ink. Next I positioned the mask over the stamping so I could stamp in the reflecting water. Because the frisket film is transparent I was able to line up the trees when I stamped them as reflections. I also added a bit of sponging at the edge of the water.
When I came to finish the card I tried adding some cord and ribbon but nothing was quite right. I settled on some very thin strips of the same black cardstock I used to mat the panel.
Supplies:
Stamps: Prancers, Eloquence (PB)
Inks: Memento Summer Sky, London Fog, Tuxedo Black(Imagine Craft/Tsukineko)
Cardstock: Neenah Solar White 110lb cardstock, black cardstock
Also: Winsor & Newton masking fluid, Grafix frisket film
Autumn Branches
Posted: November 5, 2014 Filed under: Etched Branches, Watercolour, Words of Gratitude | Tags: Fabriano Watercolour Paper, Penny Black creative dies, Penny Black stamps, Ranger Distress stains, Tsukineko Memento inks, Tsukineko Radiant Neon inks 12 Comments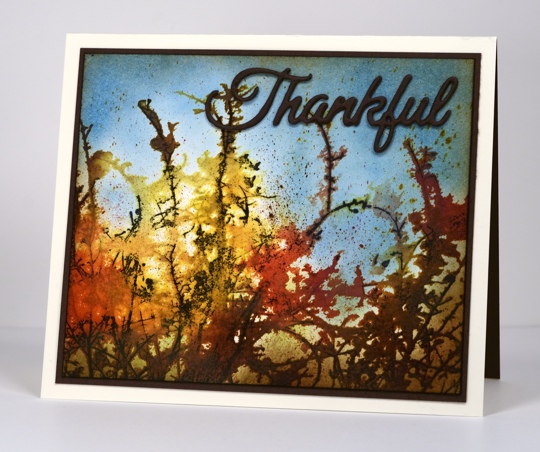
The etched branches stamp is once again the star of an autumn card; I have yet to use it on a winter scene. Using loose watercolouring I tried to recreate the colours I have been seeing against bright blue skies lately. We have had some beautiful clear autumn days and it has been a great year for gorgeous colours.
I began by dabbing Ranger Archival jet black ink onto “Etched Branches” stamp leaving some places un-inked. I then stamped onto watercolour paper and placed a stamp positioner next to the stamp before removing it to mark the position for subsequent impressions. As I was making several impressions it helped to tape the stamp positioner to the panel with painter’s tape. I inked small sections of the “Etched Branches” stamp with Mustard Seed distress stain and stamped onto panel using the stamp positioner to guide the stamp into the same place then repeated the same steps with other distress stains inking different sections of the stamp each time. With all the colour stamped I spritzed the panel with water to make the colours bleed into each other and the surrounding area. Next I splattered the same distress stains over the panel and let all the ink dry.
Before removing the stamp positioner I re-inked a few sections of the stamp with black marker to give some branches more definition. To colour the sky I sponged Radiant Neon Electric blue ink, for the foreground Memento Luxe Pear Tart ink and to finish Vintage Photo distress ink around border. I matted the panel with brown cardstock and stacked three diecuts of the word “Thankful” for my sentiment.
For more Thanksgiving inspired projects visit the Penny Black blog this week
Stamps: Etched Branches (PB)
Creative Dies: Words of Gratitude (PB)
Inks: Archival Black ink, Barn door, Vintage Photo, Mustard Seed, Crushed Olive, Spiced Marmalade distress stains, Vintage Photo distress ink (Ranger) Radiant Neon Electric Blue ink, Memento Luxe Pear Tart ink, Memento Tuxedo Black marker(Imagine Crafts/Tsukineko)
Cardstock: Fabriano 100% cotton hot pressed watercolour paper, Neenah Natural white cardstock, brown cardstock
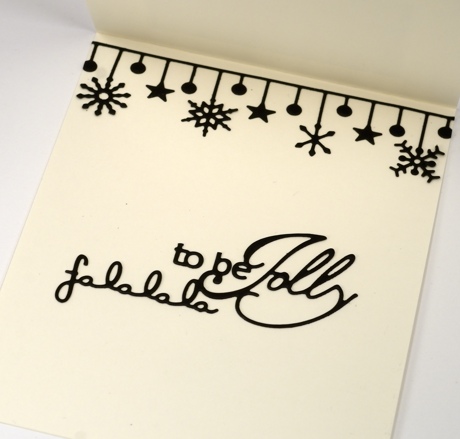
‘Tis the season
Posted: November 4, 2014 Filed under: CAS, Skyline, Snow Drops, Tis the season | Tags: Penny Black creative dies, Penny Black stamps, Tsukineko Memento inks, Tsukineko Radiant Neon inks 11 Comments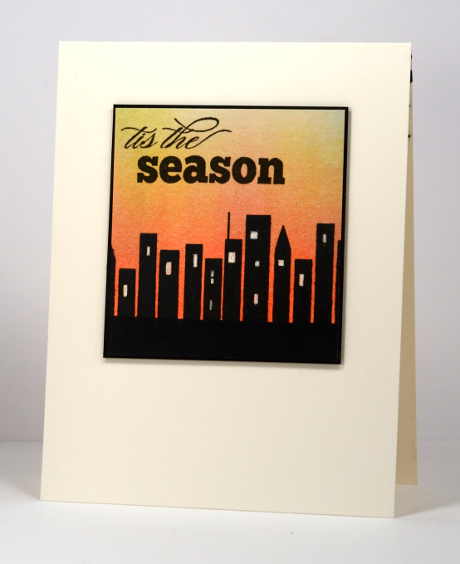
‘Tis not quite the Christmas season just yet but it is the season to change the clocks back which is what we did on Sunday. That means the sunset came earlier than I am used to and I was able to enjoy it at the end of a run. The light was orange and yellow behind the silhouetted trees and buildings as I ran home and that is what inspired this silhouetted city scape. I was undecided about a sentiment until I read the Less is More and the Splitcoast Clean and Simple challenge for this week, both are about non-traditional Christmas cards. This card is definitely non traditional especially when you peek inside to see the rest of the sentiment along with some black snowflakes. Seriously, who wants black snowflakes? I am not sure they work. What do you think?
I brayered the colour onto Neenah natural white cardstock, first radiant neon electric coral, next memento dandelion and lastly from the other end of the panel summer sky. (There is no summer sky left at the top of the panel as I had to trim it after messing up the sentiment.) I stamped the skyline stamp in black then brayered black to cover the base of the panel. The windows are coloured with a white gel pen and the sentiment stamped in versafine onyx black ink. I gave the panel a thin black mat and popped it up on dimensional squares. Inside the card is the rest of the sentiment trimmed from a new die cut and paired with the Snowdrops die cut.
Supplies:
Stamps: Skyline, Season’s Wishes (PB)
Creative Dies: Tis the Season, Snow Drops (PB)
Inks: Memento dandelion, tuxedo black, Radiant Neon Electric coral, Versafine onyx black (Imagine Craft/Tsukineko)
Cardstock: Neenah natural White 110lb cardstock, black cardstock
Let it snow
Posted: October 30, 2014 Filed under: Joyous Wishes, Prancers, Snow Drops | Tags: Penny Black creative dies, Penny Black stamps, Tsukineko Memento inks 14 Comments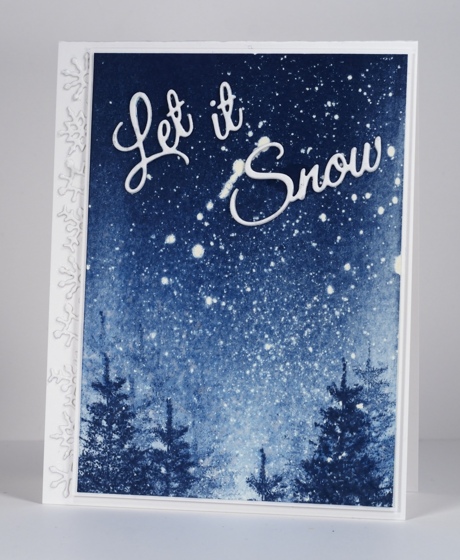
Snow is in our weather forecast for the next few days; I don’t imagine there will be as much as in the card above but who knows?
I know I keep mentioning the “panels already splattered with masking fluid” that I have sitting around on my craft table. There are a couple of reasons I have extras on hand, one is that the fluid takes at least 20 minutes to dry properly so it is good to have one ready for when inspiration strikes. Also I have several different sizes of watercolour blocks now so when I splatter the masking fluid on a block I can end up with quite a few card-sized panels. This panel was generously splattered with masking fluid, both tiny dots and larger ones. I ended up working with just one ink, Memento Nautical blue. I brayered the ink over the masking fluid, a method which gives each dot softer edges, a different effect to that created with sponging ink or watercolouring. I brayered from one edge only and the blue faded out toward the opposite edge of the panel making it the perfect place to stamp some trees with first, second and third generation stamping. After stamping the trees I spritzed the bottom of the card once so there is a little bit of blur around the trees.
I decided on a die cut sentiment so it would stand out and ended up cutting two and stacking them together. When trimmed the panel was a bit narrower than my usual card size so rather than trim the card base I matted with white and popped the panel up over little die cut snow flakes from the Snow drops die.

Supplies:
Stamps: Prancers (PB)
Creative Dies: Joyous Wishes, Snow Drops (PB)
Inks: Memento Nautical Blue (Imagine Craft/Tsukineko)
Cardstock: Neenah Solar White 110lb cardstock,
Also: Winsor & Newton masking fluid
Winter Woodland Wonder
Posted: October 13, 2014 Filed under: Woodland Wonder | Tags: Penny Black stamps, Tsukineko Memento inks 13 Comments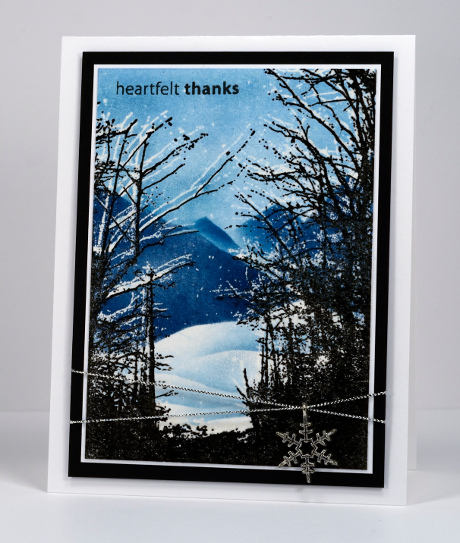
Woodland Wonder is another gorgeous stamp from the new Penny Black release. It is lovely to use in a winter scene but, like ‘Etched Branches‘ in my last post, I will be using all year I’m sure.
I used sponging and embossing for this scene, stamping the image first in versamark then again in versafine onyx black ink before embossing in clear powder. I used a paintbrush to paint some masking fluid on a few branches and splattered a few spots here and there before moving on to the sponging. I started with the sky, sponging it in Memento Summer Sky ink then masked over both the sky and the foreground to sponge Memento Nautical blue mountains. I sponged over the edge of a curved mask a couple of times in the foreground to create the appearance of snow banks. To finish I removed the masking fluid and matted in both black and white cardstock. The little silver snowflake is a charm my friend Lorraine gave me last year when I was ‘shopping her stash’ in Washington. It is held in place by some silver cord.
Happy Thanksgiving to all my Canadian readers; we are enjoying some lovely sunny skies and beautiful autumn colours in Ottawa this weekend. Later today we will be enjoying some roast turkey. I have so much to be thankful for, not the least of which are my generous and faithful blog readers.
Supplies:
Stamps: Woodland Wonder, Amazing (PB)
Inks: Memento Nautical Blue, Summer Sky, Versamark, Versafine onyx black (Imagine Craft/Tsukineko)
Cardstock: Neenah Solar White 110lb cardstock, Neenah black 100lb cardstock
Also: clear embossing powder, silver cord, silver snowflake charm


