
A fringed iris
Posted: February 15, 2016 Filed under: CAS, Passionate | Tags: CAS, Faber-Castell Albrecht Durer Watercolour pencils, Fabriano Watercolour Paper, Penny Black stamps, Ranger Distress stains 17 Comments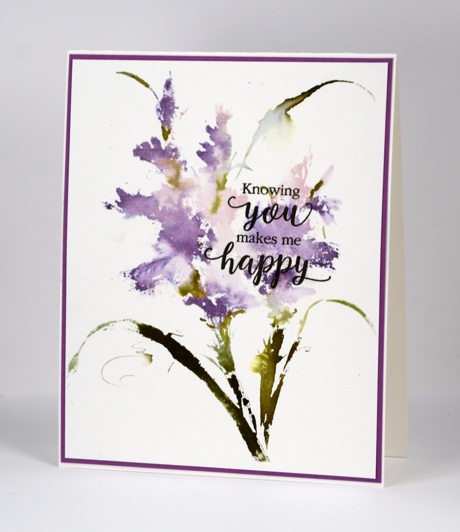
This pretty new stamp from Penny Black is called ‘Passionate’ and I think it might be a fringed iris but as I have said before my floral knowledge is limited. Penny Black gives whimsical romantic names to many of their floral stamps so I am not always sure if I have identified them correctly. The new collection ‘So Special’ is now available in the online store and the whole catalogue can be viewed here.
If your weekend was anywhere near as cold as ours you might enjoy some spring flowers today. We spent a large chunk of the freezing weather watching the shenanigans from the NBA All-Star weekend in Toronto because we have a 6 foot basketball player in the house now!
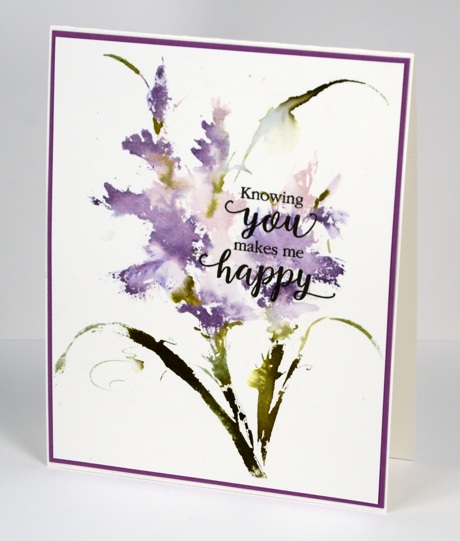
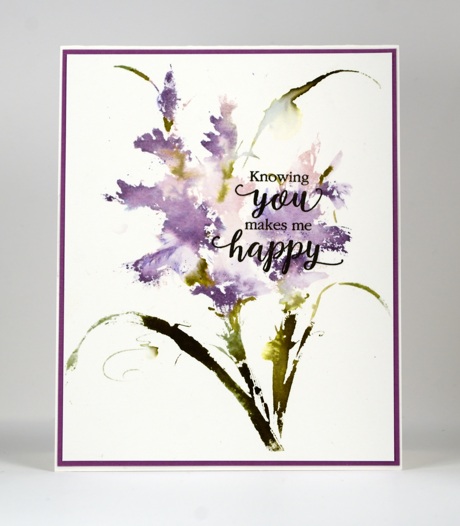
I have tried two colour schemes with this large floral cling stamp. Today’s colours are similar to the irises I have in my own garden. (I’ll share the other colour scheme another day) The cards above and below are not that different but I wanted to show you yet another reason I love to stamp with distress stains. Inking the stamp directly with distress stains makes it quite wet so a second or third impression usually creates a couple of similar but softer images. The ‘knowing you makes me happy’ card above is the first impression inked with two purple and two green distress stains. I sprinkled a little water on the paper before I stamped so the colour would bleed more in some places than others. I added a bit more definition with a watercolour pencil and painted some green stain on the stems in the centre of the image where they were not distinct enough.
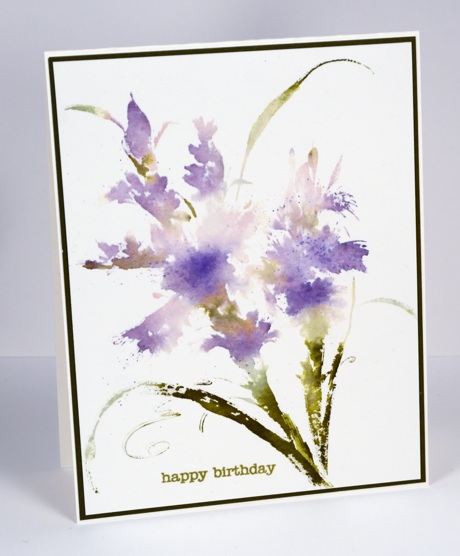
The ‘happy birthday’ version of the card is the second impression; I didn’t add any new stain but did spritz before stamping to spread and blend the colour.
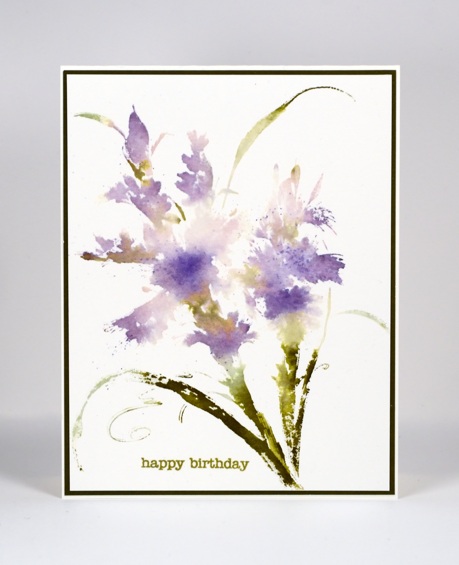
I used a watercolour pencil to darken the centre of the flowers and add some splatter over and around the petals.

Supplies:
Stamps: Passionate, Sentiment Collection, Snippets (PB)
Inks: milled lavender, dusty concordbundled sage, forest moss distress stains (Ranger)
Pencils: Faber Castell Albrecht Dürer watercolour pencils
Cardstock: Fabriano 100% cotton hot pressed watercolour paper,green cardstock, purple cardstock
Pink Poppy Time
Posted: January 23, 2016 Filed under: Fresh, Poppy Time | Tags: Fabriano Watercolour Paper, Penny Black stamps, Ranger Distress stains 13 Comments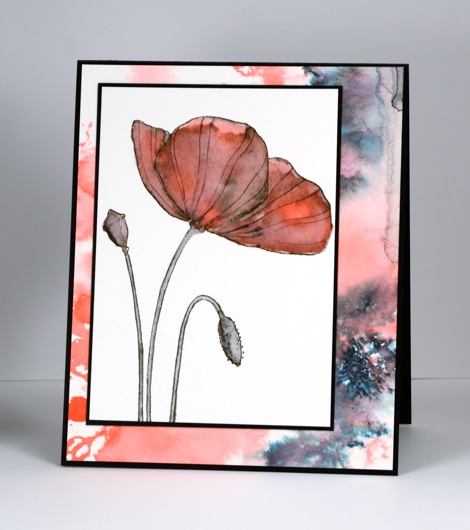
I don’t often add more than one mat or layer to a stamped panel but it was fun co-ordinating a patterned panel with the focal image. By working on two panels at once I was able to create one very controlled image panel along with a loose background one.
The single poppy I stamped in black soot ink then drew over a few of the outlines with the ‘elegant writer’ pen. When I started filling the poppy with pink stain the black ink bled into the pink giving it the watermarked grungy look. To create the patterned paper behind the panel I stamped the ‘Fresh’ poppy stamp in pink stain, added some detail with the elegant writer pen again and then flooded the panel with a spritzer. The pink spread and the black bled into black, pink and green.
I doubt you will start seeing oodles of layers on my cards; there are talented card makers who do that so well. From time to time however it is fun to get fancy with a few extra layers. Speaking of layers (or lack of)there is one day left to enter the One Layer Simplicity challenge for January. Even if you can’t squeak in with a card, check out the cool’sky inspired’ cards linked up there.
Supplies
Stamps: Poppy Time, Fresh (Penny Black)
Inks: Elegant Writer pen (Speedball) Black soot distress ink, Worn Lipstick distress stain (Ranger)
Cardstock: Fabriano cold pressed watercolour paper, Black cardstock
All Abloom
Posted: January 18, 2016 Filed under: All Abloom | Tags: CAS, Penny Black stamps, Ranger Distress stains 10 Comments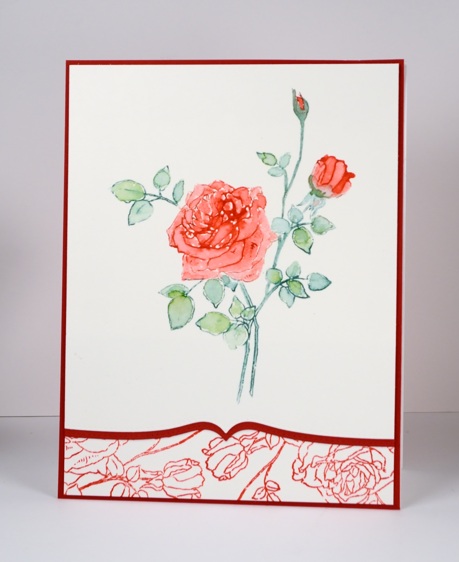
This week I will be sharing cards made with stamps and dies from Penny Black’s new ‘Love Always‘ release. This delicate rose is from a transparent set of floral stamps. I inked it with a mix of red and green distress stains and markers. I pulled the colour into the petals and leaves with a small paintbrush adding extra here and there where needed. To finish I used the same stamp to create an outline patterned panel at the bottom of the card front and the stitched edge die to shape the bottom of the panel and red mat underneath.
Once again the Valentine’s stamps prompted me to pull out red ink; I’m not sure why I can’t break free from that mould. Perhaps I should have tried black. A friend of mine bought a black rose bush at the end of last season and is eager to see what it looks like once summer comes around. There is such a thing as a blue rose too although that does not seem quite right.
Supplies:
Stamps: All Abloom (PB)
Dies: Stitched Edges (PB)
Inks: Festive berries, Peeled Paint, Pine needles distress stains and markers (Ranger), Versafine Satin red ink (Tsukineko)
Cardstock: Hotpressed Fabriano watercolour paper, Neenah chili red
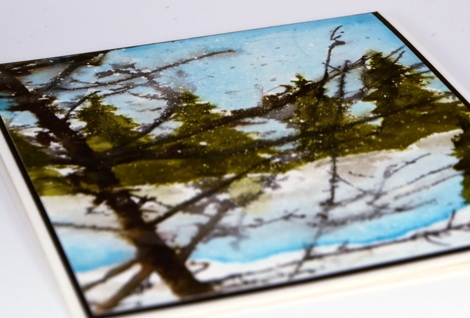
Winter Weather
Posted: January 16, 2016 Filed under: Nature's Friend, Soft Whisper, Stamped Landscapes | Tags: Penny Black stamps, Ranger Distress inks, Ranger Distress stains 11 Comments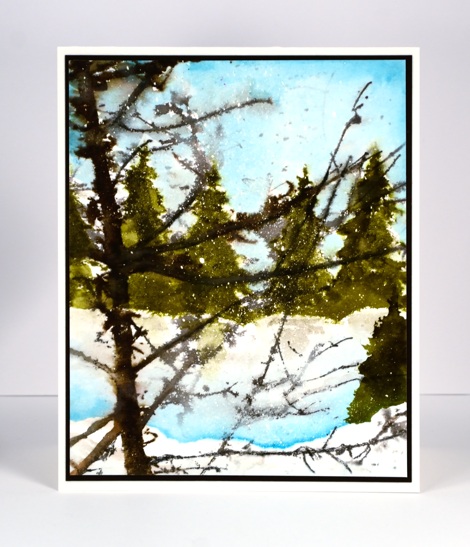
Remember back in December when I kept mentioning the lack of snow around here? There wasn’t just a lack of snow there was really no winter weather at all. Well, that is over; we have snow, ice and it’s cold outside! The winter weather has inspired me to create some snowy scenes.
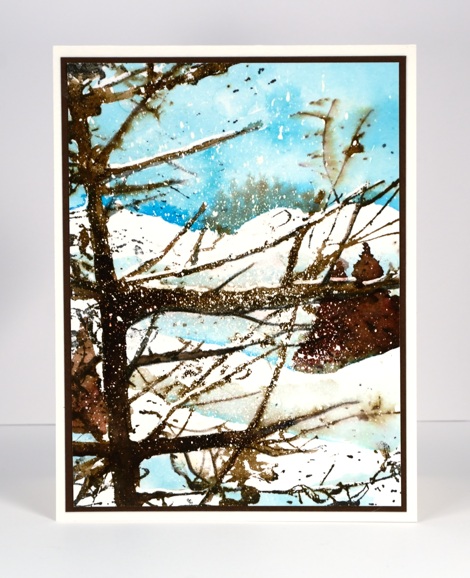
I stamped and painted these two winter scenes beginning both times with a splatter of masking fluid to create the look of falling snow. Once the masking fluid was dry I stamped the large tree trunk stamp, ‘Soft Whisper’ in brown and then added some more masking fluid on the top of the branches (on the snowier card) and added extra definition to the branches and trunk with light brown, dark brown and black paint.
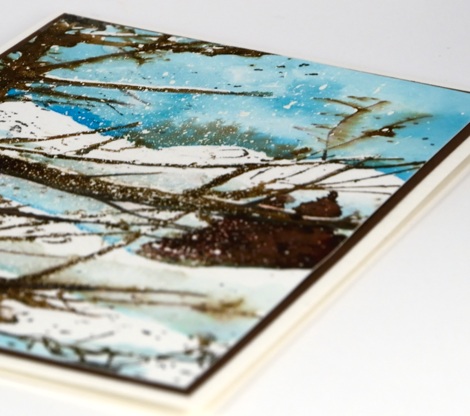
On one card I stamped the trees in green distress stain on the other I painted trees in brown brusho. It was interesting to limit my colour palette to brown and blue for one card and the additional green on the other card. I added the sky and snow banks after the branches so there is some bleeding of brown into blue here and there.
I was interested to read the comments on my recent gelli plate post; I will be trying the different techniques described when I get a chance. I am also hoping to share more art journal pages this year including the one I started yesterday.
Stamps: Soft Whisper, Nature’s friend (PB)
Inks: Black Soot, Gathered Twigs, Forest Moss, Broken China distress inks and stains (Ranger)
Paint: Colourcraft Brusho
Cardstock: Canson 100% cotton hot pressed watercolour paper
Also: Winsor & Newton masking fluid
Holly thank yous
Posted: January 11, 2016 Filed under: Hand drawn, Hand lettered | Tags: Hand lettering, Ranger Distress stains 15 Comments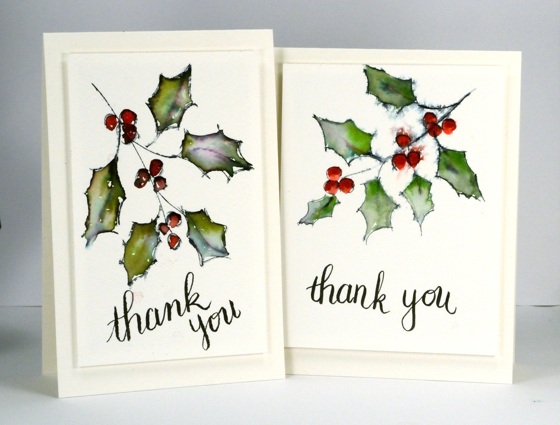
I drew a few Christmas thank you cards on the weekend to give to some friends. What started as a fairly quick exercise became frustrating as I picked up red stain on my fingers and proceeded to print it on the panels as I put the cards together. I think all the cards ended up with little red smudges here and there. One had to be remade because I made such a mess of it.
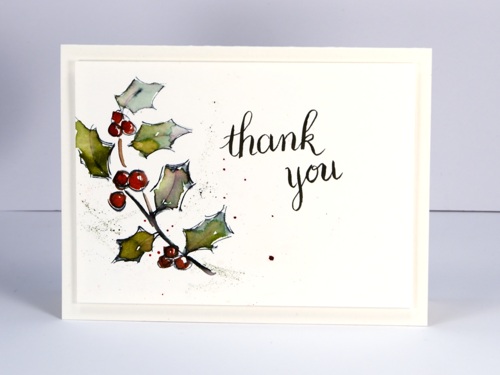
I drew the holly with the elegant writer pen from Speedball which bleeds pink and green colour when wet. I added distress stains to the inside of my leaves and berries which blended with the colours from the pen to create some multicoloured leaves.
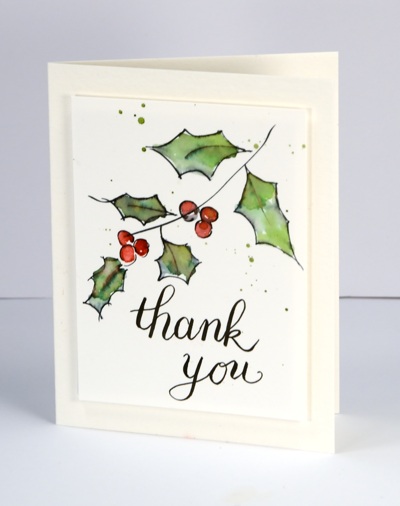
I did the hand lettering with a different pen and with varying levels of success as far as keeping slope even and thick and thin happening. It’s all good practice! All the panels are popped up on fun foam on watercolour paper card bases.
Supplies:
Inks: mowed lawn, peeled paint, festive berries, barn door distress stains (Ranger) Elegant Writer (Speedball) Fudenosuke brush pen (Tombow)
Cardstock: Fabriano 100% cotton hot pressed watercolour paper, Canson cold pressed watercolour paper
Happy Anniversary, Baby
Posted: January 7, 2016 Filed under: Bridal March | Tags: Penny Black stamps, Ranger Distress stains 39 Comments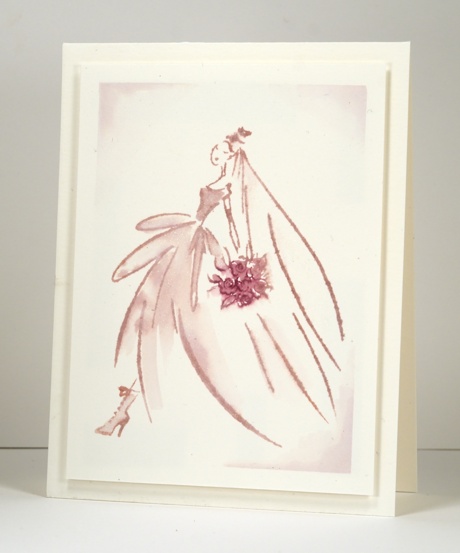
It was my wedding anniversary yesterday so a wedding related card seems appropriate. I don’t do many cards with people in them and do not have skills in painting skin colour. Making this a monochrome card solved that little problem nicely. I only used two colours, both from the purple family, and managed to blend enough colour within the outline to provide some dimension. I stamped with distress stain and pulled colour from the stamping while it was still wet. Masking tape around the original panel created a frame then popping it up on dimensional tape which created another subtle frame.
This elegant dress looks nothing like my wedding dress, nor did I have a veil or fancy boots like those above. I did design and make my wedding dress myself and still love it despite how dated it seems now. My mother borrowed her wedding dress from a dear friend; it was extremely elegant and would not look out of place today. Mine will not be back in style until enormous sleeves return!
Supplies:
Stamps: Bridal March (PB)
Inks: Milled lavender, Aged Mahogany distress stains (Ranger)
Cardstock: Hotpressed Fabriano watercolour paper
Blue Christmas
Posted: December 22, 2015 Filed under: Regalia | Tags: Penny Black creative dies, Penny Black stamps, Ranger Distress stains, Tsukineko Memento inks 7 Comments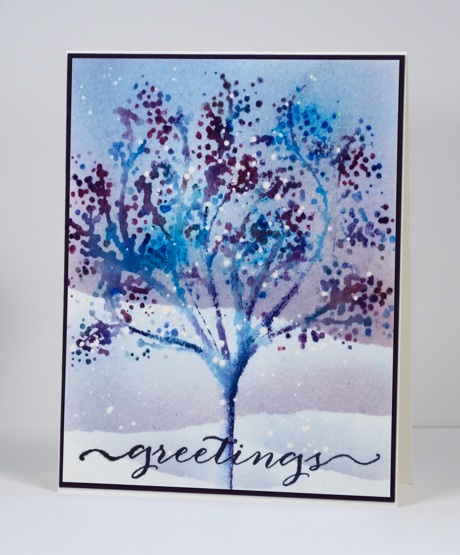
I don’t know under what circumstances one would have a blue tree like this! I just grabbed all the blue and purple markers and with the help of the MISTI stamped and restamped then spritzed and sprinkled blue brusho until I had whimsical blue tree.
In creating this post I remembered I had stamped this tree before but never shared it. This one was also done with the MISTI so all those colours didn’t get muddy on the stamp.

I hope you are having a lovely day. Must get on with the baking…
Supplies
Stamps: Regalia, Believe (PB)
Dies: Splendid Wishes (PB)
Inks: All the blue and purple memento markers (Tsukineko)
Paints: Brusho
Cardstock: Canson hot pressed watercolour paper, purple cardstock
Also: masking fluid
Holly heartfelt
Posted: December 16, 2015 Filed under: Holly Tweet | Tags: Fabriano Watercolour Paper, Penny Black stamps, Ranger Distress inks, Ranger Distress stains 4 Comments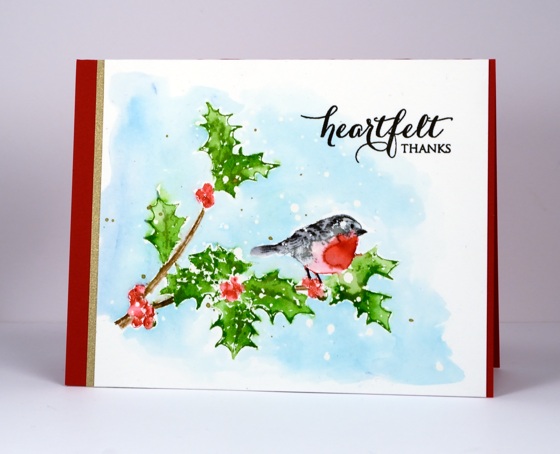
“Holly Heartfelt” sounds like a cartoon character to me! I have paired a Christmas image with a thank you sentiment for today’s card. The PB design team are creating thank you cards this week and next on the PB blog.
I began by splattering some masking fluid on watercolour paper then stamped the ‘holly tweet’ stamp with a combination of distress stain and markers (the leaves were inked with stain). While the ink was still wet I blended it with a brush to fill the outlines and blend the colours. I used tumbled glass distress stain to paint a soft background around the image. Once it was totally dry I removed the masking fluid dots and added some gold splatter and a sentiment. I thought the gold mat and red card base tied in with the berries, bird and gold dots.
Our tree is lit now awaiting some adornment…it’s beginning to look a little more like Christmas.
Supplies:
Stamps: Holly Tweet, Heartfelt (PB)
Inks: festive berries distress marker, distress gathered twigs marker, mowed lawn stain, tumbled glass distress stain, (Ranger) Versafine onyx black ink, memento tuxedo black marker,london fog marker(Tsukineko)
Cardstock: Fabriano 100% cotton hot pressed watercolour paper, gold and red cardstock
Also: masking fluid, gold wink of luna pen
Poinsettias
Posted: December 14, 2015 Filed under: Red Star | Tags: Hand lettering, Penny Black stamps, Ranger Distress stains, Tsukineko Memento inks 5 Comments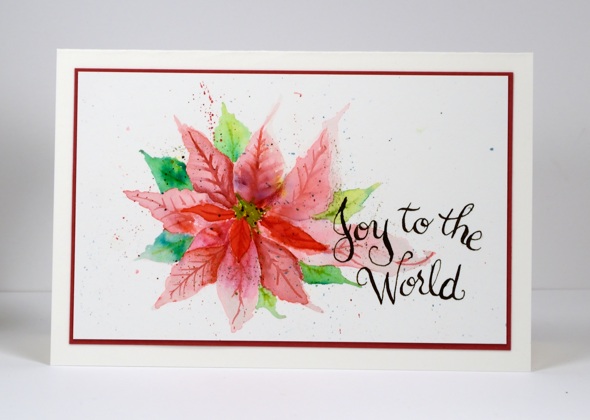
I have pink poinsettias and a little hand lettering today. I am not doing too much lettering because it isn’t the best for my hand but I am practising here and there with both pointed pen and brush markers. These pointed pen ones are more wonky than I wanted but I will keep zoning in on a style that works for me.
I stamped both poinsettias with the same stamp but obviously used different techniques to complete my designs. On the card above I stamped a pale image (no pine needles) and used it as a guide to paint with brusho. I mixed brusho with water to dip the paintbrush into rather than sprinkling it directly on the paper. The stamp was my guide for the large pink petals then I added tiny red ones and green outer ones myself. The centre is gold added with a wink of luna pen and I finished with a generous bit of splatter and a matching mat.
The stamp is a semi-solid stamp so if I ink it with distress stains it holds quite a bit of stain. On the poinsettia below I inked with pink stains, used markers on the pine needles and added the yellow and gold to the centre after stamping. I added a few veins to the petals with a fine brush and softened the pine needles with water. These panels have been sitting around for a while so once again I am not absolutely sure which colours I used but I will take a guess and add them in the supplies list at the bottom of the post.
Supplies:
Stamps: Red Star (PB)
Inks: Worn Lipstick, Spun Sugar distress stains (Ranger) angel pink memento ink, cottage ivy memento marker (Tsukineko)
Cardstock: Fabriano 100% cotton hot pressed watercolour paper, Green and red cardstock
Also: brusho powder, black ink, gold wink of luna pen
Pink Berries
Posted: December 11, 2015 Filed under: Berry Bevy | Tags: Penny Black creative dies, Penny Black stamps, Ranger Distress stains, Tsukineko Memento inks 4 Comments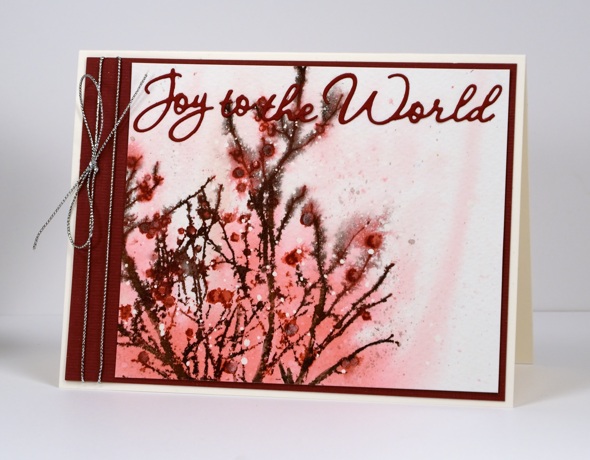
I usually end up with at least a couple of pink Christmas cards along with all the blue and green ones I make. What is your favourite colour combo for Christmas cards?
I began this card by splattering some drops of masking fluid on cold pressed watercolour paper. I am using more cold pressed these days to add a little texture to designs. Once the masking fluid was dry I wet the panel and stamped the ‘berry bevy’ stamp onto the panel in spun sugar and worn lipstick distress stains. The stain spread out to give me the background colour. I inked the stamp with both brown and burgandy for the branches and berries and spritzed to make the ink bleed in a few places. I used a paintbrush and some micro pearl powder mixed with burgandy ink to fill in the berries so some of them have a little shimmer. To finish off the card I found a matching piece of cardstock, cut a mat and a sentiment and added silver cord as the final touch.
Thanks for dropping by today.
Supplies:
Stamps: Berry Bevy (PB)
Dies: World of wishes (PB)
Inks: Worn Lipstick, Spun Sugar distress stains (Ranger) Espresso Truffle, Rhubarb Stalk Memento markers (Tsukineko)
Cardstock: Fabriano 100% cotton hot pressed watercolour paper, Burgandy textured cardstock
Also: silver cord, masking fluid, micro pearl powder


