
Golden tones
Posted: February 19, 2015 Filed under: CAS, Flower sparks | Tags: Penny Black stamps, Ranger Distress inks 16 Comments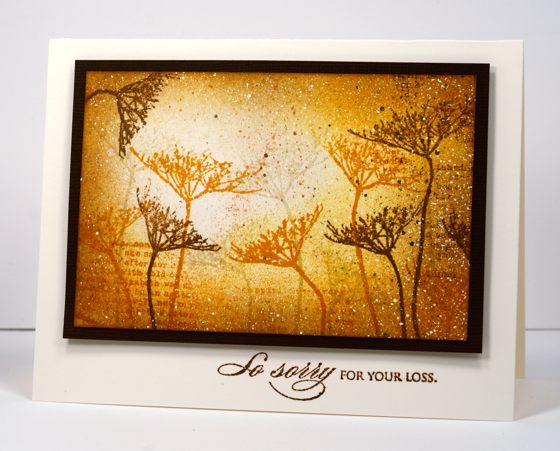
Perhaps the extremely cold weather we’re having at present is making me reach for warmer colours. The last three cards I’ve posted have featured warm golden tones. This card was stamped with two stamps from the new transparent set ‘flower sparks’. It is the first time I have used the set and I discovered it’s a clever little set. There are ten flowers in the set and each one is on a long thin stem which you can bend this way or that before you stick it on your acrylic block. With that kind of flexibility you end up with way more than ten stamps! Cool huh?
I used the same two stamps over and over but bent the stems different ways each time. I began with a piece of white cardstock flecked with masking fluid. Over that I stamped several flowers in antique linen distress ink. I chose a position for my light source and sponged antique linen, wild honey and vintage photo distress inks over the panel. When the sponging was done I added more flowers with the two darker inks. I grabbed a couple of watercolour pencils to flick spots of brown and honey colour in a few places before removing the masking fluid. It is matted in a textured brown cardstock then popped up on a natural card base.
Hope you’re staying warm.
Supplies:
Stamps: Flower Sparks, Heartfelt, Footnotes (PB)
Inks: Antique Linen, Wild Honey, Vintage Photo distress inks(Ranger)
Cardstock: Neenah Natural White 110lb cardstock, Neenah Solar White 110lb cardstock, Brown textured cardstock
Also: Winsor & Newton masking fluid
Summer birthday
Posted: February 17, 2015 Filed under: Sprigs, Stamped Landscapes, Watercolour | Tags: Penny Black creative dies, Penny Black stamps, Ranger Distress inks 23 Comments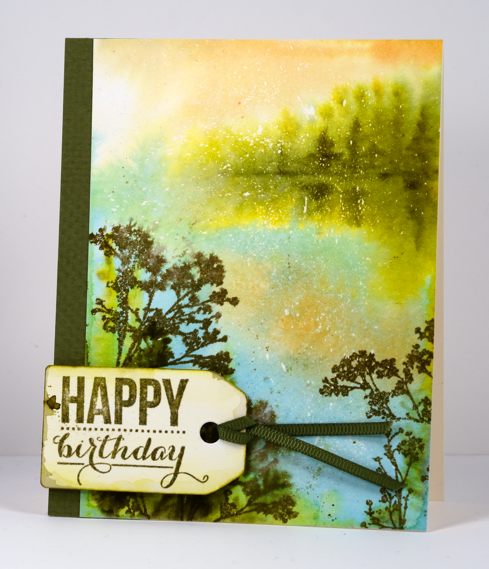
My husband and I both have February birthdays which meant hot summer days for the first 35 years of our lives. Now we celebrate in the bleak mid-winter!
For his birthday card this year I have gone with the warm tones of summer for inspiration. I managed better with this card than the anniversary card; I wrote in it and gave it to him before posting it here on the blog. To create this scene I started by flicking masking fluid onto my small watercolour block. Even though this isn’t a wintery scene some little flecks of white add interest and dimension to the scene. After the masking fluid dried I wet the whole panel and painted the trees and reflections in the distance, the sky and the water with brushes. In the foreground I stamped several stamps from the ‘sprigs’ set onto the wet paper and let them bleed into the surrounding area. When the paper dried a bit I stamped a couple more sprigs which stayed more distinct. I die cut a tag and splashed some of the same colour over it before adding a sentiment and ribbon.
Supplies:
Stamps: Sprigs , Sprinkles & Smiles (PB)
Creative Dies: Tagged (PB)
Inks: Dried marigold, forest moss, frayed burlap, crushed olive distress inks (Ranger) Versafine Spanish Moss (Imagine Crafts/Tsukineko)
Cardstock: Fabriano hot pressed watercolour paper, Olive green cardstock & ribbon
Oh Christmas Tree
Posted: December 1, 2014 Filed under: Oh Christmas Tree | Tags: Fabriano Watercolour Paper, Penny Black stamps, Ranger Distress inks, Ranger Distress stains, Sharpies 8 Comments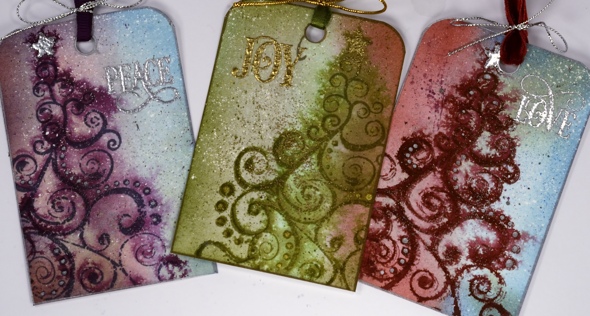
Oh Christmas Tree, a beautiful slapstick cling stamp from Penny Black, is the star of the Penny Black blog this week. You can see this stamp featured everyday on projects created by the PB Design Team. I dreamed up tags in three colour schemes featuring only a portion of the stamp but the same technique. All three tags started on the same panel as you can see below.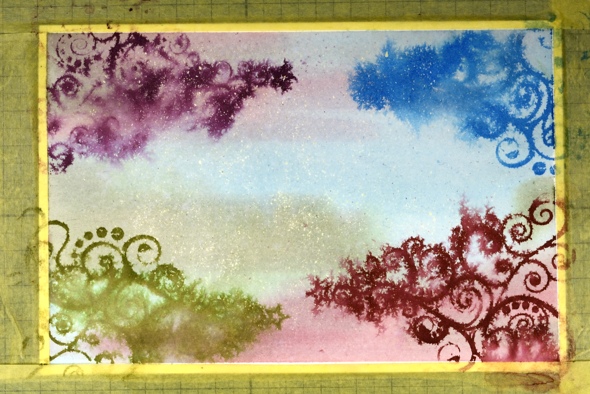
I used watercolour paper splattered with masking fluid and coloured with three distress stains (Victorian Velvet, Bundled Sage and Tumbled Glass). I swiped the stains directly onto the paper then blended them with water. While the panel was still wet I stamped ‘Oh Christmas Tree’ four times in distress inks (Seeded Preserves, Peeled Paint, Aged Mahogany, Salty Ocean). When the panel was dry I switched to pigment inks that would not bleed or blend to stamp a defined image in similar colours of Versafine ink (Crimson Red, Spanish Moss, Imperial Purple, Deep Lagoon).
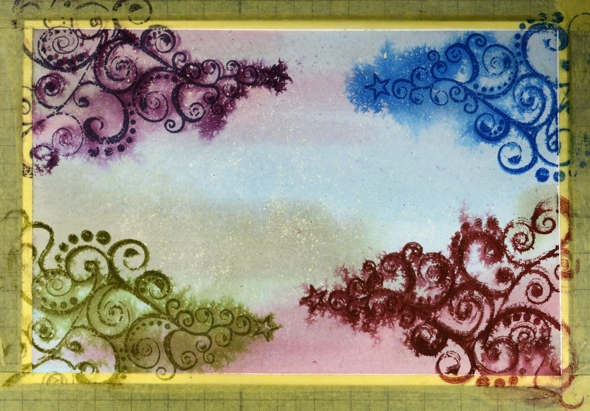
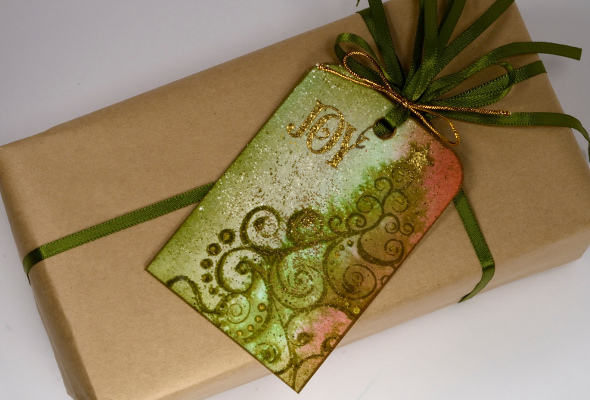
I cut the panel into four tags but the blue one did not advance to the next level. Each of the three remaining trees became a tag with rounded top corners and gold or silver highlights and sentiment. Using the colours in the background as a guide I darkened the edges of each tag with sponged distress inks. I highlighed the dots with gold or silver sharpies and added a splatter of distress stain and wink of stella pen over each tag. I think it was at this point that I removed the masking fluid to reveal the fine white specs. To continue the gold and silver details I stamped ‘Love’, ‘Joy’ & ‘Peace’ from “Joy Filled” and embossed with silver or gold embossing powder. I sprinkled embossing powder randomly and sparingly on top of the tags then heat set from underneath so as to not blow the powder off. To emboss the star I coloured it with a gold wink of stella marker then sprinkled gold embossing powder and heat set.
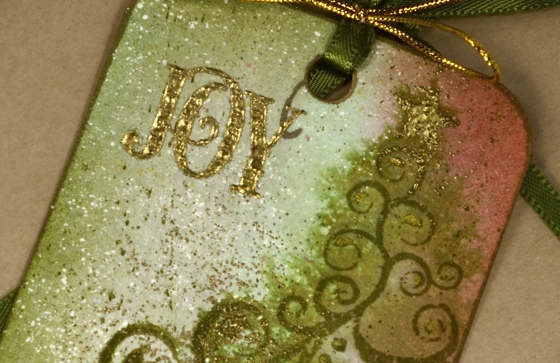
I gilded the edge of the tag with the co-ordinating sharpie then finished by adding matching ribbon and metallic cord.
Supplies:
Stamps: Joy Filled, Oh Christmas Tree (PB)
Inks: Victorian Velvet, Bundled Sage, Tumbled Glass distress stains & Seeded Preserves, Peeled Paint, Aged Mahogany, Salty Ocean(Ranger) & Crimson Red, Spanish Moss, Imperial Purple, Deep Lagoon & Versamark(Imagine Crafts/Tsukineko)
Cardstock: Fabriano 100% cotton hot pressed watercolour paper
Also: Winsor & Newton masking fluid, gold & silver sharpies, gold and silver embossing powder, gold and silver wink of stella pens.
Pine needles & cones
Posted: November 27, 2014 Filed under: CAS, Nature's Gifts | Tags: Penny Black stamps, Ranger Distress inks, Ranger Distress stains, Tsukineko Memento inks 12 Comments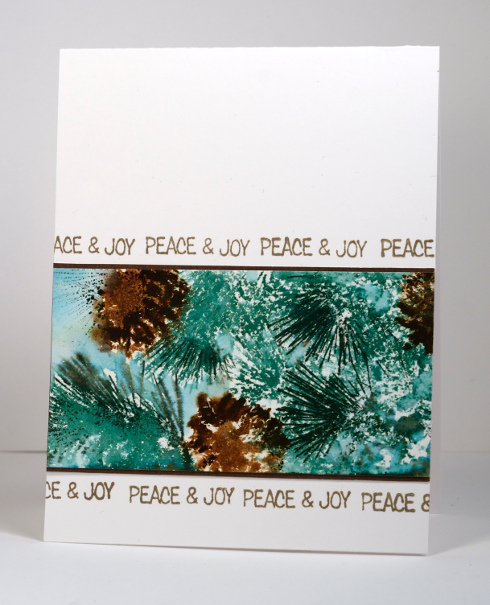
This panel of pine cones and needles is one of the bits & pieces that was waiting to be turned into something. I made the panel quite a while ago so here is my best guess at how I did it. I splattered some masking fluid on watercolour paper then inked the pine cones with vintage photo distress ink spritzed them with water then stamped them on the panel. I did the same with the pine needles in, surprise, surprise, pine needle distress ink. At this point I may have painted a little tumbled glass stain around the needles and cones as a background. When the panel had partially dried I restamped sections of the pine cone for added definition. I switched to Memento Northern Pine ink to add some darker needles. When all was dry I rubbed off the masking fluid.
I trimmed it a little and matted it with brown and then tried to think of a background that would add interest but not compete with the panel itself. I tried embossing the needles and cones from the “Nature’s Gifts” set on the card base in a pearl powder. The powder is very pretty and I will try it again on another project but it didn’t work for this one. I ended up with no more pattern on the card base that the stripes of repeated sentiments. Keeping it clean and simple qualifies it for the Less is More challenge this week to be ‘Christmassy’.
Supplies:
Stamps: Nature’s Gifts, Winter Magic (PB)
Inks: Tumbled Glass distress stains & Pine Needle, Vintage Photo distress ink(Ranger), Memento Northern Pine, Versafine Vintage Sepia (Imagine Craft/Tsukineko)
Cardstock: Neenah Avon Brilliant 110lb cardstock, Fabriano 100% cotton hot pressed watercolour paper, Sticks & Stones mix & match paper (Penny Black)
Also: Winsor & Newton masking fluid
Together under the Northern Lights
Posted: November 25, 2014 Filed under: Together | Tags: Penny Black creative dies, Penny Black stamps, Ranger Distress inks, Ranger Distress stains 21 Comments
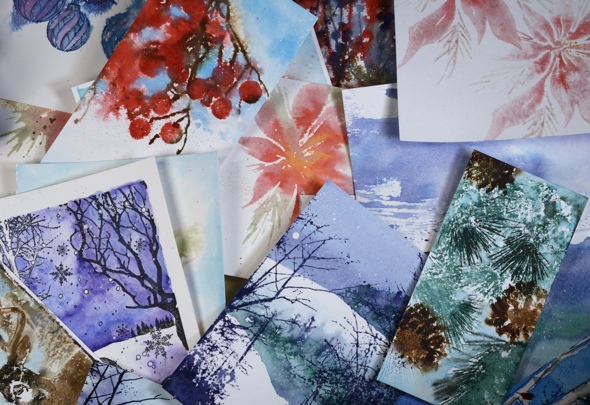
I have a stack of watercoloured backgrounds and images on my work table waiting to be turned into something. Some are practice pieces that worked, others are left over from classes I taught and some are experiments still needing some tweaking. Most of them are wintery or Christmassy so now is the time to work with them. The background above is just one of the bits & pieces that was ready to be used. It was made with distress stains blended over splattered masking fluid. I cut out the deer with the ‘Together’ die and popped them up over the background then added two hand cut snow banks and some branches cut with the ‘Nature’s Song’ die. The challenge at Less is More this week is to use something Christmassy on your card. I think this qualifies.
I will have more projects made from the bits & pieces pictured below later in the week but tomorrow I’ll be back with a video tutorial.
Supplies:
Stamps: Joy Filled (PB)
Creative Dies: Together, Nature’s Song (PB)
Inks: Chipped Sapphire, Bundled Sage, Tumbled Glass distress stains & Chipped Sapphire distress ink(Ranger)
Cardstock: Neenah Avon Brilliant 110lb cardstock, Fabriano 100% cotton hot pressed watercolour paper
Also: Winsor & Newton masking fluid
Bits & Pieces waiting for time and inspiration:
Inch by Inch 2: Twirl Tree
Posted: November 18, 2014 Filed under: CAS, Tree of Joy, Twirl Tree | Tags: Inchie Arts, Penny Black creative dies, Penny Black stamps, Ranger Distress inks, Tsukineko Memento inks 7 Comments
Day 2 of my Inchie Arts week features the white 2″ squares. All week you can see Inchie projects on the Penny Black blog and the Inchie Arts blog. There are giveaways too so make sure you visit.
To create today’s project I worked on two squares taped together at the back. While completing my design I was undecided about whether I would mount them on the card with a gap between them or not. In the end I decided to keep them together. I used the new intricate die, ‘Twirl Tree’ to cut a mask from masking paper. I also cut the star using the ‘Tree of Joy’ die. I pressed the sticky masks firmly onto the squares then added a handcut snow bank mask over the bottom of the square which overlapped the tree trunk. I sponged over the masks with memento Summer Sky ink, Salty Ocean distress ink, Chipped Sapphire distress ink and to finish, a very light application of Encore Silver metallic ink.
Before attaching the squares to the card base I punched a little bite out of both sides of the card base with a ½” circle punch and wound dark blue and turquoise machine embroidery thread round and round. I taped it down firmly then popped up the squares over the thread and added a simple sentiment. We had a few centimetres of snow today so all the trees look prettier. I won’t talk about it too much though because I know some of you would rather not think about winter and others of you have a whole lot more than a few centimetres!
Supplies:
Stamps: Yuletide Greetings (PB)
Creative Dies: Twirl Tree, Tree of Joy (PB)
Inks: Memento Summer Sky ink, Encore Silver Ultimate Metallic ink (Imagine Crafts/Tsukineko) Chipped Sapphire, Salty Ocean distress ink(Ranger)
Cardstock: Neenah Solar White 110lb cardstock, Inchie Arts 2″ white square
Also: machine embroidery thread
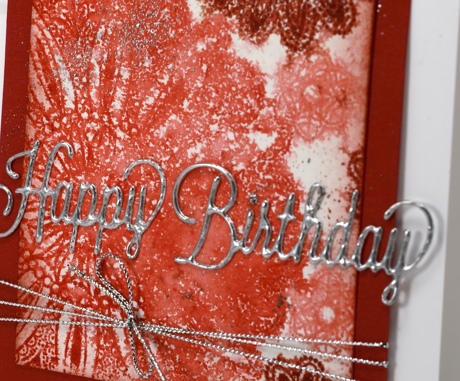
Dazzler Birthday
Posted: November 8, 2014 Filed under: Celebrations, Dazzlers | Tags: Penny Black creative dies, Penny Black stamps, Ranger Distress inks 5 Comments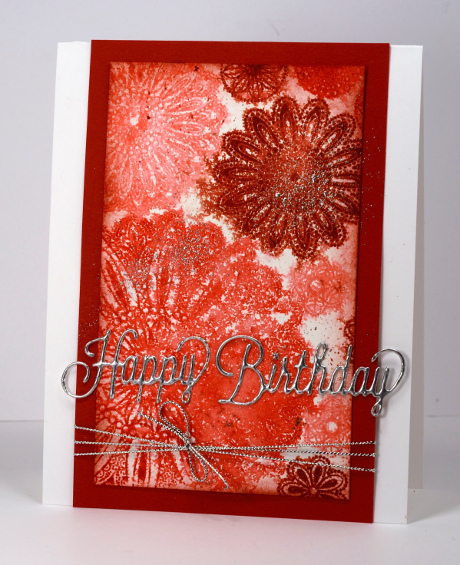
Look! It’s not all autumn leaves and snow scenes around here. I pulled out a set of flower/circle pattern transparent stamps and gave them the watery treatment. I stamped them on watercolour paper in three different distress inks then spritzed the panel lightly and let them bleed into each other a bit. After trimming my panel I added both some ink splatter and some dark sponging around the edge with barn door ink. After heat embossing the diecut sentiment in silver I wanted a little silver on the patterned panel too so I flicked my silver wink of stella pen. It wasn’t quite silvery enough so I sprinkled some embossing powder over the same area and it stuck to the wink of stella ink making it possible for me to heat it and achieve a fine sprinkle of silver. You can just see it in the top left of detail photo below.
Stamps: Dazzlers (PB)
Creative Dies: Celebrations (PB)
Inks: Fired Brick, Festive Berries, Worn Lipstick distress inks (Ranger) Versamark (Imagine Crafts/Tsukineko)
Cardstock: Fabriano 100% cotton hot pressed watercolour paper, Neenah Natural white cardstock, red cardstock
Also: Silver embossing powder, Silver cord, Wink of Stella silver marker
Blessings
Posted: September 18, 2014 Filed under: Autumn Jewels, Lush & Lavish, Words of Gratitude | Tags: Fabriano Watercolour Paper, Penny Black creative dies, Penny Black stamps, Ranger Distress inks, Ranger Distress stains 10 Comments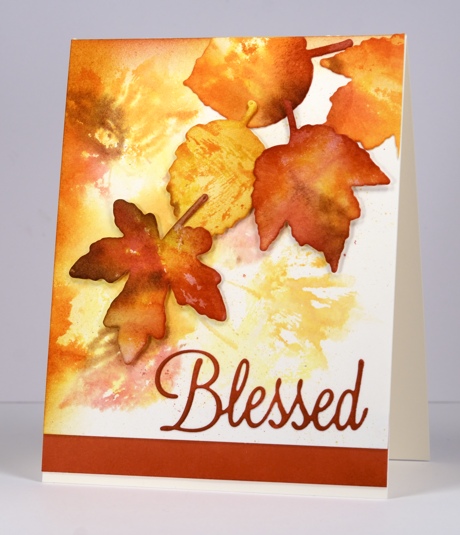
The new leaf stamps and co-ordinating dies from Penny Black are such a treat to use. To create this card of cascading leaves I started by spritzing a 5″x 7″ watercolour block with water. I then inked several of the leaf stamps from the “Lush & Lavish” set with the autumn toned distress stains listed below. I stamped each stamp repeatedly working from one end of the paper to the other so all the intense coloured leaves were at one end and the paler ones at the other. I let the paper dry completely before die cutting three whole leaves and two partial leaves from the intensely coloured end of the paper. I trimmed the other end to be a background for the card. Using the distress inks I sponged the edges of the die-cut leaves to darken them. I arranged and attached the leaves on the background panel, some popped up and others just glued.
To finish the card I cut the word “Blessed” and a border strip from Penny Black fall festival paper. The leaves are just beginning to turn here in Ottawa, there is nothing as intense as the colours in this card but I am looking forward to seeing the gorgeous colours. We have several very large trees in our backyard so once the leaves start turning and falling it goes on for weeks and weeks and weeks.
Supplies
Stamps: Lush & Lavish (PB)
Creative Dies: Autumn Jewels, Words of Gratitude (PB)
Inks: Mustard Seed, Barn Door, Spiced Marmalade, Vintage Photo distress stains & Wild Honey, Spiced Marmalade, Fired Brick, Vintage Photo distress inks(Ranger)
Cardstock: Neenah Natural White 110lb, Fabriano 100% cotton hot pressed watercolour paper, PB Mix & Match Fall Festival paper
Also: Adhesive Sheet & Thin dimensional adhesive squares(Scrapbook Adhesives)
Autumn Dance
Posted: September 10, 2014 Filed under: Uncategorized | Tags: Fabriano Watercolour Paper, Penny Black stamps, Ranger Distress inks, Ranger Distress stains 7 Comments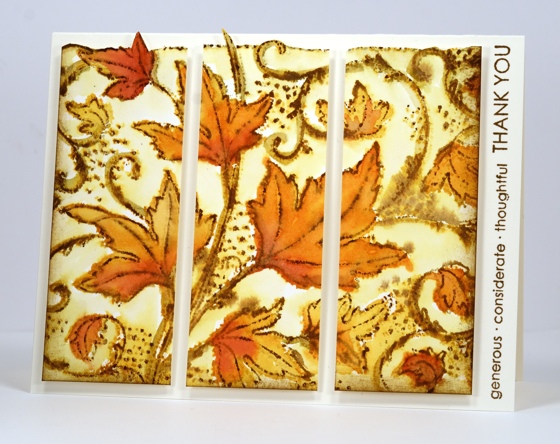
The Fall 2014 reveal and giveaway continues on the Penny Black blog this week. The image above was created using one of the new Autumn stamps, a large whimsical array of leaves. I used watercolour paper and stamped the image twice, once in wild honey and again in frayed burlap distress inks . I then used wild honey, spiced marmalade, barn door, frayed burlap and dried marigold to paint inside the leaves and over the outlines. Using a waterbrush I blended the colour from the dots and lines into the background filling the spaces with pale yellow and olive tones. After finishing my colouring I restamped the outline image in vintage photo distress ink. Finally I added some gold pearl ex mixed with water over the top of a few leaves. You can’t see it in the photo above but on the actual card it adds a gold shimmer.
The whole image has a wavy border with leaves and swirls cutting through it here and there but I just kept the border at the top of my panel and trimmed the other three sides. I sliced the panel into three even sections and popped them up on dimensional squares. I knew I had a nice long sentiment for the narrow space but I had to hunt it out. It’s from the “…wishing you” set.
Supplies
Stamps: Autumn Dance, …wishing you (PB)
Inks: Mustard Seed, Barn Door, Spiced Marmalade, Vintage Photo distress stains & Wild Honey, Antique Linen(Ranger)
Cardstock: Neenah Natural White 110lb, Fabriano 100% cotton hot pressed watercolour paper
Also: 3D Foam squares (Scrapbook Adhesives)
Berry Merry Christmas
Posted: August 13, 2014 Filed under: Berry Merry Christmas, Watercolour | Tags: Fabriano Watercolour Paper, Penny Black stamps, Ranger Distress inks, Ranger Distress stains 10 Comments
I think these berries might be one of my favourite stamps from the new “Season’s Greetings” release from Penny Black. I opted once again for a watercolour design when creating this card starting with a piece of hotpressed watercolour paper splattered with masking fluid. I inked the stamp with barn door distress stain on the berries and vintage photo distress stain on the stems. I spritzed the inked stamp and stamped it twice on the panel. Using brush and some water I added fired brick ink to some of the berries to give them a bit more dimension. I added water here and there to blend and spread the colours. I added some peeled paint in the background but decided to primarily use broken china stain to paint the sky. I painted around the images with water and broken china stain letting some of the berries and stems bleed into the blue. When it was almost dry I added some yellow highlights with a watercolour pencil and splattered some undiluted broken china distress stain over the sky areas.
To finish off the card I removed the masking fluid then added the sentiment in walnut stain distress ink and matted with blue before attaching to a deep red card base.
Supplies:
Stamps: Berry Merry Christmas, Festive Wishes (PB)
Inks: Barn Door, Peeled Paint, Vintage Photo, Fired Brick, Broken China, Walnut Stain distress stains and inks (Ranger)
Pencils: Albrecht Durer watercolour pencils Lemon 107 (Faber Castell)
Cardstock: Fabriano 100% cotton hot pressed watercolour paper
Also: Winsor & Newton masking fluid


