
Twilight Trees
Posted: November 12, 2015 Filed under: Joy to All, Stamped Landscapes | Tags: Canson watercolour paper, Penny Black stamps, Ranger Distress inks 12 Comments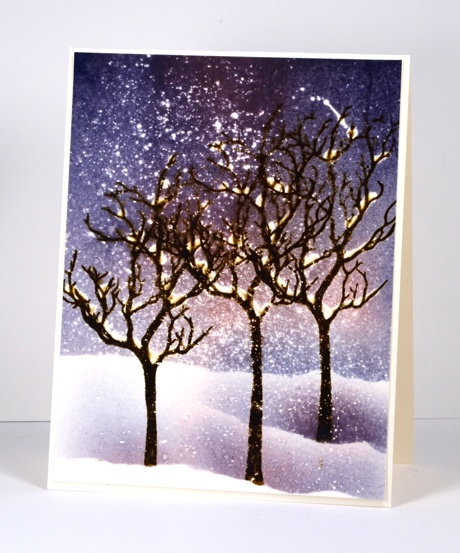
When I first featured this tree stamp I said I would be back with more designs but then forgot this one was waiting in the wings. I started this one with masking fluid, quite a bit, splattered over the panel. Once the masking fluid was dry I stamped the trees in brown dye ink then painted masking fluid on some of the branches. When that was dry I positioned a mask two thirds down the panel so I could brayer the sky with blue and pink inks. I removed the horizon mask and used smaller masks below the tree trunks to sponge some snow drifts. I looked for a place to add a sentiment but decided to leave it blank on the front and add something later inside.
I am happy to report here in Ottawa there are no scenes even remotely resembling this. We have made a start on leaf collection but still have half the backyard to finish. The weather has been kind.
Supplies:
Stamps: Joy to All (PB)
Inks: Chipped Sapphire, Worn Lipstick, Vintage Photo distress inks, (Ranger)
Cardstock: Canson 100% cotton hot pressed watercolour paper, Neenah natural white
Also: Winsor & Newton masking fluid
OLS 21 Whatever the Weather
Posted: October 1, 2015 Filed under: One-Layer Simplicity challenge, Summer Fun | Tags: Penny Black stencils, Ranger Distress inks, Tsukineko Memento inks 4 Comments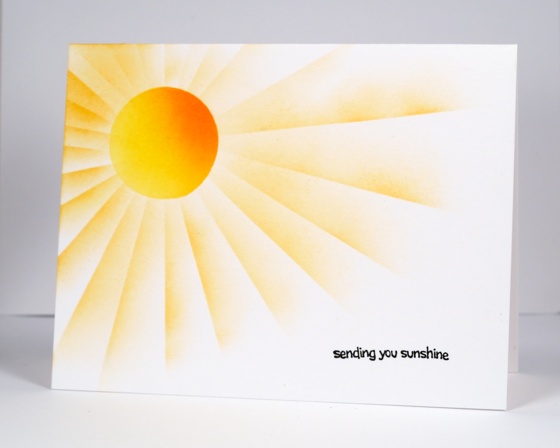
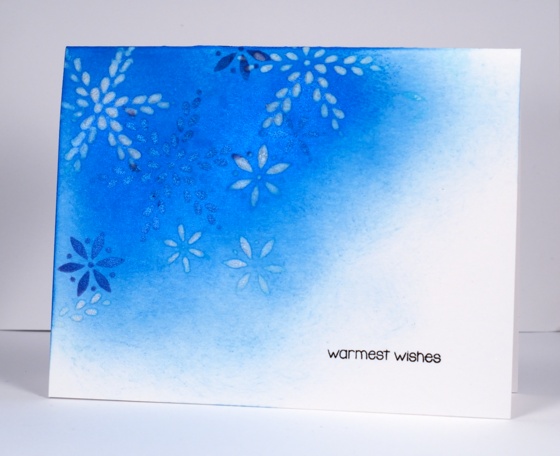
It is time for a new challenge at One Layer Simplicity and I am the October host. The One Layer Simplicity team (Susan, Karen, Ardyth and myself) issues a new challenge each month. We always have a different theme but the same requirement to keep the card one layer and the design simple. This month my theme is ‘Whatever the Weather’. In the southern hemisphere spring has sprung and here in the northern hemisphere the temperatures are dropping as autumn takes over. To participate in the challenge your card needs to be weather related. I used post-it masks to make a warm sunny card and a stencil to create a chilly snowflake card.
Supplies
Stamps: Summer Fun, Holiday Snippets (PB)
Stencils: Snowdance (PB)
Inks: Memento dandelion, cantaloupe, tangelo & versafine onyx black(ImagineCrafts/Tsukineko) Salty Ocean, chipped sapphire distress ink (Ranger)
Cardstock: Neenah Solar White
Also: Pearl-ex Interference blue powder
Watercoloured leaves the distressing way
Posted: September 30, 2015 Filed under: Filigree Foliage, Wishes | Tags: Penny Black creative dies, Penny Black stamps, Ranger Distress inks, Ranger Distress stains 18 Comments
Watercolour and autumn were made for each other were they not? I went for a run this morning and there were deep red maple leaves lying on the path looking like mini masterpieces. I kept wanting to pick them up and bring them home to inspire some painting. I did not want to carry them however and there will be thousands (I am not kidding) in my yard over the next 6-8 weeks (again, not kidding).
I did a periscope comparing painting leaves with distress stains, ink pads and markers this morning. These cards use the same techniques I demonstrated on the video. The first one is my favourite distress technique, stamping with stains then moving the stain with a paintbrush to fill the stamped image. I added fine splatter to the leaves on this one but kept the next one fairly clean.
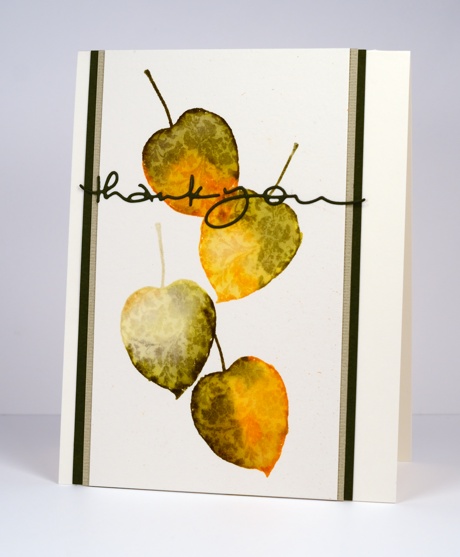
I used the same ‘stamp then paint and blend’ technique for the second card but inked the stamp with ink pads. The main difference is less liquid on the stamp and an image that soaks into the watercolour paper more quickly. The result once blended with water is similar but more of the stamped outline remains. Using markers gives a similar result to inkpads but transfers even less liquid on the stamp. With markers however you can apply colour to small areas of the stamp and have a more detailed and intricate colour result.
To finish I matched cardstock to the stamping for mats and die cut sentiments.
Supplies

Autumnal grove
Posted: September 11, 2015 Filed under: Periscope, Snowy Grove, Stamped Landscapes | Tags: Penny Black stamps, Periscope, Ranger Distress inks 19 Comments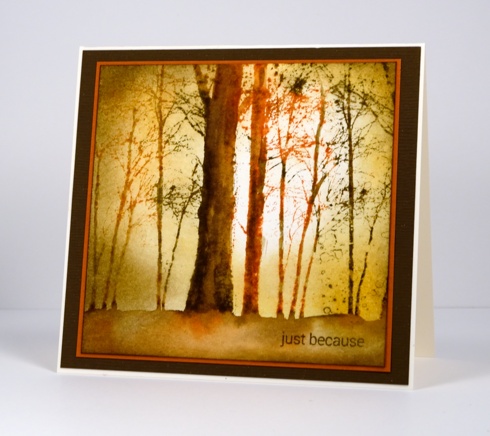
I have another card made with the beautiful new ‘snowy grove’ stamp. I filmed myself painting the trees on periscope so if you are quick you can catch that before it disappears forever. I intend to save some of my periscope videos and share them for longer on another site but I didn’t click the right button for that this morning. And maybe just as well because it was my first attempt and not my classiest presentation!
Anyway the technique is fresh in my mind so I will describe it here. I inked the stamp randomly with both walnut stain and rusty hinge ink. I stamped it on watercolour paper then used a waterbrush to blend the colour up and down all the trunks. The stamped impression wasn’t perfect but it didn’t matter because I painted over the trunks anyway. Once I had done that I painted the forest floor with the same inks and plenty of water. When it was all dry I sponged the background working in antique linen, wild honey and walnut stain, getting darker the further I moved from my ‘light source’.
Thanks for your lovely comments about yesterday’s card; can you tell I like this stamp!?
Supplies:
Stamps: Snowy Grove, Snippets (PB)
Inks: walnut stain, rusty hinge, antique linen, wild honey distress inks (Ranger)
Cardstock: Canson hot pressed watercolour paper, brown cardstocks
Snowy Grove
Posted: September 10, 2015 Filed under: Snowy Grove | Tags: Canson watercolour paper, Penny Black stamps, Ranger Distress inks 24 Comments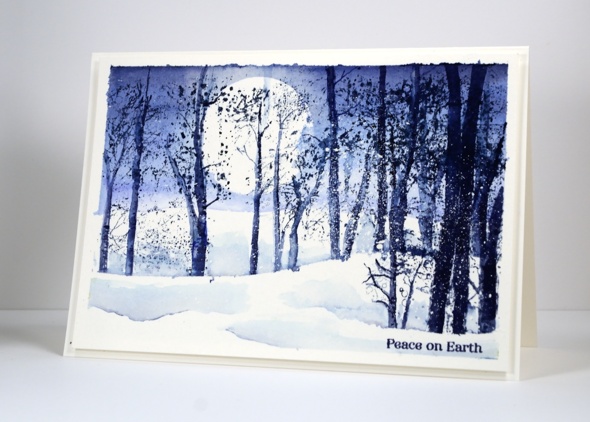
A couple of days ago I posted a autumn themed card created with the ‘snowy grove’ stamp; today I have a snowy one. I only used two colours for this one which thankfully I wrote on the back of the panel because as is my habit I didn’t note down my technique straight away and now it is a bit hazy. The panel has been sitting around for a few weeks waiting for attention.
The panel was splattered with masking fluid first, you can see the fine white dots over the tree trunks. I then taped down the panel and positioned a frisket circle mask to create a moon. It makes more sense to position the frisket mask before splattering masking fluid so the dots of masking fluid don’t keep the frisket from sticking securely to the paper. With the moon mask in place I painted a blue sky with chipped sapphire and blueprint sketch distress stains. I let that dry, removed the moon mask and placed a hill shaped frisket mask lower down the panel. I stamped the snowy grove stamp over the mask then used a small paintbrush and both distress stains to give more definition to some of the trees. I also added shadow behind the snowbank with diluted blue stain. When that was dry I inked only some of the trees to stamp in the right hand foreground. I added a few snowy dips and a sentiment then popped up the whole panel with fun foam on a matching base. Edited to add: (I filmed a short video on periscope showing how I painted the trees. It will be up for 24hrs. It was my first periscope and is very amateur but I guess I can only improve)
I do love it when I see scenes like this in winter; I think a snow covered landscape is quite magical. But as I have said before I’m not wishing summer away at all. Last night I saw the most spectacular sunset I have witnessed in a long time. I was watching my son’s soccer game so was able to see the colours deepen and develop for over an hour. It was incredible. (I shared a few photos here.)
Supplies:
Stamps: Snowy Grove, Holiday snippets(PB)
Inks: Chipped sapphire & blueprint sketch distress stains inks (Ranger)
Cardstock: Canson 100% cotton hot pressed watercolour paper
Also: masking fluid
Greatest of these
Posted: September 9, 2015 Filed under: Love Chapter, Soft Wings | Tags: Penny Black stamps, Ranger Distress inks, Ranger Distress stains, Tsukineko Memento inks 7 Comments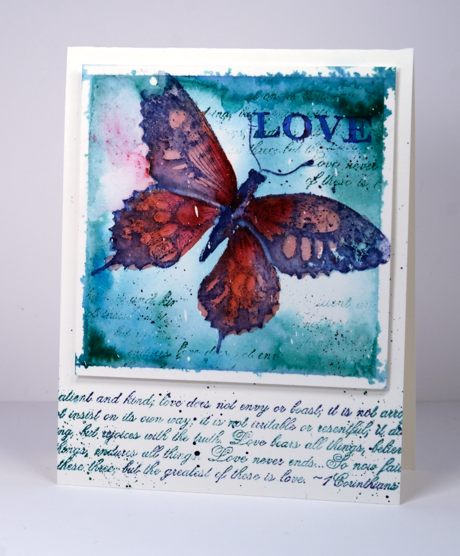
Today’s card is an example of wet into wet watercolour with some stamping added later for definition and texture. I wet the taped panel of watercolour paper then stamped a pale butterfly to give me an outline to paint over. I painted in pinks and purples and added background colour in teal. When it was dry I restamped in dark blue and did some partial stamping with the text stamp from the ‘love chapter’ transparent set.
I love watching the colour blend and blur when I stamp onto wet watercolour paper. If you haven’t tried it you should; it’s fun and you can always stamp over it if it is just too loose and flowy for you! I mentioned Periscope in my last post; if you’d like to know more about it I found this helpful tutorial.
By the way the latest One Layer Simplicity challenge is up and running with Ardyth. It’s all about numbers; check it out.
Supplies:
Stamps: Soft Wings, Love Chapter (PB)
Inks: Pine needles, Chipped Sapphire, Aged Mahogany, Worn Lipstick distress stains and inks (Ranger) Summer Sky memento ink (Tsukineko)
Cardstock: Fabriano 100% cotton hotpressed watercolour paper
Also: Winsor & Newton masking fluid
Golden Woods
Posted: September 7, 2015 Filed under: Bister, Snowy Grove | Tags: Bister, Canson watercolour paper, Penny Black stamps, Ranger Distress inks, Ranger Distress stains, Tsukineko Memento inks 14 Comments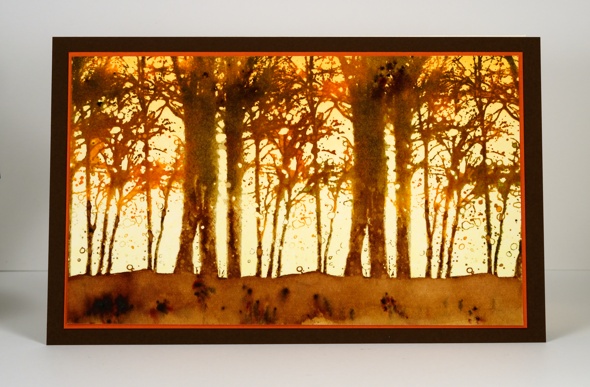
Snowy Grove (used on the card above) is one of my favourite stamps from the new PB release. I have already used it for a fall and a winter look and plan to include it in one of my upcoming Christmas card classes. To create this scene I created the soft gradation of colour behind the trees first by brayering memento dandelion ink over the bottom half of the panel and memento cantaloupe ink over the top half. I then inked the stamp with forest moss, gathered twigs and dried marigold distress inks and stamped. For the more watery blended look I inked the stamp again with vintage photo and spiced marmalade distress stains and stamped a second time (with the help of the misti). Because the stains sit on the paper for a while without soaking in I was able to grab a paintbrush and paint over the large trunks to fill in the empty circles that suggest snow. I pulled some of the stain down into the ‘ground’ area and, with some extra stain, filled the forest floor with brown stain then sprinkled some brown bister powder over the panel for extra texture.
By the way I have been enjoying watching a few amazingly artistic stampers create pretty things live or on replay using Periscope. I hope to film my first ‘scope’ some time this week. Maybe I’ll see you there. (If you haven’t heard of Periscope click on the link for a little overview)
Supplies:
Stamps: Snowy Grove (PB)
Inks: Memento Cantaloupe & Dandelion (Tsukineko ) Forest Moss, Gathered Twigs, Dried Marigold, Vintage Photo, Spiced Marmalade distress stains and/or inks (Ranger)
Cardstock: Canson 100% cotton cold pressed watercolour paper, brown cardstocks
Also: Brown Bister
Astral
Posted: August 25, 2015 Filed under: Astral, Bister | Tags: Bister, Penny Black stamps, Ranger Distress inks 8 Comments
Penny Black has several negative space stamps in the new release which are fun to work with. Working with this one called ‘Astral’, I decided I wanted several colours behind the bright white bird and tree so built them up in several stages. I used the MISTI and stamped in a pale blue ink first. I inked the stamp again, this time with darker blues and purples then spritzed it lightly with a pearl-ex spray so the colours would blend a little and have some shimmer when stamped. I also spritzed the stamped panel so I could drop some mahogany bister in a few places. Finally I added some water droplets and dabbed them up straight away to create pale circles.
The Penny Black blog continues to feature new stamps and projects every day, the catalogue is now available, the new products are in the store and you still have the chance to win some stamps or dies. Fun times, stampers!
Supplies:
Stamps: Astral (PB)
Inks: Dusty Concord, Worn Lipstick, Salty Ocean, Stormy sky distress inks (Ranger), Memento Summer Sky (Tsukineko)
Cardstock: Fabriano 100% cotton hot pressed watercolour paper
Also: Bister watercolour powder, Interference Blue pearl-ex spray
Cosy Cottage
Posted: August 4, 2015 Filed under: Christmas Cottage | Tags: Fabriano Watercolour Paper, Penny Black stamps, Ranger Distress inks 11 Comments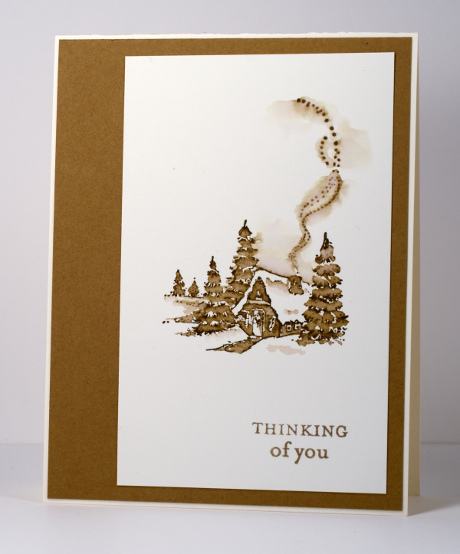
From January to June this year I was honoured to be a member of the Dirty Dozen at Splitcoaststampers. My term on the team is over now but I will forever be a Dirty Dozen Alumni which brings its own opportunities and privileges. Right now there are all sorts of challenges going on especially for fan club members. Alumni have dreamed up wonderful projects and multiple challenges are being released each day.
While I was a member of the Dirty Dozen I created projects with a different theme each month. This is one of the first cards I shared; the theme was “All Cooped Up”. I made it during the bleak midwinter, a far cry from our current hot midsummer! I stamped with one ink then pulled colour from the stamped image with a small paintbrush to fill in the trees, cottage and path. I kept it clean and simple when finishing the card by matching the ink colour exactly with a cardstock mat.
Supplies:
Stamps: Christmas Cottage, Enjoy Life (PB)
Inks: Vintage Photo Distress Stains (Ranger)
Cardstock: Fabriano 100% cotton hot pressed watercolour paper, Neenah Natural White 110lb card stock, Tan cardstock
Patterns on patterns
Posted: March 30, 2015 Filed under: Hidden Hearts, Hypnotic | Tags: Penny Black creative dies, Penny Black stencils, Ranger Distress inks 4 Comments
I’ve been wanting to create something with the large ‘Hypnotic’ circle stencil ever since it arrived but there were flowers to stamp first! Inspired by the pretty colour schemes of Karen Dunbrook I pulled out all my blue and green toned distress inks the other day and sponged over and around this pretty stencil. There was already masking fluid splatter over the Neenah Solar White panel to create some extra texture. I chose a spot close to the centre of the circle pattern to be the lightest area then worked out from there making the outer edges of the stencil the darkest areas. When I was happy with the sponging I splattered some blue and green ink over the panel and dropped some water also. To create the watermark on the right I painted water onto the stencil then pressed it onto the sponging. Once all was dry I removed the masking fluid and added a sentiment, the circular ‘Hidden Hearts’ die cut and a strip of matching cardstock along the base of the panel.
It is almost time for a new One Layer Simplicity challenge but before that appears on April 1st, pop on over and see the details the design team highlighted from all the creative March entries. I tried to create a ‘words only one layer card’ for the challenge this month but my attempts went from bad to worse ending with card which was comical it was so wrong. Sorry, but you’ll never see that one. I am going to try again in April with a fresh new challenge.
Supplies:
Stencil: Hypnotic (PB)
Creative Dies: Hidden Hearts, Stylish Gratitude (PB)
Inks: peacock feather, salty ocean, pine needles, chipped sapphire distress inks (Ranger)
Cardstock: Neenah Solar white cardstock, turquoise cardstock,


