
Poppy Painting
Posted: July 18, 2015 Filed under: Poppy Time | Tags: Bister, color burst, Fabriano Watercolour Paper, Kuretake Zig clean color real brush markers 14 Comments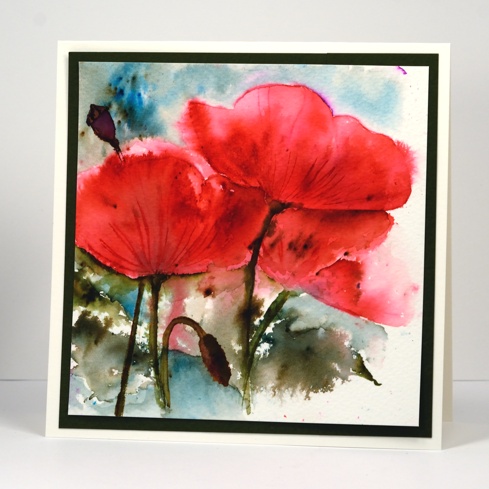
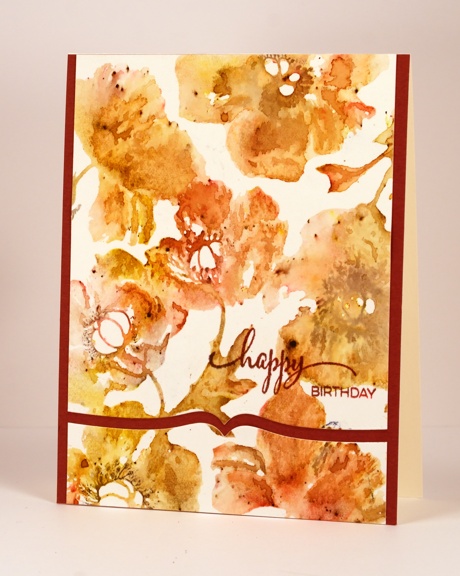
More bister, this time in combination with color burst powder and zig clean color real brush pens. This panel of poppies was almost tossed because at one point it looked a mess. I stamped two poppies using a pink zig pen to ink the stamp. I filled the outline in using both the pen and some pink colour burst powder. I also painted the stems in green but it all looked a bit dull and I wasn’t sure how to add interest. I decided to lose some of the definition by spritzing the whole thing with water. The poppies bled in all directions and it really wasn’t an improvement at all! I set it aside and worked on something else while it dried. When I came back to it I decided to add another partial poppy as well as the bud and seed head. I painted loose leaf shapes and added green and blue bister powder around the bottom and top of the panel. To sharpen the poppy images a little I painted darker colours below the edges and added the veins back in.
Those poppies keep finding their way onto my cards; I don’t know how it happens…
Supplies:
Stamps: Poppy Time (Penny Black)
Inks: Color Burst & Bister watercolour powders
Cardstock: Fabriano cold pressed watercolour paper
Also: Zig clean color real brush markers
Bister burst balloons
Posted: July 13, 2015 Filed under: Bister, Color Burst, Dies | Tags: Bister, color burst, Penny Black stamps 16 Comments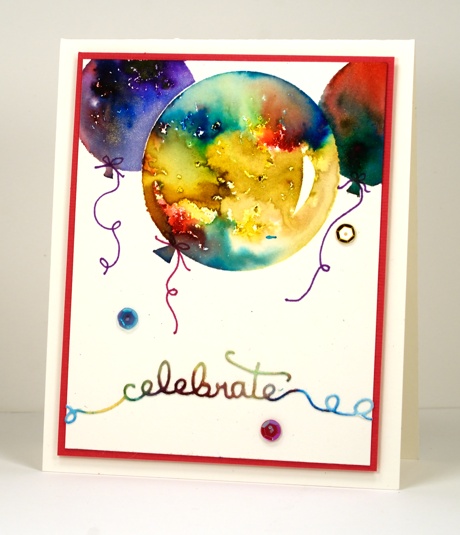
I have added another powdered watercolour paint to my collection so the fun continues. You can see in the card above there are some bright colours alongside the muted earthy gold tone. I picked up four bottles of Color Burst powder from our wonderful local scrapbooking store. I just chose four favourites out of the six available (blue, pink, purple & green). This card is for my younger daughter who is celebrating her 19th birthday today. Her favourite colour is yellow so I needed to include some bister yellow but the rest of the colours are color burst. The powders did play well together so the possibilities are looking endless!
I die cut circles from frisket film and used scissors to cut the little tie end outside the balloon shape. I pressed the large frisket mask (the negative part) down firmly, added a little crescent shape to mask the highlight then sprinkled powder inside the balloon shape. I spritzed pearl-ex spray over the top of the powders. I did move them round a little with a paintbrush just to make sure the whole area was coloured but then I left them alone to work their color magic. When the paint was dry I removed the negative mask and covered the balloon with the positive mask while I added two smaller balloons behind.
The sentiment was die cut from a watercolour scrap and the balloon strings were hand drawn with fine tip sharpies. Yes, you can see sequins on a card of my making, strange though that might seem to you. My girl likes a little sparkle!
Supplies:
Creative Dies: Doodles (PB)
Cardstock: Canson 100% cotton hot pressed watercolour paper
Also: Bister powders, Color Burst powders, Grafix frisket film, sequins, homemade shimmer spray made by adding pearlex powder to water.
Flowers on flowers
Posted: July 11, 2015 Filed under: Bister, Enamor, Floral Tapestry | Tags: Bister, Kuretake Zig clean color real brush markers, Penny Black stamps 13 Comments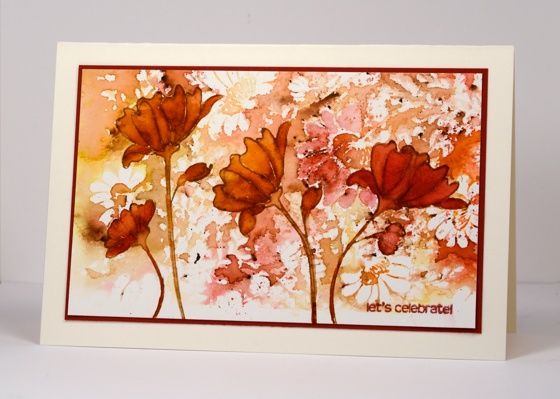
The other day when I was happily stamping background stamps over papers sprinkled with bister powder I made this print with ‘floral tapestry’. I can’t remember exactly what I used to stamp. I think it was mainly water on the stamp and mahogany and yellow bister on the dry watercolour paper. I may have used a pale distress stain; I’m not sure. I was using the Misti so I did stamp multiple times in order to spread the water over the whole panel. Sadly you can’t see it in the photo but the water had some pearl-ex powder mixed in so the pattern has a pretty sheen to it. While trying not to make the panel too busy I did want to have something more defined in the foreground so I stamped several flowers with brown inks and coloured them with watercolour markers using pearl-ex water to blend so they too have a shimmery sheen.
Dina Kowal posted an informative video this week with so much inspiration for using different watercolour powders. She also has two posts on her blog, one about the powders and the other about papers to use with the powders. Dina is a fabulous artist and has compared, tested and created with the powders. Now we can all benefit from all her research. Thanks, Dina.
Supplies:
Stamps: Floral Tapestry, Snippets, Enamor (PB)
Inks: Versafine Crimson Red (Tsukineko) Vintage Photo, Gathered Twigs Distress stains (Ranger)
Cardstock: Neenah Classic Crest Natural White 110lb smooth , Canson 100% cotton hot pressed watercolour paper
Also: Zig clean color real brush markers
Misti & Bister
Posted: July 6, 2015 Filed under: Bister, Poppy Pattern | Tags: Bister, Penny Black stamps 9 Comments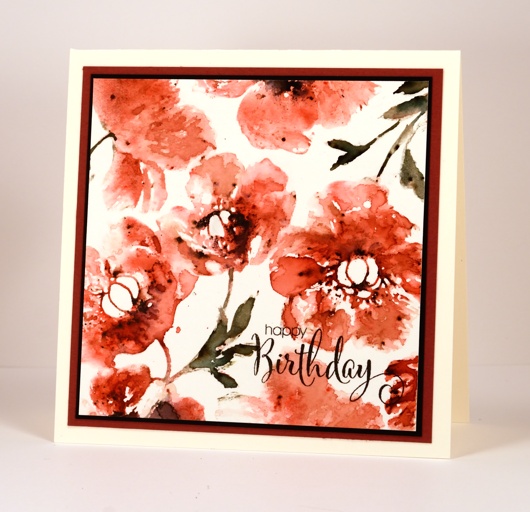
My bister experiments continue, this time with the help of the MISTI. I know the Misti is helpful for all sorts of stamping but so far I have used it most frequently for background stamps. The poppy pattern stamp is a lovely stamp but I must admit I had hardly used it before I got the Misti. I used bister powders for both the cards below but used a different order for applying colour, ink and water.
On the panel above I inked the flowers on the stamp with spun sugar distress stain; it is a pale colour so I could see it when it stamped but it didn’t impact the end result very much. After stamping I dropped mahogany bister powders onto the wet flowers. After the first impression I switched to stamping with water, adding a bit more bister here and there until the flowers were well covered. I dropped some black powder in the centre of a few poppies and then inked the leaves with iced spruce distress stain (again a pale colour) and dropped green powder onto the wet leaves and stems. I re-stamped many times to get the effect I wanted always in the same place because the stamp was firmly positioned on the Misti and my watercolour paper panel was held down by both tape and magnets. I let it air dry then brushed off excess bister, added a black sentiment and two co-ordinating mats.
On my second panel I randomly sprinkled yellow and mahogany bister powder onto a dry piece of watercolour paper (once again held firm in the misti). Before I could stamp over the dry powder I managed to brush half of it off with a towel so I had to sprinkle another lot over the panel! I then painted water onto the stamp with a paint brush and stamped over the powder. I had to stamp several times with water before the flowers really took shape. Instead of adding black powder to the centres of the poppies this time I added distress marker to the centres on the stamp then stamped over the top of the colour already there. Again I let it air dry then brushed off some excess powder. For a little added interested I trimmed then die cut the panel so it could reveal a thin strip of the burgandy cardstock underneath. I wanted the sentiment in the same ink colour as the cardstock so I stamped first in versafine satin red then over the top with versafine vintage sepia. (restamping sentiments precisely is another tricky task made easy with the misti)
Edited to add: Dina Kowal posted a very helpful description of four different water-soluble powders on Splitcoast. Check it out to see price comparisons, colour range similarities and differences as well as a good way to repackage the powders.
Supplies:
Stamps: Poppy Pattern, A Sweet Day(PB)
Inks: Spun Sugar, Iced Spruce distress stain & black soot distress marker (Ranger)
Creative Dies: Stitched Edges (PB)
Cardstock: Canson 100% cotton hot pressed watercolour paper
Also: Bister pigment powders
Christmas Bister
Posted: June 29, 2015 Filed under: Before the Snow, Bister, CAS, Stamped Landscapes | Tags: Bister, Fabriano Watercolour Paper, Penny Black stamps 22 Comments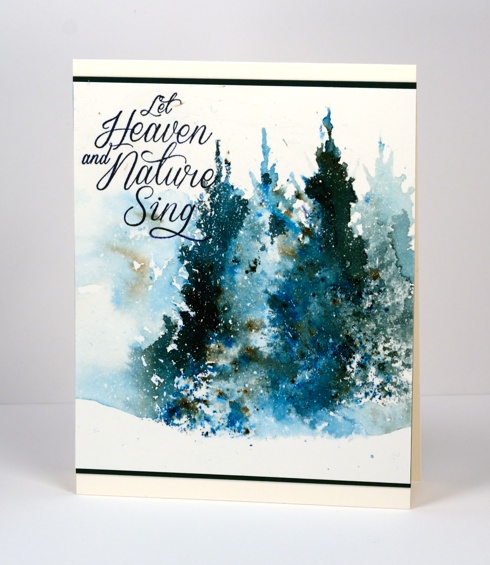
I know it is odd for me to throw a Christmas card up on the blog in June but I had to pair the green and blue bister powders with the beautiful ‘Before the Snow’ tree stamp. After watching the way the bister powders reacted in water I wanted to see if I could stamp an image with water then drop some powder onto the watery image. It took a bit of fiddling around, several re-stampings and a paintbrush for some extra shaping but my experiment did work and I will keep playing with the technique.
I had splattered my watercolour panel with masking fluid in advance so I would have flecks of snow. The powders created pretty blues and greens that I was not able to match with one ink pad so I stamped my sentiment twice first in green then in blue and ended up with a suitable match.
Don’t worry I’m not switching to winter stamping; I’ll be back with bright summery images soon!
Supplies:
Stamps: Before the Snow, Season’s Wishes (PB)
Inks: Versafine Majestic Blue & Spanish Moss (Tsukineko) Blue and Green bister powders
Cardstock: Fabriano 100% cotton hot pressed watercolour paper & Green card
Also: Winsor & Newton Masking Fluid
A Bit of Bister
Posted: June 25, 2015 Filed under: Bister, Flower sparks | Tags: Bister, CAS, Penny Black stamps 12 Comments
I have another card for you made from my beginner bister experiments. The panel above, cut from a larger piece, was made by first spritzing water on cold pressed watercolour paper then dropping bister powders onto the dampened paper. I have yet to try other types of paper but I would definitely recommend the texture of cold pressed paper with bister because the liquids settle into the grooves making little patterns of more intense colour.
I chose the Queen Anne’s lace stamps from the flower sparks set as they were perfect for stamping over the bister. I was able to position the stems and flower heads to make the most of random patterns.
Thanks for dropping by. More bister bits & pieces to come!
Supplies:
Stamps: Flower Sparks, Snippets (Penny Black)
Inks: Versafine Onyx Black, (Tsukineko) Bister pigment powders
Cardstock: Canson cold pressed watercolour paper, Fabriano hot pressed watercolour paper
A Burst of Bister
Posted: June 24, 2015 Filed under: Bister, Poppy Time | Tags: Bister, Kuretake Zig clean color real brush markers, Penny Black stamps 12 Comments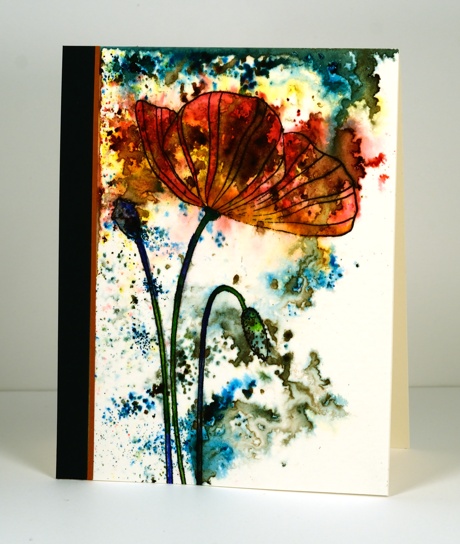
This is my first creation using bister. A friend shared her set of powders with me a week ago and I made several panels exploding with colour and have turned only one into a card. When I was experimenting with the pigment powders I stamped the large ‘Poppy Time’ stamp on a couple of pieces of cold pressed watercolour paper and left two more pieces blank. I then spritzed water on the panels and started dropping bister into the water using a very very small paintbrush. Because I had poppies already stamped on two panels I tried to drop bister colours in appropriate areas. On the blank panels I was more random with the powders and I ended up liking those panels better. I have my own set of powders now and I am looking forward to trying some more techniques.
I did learn that it is best to walk away and let the pigments powders do their magic. It helps to have a packet of Honey & Dijon mustard chips on hand to distract you at that point. To turn the panel above into a card I used a couple of my zig clean colour real brush markers to add extra colour to the stamped images. I trimmed the panel and attached it to a card base with two strips of co-ordinating card stock.
Supplies:
Stamps: Poppy Time (Penny Black)
Inks: Versafine Onyx Black (Tsukineko), Bister pigment powders
Cardstock: Canson cold pressed watercolour paper
Also: Zig clean color real brush markers


