
Pink & Gold Poinsettias
Posted: December 6, 2014 Filed under: Joyous, Red Star, World of Wishes 18 Comments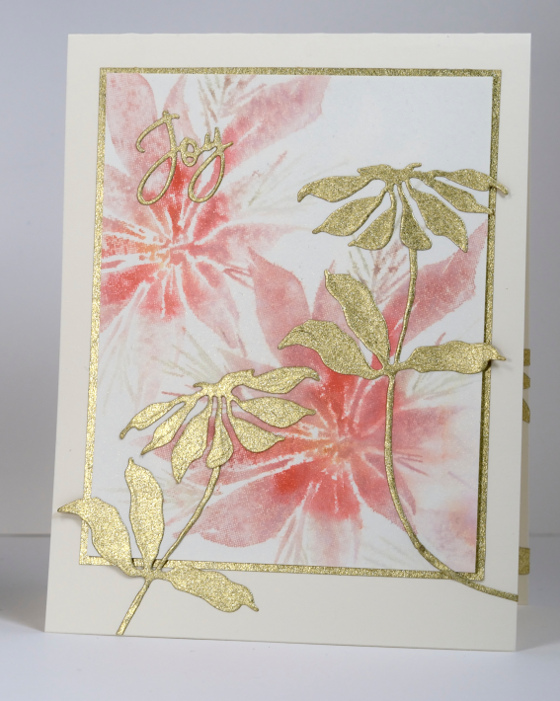
The panel pink panel on this card is one of the bits and pieces I had sitting around. When I was creating cards with the “Red Star” pointsettia stamp and distress stains I often stamped once or twice on a panel without re-inking. The distress stain pigment is intense and the liquid on the stamp is usually enough to get a few impressions. The panel on the card above would have been one of the third or fourth impressions, hence the pale watery pinks. (To see the more vibrant first and second impressions take a look at this card) I chose to embellish and mat with gold because there is a subtle gold sheen over the watercoloured panel made by spritzing with my pearl-ex interference gold spray (home made).
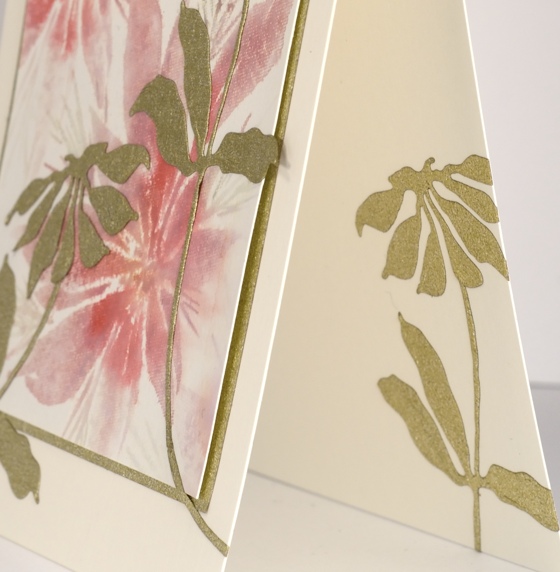
The gold poinsettias are cut from gold wrapping paper using the “Joyful” dies. Before cutting I applied an adhesive sheet to the back of the paper so I could easily stick the flower and stem onto the card. The effect looks a little like gilding because the paper is so much thinner than cardstock. The word ‘joy’ is also cut from the same wrapping paper.
I’ve linked to Simon Says Christmas challenge and Virginia’s View All Things Distressed challenge.
Supplies:
Stamps: Red Star (PB)
Inks: Victorian Velvet, Bundled Sage, Mustard Seed, Barn Door Distress Stains (Ranger)
Cardstock: Fabriano 100% cotton hot pressed watercolour paper, Neenah Natural White 110lb card stock, Gold wrapping paper
Creative Dies: Joyful, World of Wishes (PB)
Also: Interference Gold Pearl-ex spray
Together under the Northern Lights
Posted: November 25, 2014 Filed under: Together | Tags: Penny Black creative dies, Penny Black stamps, Ranger Distress inks, Ranger Distress stains 21 Comments
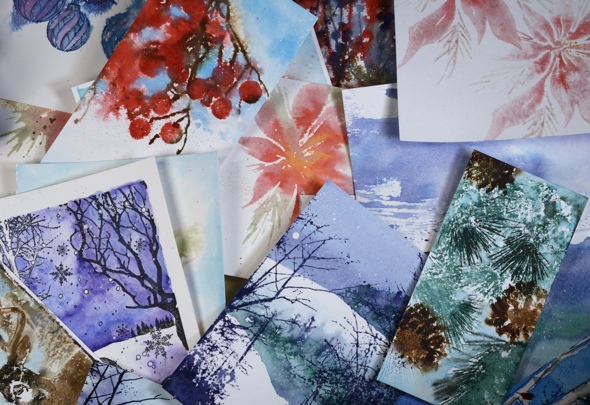
I have a stack of watercoloured backgrounds and images on my work table waiting to be turned into something. Some are practice pieces that worked, others are left over from classes I taught and some are experiments still needing some tweaking. Most of them are wintery or Christmassy so now is the time to work with them. The background above is just one of the bits & pieces that was ready to be used. It was made with distress stains blended over splattered masking fluid. I cut out the deer with the ‘Together’ die and popped them up over the background then added two hand cut snow banks and some branches cut with the ‘Nature’s Song’ die. The challenge at Less is More this week is to use something Christmassy on your card. I think this qualifies.
I will have more projects made from the bits & pieces pictured below later in the week but tomorrow I’ll be back with a video tutorial.
Supplies:
Stamps: Joy Filled (PB)
Creative Dies: Together, Nature’s Song (PB)
Inks: Chipped Sapphire, Bundled Sage, Tumbled Glass distress stains & Chipped Sapphire distress ink(Ranger)
Cardstock: Neenah Avon Brilliant 110lb cardstock, Fabriano 100% cotton hot pressed watercolour paper
Also: Winsor & Newton masking fluid
Bits & Pieces waiting for time and inspiration:
Inch by Inch 5: Christmas Village
Posted: November 21, 2014 Filed under: Frame, Gleeful | Tags: Faber-Castell Albrecht Durer Watercolour pencils, Penny Black creative dies, Penny Black stamps 6 Comments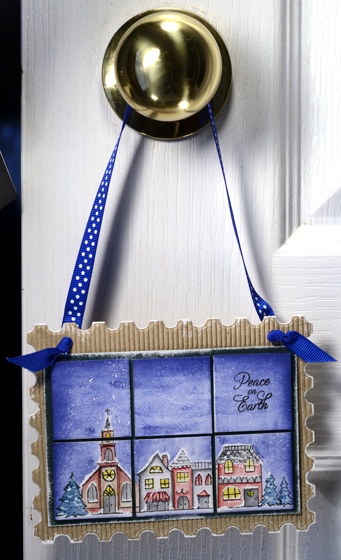
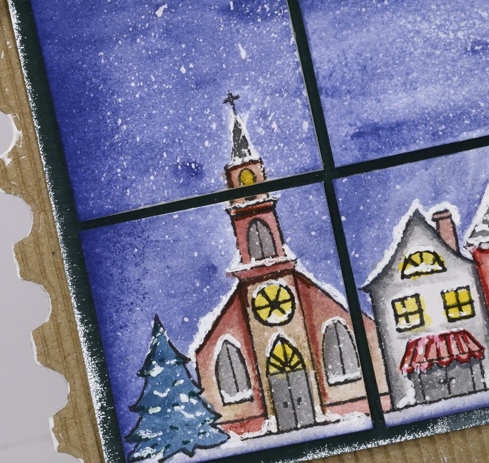
I hope you have enjoyed the Inchie Arts projects this week. My final one (for now) is a door handle decoration, a little panel with a winter scene on six 1.5″ squares.
To create this panel I began by splattering masking fluid on six squares then, when the fluid had dried I placed them edge to edge in a 2×3 array on masking paper to hold them together while I stamped and coloured. I stamped the village from the transparent set, “Gleeful” on an array of tiles in versafine onyx black. Using a waterbrush I picked up blue from a watercolour pencil to paint the sky. With a selection of watercolour pencils I coloured and blended the buildings and trees in the stamped image. Once the watercolouring had dried I rubbed off all the masking fluid to reveal the ‘falling snow’. I used ultrafine sharpie markers to highlight some features on the fillage and a clear wink of stella pen to make the windows glisten. With a white gel pen I drew snow on roofs, window trim and around doorways to finish off the picture.
To assemble the decoration I cut a corrogated cardboard base using the ‘Frame’ die and a green mat for the squares then painted the frame edges with white gesso and the green card with wedding dress luxe ink. I mounted the art squares on the green with a small margin between each square then finished it off with a blue and white polka dot ribbon.
Make sure you visit the Penny Black and the Inchie Arts blogs for more Inchie inspiration and for a chance to win some stamps and art squares.
Supplies:
Stamps: Gleeful (PB)
Creative Dies: Frame and Pattern (PB)
Inks: Versafine Onyx Black (Imagine Crafts/Tsukineko)
Pencils: Albrecht Durer watercolour pencils (Faber Castell)
Cardstock: Green cardstock, Natural corrogated cardstock, Inchie Arts 1.5″ white square
Also: Winsor & Newton masking fluid, polka dot ribbon, white gesso, white gel pen, clear wink of stella pen, ultrafine sharpies
Inch by Inch 2: Twirl Tree
Posted: November 18, 2014 Filed under: CAS, Tree of Joy, Twirl Tree | Tags: Inchie Arts, Penny Black creative dies, Penny Black stamps, Ranger Distress inks, Tsukineko Memento inks 7 Comments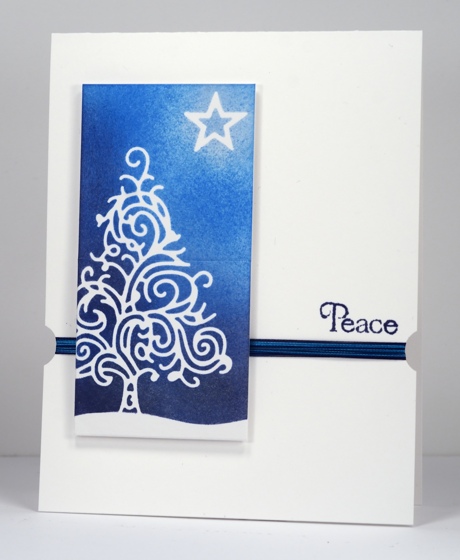
Day 2 of my Inchie Arts week features the white 2″ squares. All week you can see Inchie projects on the Penny Black blog and the Inchie Arts blog. There are giveaways too so make sure you visit.
To create today’s project I worked on two squares taped together at the back. While completing my design I was undecided about whether I would mount them on the card with a gap between them or not. In the end I decided to keep them together. I used the new intricate die, ‘Twirl Tree’ to cut a mask from masking paper. I also cut the star using the ‘Tree of Joy’ die. I pressed the sticky masks firmly onto the squares then added a handcut snow bank mask over the bottom of the square which overlapped the tree trunk. I sponged over the masks with memento Summer Sky ink, Salty Ocean distress ink, Chipped Sapphire distress ink and to finish, a very light application of Encore Silver metallic ink.
Before attaching the squares to the card base I punched a little bite out of both sides of the card base with a ½” circle punch and wound dark blue and turquoise machine embroidery thread round and round. I taped it down firmly then popped up the squares over the thread and added a simple sentiment. We had a few centimetres of snow today so all the trees look prettier. I won’t talk about it too much though because I know some of you would rather not think about winter and others of you have a whole lot more than a few centimetres!
Supplies:
Stamps: Yuletide Greetings (PB)
Creative Dies: Twirl Tree, Tree of Joy (PB)
Inks: Memento Summer Sky ink, Encore Silver Ultimate Metallic ink (Imagine Crafts/Tsukineko) Chipped Sapphire, Salty Ocean distress ink(Ranger)
Cardstock: Neenah Solar White 110lb cardstock, Inchie Arts 2″ white square
Also: machine embroidery thread
Snow Wishes
Posted: November 15, 2014 Filed under: Skyline, Snow Wishes | Tags: Penny Black creative dies, Penny Black stamps, Tsukineko Memento inks 9 Comments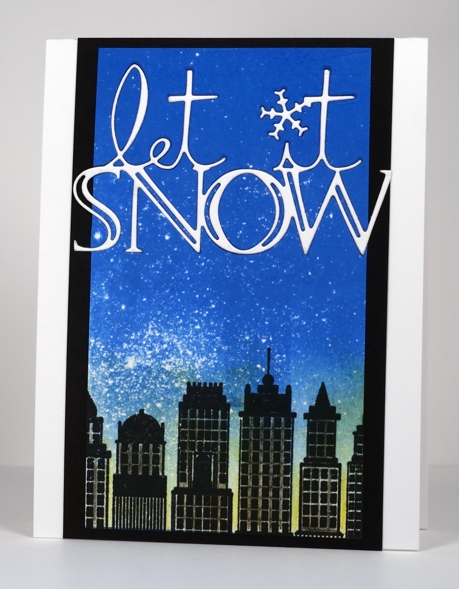
The theme on the Penny Black blog has been intricate dies this week and the designers have created beautiful projects. My card today features one of the new intricate sentiments fitted into a snowy city sky. To create the scene I splattered masking fluid on white cardstock then brayered Memento Bahama Blue ink from one end which resulted in the colour fading out toward the other end. I stamped part of the slapstick cling stamp, ‘Skyline’ at the base of the panel and sponged yellow around the buildings and used a grey marker on the facades. I die cut the ‘Snow Wishes’ sentiment out of the top of the panel and out of a piece of white cardstock then fitted the white diecut into the stamped panel, attached it all to the black mat and finally to the white cardbase.
Stamps: Skyline (PB)Creative Dies: Snow Wishes (PB)
Inks: Memento Bahama blue, Dandelion, London fog inks, Versafine Onyx black (Imagine Crafts/Tsukineko)
Cardstock: Solar white cardstock, Epic Black cardstock (Neenah)
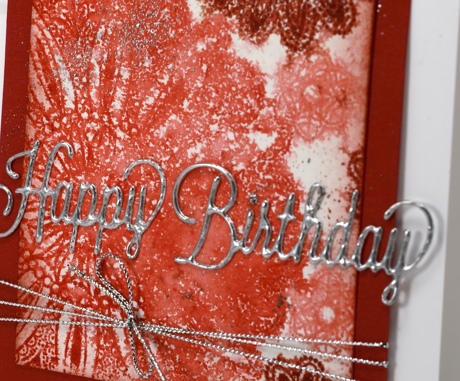
Dazzler Birthday
Posted: November 8, 2014 Filed under: Celebrations, Dazzlers | Tags: Penny Black creative dies, Penny Black stamps, Ranger Distress inks 5 Comments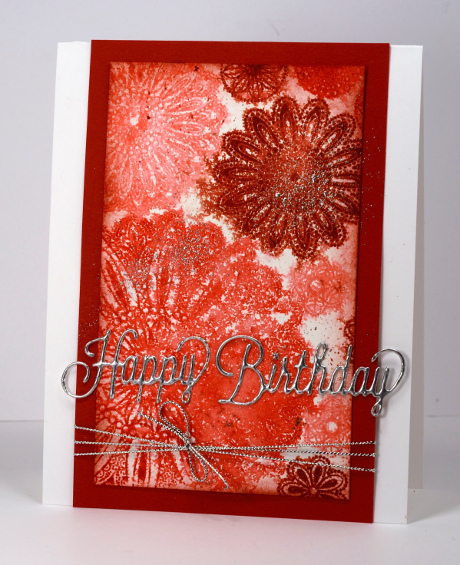
Look! It’s not all autumn leaves and snow scenes around here. I pulled out a set of flower/circle pattern transparent stamps and gave them the watery treatment. I stamped them on watercolour paper in three different distress inks then spritzed the panel lightly and let them bleed into each other a bit. After trimming my panel I added both some ink splatter and some dark sponging around the edge with barn door ink. After heat embossing the diecut sentiment in silver I wanted a little silver on the patterned panel too so I flicked my silver wink of stella pen. It wasn’t quite silvery enough so I sprinkled some embossing powder over the same area and it stuck to the wink of stella ink making it possible for me to heat it and achieve a fine sprinkle of silver. You can just see it in the top left of detail photo below.
Stamps: Dazzlers (PB)
Creative Dies: Celebrations (PB)
Inks: Fired Brick, Festive Berries, Worn Lipstick distress inks (Ranger) Versamark (Imagine Crafts/Tsukineko)
Cardstock: Fabriano 100% cotton hot pressed watercolour paper, Neenah Natural white cardstock, red cardstock
Also: Silver embossing powder, Silver cord, Wink of Stella silver marker
Autumn Branches
Posted: November 5, 2014 Filed under: Etched Branches, Watercolour, Words of Gratitude | Tags: Fabriano Watercolour Paper, Penny Black creative dies, Penny Black stamps, Ranger Distress stains, Tsukineko Memento inks, Tsukineko Radiant Neon inks 12 Comments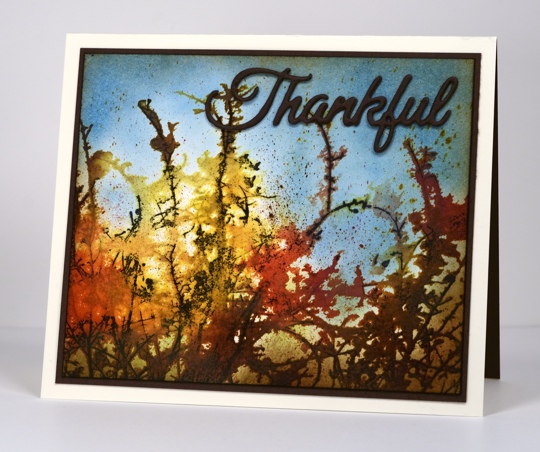
The etched branches stamp is once again the star of an autumn card; I have yet to use it on a winter scene. Using loose watercolouring I tried to recreate the colours I have been seeing against bright blue skies lately. We have had some beautiful clear autumn days and it has been a great year for gorgeous colours.
I began by dabbing Ranger Archival jet black ink onto “Etched Branches” stamp leaving some places un-inked. I then stamped onto watercolour paper and placed a stamp positioner next to the stamp before removing it to mark the position for subsequent impressions. As I was making several impressions it helped to tape the stamp positioner to the panel with painter’s tape. I inked small sections of the “Etched Branches” stamp with Mustard Seed distress stain and stamped onto panel using the stamp positioner to guide the stamp into the same place then repeated the same steps with other distress stains inking different sections of the stamp each time. With all the colour stamped I spritzed the panel with water to make the colours bleed into each other and the surrounding area. Next I splattered the same distress stains over the panel and let all the ink dry.
Before removing the stamp positioner I re-inked a few sections of the stamp with black marker to give some branches more definition. To colour the sky I sponged Radiant Neon Electric blue ink, for the foreground Memento Luxe Pear Tart ink and to finish Vintage Photo distress ink around border. I matted the panel with brown cardstock and stacked three diecuts of the word “Thankful” for my sentiment.
For more Thanksgiving inspired projects visit the Penny Black blog this week
Stamps: Etched Branches (PB)
Creative Dies: Words of Gratitude (PB)
Inks: Archival Black ink, Barn door, Vintage Photo, Mustard Seed, Crushed Olive, Spiced Marmalade distress stains, Vintage Photo distress ink (Ranger) Radiant Neon Electric Blue ink, Memento Luxe Pear Tart ink, Memento Tuxedo Black marker(Imagine Crafts/Tsukineko)
Cardstock: Fabriano 100% cotton hot pressed watercolour paper, Neenah Natural white cardstock, brown cardstock
‘Tis the season
Posted: November 4, 2014 Filed under: CAS, Skyline, Snow Drops, Tis the season | Tags: Penny Black creative dies, Penny Black stamps, Tsukineko Memento inks, Tsukineko Radiant Neon inks 11 Comments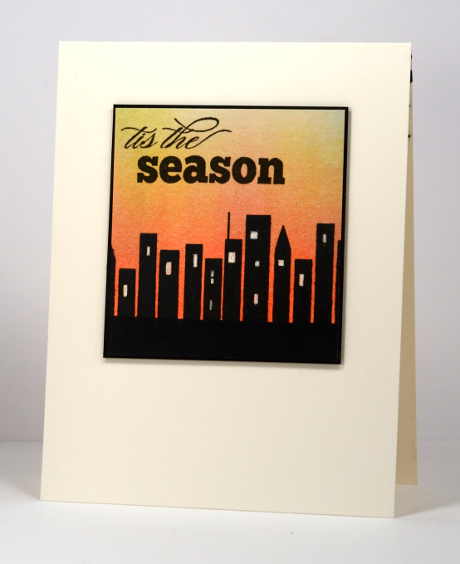
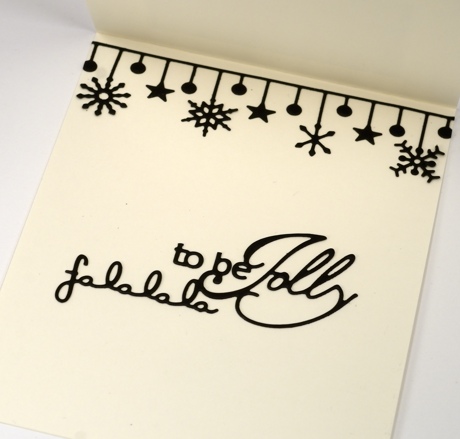
‘Tis not quite the Christmas season just yet but it is the season to change the clocks back which is what we did on Sunday. That means the sunset came earlier than I am used to and I was able to enjoy it at the end of a run. The light was orange and yellow behind the silhouetted trees and buildings as I ran home and that is what inspired this silhouetted city scape. I was undecided about a sentiment until I read the Less is More and the Splitcoast Clean and Simple challenge for this week, both are about non-traditional Christmas cards. This card is definitely non traditional especially when you peek inside to see the rest of the sentiment along with some black snowflakes. Seriously, who wants black snowflakes? I am not sure they work. What do you think?
I brayered the colour onto Neenah natural white cardstock, first radiant neon electric coral, next memento dandelion and lastly from the other end of the panel summer sky. (There is no summer sky left at the top of the panel as I had to trim it after messing up the sentiment.) I stamped the skyline stamp in black then brayered black to cover the base of the panel. The windows are coloured with a white gel pen and the sentiment stamped in versafine onyx black ink. I gave the panel a thin black mat and popped it up on dimensional squares. Inside the card is the rest of the sentiment trimmed from a new die cut and paired with the Snowdrops die cut.
Supplies:
Stamps: Skyline, Season’s Wishes (PB)
Creative Dies: Tis the Season, Snow Drops (PB)
Inks: Memento dandelion, tuxedo black, Radiant Neon Electric coral, Versafine onyx black (Imagine Craft/Tsukineko)
Cardstock: Neenah natural White 110lb cardstock, black cardstock
Let it snow
Posted: October 30, 2014 Filed under: Joyous Wishes, Prancers, Snow Drops | Tags: Penny Black creative dies, Penny Black stamps, Tsukineko Memento inks 14 Comments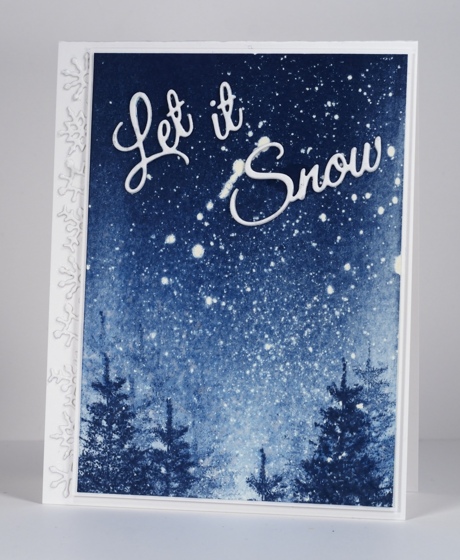
Snow is in our weather forecast for the next few days; I don’t imagine there will be as much as in the card above but who knows?
I know I keep mentioning the “panels already splattered with masking fluid” that I have sitting around on my craft table. There are a couple of reasons I have extras on hand, one is that the fluid takes at least 20 minutes to dry properly so it is good to have one ready for when inspiration strikes. Also I have several different sizes of watercolour blocks now so when I splatter the masking fluid on a block I can end up with quite a few card-sized panels. This panel was generously splattered with masking fluid, both tiny dots and larger ones. I ended up working with just one ink, Memento Nautical blue. I brayered the ink over the masking fluid, a method which gives each dot softer edges, a different effect to that created with sponging ink or watercolouring. I brayered from one edge only and the blue faded out toward the opposite edge of the panel making it the perfect place to stamp some trees with first, second and third generation stamping. After stamping the trees I spritzed the bottom of the card once so there is a little bit of blur around the trees.
I decided on a die cut sentiment so it would stand out and ended up cutting two and stacking them together. When trimmed the panel was a bit narrower than my usual card size so rather than trim the card base I matted with white and popped the panel up over little die cut snow flakes from the Snow drops die.

Supplies:
Stamps: Prancers (PB)
Creative Dies: Joyous Wishes, Snow Drops (PB)
Inks: Memento Nautical Blue (Imagine Craft/Tsukineko)
Cardstock: Neenah Solar White 110lb cardstock,
Also: Winsor & Newton masking fluid
Ski Hill
Posted: October 24, 2014 Filed under: CAS, Prancers, World of Wishes | Tags: Penny Black creative dies, Penny Black stamps 6 Comments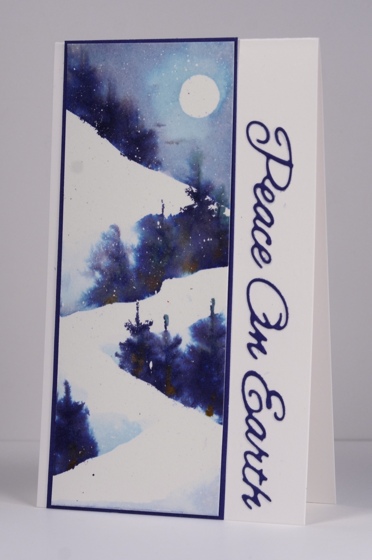
This tall and narrow scene reminds me of a ski run, albeit a fairly narrow one! I created this on a scrap of watercolour paper already splattered with masking fluid. Once again I am not entirely sure of the inks I used but I will list what I think they were in the supply list below. I used a half inch punch to create a circle mask for the moon and masked the hills one by one as I went down the panel. After painting the sky in chipped sapphire and broken china distress stain I stamped dark blue trees onto the damp sky area to end up with very watery trees. I then moved my mask and stamped more trees then painted some diluted broken china stain around them to blur the images and extend the edge of the snow bank. I did the same for the last two tree sections. When I had finished the panel was very blue and did not have enough contrast or variety of colour so I added some brown ink to the trunks of the trees.
To finish I rubbed off the masking fluid, matted in Periwinkle mix&match cardstock and added the die cut sentiment. I think the sentiment is a bit too big for the narrow panel so I would use something smaller if I did a similar layout again.
Supplies:
Stamps: Prancers (PB)
Creative Dies: World of Wishes (PB)
Inks: Broken China, Chipped Sapphire distress stains & Chipped Sapphire, Vintage Photo distress ink (Ranger)
Cardstock: Periwinkle Mix & Match (PB), Neenah Avon Brilliant white 110lb cardstock, Fabriano 100% cotton hot pressed watercolour paper
Also: Grafix frisket film, Winsor & Newton masking fluid


