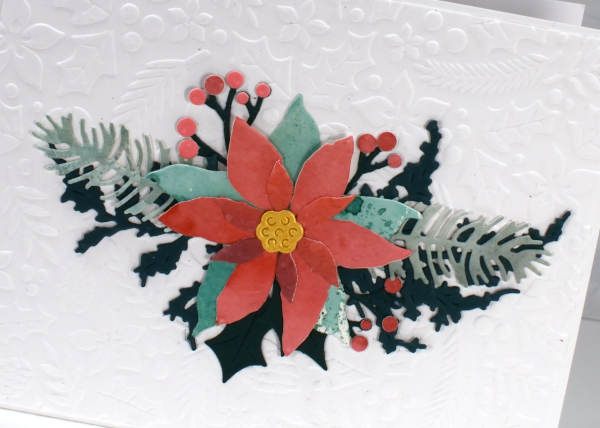
Layered Poinsettias
Posted: December 3, 2024 Filed under: Dies, Gina K, holiday flora embossing folder, joy of giving, juniper, layered poinsettia, layered Xmas wreath die set, Penny Black, stocking stuffers | Tags: Penny Black creative dies 1 Comment
I have a box of berries, leaves, pine boughs and other festive foliage along with some watercoloured panels waiting to be put to use. I cut poinsettias from the watercoloured panels and had fun arranging them on an embossed panel with other foliage die cuts. (PB ‘joy of giving‘, ‘juniper‘, ‘layered Xmas wreath‘ and stocking stuffers)
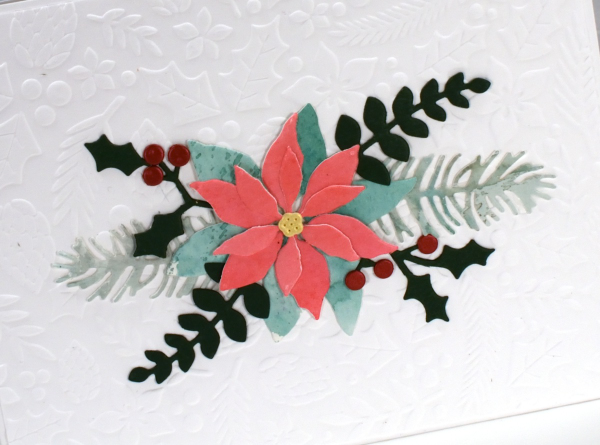
The pretty background panel is Neenah solar white embossed with the Gina K ‘holiday flora’.
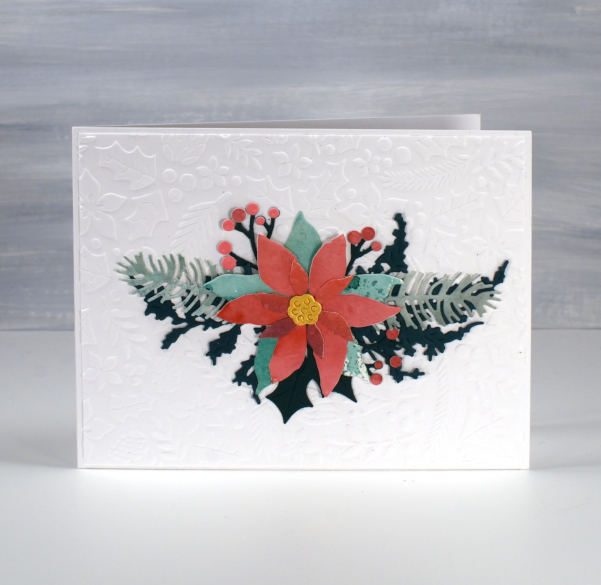
I like the variety of patterns and colours in the petals and leaves when they are cut from a watercolour panel. I held a couple of Christmas card making nights for my church and we made watercolour panels using my smoosh, spritz and swipe method. We ‘smooshed’ distress inks on a teflon mat, ‘spritzed’ the ink with water to dilute and move it, then ‘swiped’ the watercolour paper through the ink as many times as needed to make a well coloured panel.
This post includes affiliate links from Foiled Fox and Scrap n Stamp. If you buy through these links I receive a small commission at no extra cost to you.
Delicate Pines – 9 Ways!
Posted: November 29, 2021 Filed under: delicate pines, Dies, gift card pocket, joyful ornaments, jubilation, juniper, onramental branch, Penny Black, tall trees, Taylored Expressions, trees and hills | Tags: Catherine Pooler inks, Penny Black creative dies, Penny Black stamps, Taylored Expressions, Tsukineko Versafine inks 8 Comments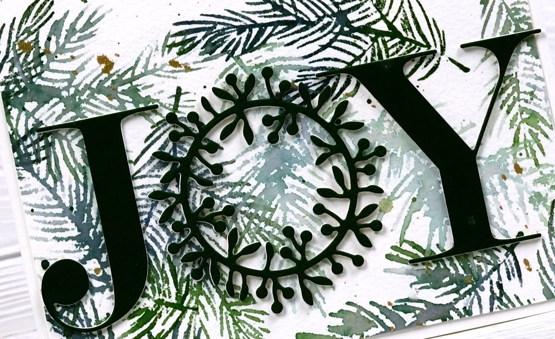
Welcome to a long post with quite a few photos!
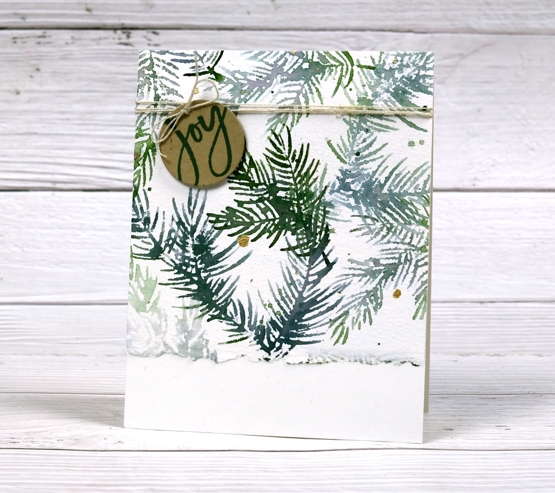
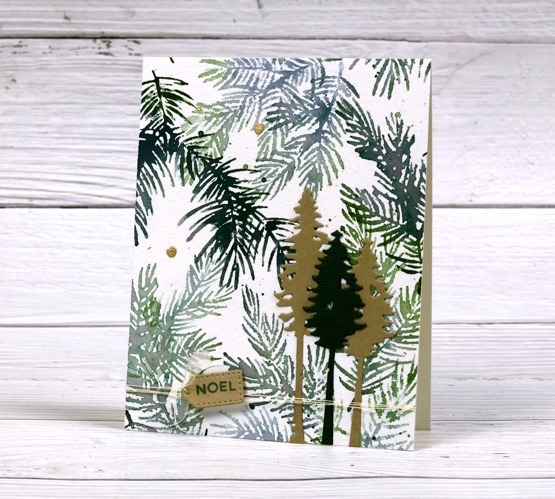
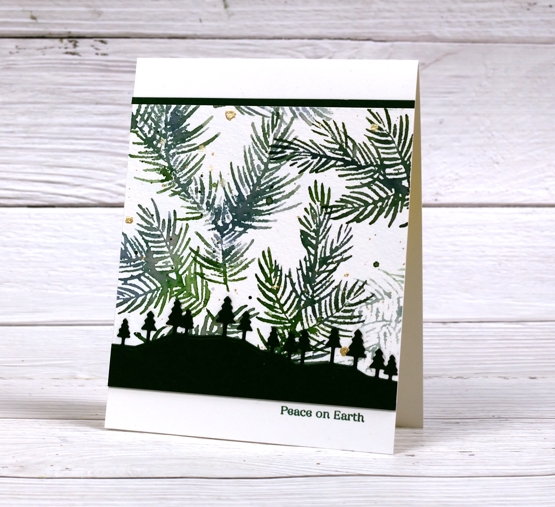
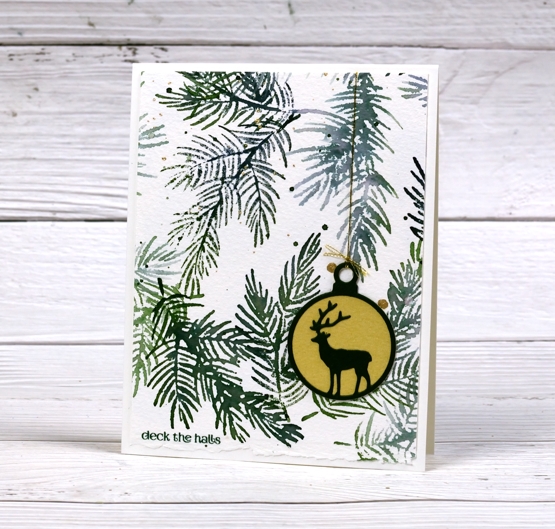
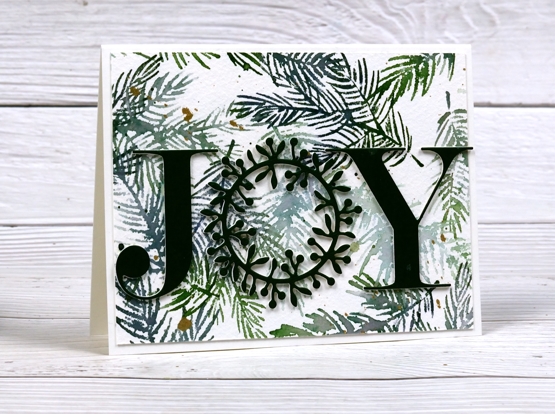
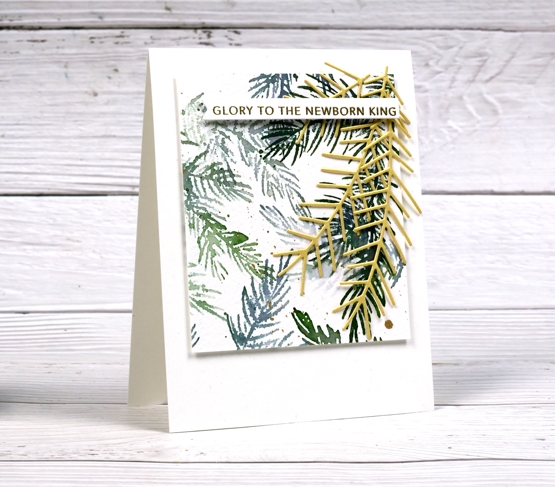
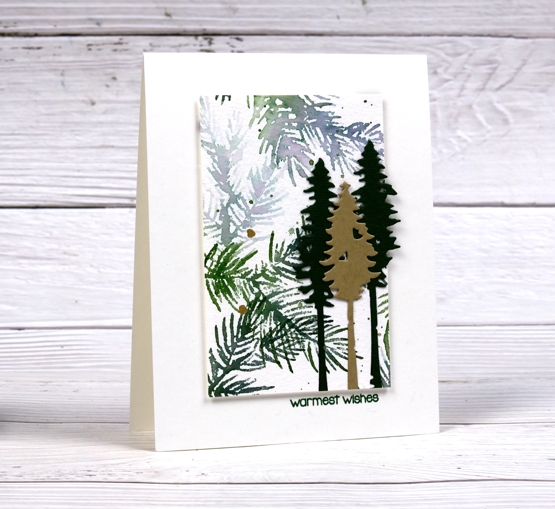
When I last counted up the names on my Christmas card list and the number of cards I have completed the two numbers were not close to matching. I decided a quick way to grow the stack of cards would be to stamp a big panel then slice it up to make several cards.
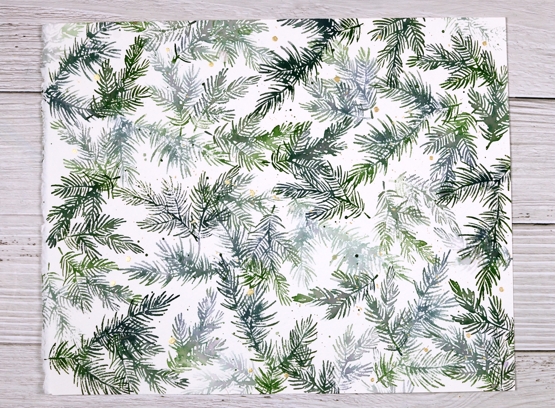
Turns out this idea was not all that quick. It took a while to make these cards because although they are from the same stamped panel, they are still all different. The photo above shows the original panel stamped with Penny Black’s new ‘delicate pines’ set of 3 stamps and two Catherine Pooler inks. After the stamping I added ink splatter then gold paint splatter.
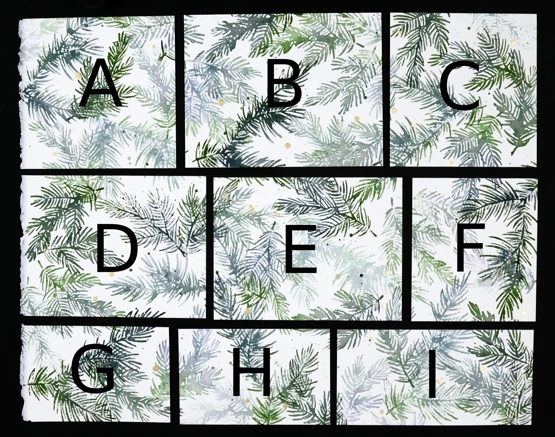
I kept the deckle edge on the 11″x14″ cold pressed watercolour panel and sliced up the panel lengthwise first. A,B & C are all 4¼” wide, D,E & F are all 4″ wide which left G,H & I all 2¾” wide. Below are all the finished cards. I used some pale gold, Bazzill avocado green and kraft cardstocks for the die cuts and framing. I used versafine clair rainforest ink to add sentiments and some linen twine here and there. All the cards are shown below with the size of the stamped panel portion included underneath (all the finished cards are 4¼”x 5½”)
A. 4¼ x 4½
B. 4¼ x 5½
C. 4¼ x 4⅛
D. 4 x 5¼
E. 4 x 5¼
F. 4 x 3½
G. 2¾ x 4¼
H. 2¾ x 4¼
I. 2¾ x 5½
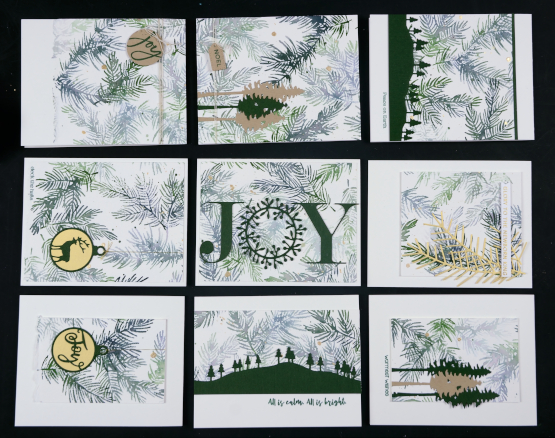
The finished cards above are in the places that correspond to the labelled photo up at the beginning of the post. I had them laid out on a cutting mat on the floor beside me as I put them all together so I didn’t get them mixed up. I wanted you to see how I used each size in a different way.
I hope you find some inspiration from these cards. Remember that three of my online classes are on sale until the end of November. Use the code HTNOV to get a 25% discount on the Floral Faves class, Winter Wonder class and the Colour Clues class.
The stores I have affiliate links with are also having sales right now (isn’t everyone?) I have put the links in the right hand side bar of the blog for easy access. Just click on the store name and start shopping!
Supplies
(Compensated affiliate links used when possible)
Frozen Vista
Posted: November 25, 2020 Filed under: frozen vista, juniper, layered Xmas wreath die set, Penny Black, Uncategorized, Winter lantern | Tags: brutus monroe embossing powder, Penny Black creative dies, Penny Black stamps, Ranger Distress inks 6 Comments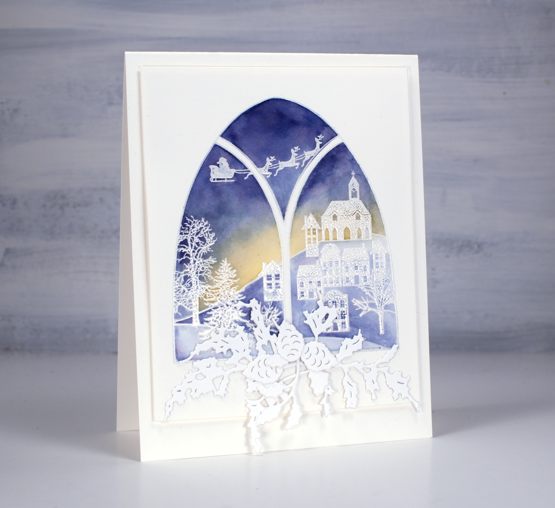
This lovely window stamp is from a Penny Black set, frozen vista which includes two arched window stamps. I stamped it on hot pressed watercolour paper in versamark then embossed in white powder. I used three distress inks to paint over the embossing, chipped sapphire in the sky, scattered straw at the horizon and stormy sky on the snowy ground.
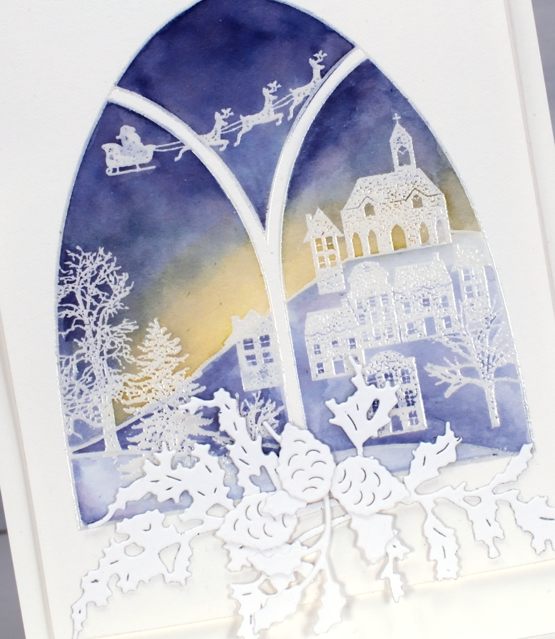
To make a swag below the window I added double sided adhesive to some neenah solar white cardstock then die cut the PB juniper dies, holly from the layered Xmas set and pinecones from the winter lantern set.
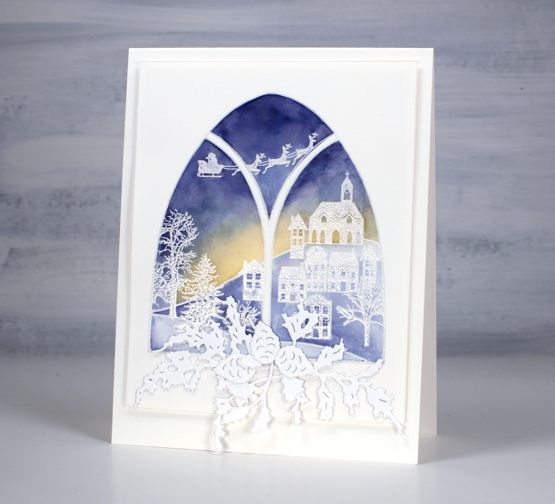
Because of the subtle colours and abundance of white and offwhite I popped up the painted panel on a couple of layers of cardstock to give it a shadow frame on the same coloured card base.
Supplies
(Compensated affiliate links used when possible)
Winter Window
Posted: November 9, 2020 Filed under: art deco window, juniper, layered Xmas wreath die set, Penny Black, Winter lantern | Tags: Dr PH Martin, Penny Black creative dies, Penny Black stamps 6 Comments
Sometimes I get inspired by the detailed and delicate foliage dies from Penny Black. The new ‘juniper’ die set got me started for this design along with a navy panel of cardstock splattered with white paint.
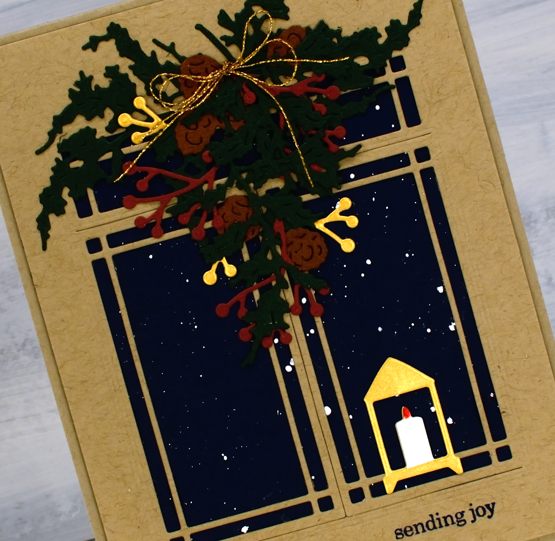
I gathered other dies to combine into a winter window scene. I could have chosen brighter reds and greens but I am in a muted vintage style phase right now so forest green and burgandy were my picks for the juniper and berries. All the dies are listed below; I picked from a few sets and added double sided adhesive to all the cardstock before die cutting. The window die is designed to open but I chose the adhesive backing so it would be stuck down firmly to keep the snow outside and the candle from blowing out!

Supplies