
Birds at night
Posted: February 28, 2013 Filed under: Birds on wire, CAS, Stamped Landscapes 28 Comments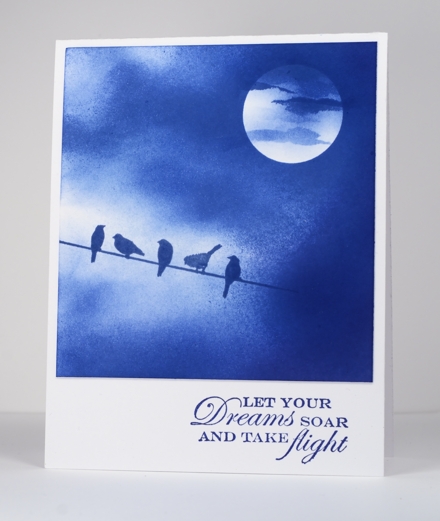
This card is inspired by a photograph taken by Luz Adriana Villa A and shared on flickr. I saw it on Pinterest.
The sky took a while to build up as I sponged from the outside in, with three blues. I used a little light blue at the beginning, the darkest blue at the end but the majority of the sponging was done with Memento Danube Blue. I positioned the moon mask first and stamped the birds before I did any sponging so that I could vary the depth of colour around the image. After I removed the moon mask I tore little strips out of the sticky part of a post-it note to create a very thin cloud like shape.
Supplies
Stamps: Birds on a wire, Free Flight (PB)
Inks: Memento Summer Sky, Paris Dusk & Danube Blue (Tsukineko)
Three Tile Layout
Posted: February 27, 2013 Filed under: Background Stamps, CAS, Glory of Modesty, Penny Black 15 Comments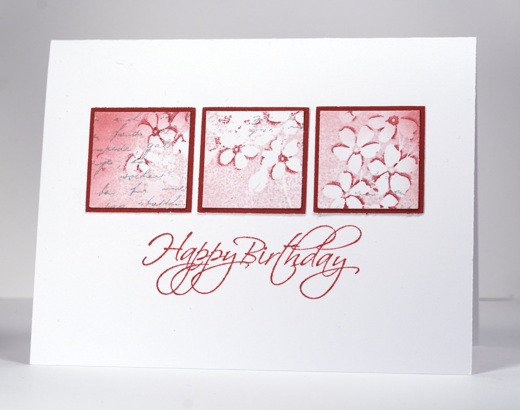
When I was creating the background stamp tutorial my first attempt was almost complete when I messed up the sentiment. No point letting those pretty flowers go to waste so I punched them out and used the three element in a row layout that Susan Raihala says is her all time favourite layout.
To see how I create that little extra dimension in my flowers check out my tutorial here.
Supplies:
Stamps: Glory of Modesty, Flourish Birthday, Letter Background(PB)
Inks: Memento Angel Pink, Love Letter, London Fog & Versafine Smokey Grey (Tsukineko)
Cardstock: Penny Black Mix & Match Papers Rose Garden
Hand-drawn birthday cupcake
Posted: February 26, 2013 Filed under: CAS, Hand drawn, My Kid's cards 12 Comments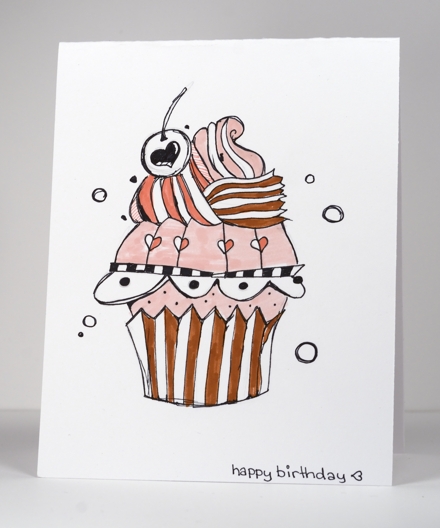
Thanks for all your kind wishes for my birthday last week. My family spoiled me with wonderful food and gifts and I had a very enjoyable day. Most of the afternoon was spent with my husband setting up his gift for me: the laptop I am using to write this post. It has enabled me to get a few posts ready to publish sitting in the lodge at the ski hill while my son skis.
The card above was hand drawn by my younger daughter – pretty sweet looking cupcake isn’t it?
My older daughter gave me season three of Downton Abbey, which we are very keen to watch after really enjoying the first two seasons a friend loaned me over Christmas. I have been telling friends not to tell me anything about the current season, I don’t want to see any spoilers!
Background stamp tutorial
Posted: February 25, 2013 Filed under: Background Stamps, CAS, Glory of Modesty, Penny Black, Tutorial 38 Comments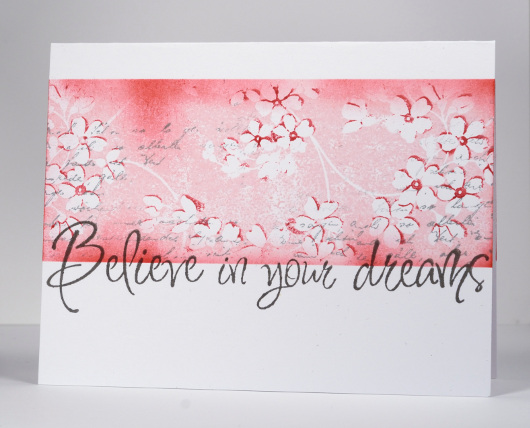
After creating a one layer card with the background stamp Glory of Modesty or GOM for short, I decided to use the same technique and let you in on one step I didn’t mention when I explained my process the first time. It is not a complex step at all, simply one which is easier to show than explain with words.
When I posted the card below my friend, Lindsey from Bashful Blogging commented that “the flowers really do seem on a slightly higher plane despite it being one layer”. I have created another card and a tutorial showing how to get your flowers to appear to be on a “higher plane”.

I used the same stamp because this technique works beautifully with this stamp but I changed my colour scheme and the size of the image panel.
Supplies:
Stamps: Glory of Modesty, Edge to Edge, Letter Background(PB)
Inks: Memento Angel Pink, Love Letter, London Fog & Versafine Smokey Grey (Tsukineko)
Black Damask
Posted: February 23, 2013 Filed under: Background Stamps, CAS, Damask Pattern, Queen Anne's Lace 18 Comments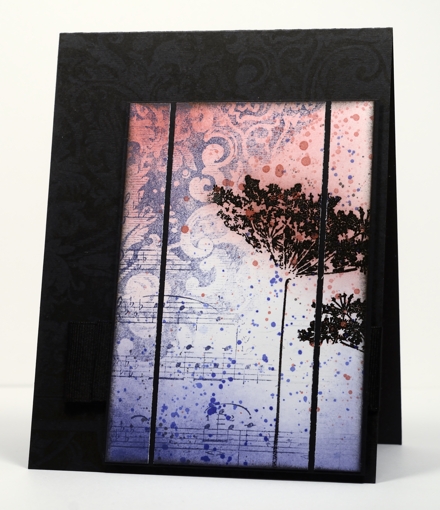
A few weeks back I used the damask background stamp to make a cup. I really hadn’t used the stamp much before that. After making the cup I noticed how elegant the detail in the stamp is and decided it was time to pull it out again. I also have some beautiful new ink colours from Tsukineko which I needed to play with.
I inked diagonally across the damask stamp with Versamagic Night Sky ink and stamped it on the panel. I then inked the music background, diagonally also, in order to fill the other half of the panel. It was only after I had stamped the music that I saw that I hadn’t worked out the whole upside-down and opposite side thing properly! I’m kind of glad I got it wrong though because I ended up liking the two backgrounds overlapping and it left me with a white space to stamp some flowers.
The flowers are stamped with versamark and embossed in black so they would resist the sponging and ink droplets added next. I sliced up the panel and matted in black and then looked for the right colour cardbase. White was too stark; black worked better but needed a little something on it. My intention was to emboss the damask background but once I had stamped it in Versafine Onyx black it showed up fine (possibly not in the photo). The wide grosgrain ribbon is pleated and stapled behind the popped up panel.
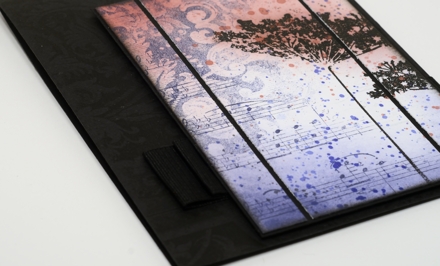
Supplies
Stamps: Damask Pattern, Queen Anne’s Lace, Music Background (PB)
Ink: Memento Rhubarb Stalk, Versafine Onyx Black & Versamagic Night Sky (Tsukineko)
Also: Black embossing powder
Tiles from a background stamp
Posted: February 22, 2013 Filed under: CAS, Glory of Modesty, Tree-mendous 24 Comments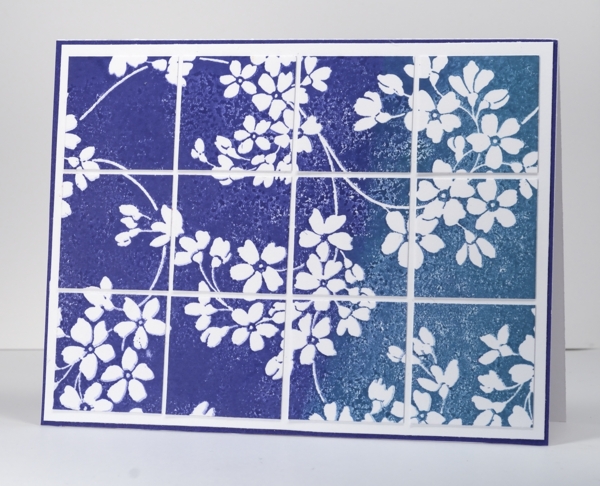
When I had this stamp out to make the birthday card I played around with a few different inks, papers and techniques. I know it is the size of a background stamp but I have stopped thinking of it as a background stamp as I am yet to use it in the background. It is such a pretty design it always gets to be the main event. When a stamp has a lot of blank un-patterned rubber on it, it can be hard to ink evenly so I played around a bit with inks and water to try and get past this issue. If you use a pigment ink it is juicier and will give you good coverage. I wanted to blend some colours on the stamp so I chose to use water soluble Memento dye inks instead.
I inked the stamp generously with Paris Dusk and Teal Zeal then spritzed it with water giving the water and ink a little time to blend before stamping the image on white card stock. The blank rubber part of the image is not solid colour but I quite like the texture created with some tiny air bubbles and ink pooling. I tried the large image on the card base but decided to cut it into tiles to add another element to the design.
Thanks for all your kind birthday wishes. My birthday is Sunday; my husband is exactly one week older and wiser than me!
Supplies:
Stamps: Glory of Modesty, (PB)
Inks: Memento Teal Zeal & Paris Dusk (Tsukineko)
Cardstock: Periwinkle Mix & Match Papers
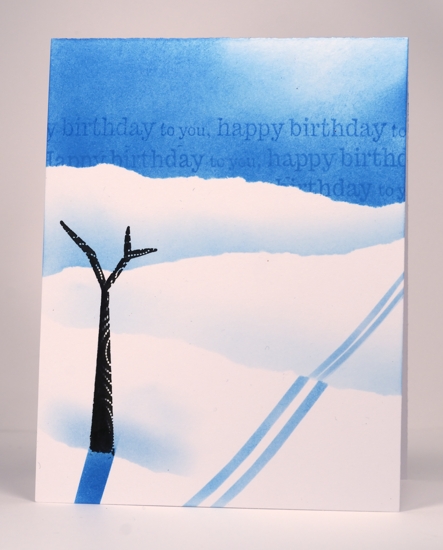
Several of you wanted to see the misunderstood birthday card I made for my husband so I have included it below. If you are as baffled as half my family were then you can mouse over the picture or click on it and you will see the photo title.
The aspects of this card I don’t like are:
the lack of branches on the tree. I am looking forward to using this stamp again with foliage
the sponged ski trails which aren’t very even
the sparse landscape. We don’t like skiing out in the open like that; it gets too cold but as I was stamping at the last minute one tree was all this card got. Sad that the cardmaker’s family’s cards get left to last!
Aspects of this card I do like:
the sentiment in the sky
the colouring on one side of the tree trunk
OLW 128 Feminine Birthday Card
Posted: February 20, 2013 Filed under: Background Stamps, CAS, Glory of Modesty, OLW 30 Comments
This one should not be a difficult challenge. Most of us do birthday cards for females all the time. It’s those masculine cards that are the tricky ones. I made a card for my husband’s birthday last week which is yet unposted because half the small survey of people I showed it to did not understand what the scene was meant to be! Including my husband…
Remember to keep it one layer, and use a few of your favourite things on it; that’s what I did. I masked; you know I like to do that. I inked the background stamp with blue, my favourite colour. I added the letter background stamp that I love over the top and did a little sponging in both teal and yellow.
OLW128 Rules
1. A one-layer card is defined as a single layer of card stock. No other layers allowed.
2. Make a one-layer birthday card for a female
3. Post your cards online and link to them using the InLinkz button at the end of this post. If you link to your blog, be sure to link to the specific post, not just your blog’s main page.
4. I may or may not have chosen this theme because I am having a birthday this week. Not of course that I am making myself a birthday card, but I might just be opening a few.

Supplies:
Stamps: Glory of Modesty, Edge to Edge, Letter Background(PB)
Inks: Memento Teal Zeal, Summer Sky, Dandelion (Tsukineko)
Blooms and splatters
Posted: February 18, 2013 Filed under: CAS, Penny Black 14 Comments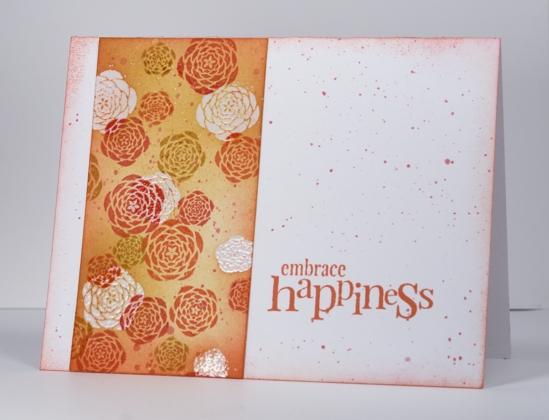
After making my previous card I noticed splattered droplets of red ink on a couple of card bases sitting on my work desk. I wasn’t going to let them go to waste so I made a panel with more ink splatters and combined it with the splattered card base. The little blooms on this panel are from the Penny Black sentiment set “Eloquence”. The transparent sentiment sets from PB usually have a few little image stamps in amongst the words. On this set there are three blooms of different sizes. I pulled them out to make a patterned panel in three colours and embossed a few in clear before sponging over everything.
Supplies:
Stamps: Eloquence, Friendship (PB)
Inks: Memento Lady Bug, Morocco & Peanut Brittle (Tsukineko)

There is still a week left of new catalog inspiration at the Penny Black Blog. They are fifteen days into the 20 consecutive days of inspiration, featuring stamps from the Take Flight catalog! And since they’re featuring 20 days of inspiration, they’re also giving away 20 NEW stamps to one lucky reader
Spots & Blossoms
Posted: February 17, 2013 Filed under: Blooming Garden, CAS 12 Comments
This card started with a desire to use yet another of Penny Black’s new background stamps. In the finished product however, that stamp is barely visible. I began by flicking Lady Bug ink onto white cardstock then stamped the background stamp, Dots in space in pink. It was a pale pink and I had wiped off some of the ink before making the impression so it was a very subtle start. Over the dots I repeatedly stamped the blossom branch from Blooming Garden, also in Memento Angel Pink. Next I inked the same blossom stamp with Lady Bug Red and added Rich Cocoa ink to the stems with a marker. I sponged next with the same red and brown and added the sentiment in the space I had left. Adding the sentiment to the panel meant that I did not have anything to add to the card base to make a visual triangle (If you read Susan Raihala’s Simplicity blog you will know what I am talking about) so I punched an oval tucked it under the matted panel and place a small knot of ribbon on top. I didn’t exactly achieve a triangle but I added something to the white space on the right to lead the eye across the card.
Supplies:
Stamps: Blooming Garden, Dots in space, Eloquence (PB)
Inks: Memento Angel Pink, Lady Bug stamp pads and Rich Cocoa marker (Tsukineko)
Cardstock: Coral Reef Mix & Match Papers
Love is…
Posted: February 14, 2013 Filed under: CAS, Love Chapter, Penny Black 17 Comments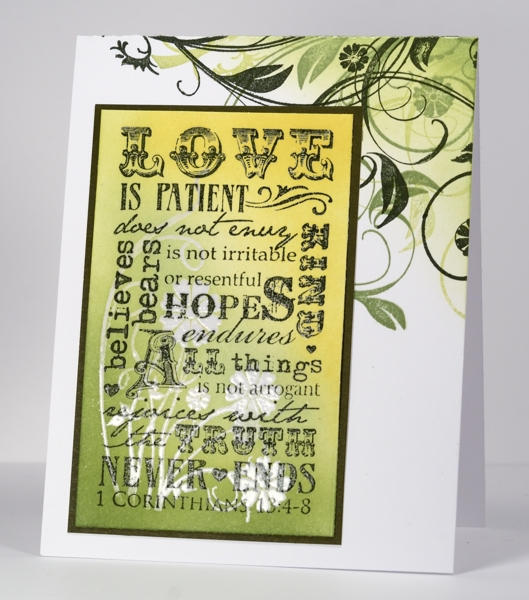
This card features stamps from two new Penny Black sets. The flourishy florals are from the slapstick cling set, Longing, and the 1 Corinthians text is from the transparent set, Love Chapter. I posted a little sneak peak this morning of a card made with the Longing stamps; you can see the whole card on the Penny Black blog.
I began the text panel for this card by stamping the floral stamp in Versamark and the text in Versafine Olympia Green then embossing both in clear e.p. I then sponged in greens and yellows and matted in Olive Grove Mix & Match paper. I overlapped the other floral stamp from the Longing set on the card base in three greens and sponged the corner.
Supplies:
Stamps: Love Chapter, Longing(PB)
Inks: Memento New Sprout, Pear Tart, Bamboo Leaves, Versafine Olympia Green, Versamark (Tsukineko)


