
Sparkle String
Posted: August 20, 2014 Filed under: My Kid's cards, Sparkle String | Tags: Penny Black creative dies, Tsukineko Radiant Neon inks 15 Comments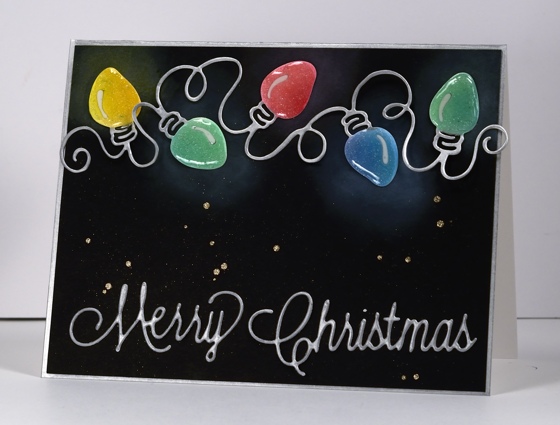
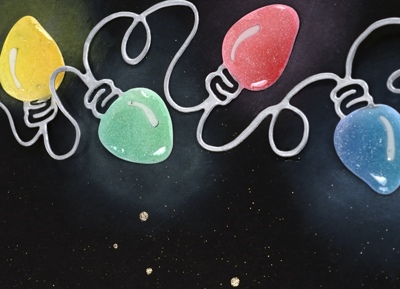
I had fun creating this little string of lights. I cut several strings of lights with the “Sparkle String” die and experimented with colouring techniques. I decided on the radiant neon inks because the colours are so soft and pretty. To colour the lights I left them in the negative die cut with a bit of tape on the back to keep things from moving around. Before I coloured each light I removed the little white highlight and set it aside. I sponged each light in a radiant neon ink then darkened the left side with a slightly darker ink. (To Electric Green I added Electric Blue, to Electric Yellow I added Electric Orange, to Electric Coral I added Memento Luxe Love Letter, to Electric Blue I added Electric Purple.) I added a bit of sparkle to each bulb with a clear Wink of Stella pen then slotted the white highlights back in. The cords between the bulbs and the die cut sentiment are coloured with a silver sharpie. My finishing touch for the string of lights was glossy accents on each bulb which made them all quite shiny and raised.
I decided to set the lights on a black background but wanted “glow” around each one. I tried the sponging the neon ink directly onto the black cardstock but the colour was not light or bright enough. By sponging with white pigment ink first I provided a white base for each bit of neon sponging. I glued the bulbs to the black panel but not the cords so some of them are raised a little. To attach the Merry Christmas I used a Scrapbook Adhesives Transfer Sheet before die cutting. When it came to sticking it down all I had to do was remove the backing and press it down onto the black panel.
The little splatters you see in the detail picture below are clear Wink of Stella and the larger ones are Silver Wink of Stella.
Since I am showing you my sparkly light card I thought I would share a card my son made the other day. In our latest bit of sorting and organizing he found a set of stickers I had bought him long ago. The set had several instruments but he just used the drum kit and amp. He added the lights, the rack for the lights, the sponging and the little cord and power outlet himself. The coolest feature of this card however is the way it lights up.

Inside he attached a small battery operated light which shines through the holes he punched for the floodlights!

Thanks for dropping by and thanks for the responses to my latest video. I know my videos are few and far between so I appreciate your positive feedback very much.
Supplies:
Creative Dies: Sparkle String, Joyous Wishes (PB)
Inks: Radiant Neon Electric Blue, Green, Coral, Yellow, Orange, Purple inks & Memento Luxe Love Letter, Wedding Dress ink (Imagine Craft/Tsukineko)
Cardstock: Neenah Solar White 110lb, Black cardstock
Also: Silver Sharpie, Glossy Accents, Clear & Silver Wink of Stella pens, Scrapbook Adhesives Transfer Sheet
Hand-drawn birthday cupcake
Posted: February 26, 2013 Filed under: CAS, Hand drawn, My Kid's cards 12 Comments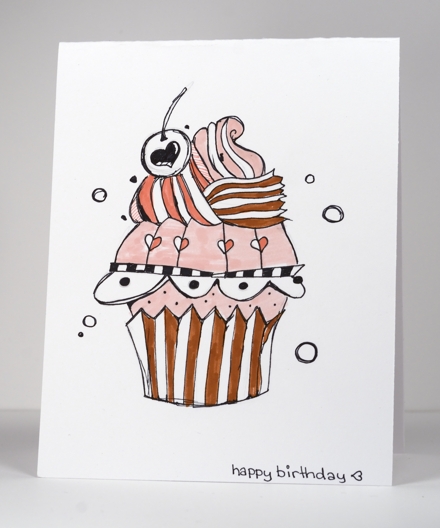
Thanks for all your kind wishes for my birthday last week. My family spoiled me with wonderful food and gifts and I had a very enjoyable day. Most of the afternoon was spent with my husband setting up his gift for me: the laptop I am using to write this post. It has enabled me to get a few posts ready to publish sitting in the lodge at the ski hill while my son skis.
The card above was hand drawn by my younger daughter – pretty sweet looking cupcake isn’t it?
My older daughter gave me season three of Downton Abbey, which we are very keen to watch after really enjoying the first two seasons a friend loaned me over Christmas. I have been telling friends not to tell me anything about the current season, I don’t want to see any spoilers!
Birthday Diversity
Posted: August 7, 2010 Filed under: Inspired by Nature, My Kid's cards 2 Comments
I mentioned the other day that I would post the handmade cards my 16 year old received for her birthday, so here they are. The one above is the one I made. The background is all sponged; I made a wavy mask, sponged the top colour then cut a different wavy pattern across the top of the masking paper, sponged again, new mask, more sponging and so on. I didn’t worry about sponging over the colour I had just done as it did make too much difference. When all my stripes were complete I stamped the image from Inspired by Nature in Artichoke and added a paper insert to write on.
My younger daughter made the abstract collage below, a style I have never tried myself. We were all impressed withe the final mix of textures colours and shapes.

My son continued the sport theme he used when making my younger daughter’s soccer card, changing the sport to tennis and using some self adhering mesh I had for the net. We all think he should make a whole range of sports action cards. Thanks for dropping by to see the diversity in card making styles at our place!

Sunny Birthday
Posted: July 17, 2010 Filed under: Designer Paper, My Kid's cards 1 Comment
On Tuesday we celebrated my 14year old daughter’s birthday. This is the card I made for her which coincidentally matched the FIFA replica soccer ball her brother gave her. I used two pieces of patterned paper in the centre panel, adhering the flowered strips onto a pale yellow/white piece and then trimming them. I matted in white, then black which I had cut with scallop scissors. I love the look of the gingham ribbon it’s very bold and happy.
The card my son made was quite impressive as he cut all his shapes out and created a soccer scene.

Supplies:
Stamps: Hugs and Wishes
Inks: Basic Black
Cardstock: Whisper White, Basic Black, Yoyo Yellow, dp from a Michaels slab
Also: Black and white gingham ribbon
My clever boy
Posted: February 13, 2010 Filed under: My Kid's cards 4 CommentsI don’t have any cards of my own to share but here are few winners from my boy. His cards continue to amaze me. Sometimes he uses my stamps but more often than not he creates his whole card by cutting and piecing images he has drawn himself. Here are some of his latest creations:
This one he made for a boy turning 13

Then he took a different approach for a penguin-loving girl turning 10

And then a hockey-loving boy turning 10

But my personal favourite is the hand drawn farewell card he made for his 19 year old cousin who stayed with us for a few weeks. He skated; he skied; he made snowmen; he tobogganed and then within a few days of leaving us he was on the coast of Australia, surfing.

I haven’t been doing any card making lately, but I have been pursuing a different artistic pursuit that I hope to share with you soon.
Thanks for stopping by after things have been quiet here so long,
So thankful
Posted: August 12, 2009 Filed under: Lovely as a Tree, My Kid's cards 2 Comments
A few days ago I posted the birthday cards my girls made for each other. Today I have a card my fifteen year-old made for my husband and me and gave to us on her birthday. We were surprised to be receiving a card but there was a beautiful hand made gift too, which blew us away. I wrote about it here
Supplies:
Stamps: Lovely as a Tree, All Year Cheer
Inks: Versamark, Not quite Navy
Cardstock: Not quite Navy, Brushed Silver, Whisper White
Also: Silver e.p.
A rather late Fathers’ Day post
Posted: July 1, 2009 Filed under: My Kid's cards 3 CommentsI’m sorry for the tardiness of this post. My children did indeed make great cards for their father on Fathers’ Day, but I didn’t get them up here. We could just consider them very early for Fathers’ Day in Australia, after all their father is Australian!

Once again everyone took a different route when making their card. Remember my eight year-old son made me a huge Mothers’ Day card because he couldn’t be bothered going downstairs for cardstock? Well this time when I reminded him about Fathers’ Day he was downstairs near the cardstock so he picked up the already folded piece of blue cardstock on the table and drew computer inspired card you see above.
Our 12 year-old daughter printed a photo out on vellum which features my husband a few years ago when we were visiting his brother and trying a strange motorised scooter thing! The classic style on the right was made by our 14 year- old daughter who printed out her own sentiment. I never think of doing that, but it makes sense, then I can say absolutely anything on my cards!
Thanks for dropping by.
Happy Mother
Posted: May 10, 2009 Filed under: My Kid's cards 6 CommentsThat’s me.
Here are the lovely cards my precious children made for me. Each one says something about the child who made it. The first one was made by my 14 year old daughter.

My 12 year old daughter made the card below with the Chinese theme. She drew the little fan, decorated and cut it out.

The card below was made by my 8 year old son. It is very large, he made it with sheets of newsprint! I asked him whether he thought I might need it large so I could read it without my glasses. He answered, “No, I just couldn’t be bothered going all the way downstairs for the cardstock” !?!


Lego birthday
Posted: April 25, 2009 Filed under: My Kid's cards 5 Comments
My son is off to a birthday party this afternoon and this is the card he made for this friend. Whenever he makes card he tends to use the paper cutting method, cutting out all the separate components of a picture usually from his own design. He had one of his lego men in front of him when he did all the cutting for this card. And he added a little free advertising on the corner!
A Sweet Little Thankyou
Posted: February 10, 2009 Filed under: Designer Paper, My Kid's cards, One of a Kind 2 Comments
I posted a drawing set decorated by my younger daughter a few days ago. Today I have a little gift bag made by my older daughter. She didn’t make it with anyone in mind, but just thought it would be good to have in reserve. I think she did a beautiful job and it is just the size for a few chocolates or cookies or perhaps some pretty soap. The dimensions are 4½” high, 4″ across and 2″ wide. She made the bag out of Berry Bliss Designer Paper and used Whisper white, Pretty in Pink and Close to Cocoa for the “Many Thanks” panel.
Supplies:
Stamps: One of a Kind, All Year Cheer
Inks: Pretty In Pink, Close to Cocoa
Cardstock: Whisper White, Pretty In Pink, Close to Cocoa
Also: Taupe grosgrain ribbon


