
Winged things 2
Posted: January 28, 2015 Filed under: CAS, Swirling Wings | Tags: Fabriano Watercolour Paper, Penny Black creative dies, Ranger Distress stains 12 Comments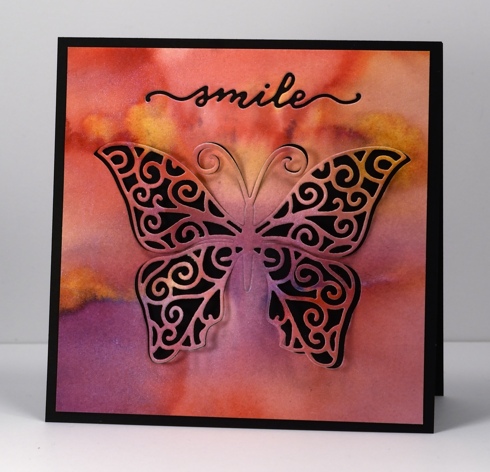
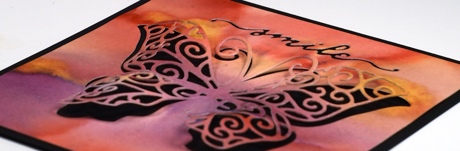
Today I have another card featuring the gorgeous new ‘swirling wings’ die from the Penny Black “Bring on the Happy” release. The panel you see on the card above is the where the inlaid coloured pieces on yesterday’s card came from. I started with a wet piece of watercolour paper and dropped several colours of distress stain onto the paper and let them blend with each other. I also sprayed some pearl-ex spray over the colours to help them blend and give it all a glimmery sheen. When I cut the butterfly I cut from one side, then the other without going all the way to the middle. That way I was able to keep the body of the butterfly attached but lift and curve the wings. I used the cute little ‘smile’ die from the ‘heartfelt set’ to add sentiment. Mounting it on a black card base seemed the perfect way to show off both the colour and the lacy swirls.
Supplies:
Creative Die: Heartfelt, Swirling Wings(PB)
Inks: Dusty Concord, Victorian Velvet, Ripe Persimmon, Spiced Marmalade, Scattered Straw distress stains (Ranger)
Cardstock: Fabriano 100% cotton hot pressed watercolour paper, Neenah Epic Black cardstock
Also: Pearl-ex spray made with interference blue pearl-ex and water
Winged things 1
Posted: January 27, 2015 Filed under: Doodles, Flights of Fancy, Flower Frolic, Swirling Wings | Tags: Penny Black creative dies, Ranger Distress stains 8 Comments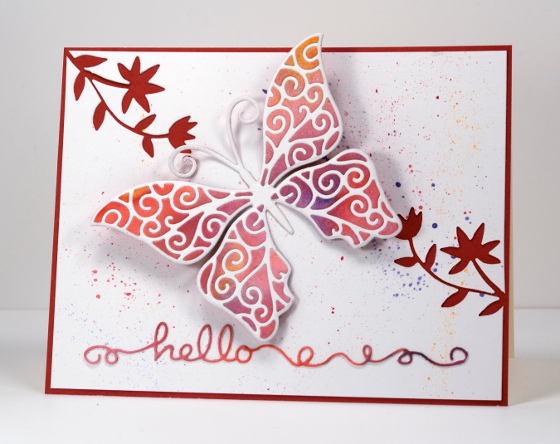
I have more Penny Black prettiness to share today, this time of the creative die variety. There are so many beautiful dies in the new release and this butterfly is one I will probably reach for again and again.
The butterfly on the card above is two layers but cut from three different pieces of cardstock. The underside of the butterfly is a solid red butterfly cut using the ‘flights of fancy’ die. I used the co-ordinating ‘swirling wings’ creative die to cut a lacy butterfly from white cardstock and from watercoloured cardstock. I kept the frame of the watercoloured butterfly for a card I’ll share tomorrow but popped out all the inserts and inserted them into the white lacy butterfly. I splattered some of the same watercolours onto the white card panel and die cut two sprays of flowers with the ‘flower frolic’ die. The little curly ‘hello’ is from a set of three called ‘doodles’ which will be wonderful to use.
Make sure you visit the Penny Black blog and facebook this week; there are giveaways along with all the new inspiration.
Supplies:
Creative Die: Doodles, Swirling Wings, Flights of Fancy, Flower Frolic (PB)
Inks: Dusty Concord, Victorian Velvet, Ripe Persimmon, Spiced Marmalade distress stains (Ranger)
Cardstock: Fabriano 100% cotton hot pressed watercolour paper, Neenah Solar white, red cardstock
Demure but sparkly
Posted: January 26, 2015 Filed under: Demure, Stitched Edges | Tags: Fabriano Watercolour Paper, Penny Black creative dies, Penny Black stamps, Ranger Distress stains 21 Comments
Are you ready for some brand new Penny Black prettiness? The new release is being revealed today on the Penny Black blog, facebook and website and there will be projects on the design team members blogs featuring new products for the new few weeks.
I first played with the new stamps around Christmas, finishing up several cards before the new year so they could travel off to CHA and join in the fun there. I am happy to be sharing some of those cards over the next week, especially as I have been too sick and too behind to do any new stamping lately. I can’t believe January is drawing to a close and I have only posted two new cards on my blog this year!
Before I got sick I did manage to create a few new cards but you will need to pop over to Splitcoaststampers.com to view them. The reason they are there and not here is quite exciting; I was invited to join the Dirty Dozen and began my six month term on January 15. I feel very honoured to involved with such a talented and committed group of artists and look forward to doing all sorts of fun things with Splitcoast in the months to come. Many projects will be featured here on my blog but each month the Dirty Dozen fills a themed gallery with projects available to fan club members only so there will be six new cards from me there each month. January’s theme is “All Cooped Up” and believe it or not I came up with six cards for the theme despite not owning a single chicken stamp!
But back to the card at hand. This one was my favourite from the eight I created for CHA. It is hard to see in the photo but it is covered in shimmery sparkliness. I began by wetting the watercolour panel and dropping Victorian Velvet, Ripe Persimmon and Tumbled glass distress stains into the water. I also sprinkled Camargue salt onto the wet areas to create patterns as it dried. All the little dots in the background were created by the salt absorbing moisture and colour. You can try it with any salt you have on hand but different salts will give you different results. When the background was dry I stamped the flowers in Spiced Marmalade distress ink, the stems in Peeled Paint and the little seeds in Dusty Concord. I used both Spiced Marmalade and Ripe Persimmon stains to paint the flower heads, spritzing with pearl-ex spray here and there to make the colour bleed and shimmer. The sentiment and mat strips do look black in the photo but they are both purple to co-ordinate with the seed heads. See that cute little shaped edge? There are two new edge dies in the “Bring on the Happy” release and I hope they will be the first of many. That edge does add that certain something don’t you think?
Oh, Happy Australia Day!
Supplies:
Stamps: Demure, Sprinkles and Smiles (PB)
Inks: Dusty Concord, Victorian Velvet, Ripe Persimmon, Spiced Marmalade, Tumbled Glass distress stains (Ranger)
Creative Dies: Stitched Edges (PB)
Cardstock: Fabriano 100% cotton hot pressed watercolour paper, purple cardstock
Love you tree
Posted: January 14, 2015 Filed under: CAS, Tree of love | Tags: Penny Black creative dies, Penny Black stamps, Tsukineko Memento inks 7 Comments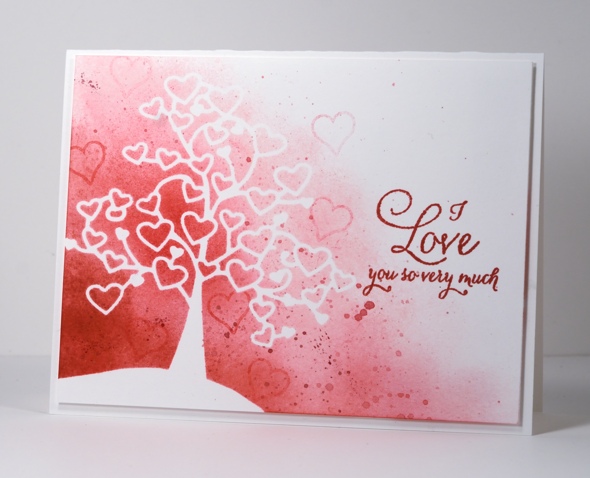
One of my favourite things to do with PB creative dies is to cut masks. For today’s card I diecut the ‘tree of love’ from masking paper then stuck it to white card stock and added a hill mask over the base of the trunk. I used three memento inks to sponge a graduated background then flicked colour from matching coloured pencils. I stamped a few hearts from the cute little ‘posted with love’ set then added the sentiment from ‘so very much’. The panel is popped up on a cardbase of the same cardstock.
Thank you for your kind wishes for Andrew’s and my anniversary; I enjoyed reading them while in New York. We had a wonderful time and I will write about it a bit and post some photos soon. I do have a confession to make however. My patient and kind husband has not received his card yet. I did not write in it before we left thinking that I would write in it during the day and give it to him at dinner on the night of our anniversary. What I didn’t count on was the fact that we were always together (not a complaint by the way, just an observation) so I did not get a chance. Later in the day I told him not to read my blog post that day but I was too late; while I was trying on clothes in Anthropologie, he had been catching up on blog posts. So even though we have been home for several days they have been full days and now I am sick in bed. It seems that my “postal disorder” extends even to the cards I don’t have to post!
Supplies:
Stamps: Posted with love, So Very Much (PB)
Creative Dies: Tree of Love (PB)
Inks: Rhubarb Stalk, Love Letter, Angel Pink memento (Imagine Craft/Tsukineko)
Cardstock: Neenah Solar White 110lb
Together under the Northern Lights
Posted: November 25, 2014 Filed under: Together | Tags: Penny Black creative dies, Penny Black stamps, Ranger Distress inks, Ranger Distress stains 21 Comments
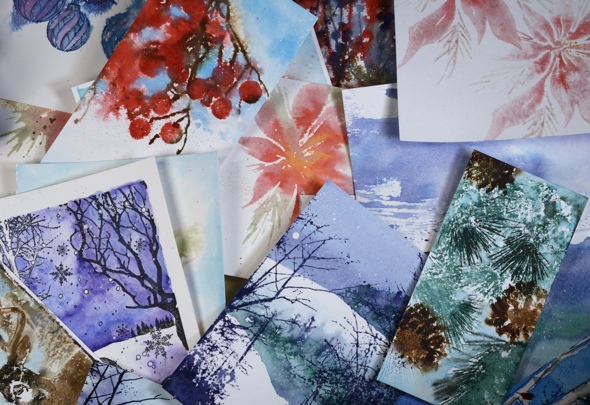
I have a stack of watercoloured backgrounds and images on my work table waiting to be turned into something. Some are practice pieces that worked, others are left over from classes I taught and some are experiments still needing some tweaking. Most of them are wintery or Christmassy so now is the time to work with them. The background above is just one of the bits & pieces that was ready to be used. It was made with distress stains blended over splattered masking fluid. I cut out the deer with the ‘Together’ die and popped them up over the background then added two hand cut snow banks and some branches cut with the ‘Nature’s Song’ die. The challenge at Less is More this week is to use something Christmassy on your card. I think this qualifies.
I will have more projects made from the bits & pieces pictured below later in the week but tomorrow I’ll be back with a video tutorial.
Supplies:
Stamps: Joy Filled (PB)
Creative Dies: Together, Nature’s Song (PB)
Inks: Chipped Sapphire, Bundled Sage, Tumbled Glass distress stains & Chipped Sapphire distress ink(Ranger)
Cardstock: Neenah Avon Brilliant 110lb cardstock, Fabriano 100% cotton hot pressed watercolour paper
Also: Winsor & Newton masking fluid
Bits & Pieces waiting for time and inspiration:
Inch by Inch 5: Christmas Village
Posted: November 21, 2014 Filed under: Frame, Gleeful | Tags: Faber-Castell Albrecht Durer Watercolour pencils, Penny Black creative dies, Penny Black stamps 6 Comments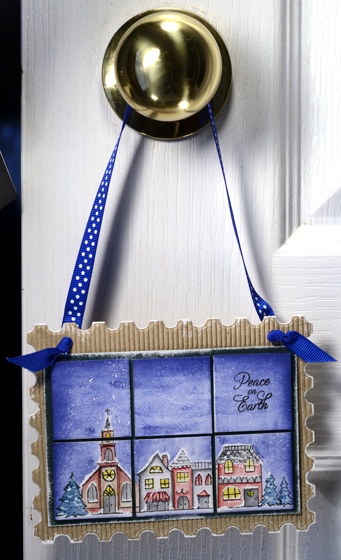
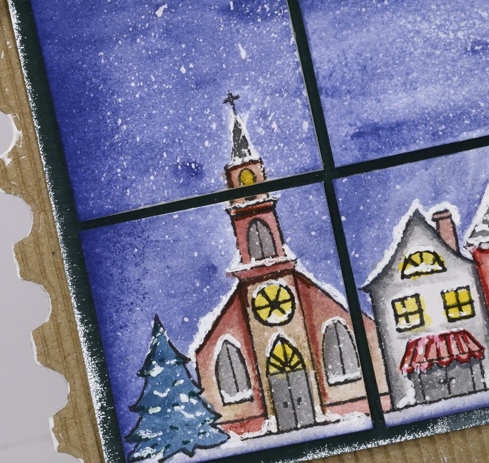
I hope you have enjoyed the Inchie Arts projects this week. My final one (for now) is a door handle decoration, a little panel with a winter scene on six 1.5″ squares.
To create this panel I began by splattering masking fluid on six squares then, when the fluid had dried I placed them edge to edge in a 2×3 array on masking paper to hold them together while I stamped and coloured. I stamped the village from the transparent set, “Gleeful” on an array of tiles in versafine onyx black. Using a waterbrush I picked up blue from a watercolour pencil to paint the sky. With a selection of watercolour pencils I coloured and blended the buildings and trees in the stamped image. Once the watercolouring had dried I rubbed off all the masking fluid to reveal the ‘falling snow’. I used ultrafine sharpie markers to highlight some features on the fillage and a clear wink of stella pen to make the windows glisten. With a white gel pen I drew snow on roofs, window trim and around doorways to finish off the picture.
To assemble the decoration I cut a corrogated cardboard base using the ‘Frame’ die and a green mat for the squares then painted the frame edges with white gesso and the green card with wedding dress luxe ink. I mounted the art squares on the green with a small margin between each square then finished it off with a blue and white polka dot ribbon.
Make sure you visit the Penny Black and the Inchie Arts blogs for more Inchie inspiration and for a chance to win some stamps and art squares.
Supplies:
Stamps: Gleeful (PB)
Creative Dies: Frame and Pattern (PB)
Inks: Versafine Onyx Black (Imagine Crafts/Tsukineko)
Pencils: Albrecht Durer watercolour pencils (Faber Castell)
Cardstock: Green cardstock, Natural corrogated cardstock, Inchie Arts 1.5″ white square
Also: Winsor & Newton masking fluid, polka dot ribbon, white gesso, white gel pen, clear wink of stella pen, ultrafine sharpies
Inch by Inch 2: Twirl Tree
Posted: November 18, 2014 Filed under: CAS, Tree of Joy, Twirl Tree | Tags: Inchie Arts, Penny Black creative dies, Penny Black stamps, Ranger Distress inks, Tsukineko Memento inks 7 Comments
Day 2 of my Inchie Arts week features the white 2″ squares. All week you can see Inchie projects on the Penny Black blog and the Inchie Arts blog. There are giveaways too so make sure you visit.
To create today’s project I worked on two squares taped together at the back. While completing my design I was undecided about whether I would mount them on the card with a gap between them or not. In the end I decided to keep them together. I used the new intricate die, ‘Twirl Tree’ to cut a mask from masking paper. I also cut the star using the ‘Tree of Joy’ die. I pressed the sticky masks firmly onto the squares then added a handcut snow bank mask over the bottom of the square which overlapped the tree trunk. I sponged over the masks with memento Summer Sky ink, Salty Ocean distress ink, Chipped Sapphire distress ink and to finish, a very light application of Encore Silver metallic ink.
Before attaching the squares to the card base I punched a little bite out of both sides of the card base with a ½” circle punch and wound dark blue and turquoise machine embroidery thread round and round. I taped it down firmly then popped up the squares over the thread and added a simple sentiment. We had a few centimetres of snow today so all the trees look prettier. I won’t talk about it too much though because I know some of you would rather not think about winter and others of you have a whole lot more than a few centimetres!
Supplies:
Stamps: Yuletide Greetings (PB)
Creative Dies: Twirl Tree, Tree of Joy (PB)
Inks: Memento Summer Sky ink, Encore Silver Ultimate Metallic ink (Imagine Crafts/Tsukineko) Chipped Sapphire, Salty Ocean distress ink(Ranger)
Cardstock: Neenah Solar White 110lb cardstock, Inchie Arts 2″ white square
Also: machine embroidery thread
Snow Wishes
Posted: November 15, 2014 Filed under: Skyline, Snow Wishes | Tags: Penny Black creative dies, Penny Black stamps, Tsukineko Memento inks 9 Comments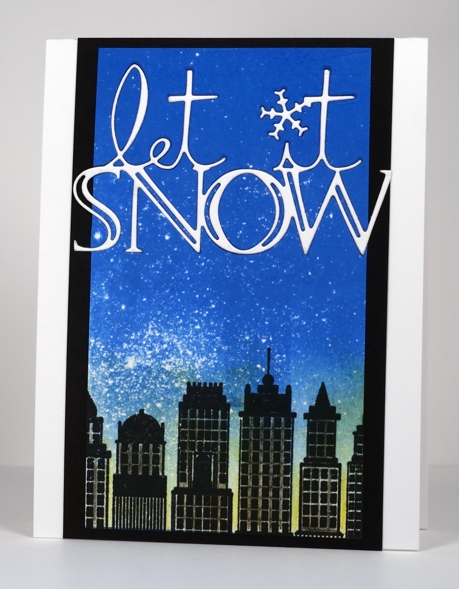
The theme on the Penny Black blog has been intricate dies this week and the designers have created beautiful projects. My card today features one of the new intricate sentiments fitted into a snowy city sky. To create the scene I splattered masking fluid on white cardstock then brayered Memento Bahama Blue ink from one end which resulted in the colour fading out toward the other end. I stamped part of the slapstick cling stamp, ‘Skyline’ at the base of the panel and sponged yellow around the buildings and used a grey marker on the facades. I die cut the ‘Snow Wishes’ sentiment out of the top of the panel and out of a piece of white cardstock then fitted the white diecut into the stamped panel, attached it all to the black mat and finally to the white cardbase.
Stamps: Skyline (PB)Creative Dies: Snow Wishes (PB)
Inks: Memento Bahama blue, Dandelion, London fog inks, Versafine Onyx black (Imagine Crafts/Tsukineko)
Cardstock: Solar white cardstock, Epic Black cardstock (Neenah)
Dazzler Birthday
Posted: November 8, 2014 Filed under: Celebrations, Dazzlers | Tags: Penny Black creative dies, Penny Black stamps, Ranger Distress inks 5 Comments
Look! It’s not all autumn leaves and snow scenes around here. I pulled out a set of flower/circle pattern transparent stamps and gave them the watery treatment. I stamped them on watercolour paper in three different distress inks then spritzed the panel lightly and let them bleed into each other a bit. After trimming my panel I added both some ink splatter and some dark sponging around the edge with barn door ink. After heat embossing the diecut sentiment in silver I wanted a little silver on the patterned panel too so I flicked my silver wink of stella pen. It wasn’t quite silvery enough so I sprinkled some embossing powder over the same area and it stuck to the wink of stella ink making it possible for me to heat it and achieve a fine sprinkle of silver. You can just see it in the top left of detail photo below.
Stamps: Dazzlers (PB)
Creative Dies: Celebrations (PB)
Inks: Fired Brick, Festive Berries, Worn Lipstick distress inks (Ranger) Versamark (Imagine Crafts/Tsukineko)
Cardstock: Fabriano 100% cotton hot pressed watercolour paper, Neenah Natural white cardstock, red cardstock
Also: Silver embossing powder, Silver cord, Wink of Stella silver marker
Autumn Branches
Posted: November 5, 2014 Filed under: Etched Branches, Watercolour, Words of Gratitude | Tags: Fabriano Watercolour Paper, Penny Black creative dies, Penny Black stamps, Ranger Distress stains, Tsukineko Memento inks, Tsukineko Radiant Neon inks 12 Comments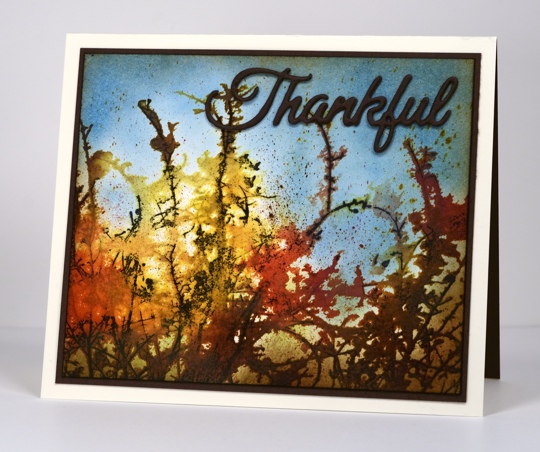
The etched branches stamp is once again the star of an autumn card; I have yet to use it on a winter scene. Using loose watercolouring I tried to recreate the colours I have been seeing against bright blue skies lately. We have had some beautiful clear autumn days and it has been a great year for gorgeous colours.
I began by dabbing Ranger Archival jet black ink onto “Etched Branches” stamp leaving some places un-inked. I then stamped onto watercolour paper and placed a stamp positioner next to the stamp before removing it to mark the position for subsequent impressions. As I was making several impressions it helped to tape the stamp positioner to the panel with painter’s tape. I inked small sections of the “Etched Branches” stamp with Mustard Seed distress stain and stamped onto panel using the stamp positioner to guide the stamp into the same place then repeated the same steps with other distress stains inking different sections of the stamp each time. With all the colour stamped I spritzed the panel with water to make the colours bleed into each other and the surrounding area. Next I splattered the same distress stains over the panel and let all the ink dry.
Before removing the stamp positioner I re-inked a few sections of the stamp with black marker to give some branches more definition. To colour the sky I sponged Radiant Neon Electric blue ink, for the foreground Memento Luxe Pear Tart ink and to finish Vintage Photo distress ink around border. I matted the panel with brown cardstock and stacked three diecuts of the word “Thankful” for my sentiment.
For more Thanksgiving inspired projects visit the Penny Black blog this week
Stamps: Etched Branches (PB)
Creative Dies: Words of Gratitude (PB)
Inks: Archival Black ink, Barn door, Vintage Photo, Mustard Seed, Crushed Olive, Spiced Marmalade distress stains, Vintage Photo distress ink (Ranger) Radiant Neon Electric Blue ink, Memento Luxe Pear Tart ink, Memento Tuxedo Black marker(Imagine Crafts/Tsukineko)
Cardstock: Fabriano 100% cotton hot pressed watercolour paper, Neenah Natural white cardstock, brown cardstock


