The Red Vintage Truck
Posted: November 29, 2024 Filed under: Coloured pencil, Vintage Truck | Tags: Echidna Studios, Faber-Castell Polychromos Colour Pencil 7 Comments
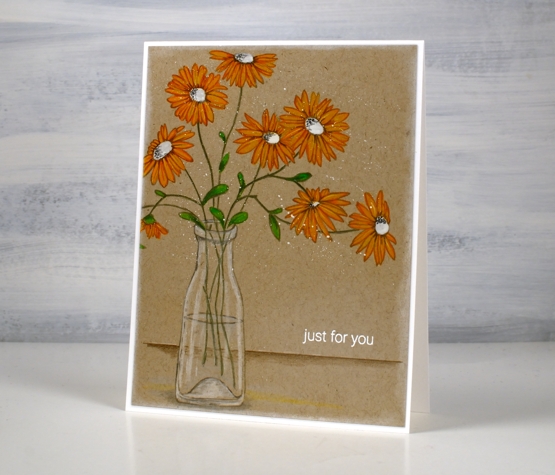
I’m just a wee bit excited about this lovely truck. As you might have guessed, it is one of my daughter’s digital designs and is available as a digital stamp from Echidna Studios to print any size you like. She took a photo of a vintage truck one day and this design is inspired by that truck. It wasn’t in winter and it didn’t have a tree in the back but she added the tree as an optional addition! The digital stamp is called Vintage Truck + Bonus Christmas Tree!

I haven’t done any pencil colouring but I thought it would pop on kraft paper so I printed it on my laser printer. I used Polychromos pencils to colour it and added the snow at the end with a white gel pen

The kraft paper is a thick paper which I bought on Amazon; I like the warmth of the colour. Some kraft papers are a bit more grey. The card is 7″x5″ which is unusual for me but I found an envelope that works. I think I might do more of a burgandy coloured truck next. My daughter did blue on her samples so check them out on the Echidna Studios instagram account. (We’d love you to follow us there and on Pinterest if you’d like to.)
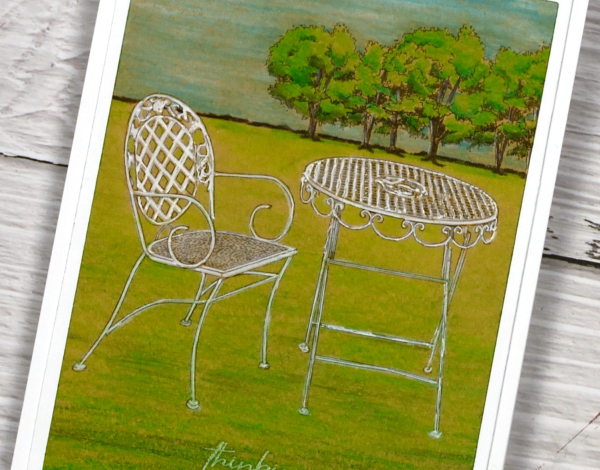
Vintage Patio set
Posted: June 26, 2024 Filed under: Coloured pencil, Echidna Studios, Tori's Trees, vintage patio set | Tags: Echidna Studios, Faber-Castell Polychromos Colour Pencil 4 Comments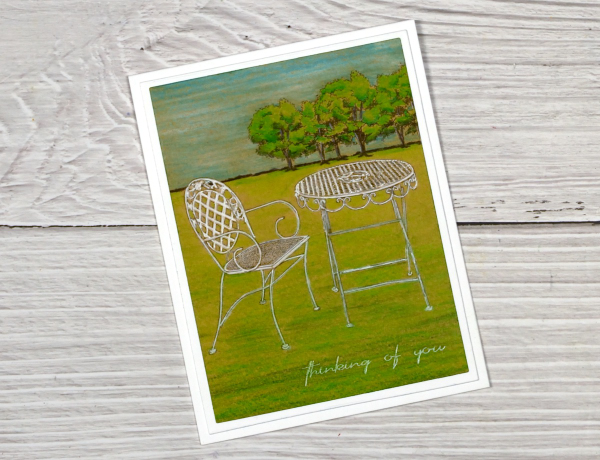
There are some lovely new summer digital images in the Echidna Studios etsy store. My daughter has been busy turning her own photos into line art for printing and colouring. I chose coloured pencils for the Vintage Patio set and added Tori’s Trees to the background. I have fun creating scenes with digital images. Even though the Vintage Patio set includes a table and two chairs I used only one chair on my card and added trees from a different digital set. Adding the ‘thinking of you‘ sentiment gave the card the card a bit of a ‘miss you’ vibe. I always like the look of coloured pencils on kraft paper so I used my Faber Castell polychromos for this card.
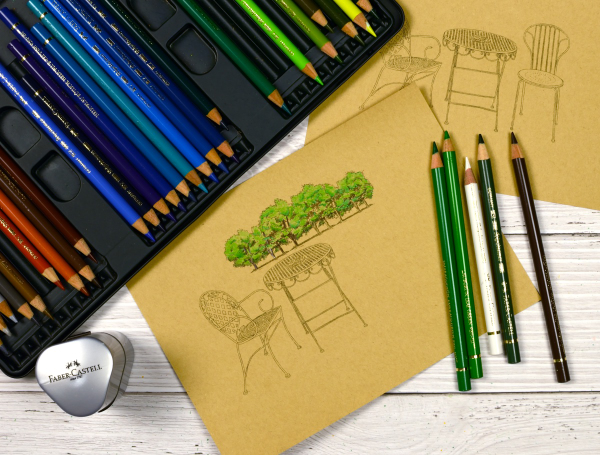
My initial plan was to colour the grass gradually wider from the edges of the trees to the chair and table, creating a wedge shape. I coloured the trees first with three greens then used the same greens plus a couple more to add the grass.

When I had coloured all the grass I used white and grey pencils to colour the table and chair but the green underneath muted the white so I used white gel pens to make the furniture pop. Keeping the wedge shape looked odd so I used my rectangle dies to help me ‘frame’ the image and choose a suitable cropped size.
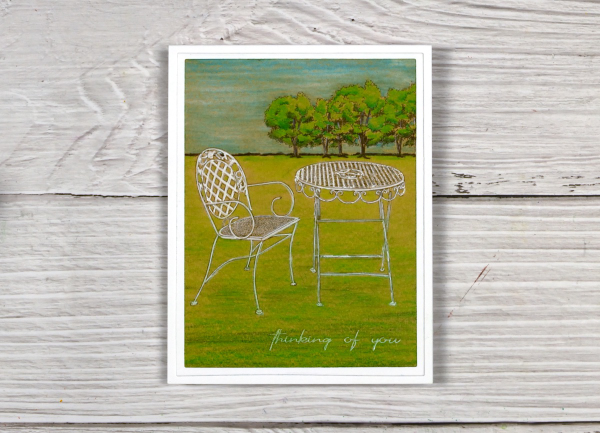
I matted the little scene with a white frame and added it to a white card base. Make sure you pop over to the Echidna Studios store to see the other summery images along with some new ‘ready to print’ coloured cards. We would love you to follow Echidna Studios on Pinterest if you use it; it will help us reach a few more card making enthusiasts!
This post includes an affiliate link from Foiled Fox. If you buy through these links I receive a small commission at no extra cost to you.
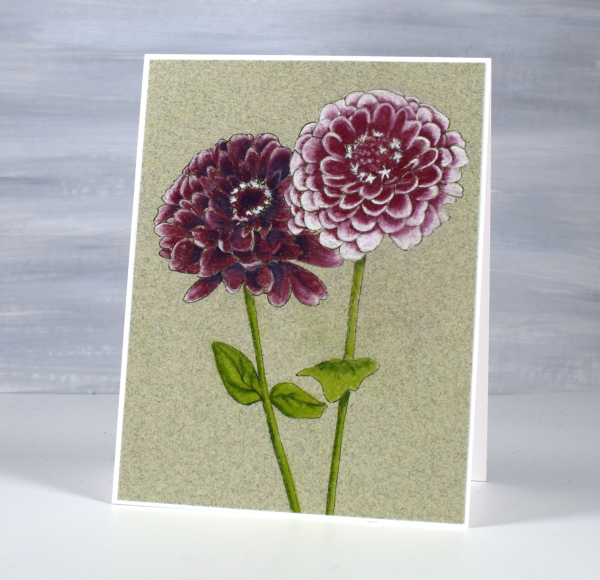
Zinnias
Posted: March 21, 2024 Filed under: Coloured pencil, Echidna Studios, pastel pencils, zinnias | Tags: canal paper, Echidna Studios, Faber Castell pastel pencils 7 Comments
As the title suggests I have zinnias to share today. This pair is just one of seven images in the new digital set, Zinnias, from Echidna Studios. There is a bunch of five blooms, the pair shown on my card and some single blooms. All the images can be layered which means you can create your own bunches or rows of zinnias for printing.
I worked on Montreal Canal Paper, a textured paper made from cotton rag. In the past I’ve used it for watercolour, this time I used my new pastel pencils. The pad of paper I used has six different colours; I chose the green as it gave me an appropriate background. The texture in the paper holds the soft pastel well. I printed the two zinnias on the paper using my laser printer.

I kept the colour scheme limited and enjoyed blending two or three colours together to get diffferent colours and tints. From the Faber Castell set of Pitt pastels I used two greens -165 &170, red -194, blue -157 and white -101. I did most of the blending by adding one colour over another but further softened the blends at the end with a burnishing pencil.
As I often do, I searched for photo inspiration before colouring and found some deep burgandy colours among the many options. I think I might plant some in my garden this spring; the new digital stamps have inspired me. Let me know if you have success with zinnias in your garden.
Calla Lilies
Posted: February 12, 2024 Filed under: calla lilies, Coloured pencil, Echidna Studios | Tags: Echidna Studios, Faber-Castell Polychromos Colour Pencil, Fabriano Watercolour Paper, sakura Koi watercolor brush pens 11 Comments
Time for new digital stamps from Echidna Studios and these two, Calla Lilies, are stunners. Once again my daughter drew the designs from one of her own photos. I printed this first one on kraft paper and coloured it with Faber Castell polychromos pencils.

My palette was quite limited as I completed most of the colouring with a pink, a green and a white. When most of the colouring was complete I used a darker pink, a darker green and a black to add final shadows and shading.

I used watercolour techniques to paint the second lily design after printing it on hot pressed watercolour paper.
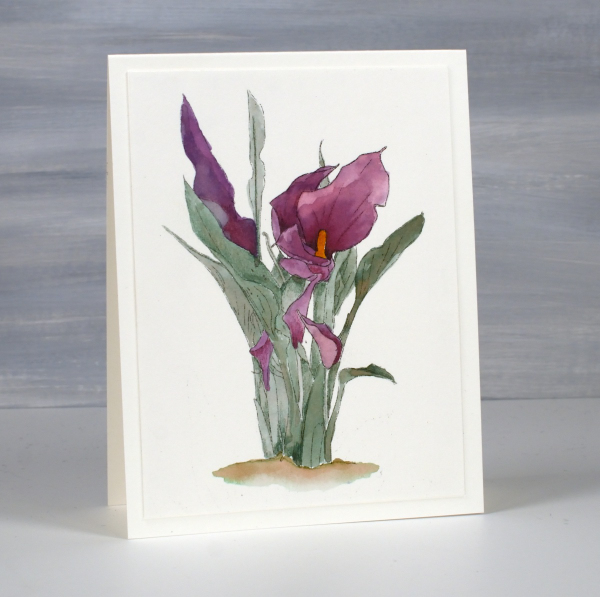
I found a photo on line to give me some colour inspiration and worked with watercolour brush pens. to get the wine colour I mixed purple and red on a glass mat then picked up the ink with a paintbrush. When using two colours in this way it is easy to get different tones for the shadows and variations just by adding more of either the purple or the red to the mix. I used one green mixed with a small amount of the same red brush pen ink to give me a more muted tone.
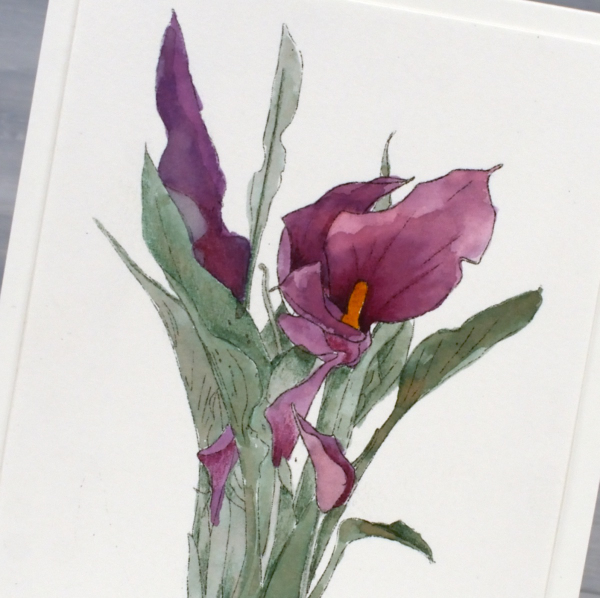
To see another colour scheme and orientation pop over to Echidna Studios instagram and take a look. I chose not to add sentiments even though they would make nice Easter cards. I think they would also be suitable sympathy cards so for now I’m leaving them blank. This post includes affiliate links to The Foiled Fox, if you use them I receive a small commission at no extra cost to you.

Gazebo
Posted: September 8, 2023 Filed under: Coloured pencil, Echidna Studios, gazebo | Tags: digital stamps, Echidna Studios, Faber-Castell Polychromos Colour Pencil 5 Comments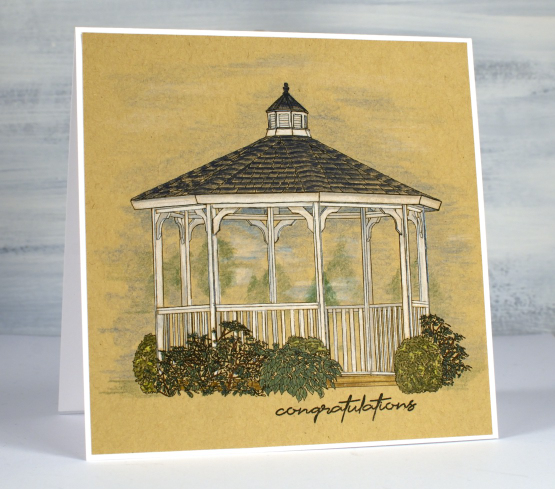
This dreamy gazebo image is the latest digital stamp from Echidna Studios. As I coloured it I had summer gatherings in mind but it would be pretty in autumn colours too.
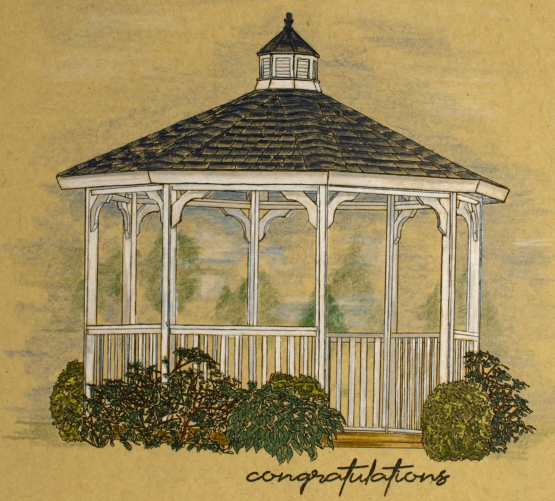
As I’ve mentioned before with a digital stamp it is possible to print it any size so I printed this one to fit a 5.5″ square and the gazebo itself is 4.25″ across. It is printed on a heavy weight kraft paper because I enjoy using coloured pencils on kraft. I really did want a white gazebo so it seemed the obvious choice. This particular kraft paper has a warmer look than the desert storm kraft cardstock I sometimes use. As you can see I coloured the gazebo and plants with enough pressure to fill the outlines and used the side of the sharpened pencil tip to add shading to the background and sky area.
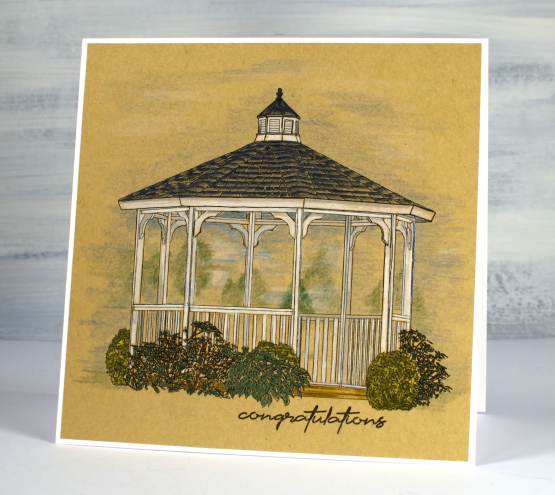
I added a sentiment from the Simply Graphic set ‘English sentiments‘ then attached the panel to a white card base. We went to a wedding many years ago where the bride and groom stood in a gazebo and the guests gathered round to watch which made me think a ‘congratulations’ sentiment fitted nicely.
There are fifty items in the Echidna Studios store now; please pop over and have a look around.
Potted Pretties in Pencil
Posted: May 24, 2023 Filed under: Coloured pencil, how sweet, Penny Black, potted pretties | Tags: Faber-Castell Polychromos Colour Pencil, Penny Black stamps 5 Comments
This is the new ‘potted pretties’ stamp from Penny Black; it is pretty isn’t it? Although I love the soft blends of loose watercolour I also find pencil colouring very satisfying too, especially on kraft cardstock.

I use Faber Castell Polychromos pencils and chose a dark and a light pink along with white for the petals, two greens for the leaves and a tan with white for the pot. Once I had almost finished I added some more shadow to the centre of some flowers and the shadows of the leaves with a dark burgandy pencil – a trick I learned from Kathy Racoosin, colouring wizard.
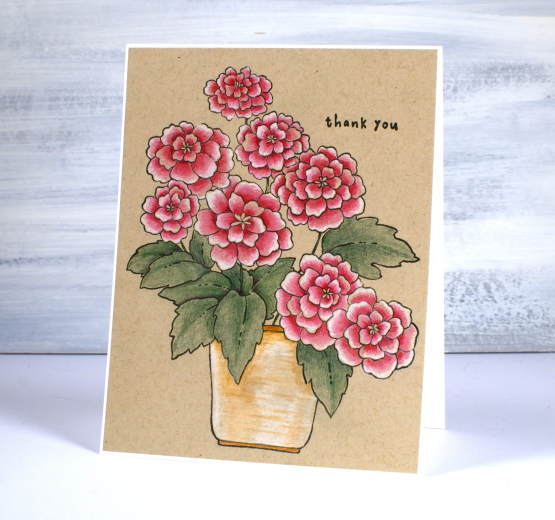
If no-line watercolour is more your thing then I am colouring the same image in that style too. I’ll post it on the blog soon.
Don’t forget to check out my new online course if you haven’t already. The discount TEAMBLOG10 is still valid for a 10% discount at checkout. Thank you to those of you who have joined already. I am excited to hear from or see some prints once you’ve had a chance to dive in!
And another event you might be interested in if you are local is the Community Paper Crafting Garage Sale on June 10.

(Compensated affiliate links from Foiled Fox)
Spring Emerges
Posted: March 28, 2023 Filed under: Coloured pencil, Penny Black, spring emerges | Tags: Faber-Castell Polychromos Colour Pencil, Penny Black stamps, Waffle Flower dies 3 Comments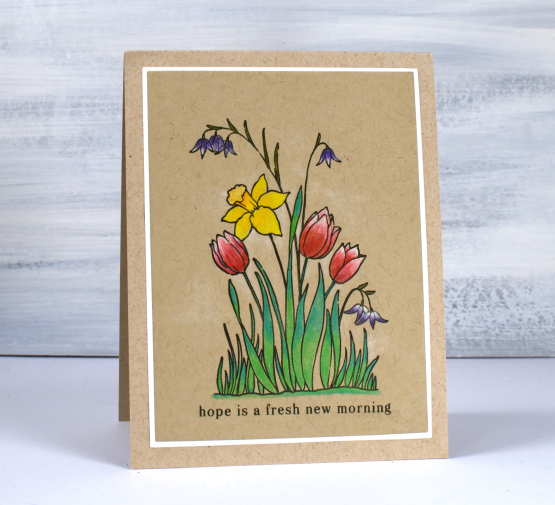
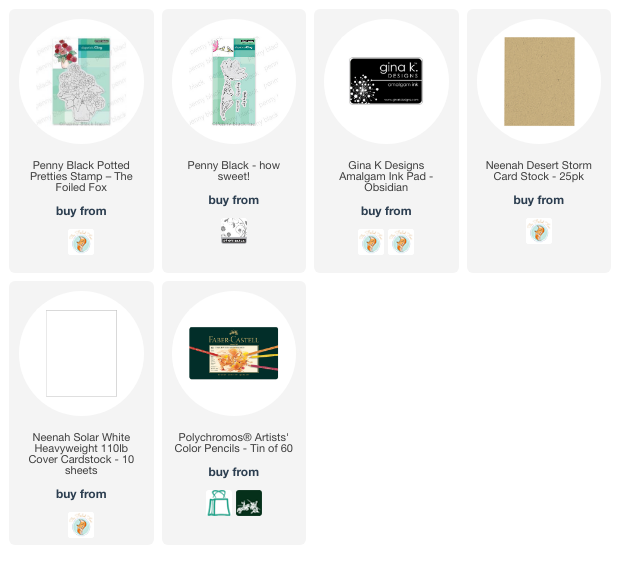
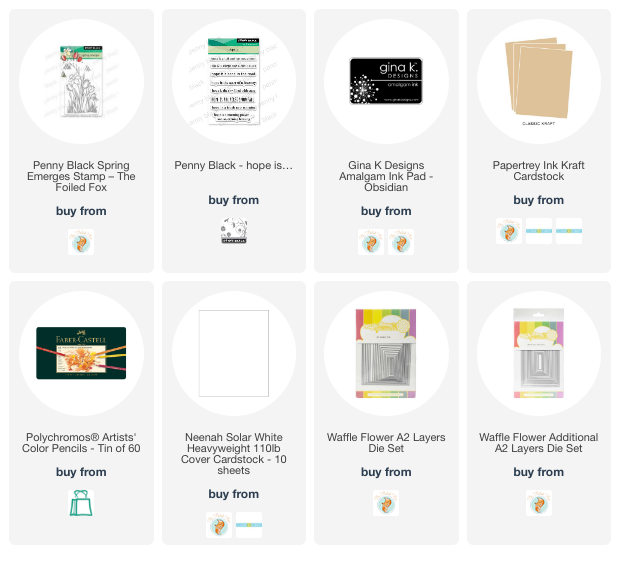
Spring is emerging around my place but not to the extent suggested in this stamp. I do have a daffodil plant that has broken through the soil and I can see a bud on it even though it is a couple of feet from the snow drifts! The stamp featured today is called ‘spring emerges’ and it is a small transparent stamp from Penny Black’s latest release.
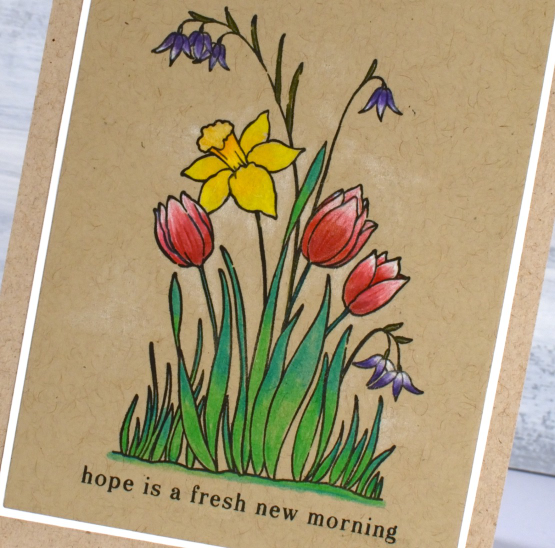
It’s been a while since my coloured pencils were the stars of the show but after finishing this little panel I might keep them on my desk a little longer. I particularly like pencils on kraft cardstock. I often add either a base of white pencil or just highlights so the brown of the kraft doesn’t make everything too muted. On this card I blended white and reds for the tulips and added white highlights purple flowers. I layered a mix of yellows and oranges for the daffodil and two greens for the leaves and grass. I kept the panel and stamp in the stamp positioner in case I wanted to restamp over the top after colouring (which I did). With a stamp this small sometimes my colouring goes outside or over the lines, restamping just sharpened the outline. I used Gina K’s osidian amalgam ink.
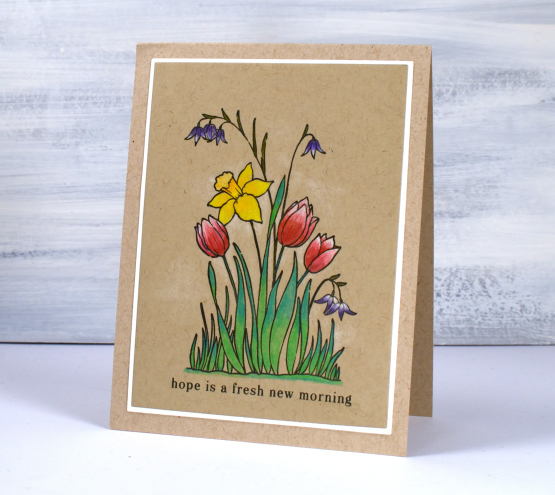
I used A2 layer dies to cut the panel and the mat and added a sentiment from the PB ‘hope is…’ set. You can see some very pale white shading around the flowers too which was done with the white pencil.
Wishing you a hope filled day.
(Compensated affiliate links from Foiled Fox, Scrap n Stamp)
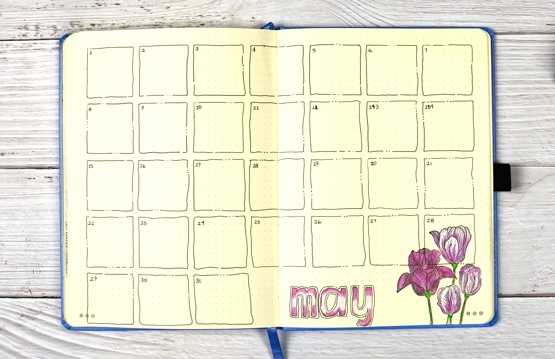
2022 BuJo – May theme
Posted: May 4, 2022 Filed under: Bullet Journal, Coloured pencil, Dingbat notebooks, Hand lettered, Penny Black, springtide | Tags: Bullet Journal, Dingbats notebook, Faber-Castell Polychromos Colour Pencil, Penny Black stamps, Ranger archival inks 5 Comments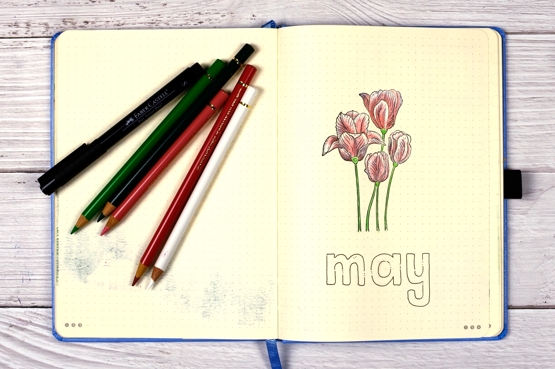
It’s been a while since the last bullet journal feature. I gave the journal a break over April; I was in recovery and catch up mode. We have skipped to May which is the month of the tulip festival in Ottawa so the theme was an easy pick. Coloured pencils seemed to make sense too as I have been working with them a bit lately.
I drew all my calendar squares by hand purposely making them a little wavy with breaks and dots. The Penny Black clear stamp ‘springtide’ seemed to work with an outline theme so I stamped in jet black archival on each page then coloured with polychromos pencils.
For each tulip colour scheme I used at least two co-ordinating colours; for the yellow tulips I used four. I forgot that both Ranger archival inks and FaberCastell polychromos pencils are oil based so the first layer of pencil blending ended up dragging some black ink. As you can see it didn’t spoil the result but I probably should have stamped the outline in memento or distress ink.
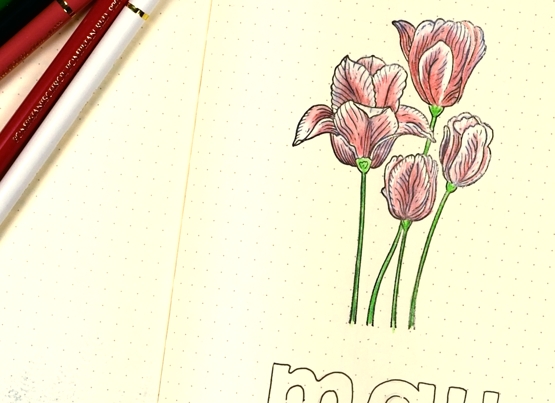
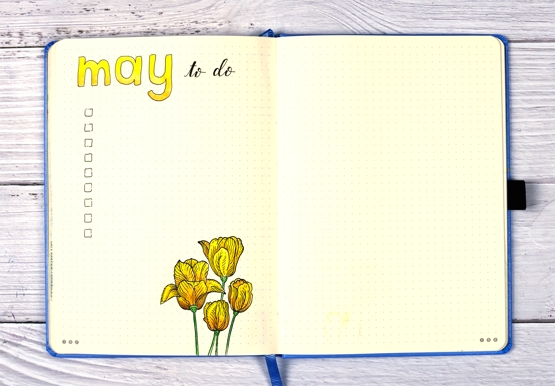
I kept the titles simple with some hand drawn block letters. I know that to-do list is empty in the photo but believe me that is no longer the case! Visiting the Ottawa Tulip Festival will be on the list for sure!
Supplies
(Compensated affiliate links used when possible)
Pencil Daisies
Posted: May 3, 2022 Filed under: Coloured pencil, daisy dream, Karin brushmarkers, springtide | Tags: Faber-Castell Polychromos Colour Pencil, Gouache paints, Karin brushmarkers, Penny Black stamps 8 Comments
When I stamped the PB ‘brilliant’ stamp for my recent pencil poppy card I also stamped several other outline stamps on kraft cardstock for pencil colouring. This stamp is called ‘daisy dream’ and is coloured with Karin pigment decobrush markers, white gouache and Faber-Castell coloured pencils.
In my recent pencil poppies post I referred you to the talented Debby Hughes for a video tutorial about colouring with gouache and coloured pencils. I used some of the same tips for this card but ended up using the Karin pigment brushmarkers as well. I coloured the petals on the flowers above with the gold marker. The effect was very similar to painting gouache first but easier because the marker brush tip did such a good job on those narrow petals. I painted the centres with white and the leaves with the Karin ‘leaf green’ marker before using coloured pencils to add details and shading to the flowers and stems. The glass vase is coloured with a white and two grey pencils.
I added some shading below and behind the vase, a white embossed sentiment and some white gouache splatter before attaching the panel to a white card base.
I now have three daffodils blooming in my garden so there should be at least 47 more coming! I did plant 50 daffodil bulbs a year and a half ago and they are supposed to multiply aren’t they?
Supplies
(Compensated affiliate links used when possible)

Pencil Poppies
Posted: April 29, 2022 Filed under: brilliant, Coloured pencil, Gouache, Penny Black | Tags: Faber-Castell Polychromos Colour Pencil, Gouache paints, Penny Black stamps 10 Comments
Today’s pencil and gouache technique was inspired by a beautiful card recently posted by Debby Hughes. Debby did a video of her process so if you are interested you can pop over to her youtube channel and follow her directions like I did.
I used a different stamp, ‘brilliant’ from Penny Black but the other supplies and technique are the same as Debby’s. I stamped on kraft cardstock with pumice stone ink, painted inside the petals with white gouache then did all the colouring with Faber Castell Polychromos pencils.
When I first stamped the ‘brilliant’ poppy stamp I used Papertrey ink soft stone ink which is my current favourite for no-line watercolour techniques. It stamped well on the kraft cardstock but when I looked at it ten minutes later it had faded quite a bit. It would be fine for someone whose eyesight is perfect but mine is not so I stamped in pumice stone distress which gave me a bit more contrast.

Debby’s technique included painting the petals in white gouache then colouring over the top. I hadn’t tried it before but I will do it again in the future. It worked very well and took the place of my previous method which was colouring in white pencil first then adding colours over the top before blending again in white. Painting with gouache first gave me a base which happens to also be a nice matte surface to colour over. I finished the design with some white gouache splatter as Debby did. So basically I am saying, ‘ do what she did!’ Thank you Debby for a great technique tutorial.
The polychromos pencils I used were: white, medium flesh, medium cadmium red, raw umber, emerald green, pine green, naples ochre and walnut brown.
Supplies
(Compensated affiliate links used when possible)