Church on a hill
Posted: June 1, 2015 Filed under: Watercolour | Tags: Faber-Castell Albrecht Durer Watercolour pencils, Fabriano Watercolour Paper, Kuretake Gansai Tambi watercolour paints 20 Comments
This year marks twenty five years of ministry for the pastor of our church. He arrived in Ottawa shortly before we did in 2000 and our families have been friends ever since. His wife asked me if I would make a card for the occasion with a church on it. I looked through my stamps but the only church stamp was a snowy scene which was mainly trees with a snow laden church in the distance. As we are pretty happy to finally be free of snow I decided against using that stamp. I attempted a painting instead and found several church images as inspiration then combined elements from a few and set my church on a tree filled hillside. Rather than obscure some of the scene I printed the words on vellum and wrapped it round the painted panel. I used my gansai tambi watercolour paints for most of the painting then switched to watercolour pencils to add finishing touches.
Supplies
Cardstock: Fabriano 100% cotton hot pressed watercolour paper, Neenah Natural White 110lb cardstock, Neenah Epic Black cardstock, rust cardstock, vellum
Also: Kuretake Gansai Tambi watercolour paints, Faber-Castell Albrecht Durer watercolour pencils
Trumpet Song
Posted: May 29, 2015 Filed under: Stitched Edges, Trumpet Song | Tags: Penny Black creative dies, Penny Black stamps, Tsukineko Memento inks 11 Comments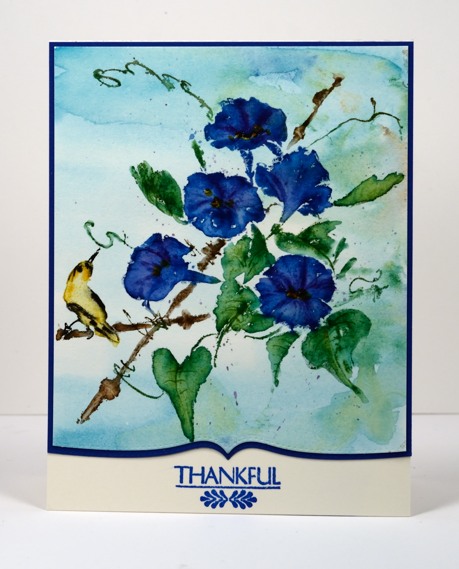
Thanks for joining me this week as I showcased stamps and dies from the new Sunshine and Smiles collection. Today I have this lovely floral slapstick cling stamp to share. I began by painting a pale blue wash over watercolour paper with Broken China distress stain. Once that was dry I inked the Trumpet Song stamp with Danube Blue and Grape Jelly memento markers on the flowers, Bamboo Leaves and Cottage Ivy on the leaves, Dandelion, Cantaloupe and Tuxedo Black on the bird and Rich Cocoa and Black on the twigs. I spritzed the stamp lightly before stamping on the watercolour panel. I used a paint brush to pick up memento ink from an acrylic block which I added to the stamped image. To finish I splattered some grape jelly and cottage ivy ink over the panel.
To complete the card I cut both the painted panel and a blue mat with one of the stitched edge dies, attached it all to a natural white card base then added a sentiment.
Karen has used this stamp on a couple of gorgeous cards recently here and here.
Supplies:
Stamps: Trumpet Song, Pretty Petals (PB)
Creative Dies: Stitched Edges
Inks: Broken China distress stain, Evergreen Bough distress inks (Ranger) Versafine Deep Lagoon, Danube Blue, Grape Jelly, Bamboo Leaves, Cottage Ivy, Dandelion, Cantaloupe, Tuxedo Black, Rich Cocoa memento markers(Imagine Craft/Tsukineko)
Cardstock: Fabriano 100% cotton hot pressed watercolour paper, Neenah Natural White cardstock
Enamor
Posted: May 28, 2015 Filed under: Enamor | Tags: Kuretake Gansai Tambi watercolour paints, Penny Black stamps 6 Comments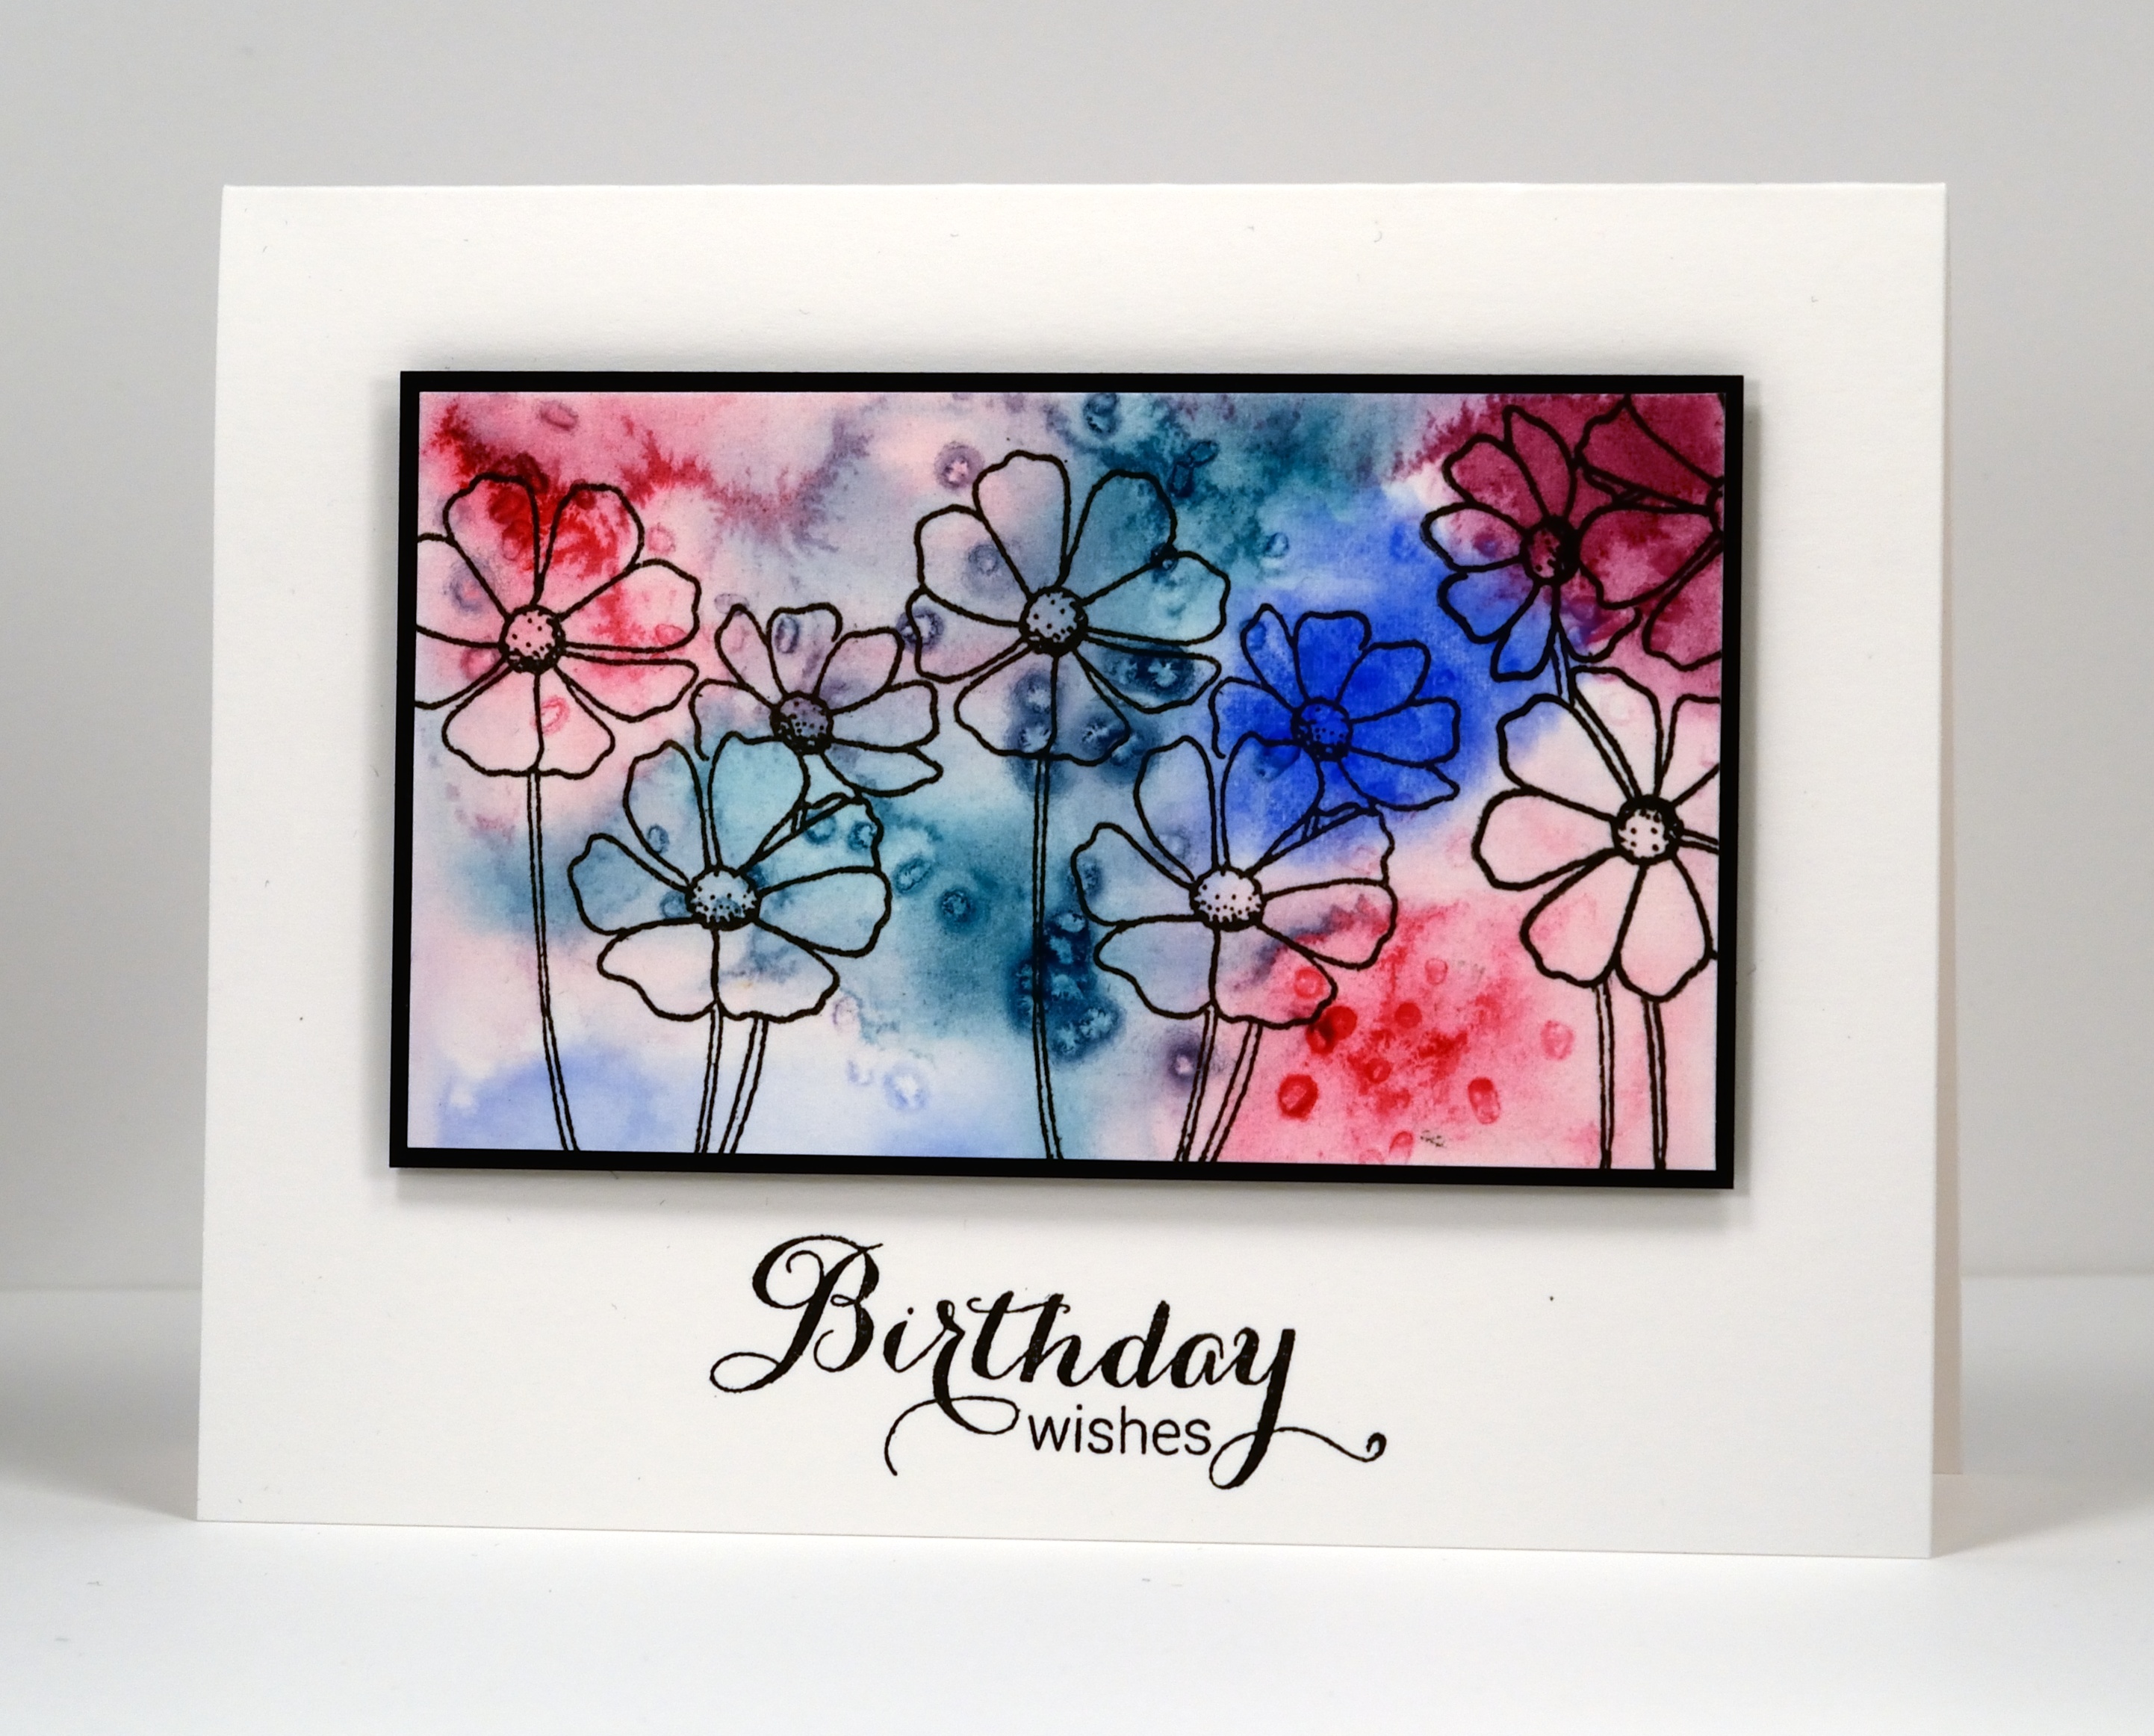
Enamor is a new transparent set of floral stamps from the Sunshine and Smiles collection; it includes both outline and solid stamps. I have featured one of each in today’s projects.
To make these two clean and simple cards I created a ‘wet into wet’ watercolour panel by dropping three colours onto a wet piece of watercolour paper then sprinkling some salt crystals here and there.
Once the panel was dry I brushed off the salt and stamped twice in colours which matched the background.
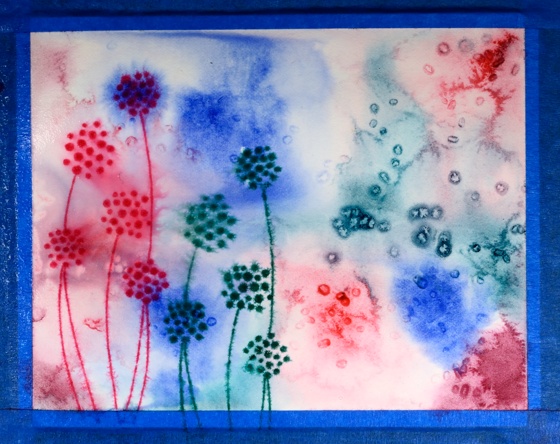
I then spritzed the stamped images and let them bleed into the surrounding area. Once the panel was dry again I stamped again in black then cut it into two pieces.
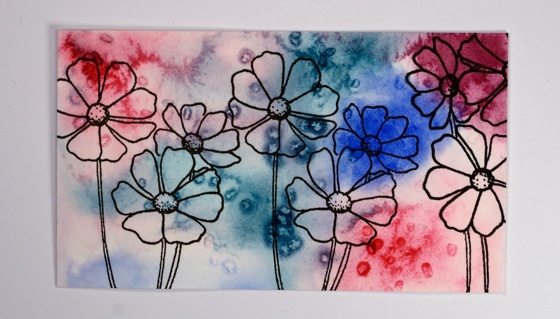
I picked an outline stamp to stamp over the patterns created by the salt on the second piece. I added black mats and sentiments to tie everything together.
Supplies:
Stamps: Enamor, A Sweet Day (PB)
Inks: Picked Raspberry, Evergreen Bough distress inks (Ranger) Versafine onyx Black (Imagine Craft/Tsukineko)
Cardstock: Fabriano 100% cotton hot pressed watercolour paper, Neenah Epic Black & Solar White cardstock
Also: Kuretake gansai tambi watercolour paints
Gentle Breeze
Posted: May 27, 2015 Filed under: Gentle Breeze | Tags: Penny Black stamps, Ranger Distress stains 10 Comments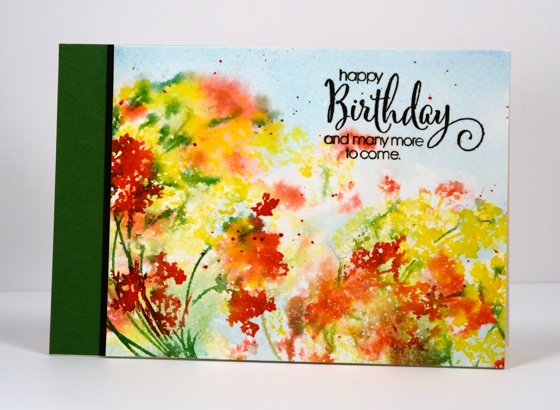
This week I am sharing projects featuring new products from the new Sunshine and Smiles collection. Today’s card features the ‘Gentle Breeze’ stamp I used with tags recently. For a change I stamped on cold pressed watercolour paper which has more texture to it. My piece of watercolour paper already had some fine splatters of masking fluid on it. I inked the stamp with distress stains, spritzed it, stamped once, spritzed again and stamped a second paler image. I then spritzed the paper which caused the colour to bleed even more into the background. When it was dry I stamped the image again creating a more defined image in the foreground. I used a marker to ink a few stems and stamped them over the blooms. When all was dry I flicked a few splatters here and there in red and green.
Supplies:
Stamps: Gentle Breeze, A Sweet Day (PB)
Inks: Festive Berries, Mustard Seed, Tumbled Glass,Evergreen Bough distress stains (Ranger) Cottage Ivy Memento Marker(Imagine Craft/Tsukineko)
Cardstock: Canson cold pressed watercolour paper, Green & Black cardstock
Butterflies Die Photo Tutorial
Posted: May 26, 2015 Filed under: Butterflies, Tutorial, Watercolour | Tags: Kuretake Gansai Tambi watercolour paints, Penny Black creative dies, Tutorial 9 Comments
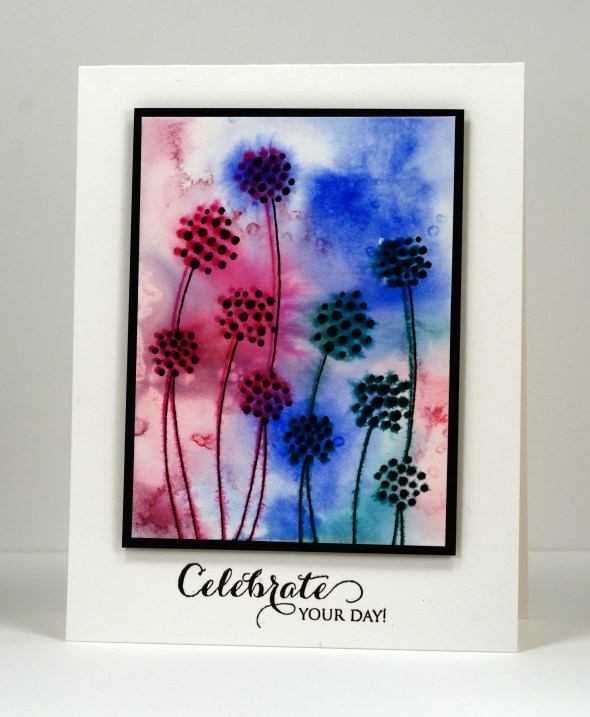
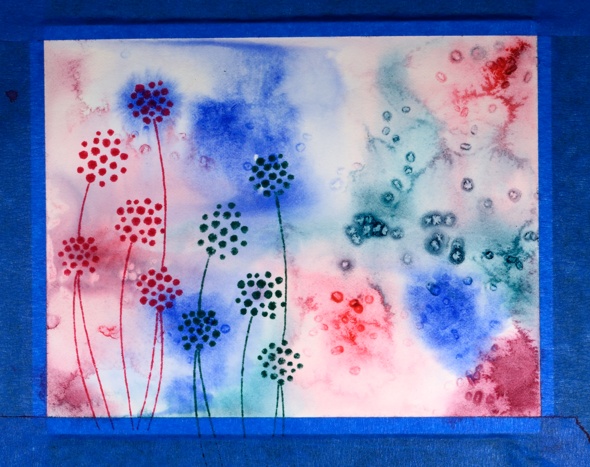
There are three new dies in the new Sunshine and Smiles. release all set in rectangular frames, which makes them a nice choice for the inlaid die technique. I used the Butterflies die to create the card above. Below is a photo tutorial with instructions below each photo describing my process.
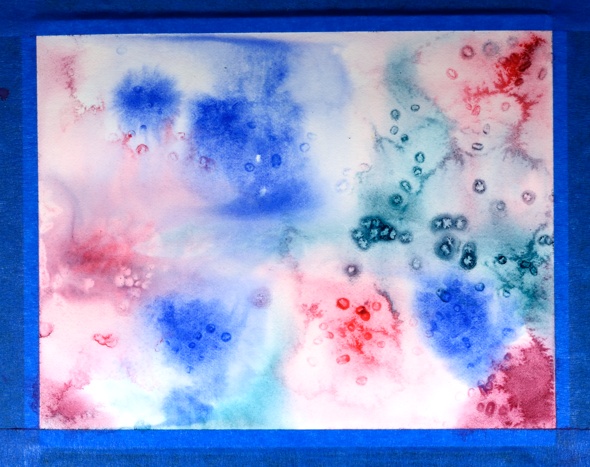
Spritz or paint water onto a piece of cold pressed watercolour paper then add watercolour paint ( I used Kuretake Gansai Tambi on Fabriano cold pressed) in three or four colours. Let it blend, tilt the paper, move it around with a paintbrush if it is not going where you want it to. Let it dry.
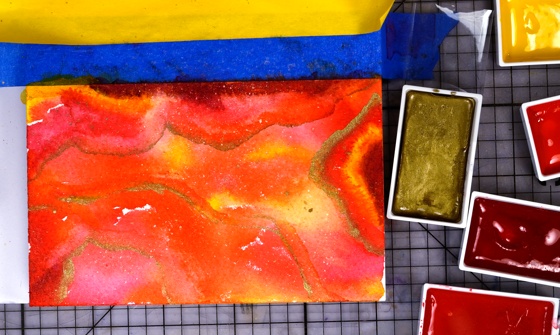
Add more paint to deepen the colours which will have dried paler than when you painted them. Add some metallic gold paint and some splatters. Let panel dry, then trim to desired size.
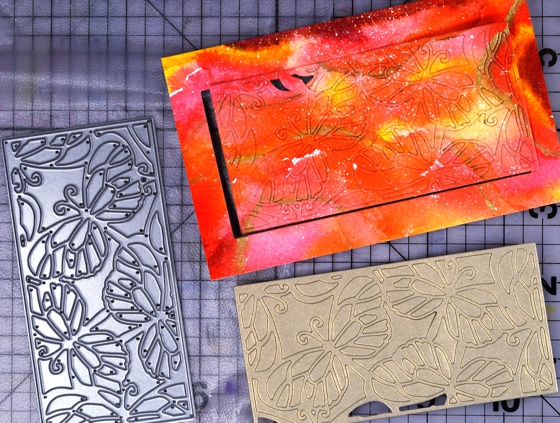
With the ‘Butterflies’ die cut a panel from your watercoloured piece and from a piece of metallic gold cardstock. Press both panels onto some ‘Cling film-Press & Seal’ to keep all the pieces together. I know it looks like I already lost some pieces but don’t worry they were there somewhere!

Attach a piece of double sided adhesive sheet (I used ‘stick it’) to a piece of cardstock larger than your die-cut panel.
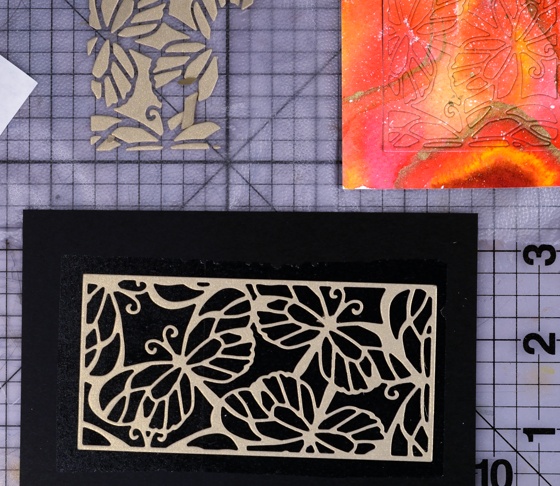
Remove the liner paper from the adhesive and press the gold ‘frame’ part of the butterflies die onto the adhesive covered cardstock.

Transfer the ‘inside’ pieces from the die-cut watercoloured panel into the gold frame pressing each one firmly onto the adhesive backing.
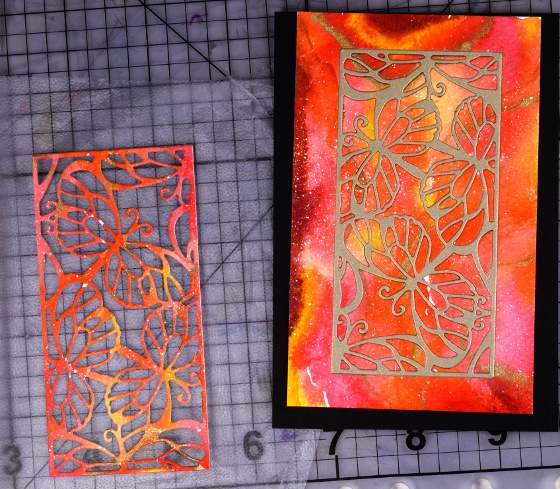
Attach the remaining border piece of watercoloured cardstock around the inlaid die-cut panel. Trim excess cardstock from the completed inlaid die cut panel. Mat with gold card then attach to co-ordinating card base.
Supplies
Creative Dies: Butterflies (PB)
Cardstock: Fabriano 100% cotton hot pressed watercolour paper, Pink and gold cardstock
Also: Kuretake Gansai Tambi watercolour paints, Stick it adhesive sheet
Collage of Wishes Watercolour Video Tutorial
Posted: May 25, 2015 Filed under: Collage of Wishes, Tutorial, Watercolour | Tags: Kuretake Gansai Tambi watercolour paints, Penny Black creative dies, Penny Black stamps, Tutorial, video 14 Comments
I hope you visited the Penny Black blog last week to enjoy a week of inspiration from our talented designer Jill Foster. This week I hope to inspire you with my projects featuring products from the new collection Sunshine and Smiles. Today’s project comes with a video tutorial. I know, unprecedented for me to have a video for you two weeks in a row! Last week I shared my technique for watercolouring with distress stains. Today I have a more traditional ‘keep within the lines’ approach using watercolour paints. The video is long so perhaps you should get a cup of coffee or tea and settle in. I have used the new slapstick cling set ‘Collage of Wishes’ and the pretty flourish die.

Supplies
Stamps: Collage of Wishes (PB)
Creative Dies: Flourish (PB)
Inks: Versafine Smokey Gray (Tsukineko)
Cardstock: Fabriano 100% cotton hot pressed watercolour paper, Kazazz cardstock discontinued
Also: Kuretake Gansai Tambi watercolour paints, Faber-Castell Polychromos pencils, Stick it adhesive sheet
With love, my friend
Posted: May 22, 2015 Filed under: Delicate Florals, Watercolour | Tags: Fabriano Watercolour Paper, Kuretake Gansai Tambi watercolour paints, Penny Black stamps, Ranger Distress stains, Tsukineko Memento inks 17 Comments
I made this for a close friend of mine who unexpectedly ended up in hospital this week. I am pleased to say she should be home by now. I began by painting a background with blue and red watercolour paints which I left to dry completely. During the whole painting and and stamping process I had the panel turned vertically but when it came to make the card I preferred it in landscape orientation. I inked the brambles stamp in mustard seed distress stain, spritzed it then stamped. The flower heads of the ‘delicate florals’ stamp, I inked in barn door distress stain and the stems in memento espresso truffle marker, spritzed and stamped. The flower heads were quite watery so I let them dry and stamped again over the top to add some details. I ended up keeping the frame made by the tape placed around the panel and popping it up on a card base made from watercolour paper. I have mentioned before how the whole matchy-matchy thing is very important to me so sometimes the card base has to be exactly the same not just close which is what it would be if I used a different card stock.
Supplies:
Stamps: Delicate Florals, Gratitude, Bramble (PB)
Inks: Mustard Seed, Barn Door distress stains, Black Soot distress marker(Ranger) Expresso Truffle memento marker, Versafine Majestic Blue & Vintage Sepia (Imagine Craft/Tsukineko)
Cardstock: Fabriano 100% cotton hot pressed watercolour paper
Watercolour with Distress Stain Video Tutorial
Posted: May 20, 2015 Filed under: Fresh, Tutorial | Tags: Fabriano Watercolour Paper, Penny Black stamps, Ranger Distress stains, Tutorial, video 29 Comments
I created a tutorial for Splitcoaststampers showing how I use distress stains to do watercolouring with outline stamps. There is both a photo tutorial and video on the Splitcoast website and I have included the video below. I used the same technique to create two cards, the one above is the star of the video, the one below is featured in the photo tutorial.
Supplies:
Stamps: Fresh , Flower Sparks (PB)
Inks: Peeled Paint, Barn Door, Spiced Marmalade, Scattered Straw, distress stains & Forest Moss, Black soot distress markers(Ranger), Versafine Spanish Moss ink (Imagine Craft/Tsukineko)
Cardstock: Fabriano 100% cotton hot pressed watercolour paper, Neenah Natural White cardstock
This is a favourite technique of mine; I used it for the following cards.


More blossoms
Posted: May 18, 2015 Filed under: Delicate Blossoms | Tags: Kuretake Gansai Tambi watercolour paints, Penny Black stamps, Tsukineko Memento inks 9 Comments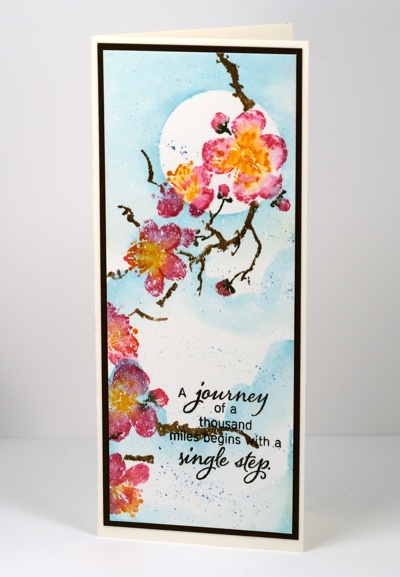
I have been creating cards with the delicate blossoms stamp quite a bit lately. I think my favourite so far is one I did for the Dirty Dozen on Splitcoast so you need to be a fan club member to view that one. I will also be using the stamp in my upcoming class which has an oriental theme running through it.
Today’s card is inspired by Chinese art and wall hangings. I started by positioning a frisket film circle mask, then splattering some masking fluid over the watercolour panel. Once the masking fluid was dry I painted some misty mountains in blue and surrounded the moon in blue also. When that was dry I removed the moon mask and inked the blossom stamp with markers, a pink, an orange and a brown. I gently spritzed the stamp and stamped once over the moon, re-inked and stamped a partial print lower down. I blended the colours on paper using a clear wink of stella pen so the petals all have a little shimmer and sparkle to them. I waited until all the ink was dry before rubbing off the masking fluid then splattered a bit of blue paint here and there.
Adding a sentiment was a bit tricky for this card because I didn’t really plan ahead. I have a clever card making friend who plans the position of her sentiment first and then designs around it. I rarely do that and sometimes end up with no sentiment or a badly positioned one like I have here. To stamp the words above the branch looked too crowded in the middle and below the branch it didn’t fit so I stamped in black which was dark enough to show up on top of the brown branch. I could have chosen a different sentiment but the ‘proverb’ style of the sentiment worked with my picture of a faraway land.
Supplies:
Stamps: Heartfelt, Delicate Blossoms (PB)
Inks: Rose Bud, Cantaloupe, Rich Cocoa, Tuxedo Black Memento markers & Versafine Onyx Black(Tsukineko)
Cardstock: Fabriano 100% cotton hot pressed watercolour paper
Also: clear wink of stella pen, Kuretake Gansai Tambi watercolour paints, Winsor & Newton masking fluid, Grafix fristket film
Blossoms
Posted: May 16, 2015 Filed under: Delicate Blossoms | Tags: Faber-Castell Albrecht Durer Watercolour pencils, Kuretake Gansai Tambi watercolour paints, Penny Black stamps 17 Comments
I have been wanting to create a white floral panel by relying on the background colour to frame the white petals. It’s hard!
I was inspired by this lovely watercolour painting by Maria Stezhko. I stamped the Delicate Blossoms stamp in memento London Fog grey to get a pale image then painted blues and greens around the petals using the Kuretake Gansai Tambi watercolour paints. The colours on the flowers are a combination of the same paints and Faber Castell Albrecht Dürer watercolour pencils. I also added some fine black lines with a Prismacolor Premier fine line marker.
In my backyard I am enjoying the real thing.