
Watercolour night sky
Posted: December 20, 2013 Filed under: Before the Snow, Stamped Landscapes, Watercolour | Tags: Fabriano Watercolour Paper, Penny Black stamps, Tsukineko Memento inks 24 Comments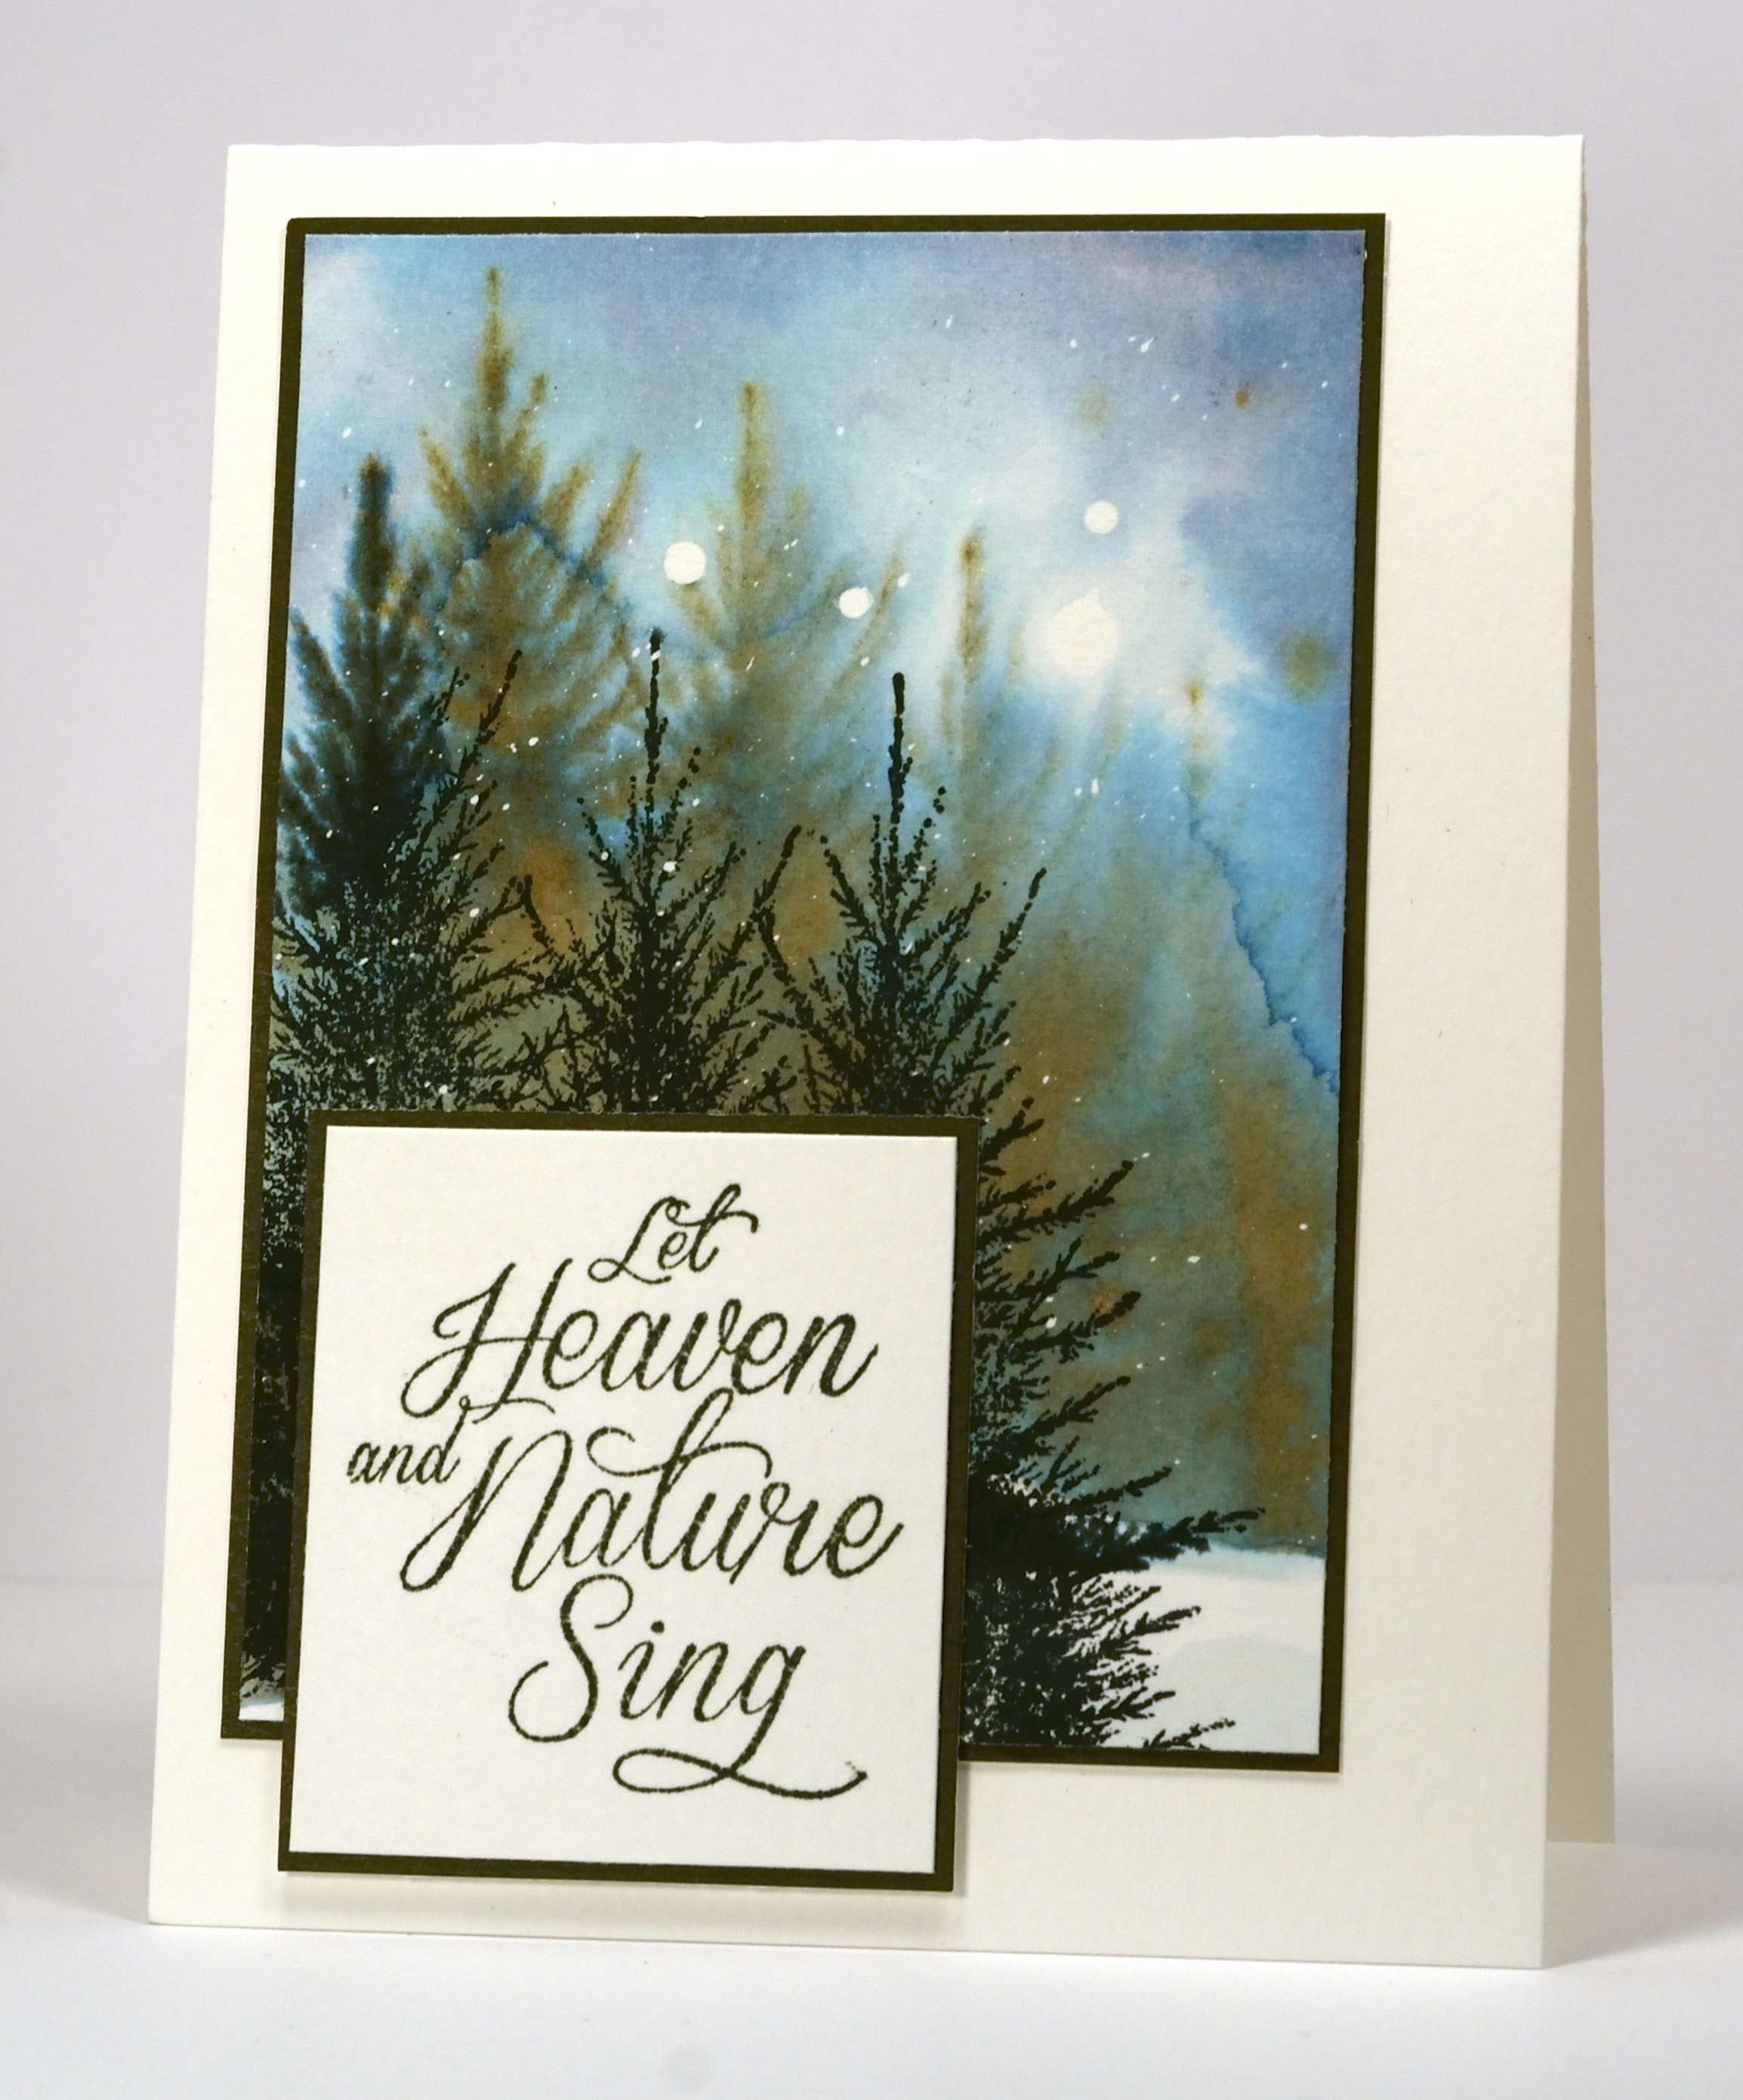
Yes, another watercolour snowscape! This one is a great example of how the pigments in the ink separate into different colours when added to wet watercolour paper. I stamped the ‘Before the Snow’ stamp in Memento Northern Pine ink onto wet paper. The dark green ink separated into mustard and blue leaving the background trees mustard and adding another blue tone to the sky. The snow at the base stayed white as I did not wet that part of the panel before stamping and adding ink. Once the first trees were stamped I added blue ink to the sky The foreground trees were added when the paper was almost dry.
Joy to the World , the Lord is come!
Let earth receive her King;
Let every heart prepare Him room,
And Heaven and nature sing,
And Heaven and nature sing,
And Heaven, and Heaven, and nature sing.
Supplies:
Stamps: Before the Snow, Season’s Wishes (Penny Black)
Inks: Memento Summer Sky, Northern Pine, Danube Blue & Versafine Olympia Green (Tsukineko)
Cardstock: Fabriano 100% cotton hot pressed watercolour paper, Penny Black mix & match olive grove paper
Also: Winsor & Newton masking fluid
Joy
Posted: December 19, 2013 Filed under: CAS, Dies, Snowflake trio | Tags: Penny Black creative dies, Tsukineko Memento inks 4 Comments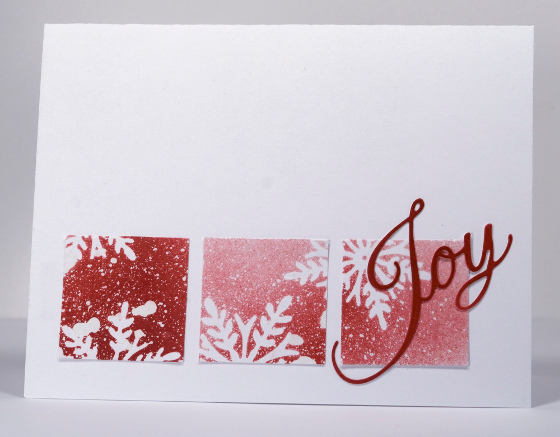
This is the second card I created to play along with the Through the Purple Haze Challenge Blog where the theme is Christmas. Just as I did with my Monday card I used only die cuts, masking fluid and ink to make this card, no stamps. It did not start out as a three square layout even though this design is a favourite of mine. It began as a one layer design with a lot of masking fluid and ink involved. Things got a little messy so I decided the best thing to do was to save the best parts of the panel and create a new design. I punched three squares, popped them up and added a die cut sentiment.
Supplies:
Inks: Memento Rhubarb Stalk (Tsukineko)
Creative Dies: Snowflake trio, Love & Joy
Also: Winsor & Newton Masking Fluid
Watercolour pine bough
Posted: December 18, 2013 Filed under: Needles and cones, Watercolour | Tags: CAS, Fabriano Watercolour Paper, Penny Black stamps, Ranger Distress stains, Tsukineko Memento inks 14 Comments
I have another watercolour card today created using a similar technique to this card. I had a piece of watercolour paper was already covered with little flecks of masking fluid so I wet the panel, inked the pine bough stamp with Memento markers and stamped it onto the wet paper. It bled quite a bit so I let it dry a little then re-inked and stamped again to give definition to the pine cones and needles. I painted the background with diluted distress stain which blended in some places with the stamping. Because I chose to mat my picture panel I did not want another border around the sentiment so I stamped the sentiment on a post-it note and cut out the centre text creating a window mask to stamp through.
My daughter made some cute cookies this week.
Supplies:
Stamps: Needles and cones, Glad Tiding (PB)
Inks: Memento Cottage Ivy, EspressoTruffle & Distress Stain Broken China (Tsukineko)
Cardstock: Fabriano 25% cotton hot pressed watercolour paper
Also: Winsor & Newton Masking Fluid
Peace
Posted: December 17, 2013 Filed under: CAS, Nature's Song | Tags: Penny Black creative dies, Tsukineko Memento inks 8 Comments
This week Penny Black is playing along with the Through the Purple Haze Challenge Blog. The theme is `Christmas`so I pulled out the masking fluid again. Before I added masking fluid I die cut the word Peace and the Nature`s Song branches out of post it notes and stuck them on the card base as masks. I didn`t flick the masking fluid on for this design; I painted it on with a paintbrush. After it dried I sponged Memento Summer Sky ink over the masking getting gradually paler as I moved from right to left.
It`s nice to create a one layer card again, made even simpler by using only one ink and no stamps.
Supplies:
Inks: Memento Summer Sky(Tsukineko)
Creative Dies: Nature’s Song, Love & Joy
Also: Winsor & Newton Masking Fluid
Tiny watercolour
Posted: December 15, 2013 Filed under: CAS, Stamped Landscapes, White Christmas | Tags: Fabriano Watercolour Paper, Penny Black stamps, Ranger Distress stains, Tsukineko Memento inks 7 Comments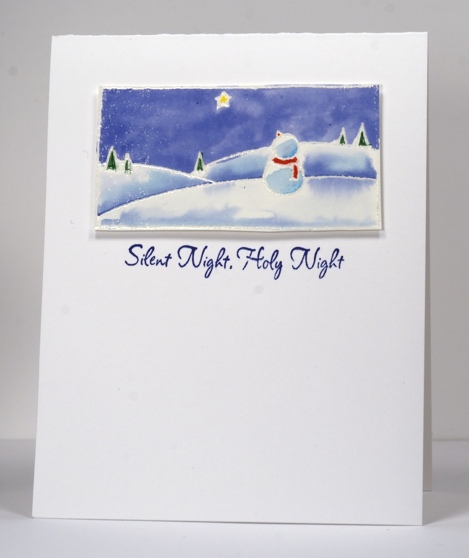
Penny Black has a set of two slapstick cling stamps depicting sweet snowy scenes. One shows a church and decorated tree, the other is above. I used distress stains and Memento markers to colour this little snow scape after I had embossed it with clear powder. I added water as I coloured, to blend and spread the ink. I think the foreground ink blend makes the snow man look like he is standing on ice rather than snow. After a storm last night we have plenty of both snow and ice.
You might be interested to know that One Layer Wednesday is currently having a make-over. The team has some exciting new plans we will share when we kick off again in the new year.
Supplies:
Stamps: White Christmas, Silent Night (PB)
Inks: Distress stains Faded Jeans, Broken China, & Memento Markers Cottage Ivy, Lady Bug, Tangelo, Dandelion & Versamark
Cardstock: Fabriano 100% cotton hot pressed watercolour paper, Neenah Solar White
Snowy Fantasy
Posted: December 14, 2013 Filed under: Fantasy, Watercolour | Tags: Fabriano Watercolour Paper, Penny Black stamps, Ranger Distress stains, Tsukineko Memento inks 18 Comments
I know my Winter Wonderland week on the Penny Black blog is officially over, but I do have a snowscape or two still to share.
This panel was done on water colour paper with a mix of Distress stains and Memento inks. I positioned a hill mask first before I stamped the tree in Versamark then inked only the trunk and branches in dark brown and stamped it again a little lower. I filled the rest of the sky with snow by repeatedly inking and stamping only a corner of the Fantasy stamp in versamark. I then embossed the tree and snow in clear powder. To create the sky I wet the top of the panel with water and started blending dusty concord and broken china distress stains. I stamped the flourish several times in Memento sweet plum while the paper was still damp. I then removed the mask and painted shadows with diluted distress stains to create the snow banks in the foreground.
Apparently another snow storm is heading our way tomorrow so it will continue to look like a winter wonderland around here!
Supplies:
Stamps: Fantasy, Dancing Deers, White Christmas (Penny Black)
Inks : Memento Sweet Plum, Espresso Truffle, Versamark (Tsukineko) Dusty Concord, Broken China Distress Stains (Ranger)
Cardstock: Penny Black Mix & Match Papers Fuschia Fantasies, Fabriano 100% cotton hot pressed watercolour paper
Also: Clear embossing powder
Watercolour Snowstorm
Posted: December 13, 2013 Filed under: Stamped Landscapes, Tannenbaum, Watercolour | Tags: Fabriano Watercolour Paper, Penny Black stamps, Tsukineko Memento inks 16 Comments
Today’s card is the last day of Winter Wonderland cards on the Penny Black blog and I created it using one of my favourite techniques: wet into wet watercolouring. I hope you have enjoyed the wintry scenes I shared this week. I love creating stamped landscapes, especially snowy ones so don’t be surprised if you see a few more while I still have snowy inspiration outside.

Supplies:
Stamps: Tannenbaum, Season’s Wishes (PB)
Inks: Memento Cottage Ivy, Northern Pine, Summer Sky, Danube Blue, Love Letter & Versafine Onyx Black (Tsukineko)
Cardstock: Fabriano 100% cotton hot pressed watercolour paper
Also: Winsor & Newton Masking Fluid
Berries in Snow
Posted: December 12, 2013 Filed under: Christmas reds and greens, Dancing Leaves, Stamped Landscapes | Tags: Penny Black creative dies, Penny Black stamps, Tsukineko Memento inks 7 Comments
The snowscapes continue today and tomorrow on the Penny Black blog. Today’s card is the only one this week that does not feature “masking fluid snow”. This is the kind of scene you might see when the snow has stopped falling and the sun shines on the crisp white world.
To create this snowscape I first stamped the Christmas Reds & Greens stamp with versamark taking care to put a stamp positioner in place before I lifted it. I then inked the same stamp with dark green pigment ink, moved the stamp positioner slightly down and to the right and stamped again. I repeated the double stamping in the opposite corner and then embossed all in clear powder. The double stamping is a technique I use to make a thin layer of snow appear on a branch or tree. (I have a tutorial showing the steps of the technique here)
Supplies:
Stamps: Christmas Reds and Greens , Yuletide Greetings (PB)
Creative Dies: Dancing Leaves
Inks: Memento Summer Sky, Dandelion & Versafine Northern Pine, Satin Red & Versamark (Tsukineko)
Cardstock: Mix & Match papers Fall Festival and Spring meadow
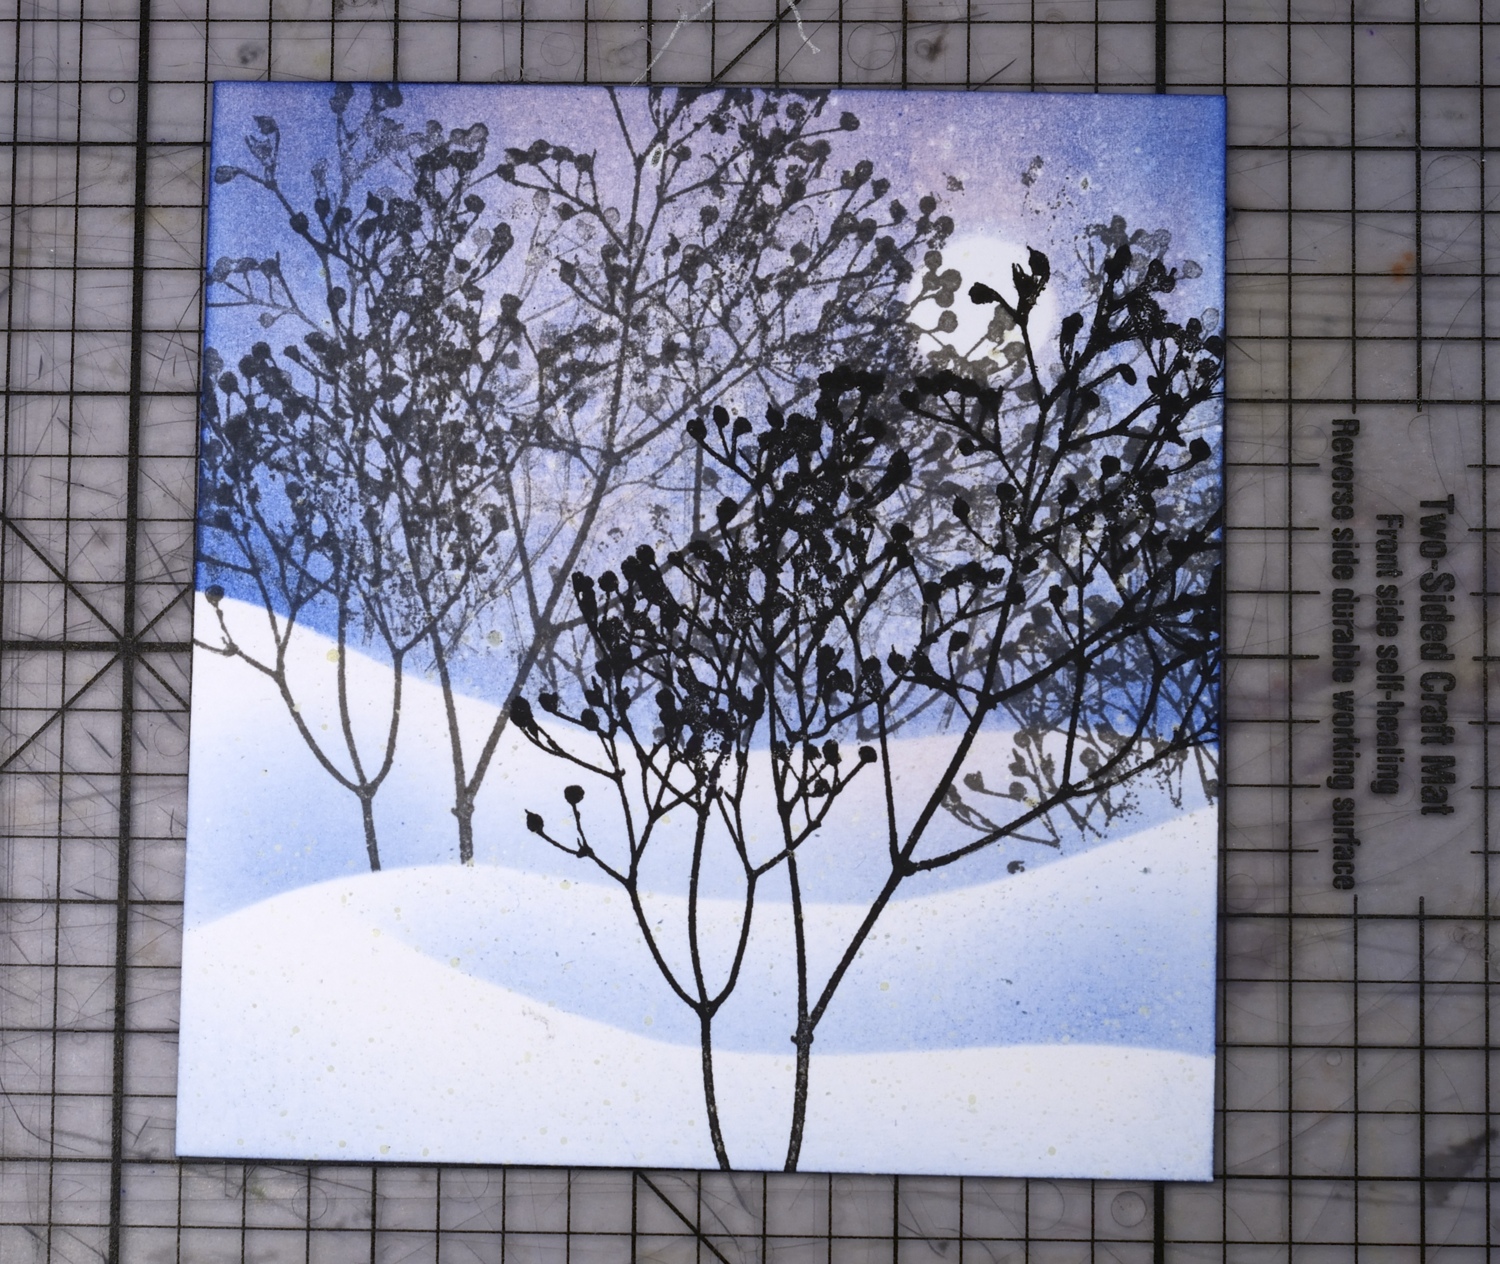
Moonlit snowfall
Posted: December 11, 2013 Filed under: Berry Tree, Tutorial | Tags: Penny Black stamps, Tsukineko Memento inks, Tutorial 12 Comments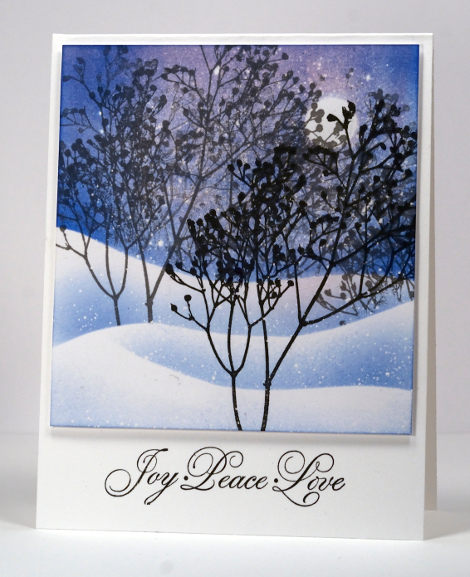
The Winter Wonderland fun continues here and on the Penny Black Blog today with a step by step tutorial.
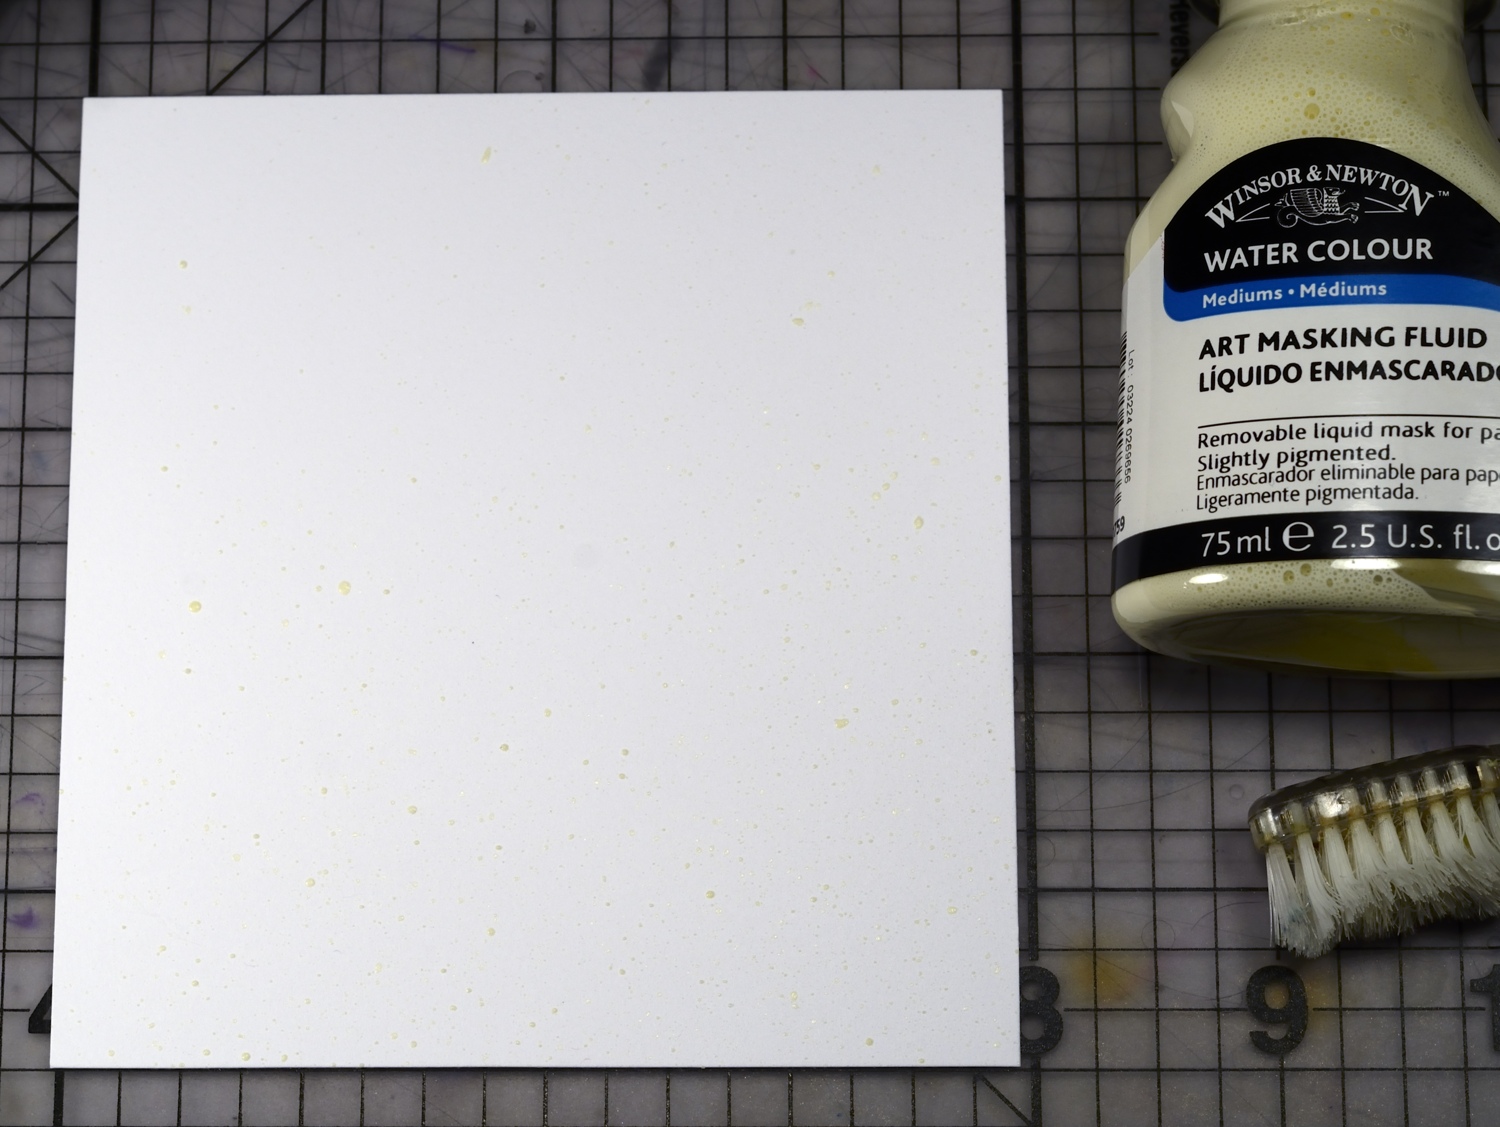
1. With a toothbrush or paint brush flick masking fluid over panel. Leave to dry for at least 20 minutes. I you use a paintbrush dip it in detergent and squeeze the detergent out before dipping the brush in the masking fluid. Wash the brush straight away after you have finished flicking.
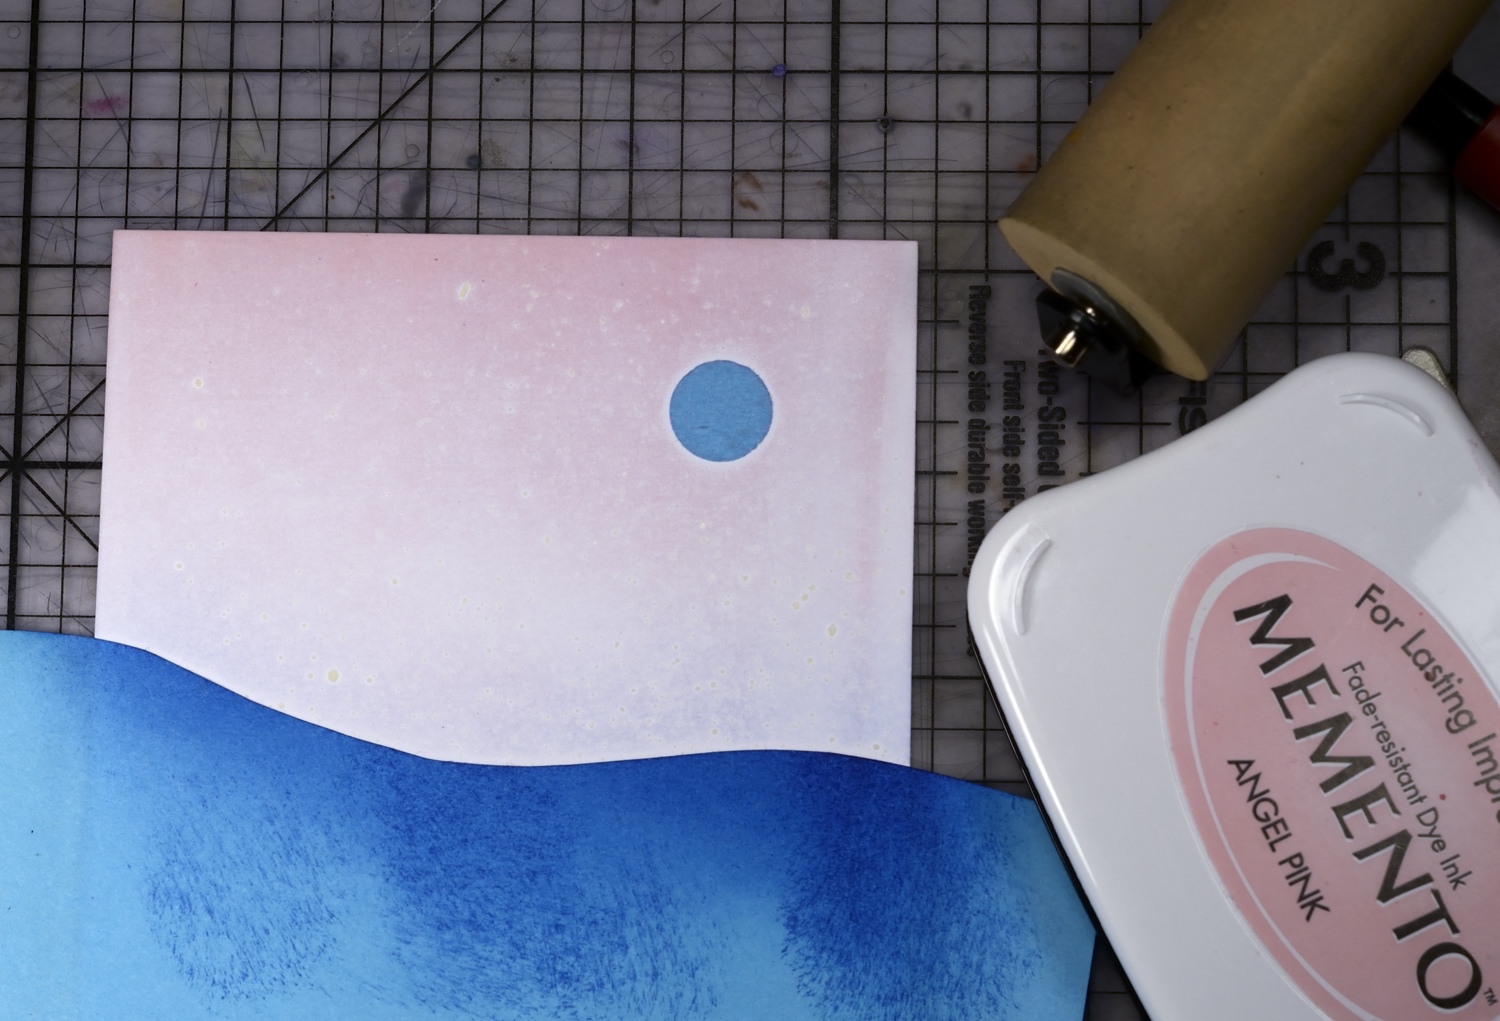
2. Punch a circle from a post-it note or masking paper and position in the sky. Cut a hill shaped mask and position it half way down the panel. Using a rubber brayer apply pink ink to sky area.
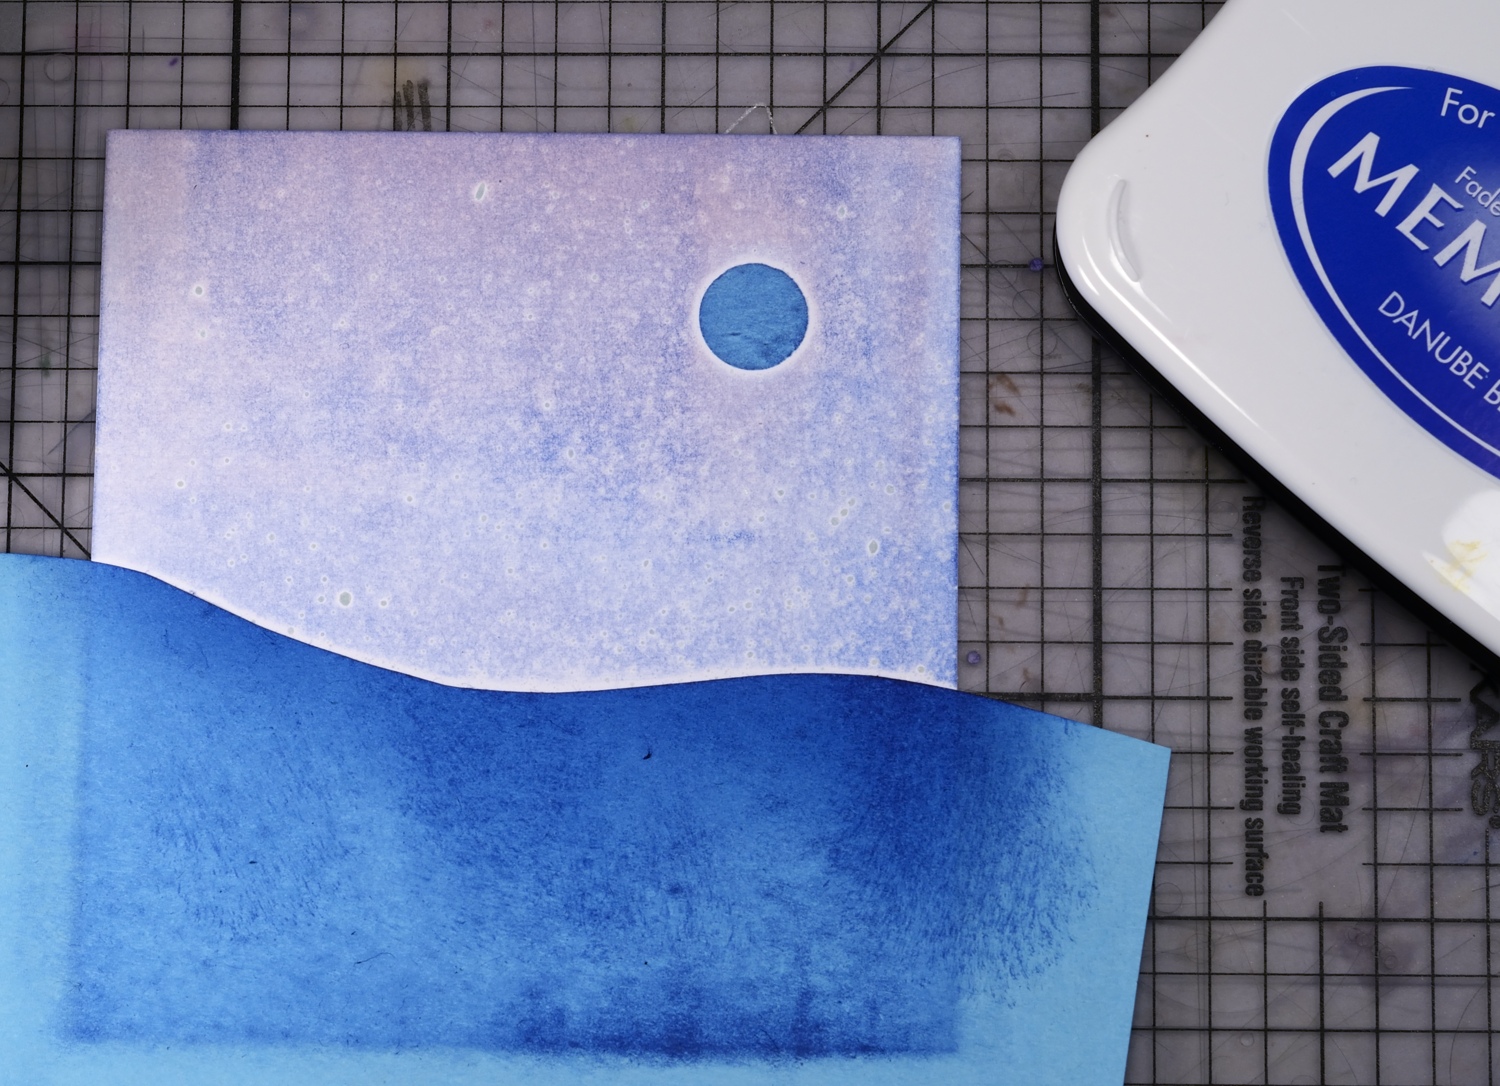
3. Brayer blue ink over the sky area.
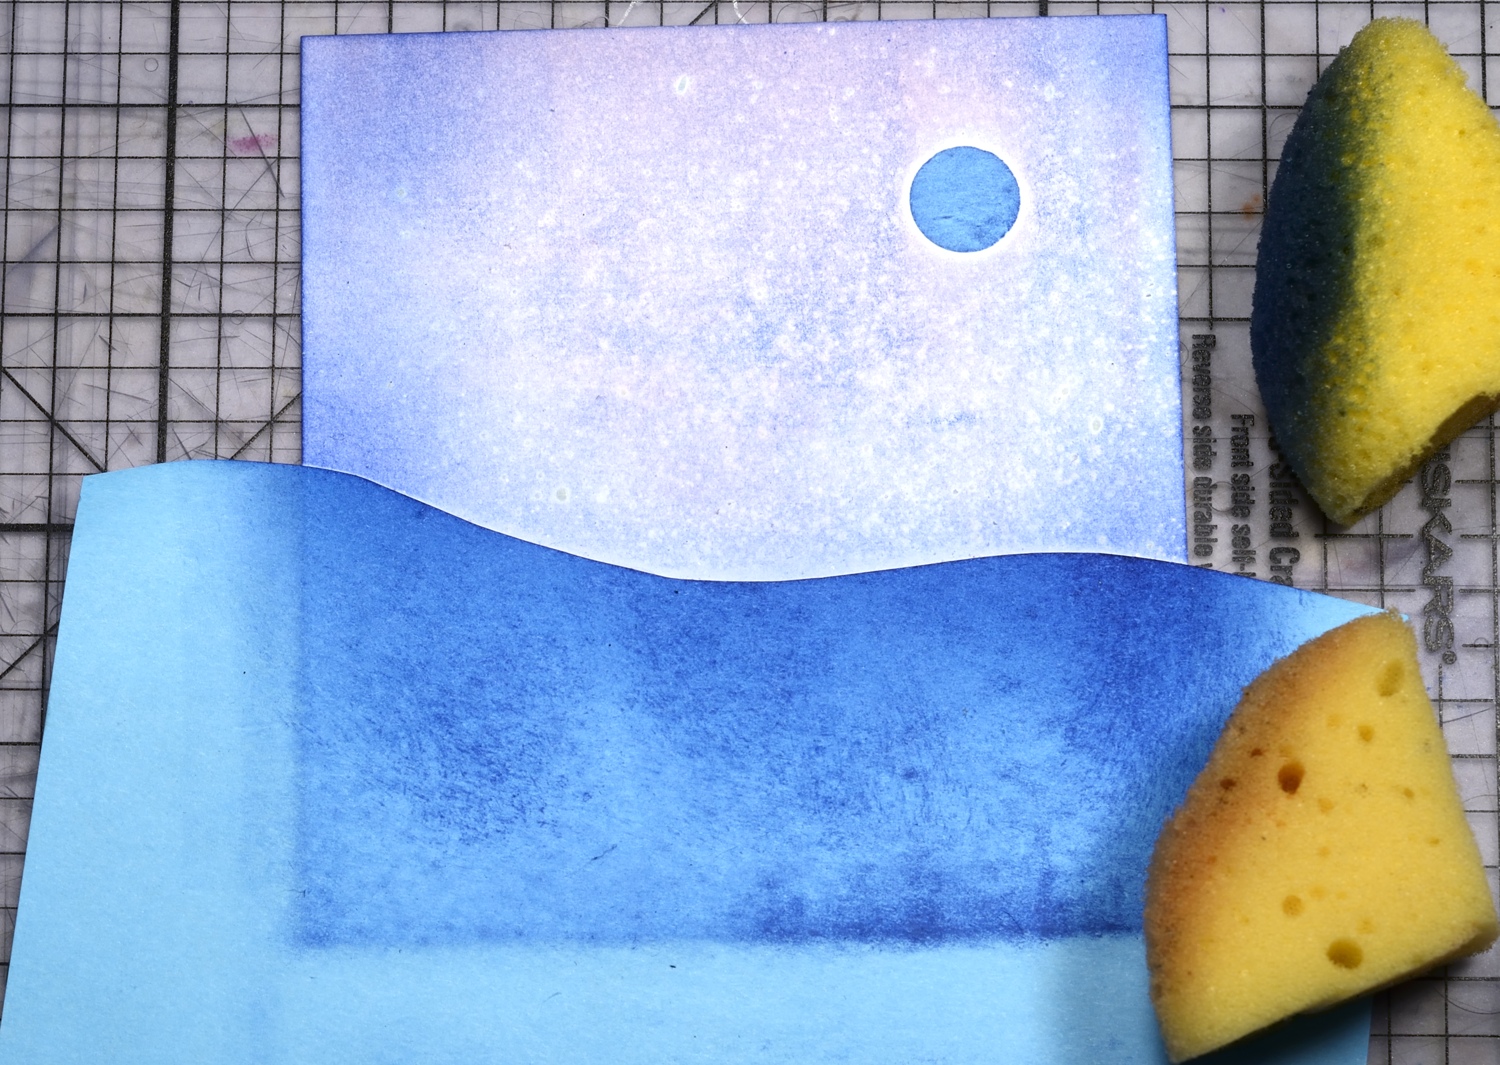
4. Add a little more blue ink around edges with a sponge. Add a little more pink ink to suit your preference.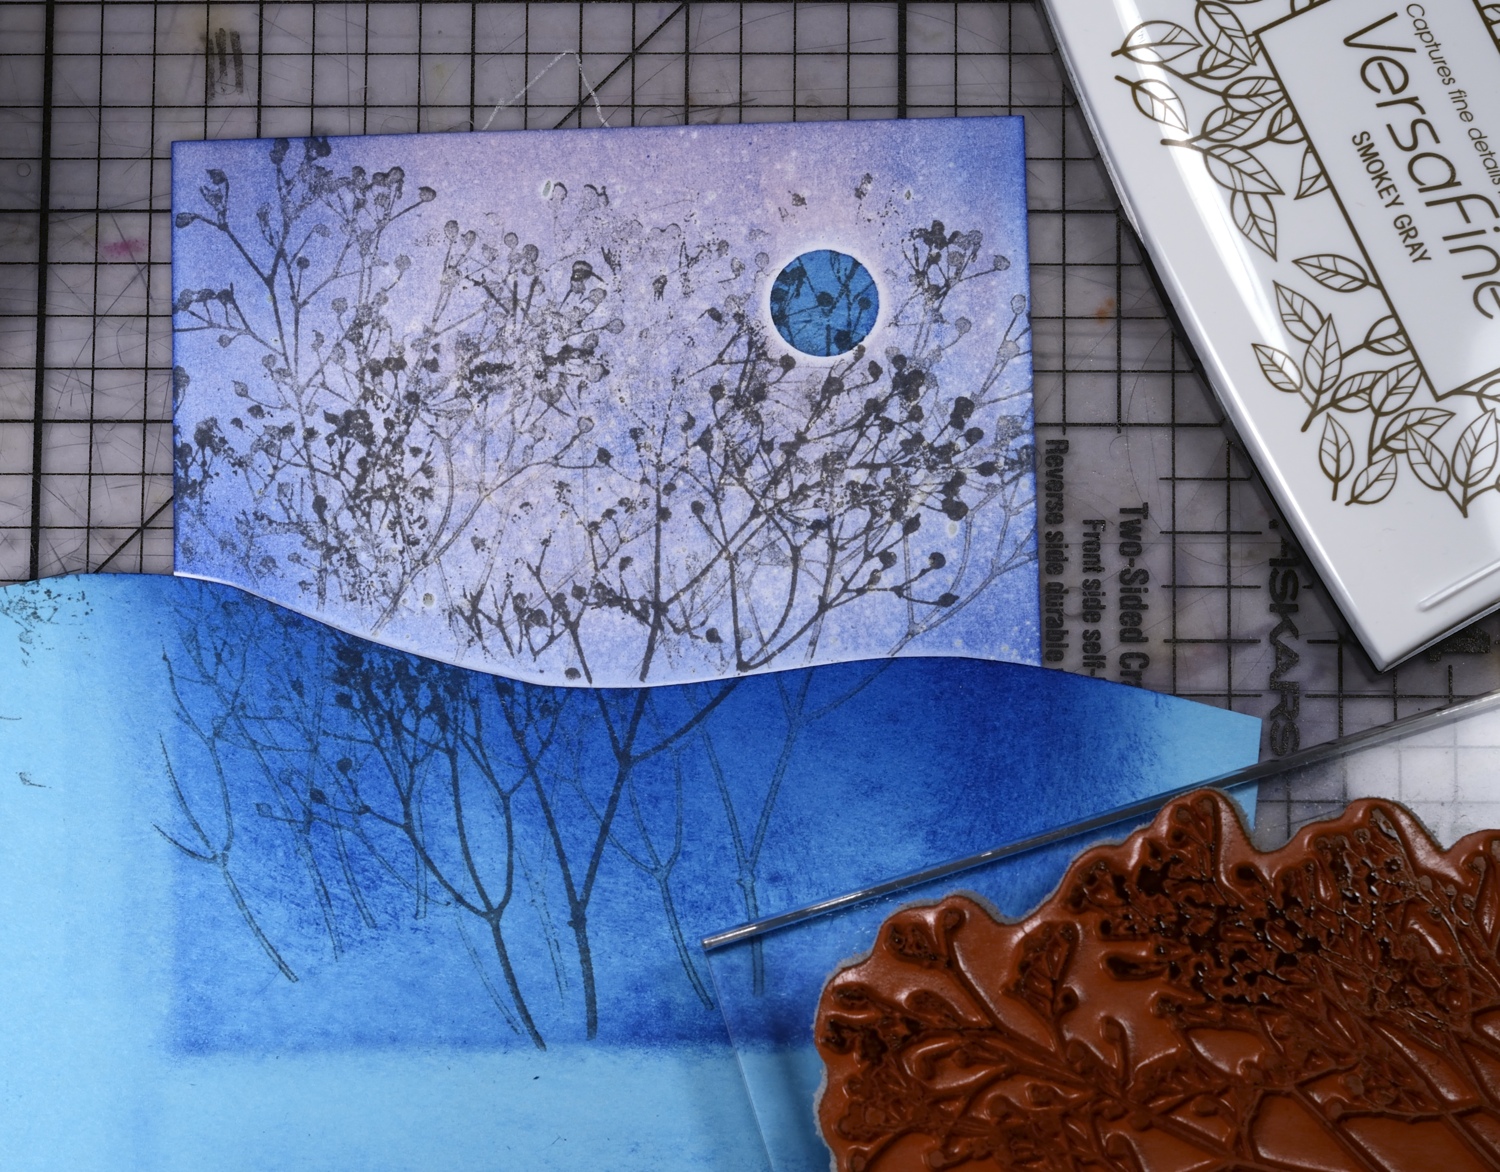
5. Stamp trees randomly with grey ink before moving either mask. These trees are in the background and do not need to be well defined.
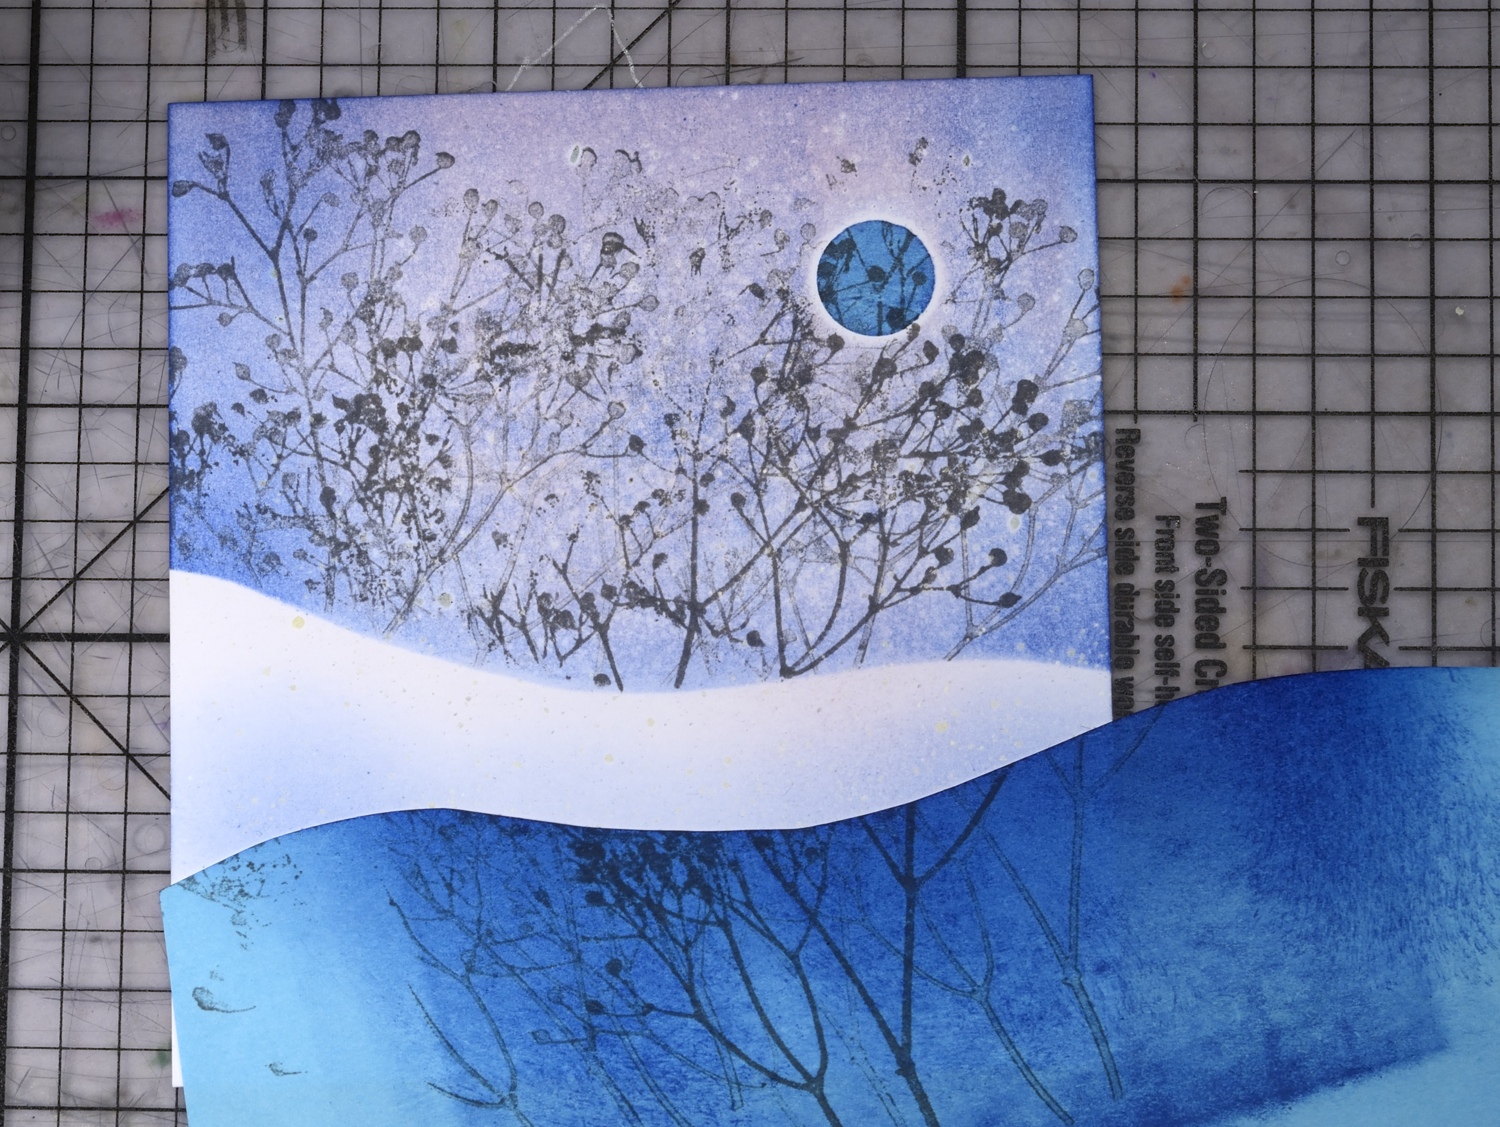
6. At this point remove the circle mask to expose the moon (I forgot to do that in the tutorial photo and had to stamp a couple of twigs in later!) Lower the hill mask and sponge blue ink along the edge and on the exposed snow bank but stop short of the horizon in order to keep it crisp and white. 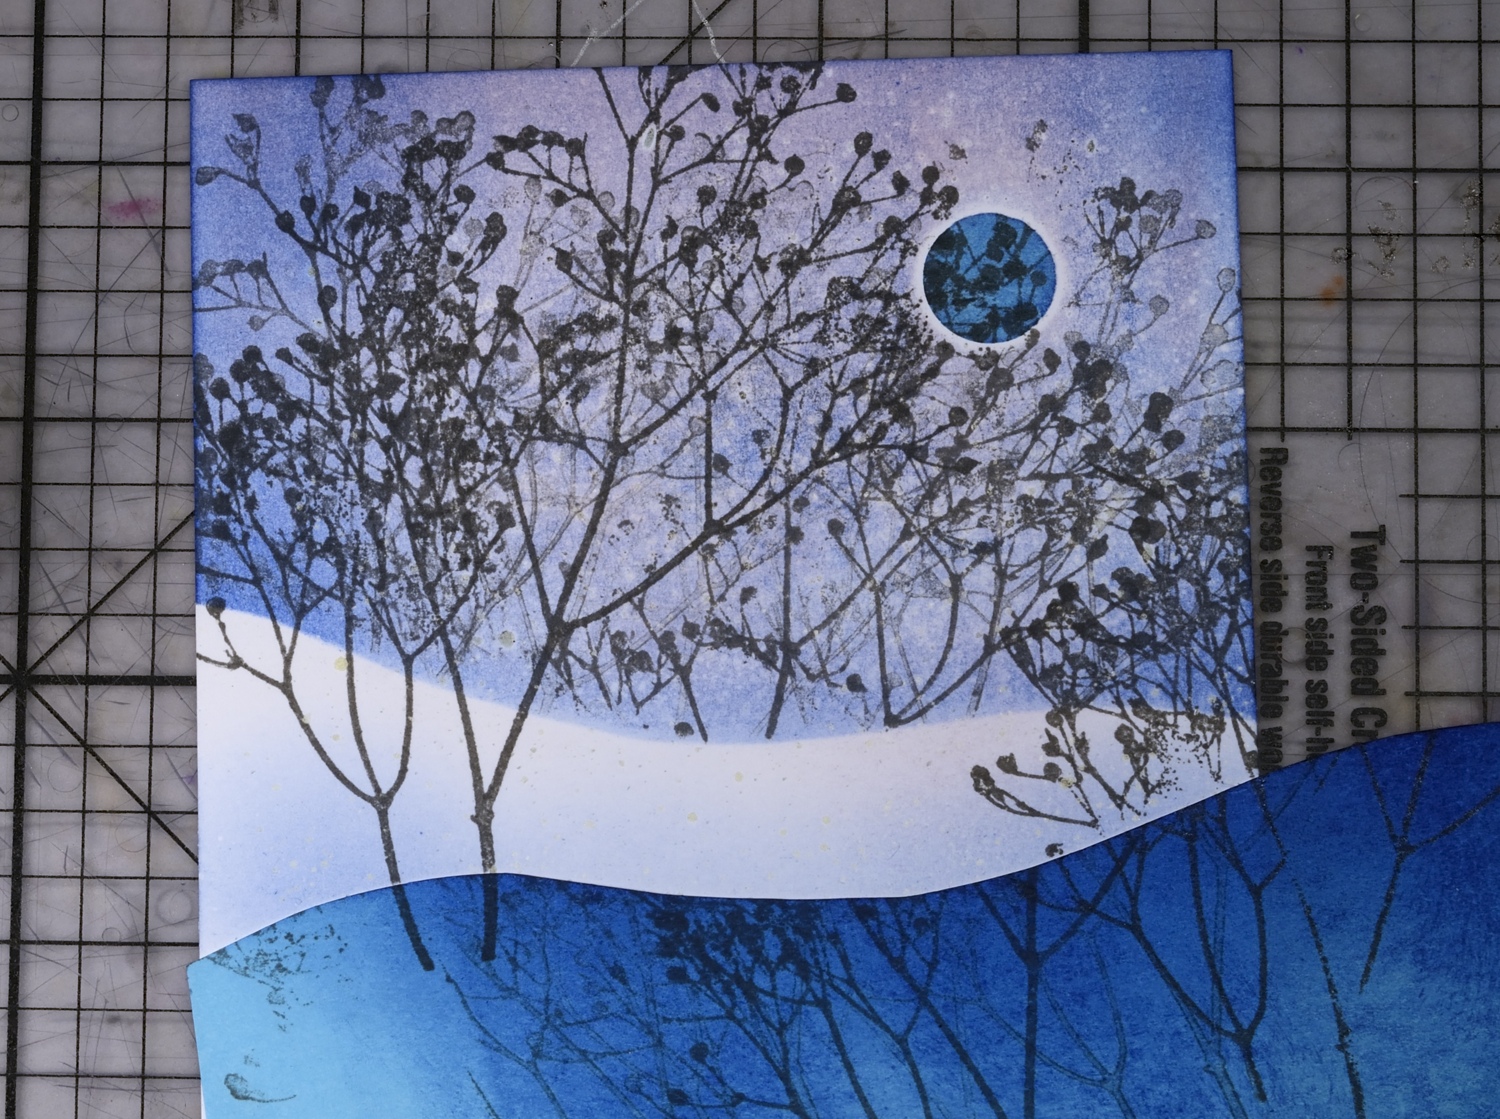
7. Stamp two more trees in grey. (remember the moon mask should have been removed before this point)
Supplies:
Stamps: Berry Tree, A Better World(PB)
Inks: Memento London Fog, Angel Pink, Summer Sky & Versamark (Tsukineko)
Also: Winsor & Newton Masking Fluid
Winter Cityscape
Posted: December 10, 2013 Filed under: All is Bright, Skyline, Stamped Landscapes | Tags: Penny Black stamps, Tsukineko Memento inks 9 Comments
Today is day 2 of Winter Wonderland on the Penny Black Blog. Make sure you check back each day for wintry inspiration.
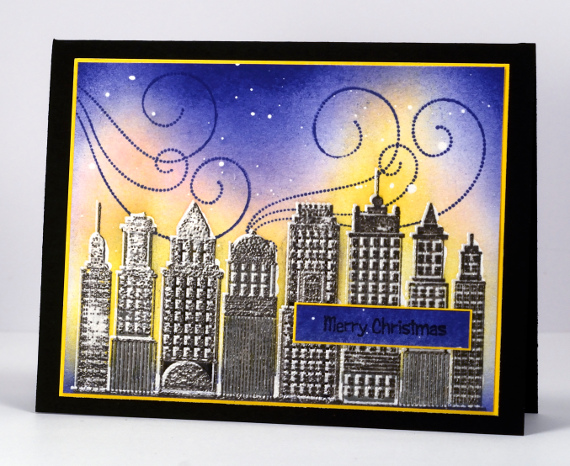
Usually my snowscapes feature snowbanks, snow laden branches and gently falling snow flakes so this one is a bit of a departure from the norm. Living in Ottawa means that I get to see the city in snow which can be very pretty especially with Christmas lights and trees peeping out from under a fresh blanket of white.
The first step in making this scene was stamping the skyline stamp in versamark, then using a stamp positioner to move the stamp slightly lower and stamping it again in grey before embossing it in clear powder. By doing this I created a snowy edge on the top and sides of the buildings. Next I flicked some masking fluid over the panel and but not as I liberally as I would to make falling snow for a forest or woodland scene. The small drops that fell could just as easily represent stars as snowflakes. I also painted masking fluid over the buildings so that any sections that were not embossed would resist the sponging to follow. The sponged sky was done in yellow, pink and blue Memento inks mimicking the glow of the city at night. A few swirls suggest a snow storm is just beginning. The sentiment was stamped on a scrap that I trimmed from the top of the panel.
I’ll be back tomorrow with more snow!
Supplies:
Stamps: Skyline, All is Bright, Winter Magic (PB)
Inks: Memento Dandelion, Angel Pink, Summer Sky & Versafine Smokey Grey, Versamark (Tsukineko)
Also: Clear Embossing Powder, Winsor & Newton masking fluid


