
OLW 82 Swirly
Posted: March 11, 2012 Filed under: CAS, Penny Black, Posies 16 Comments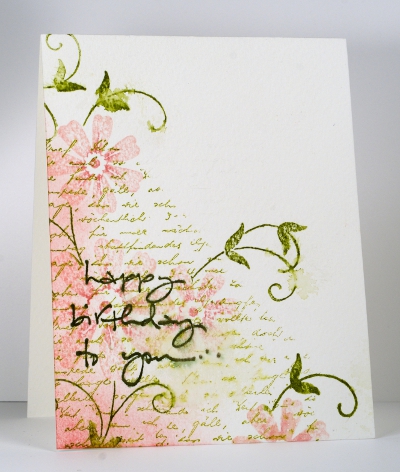
I find swirls and flourishes wonderful to work with so it wasn’t hard to pick a stamp to use for Susan’s one layer challenge this week.
I used water colour paper to maximize any spritzing or blending I did. I stamped the text stamp first; you might have noticed I keep using this stamp from Penny Black; it makes a lovely background. Next I inked the Posies stamp with markers, spritzed it and stamped it adding a little more water here and there with a sponge after stamping. After adding a little pink sponging there just happened to be a gap in the amongst the stems for a cute little sentiment.
Supplies:
Stamps: Letter Background, Posies, …to you (Penny Black)
Inks: Pirouette Pink, Regal Rose, Old Olive, Always Artichoke (SU)
Cardstock: MFP Watercolour card stock
Script & more
Posted: March 10, 2012 Filed under: CAS, Lace Flower, Penny Black, Resplendent 26 Comments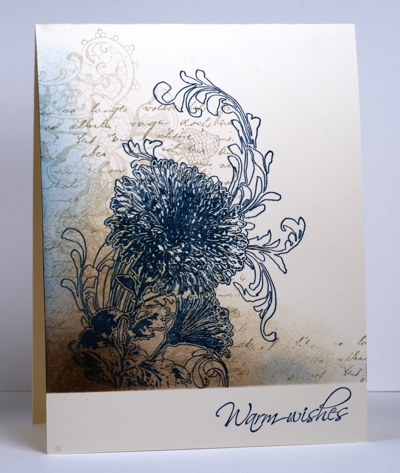
Here is my card for this week’s Less is More challenge to use script on a one layer card. I masked and then stamped the Letter Background stamp and the Lace Flower stamp from Penny Black as my background. I sponged in several colours and then stamped Resplendent from Penny Black as the feature image.
I didn’t set out to create this colour scheme, it just happened to fall together. It’s nice when it works like that.
Supplies:
Stamps: Letter Background, Resplendent, Lace Flower (Penny Black), Hugs & Wishes (SU)
Inks: Choc Chip, Crumb Cake, Not quite Navy (SU)
Cardstock: Flourishes Classic Ivory
Fly away with me
Posted: March 4, 2012 Filed under: CAS, Penny Black, Stamped Landscapes, Winter Sky 17 Comments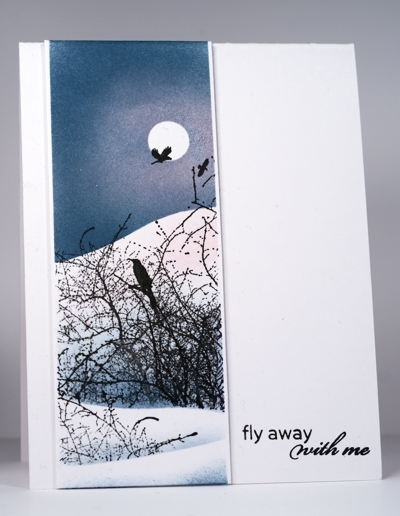
It is tempting to fly away somewhere warmer when snow and ice covers everything outside. The birds are returning and making themselves heard so spring might be round the corner.
This card started its life as a one layer card but a smudged sentiment just before it was completed meant that it became a two layer. I was not willing for the stamped and sponged panel to go to waste so I sliced it off the ruined card and popped it up on a new card base.
When making the scene I masked the sides first, then the moon and the top hill. Then I sponged the sky, before moving the mask down to create a snow bank. Before making the last snow bank I stamped the Winter Sky stamp from Penny Black making sure my bird flew in front of the moon. I added a final snow bank and stamped a bit more brush to finish it off.
Several people have asked me about masking fluid. You can find it in an art store with the watercolour paints. I use the Winsor and Newton brand but I think they are all similar.
Thanks for stopping by and thanks for the encouragement you leave me in the comments.
Supplies:
Stamps: Winter Sky (Penny Black), Birds in Vines(Flourishes)
Inks: Buckaroo Blue & Pretty in Pink (SU), Versafine Onyx Black
Cardstock: MFP 100lb white
Musical thanks
Posted: February 26, 2012 Filed under: Irises, Music Background, Penny Black 15 Comments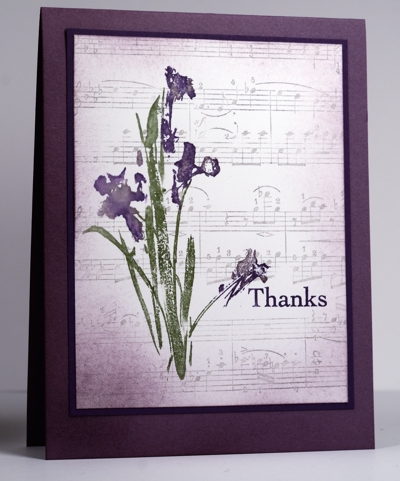
As I have said before on this blog we often have need of musically themed cards in this house. This one is made using the Penny Black music background stamp which I love because it is big and the music can cover a whole card base if necessary. For this card I just stamped it in grey on a panel and then used marker to ink the iris stamp. Before stamping it I spritzed it with water so the image would “bleed” a little then finished the panel off with some sponging and a sentiment.
Several people have asked what I use for sponging; I cut circular sponges into quarters which you can see in my sponging tutorial post here.
Thanks for dropping in today; I hope you have a great week.
Supplies:
Stamps: Music background, Irises (Penny Black), Kind Thanks (SU)
Inks: Perfect Plum, Elegant Eggplant, Garden Green, Going Gray (SU)
Cardstock: MFP 100lb white, Perfect Plum, Elegant Eggplant
Having another Penny Black Day!
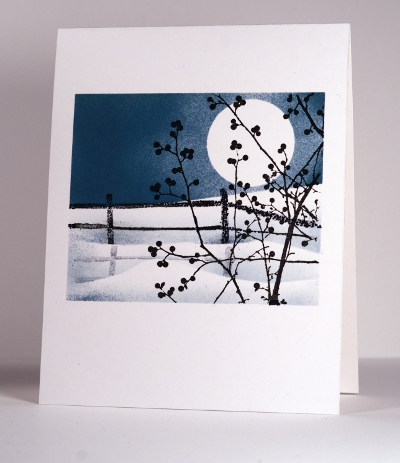
Posted: February 20, 2012 Filed under: Berry red snow white, CAS, Penny Black, Splendor 29 Comments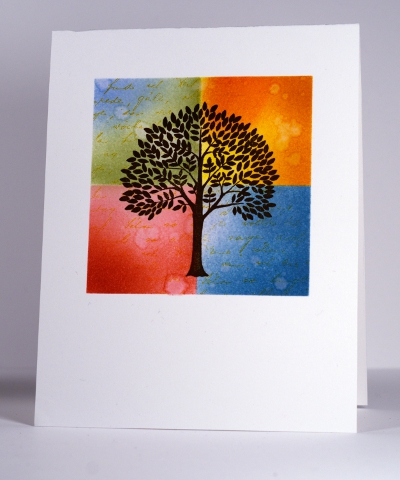
Believe or not I am being featured again on the Penny Black blog today. The exciting news is that I am now a member of the Penny Black design team. I will be posting over at the PB blog regularly and you will see more PB creations here on my blog too. I am thrilled and a little nervous about joining such a talented team of designers.
Both these cards were masked first and in the case of the top one I masked within the big square so I could sponge one season colour scheme at a time. I then added water droplets and the text before stamping the tree.
In the moonscape card I punched a circle from a post it note for my moon and placed a hill mask before sponging the sky. I used two more hill masks for snow drifts and then stamped the image in black. To create the shadow I inked the fence and stamped it on a piece of clear plastic which I could then position and press onto the snow for a mirror image.
Supplies:
Stamps: Berry red, snow white (Penny Black), Splendor (PB), Letter Background (PB)
Inks: (1st card) Pretty in Pink, Certainly Celery, Bashful Blue, Summer Sun, Pumpkin Pie, Rose Red, Marina Mist, Early Espresso
(2nd card)Marina Mist, Going Gray,Versafine Onyx Black
Cardstock: MFP 100lb white
OLW 77 Birds
Posted: February 7, 2012 Filed under: Penny Black, Winter Sky 32 Comments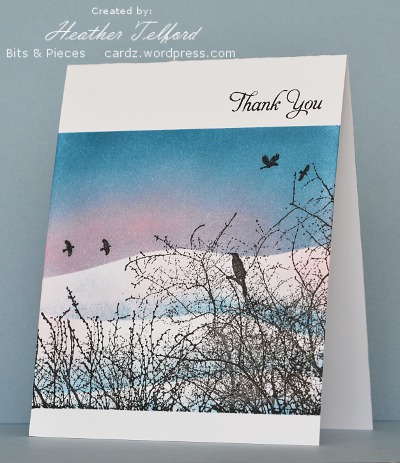
This week Jennifer Styles is hosting the OLW challenge and has asked us to use birds. It is quite a while since I participated in One Layer Wednesday but thanks to this lovely winter sky stamp complete with birds I can just squeeze a card in before a new challenge starts tomorrow. I took some photos while making this card so I’ll try to get the tutorial up soon. Thanks for all the encouragement you gave me after I posted the Berry branch tutorial on the weekend. I am happy to be able to share the technique and would love to hear how you went.
Today’s card doesn’t include any embossing just the masking and sponging to create the effect of dusk or dawn.
Supplies:
Stamps: Winter Sky (Penny Black), Tag lines(Flourishes)
Inks: Marina Mist, Pretty in Pink, Versafine Onyx Black
Cardstock: MFP 100lb white
Winter Berry Branch tutorial
Posted: February 4, 2012 Filed under: Berry Branch, Penny Black, Tutorial 45 Comments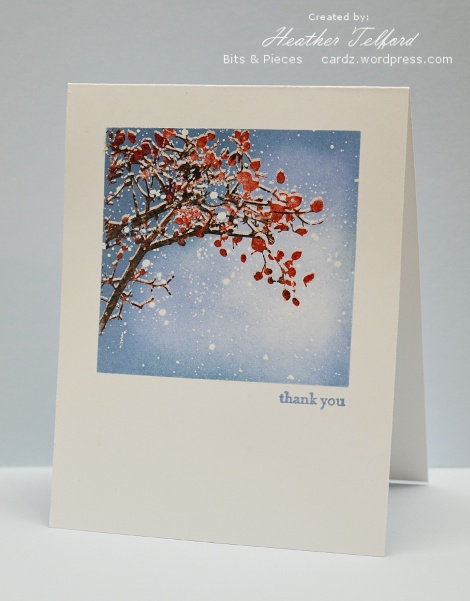
Thank you so much everyone who has arrived here via the Penny Black blog and also my faithful readers who drop in here regularly to see what I have been doing. The comments I have received in the last day have been such a treat to read. Thank you also to all my subscribers; I am so pleased you have been inspired to sign up.
What better way to thank you all than a tutorial? Many of you asked questions about the Winter Berry Branch card I posted last week so here is the tutorial which will hopefully provide the answers.
Mask the around the area where you are creating your scene. This is one of the trickiest steps, sometimes I trust my eye, sometimes the ruler; both have been known to fail me.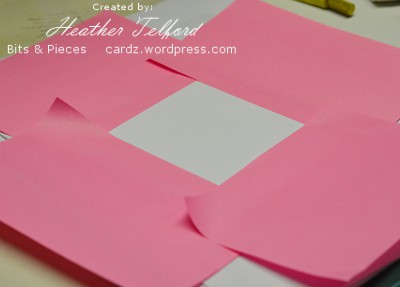
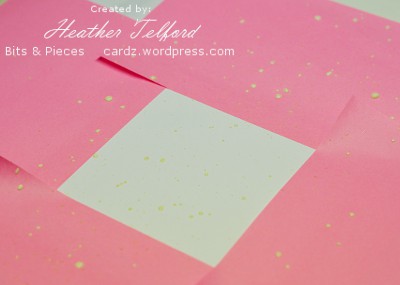
Flick masking fluid randomly over the cardbase. I put my card in a box, almost close the box and blindly flick the paintbrush with masking fluid on it around over the card. This way the masking fluid is contained in the box. An old toothbrush does a good job too but I didn’t have a spare and didn’t think anyone in my family would appreciate masking fluid toothpaste! While you wait for the masking fluid to dry, wash the brush because the masking fluid can ruin it if you don’t.
Stamp the branch first in versamark using a stamp positioning tool. Re-ink with versamark and then add whatever colours you want on your branch using markers; I used real red and early espresso. While you are inking your stamp with markers you must not move your stamp positioning tool.
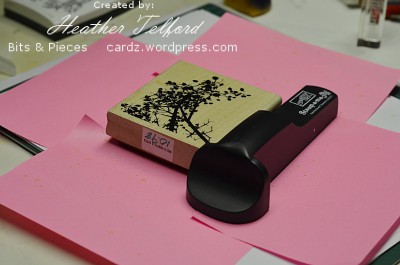
When your branched is inked in versamark and colour move your stamp positioning tool ever-so-slightly down (as in no more than a millimeter!) and stamp the branch again. What you have created is two branch images extremely close together which you will heat emboss in clear.
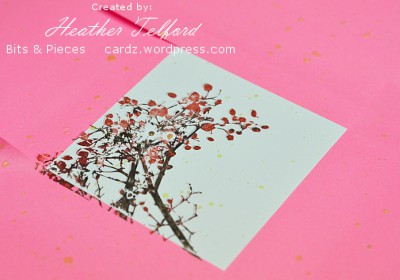
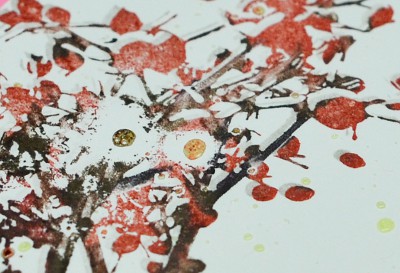
In the close up below you can see the two impressions from the stamp. Ideally you want the coloured print to overlap with the versamark print. The versamark is the snow sitting on the branch. The yellow dots are the masking fluid. Because they are raised they will resist the stamp a bit but it doesn’t matter as it will look like a clump of snow.
After embossing in clear embossing powder it is time to start sponging. I tend to build up the colour slowly when sponging so the variations in intensity will be gradual. If you are not happy with your sponging it could be that you stopped too soon.

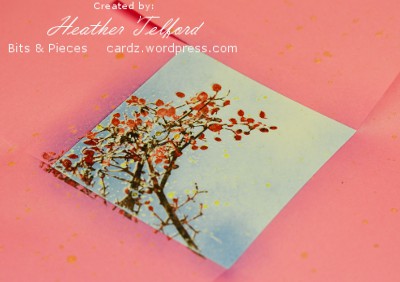
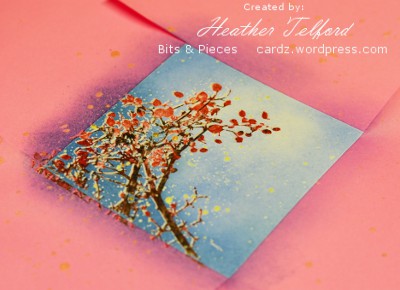
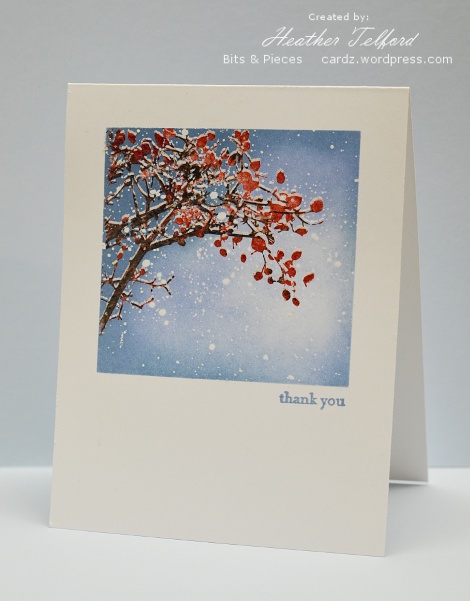
When you are happy with your sponging you can gently rub off the masking fluid. It should come off easily but make sure you keep your fingers clean otherwise you can smudge colour into the freshly revealed white spots. Remove the masks when all the masking fluid is gone to see your snow laden branch.
Supplies:
Stamps: Berry Branch (Penny Black), Teeny Tiny Wishes(SU)
Inks: Versamark, Marina Mist, Bashful Blue, Real Red, Early Espresso
Cardstock: MFP 100lb white
Also: Clear e.p., Winsor & Newton masking fluid
Having a Penny Black day
Posted: February 3, 2012 Filed under: Penny Black 14 CommentsI just wanted to let you know I am the Penny Black guest designer today. So check out their blog to see what I have been doing lately.
Berry Branch – Autumn & Winter
Posted: January 24, 2012 Filed under: Berry Branch, CAS, Rollers 19 CommentsHere are the other two cards from my little four seasons Berry Branch set. Winter is definitely my favourite and is the only one where I embossed.
Thank you for the kind comments about the first two; I am happy to have inspired a few people to try the same thing with one stamp.
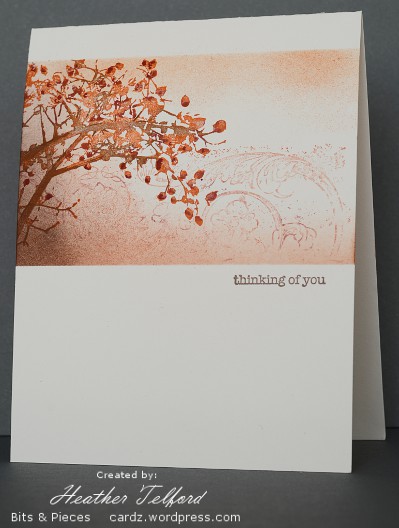
Supplies:
Stamps: Berry Branch (Penny Black), Teeny Tiny Wishes, Very Vintage roller(SU)
Inks: Chocolate Chip, Real Rust, Riding Hood Red
Cardstock: Flourishes classic ivory
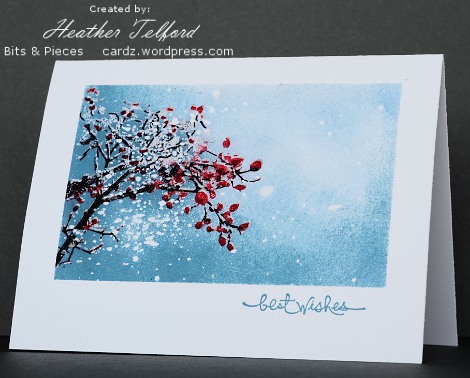
Supplies:
Stamps: Berry Branch (Penny Black), Short and Sweet(SU)
Inks: Versamark, Marina Mist, Bashful Blue, Real Red, Basic Black
Cardstock: Flourishes classic white
Also: Clear e.p., Winsor & Newton masking fluid
Berry Branch – Spring & Summer
Posted: January 22, 2012 Filed under: Berry Branch, Penny Black 12 CommentsI have been busy on another project lately which I will share in the future but today I have a little set of cards I finished a while ago. I made them for a friend’s birthday; there are four – one for each season- all made with the same stamp. Here are the spring and summer cards. Winter and autumn to follow another day.

Supplies:
Stamps: Berry Branch (Penny Black),Teeny Tiny Wishes(SU)
Inks: Regal Rose, Bashful Blue, Always Artichoke
Cardstock: Flourishes classic white
To create both cards I inked the stamp with the lighter colour and added darker highlights with marker. I also masked and sponged but you know that; it is what I do!

Supplies:
Stamps: Berry Branch (Penny Black),Hugs & Wishes(SU)
Inks: Certainly Celery, Old Olive, Bashful Blue, Always Artichoke
Cardstock: Flourishes classic white












